-
What Is VMware ESXi VM Network Configuration?
-
How to Set Up Standard Switches for VMware ESXi VM Network Configuration?
-
How to Use Distributed Switches for VMware ESXi VM Network Configuration?
-
How to Configure VLANs for VMware ESXi VMs?
-
Backing Up VMware ESXi VMs with Vinchin Backup & Recovery
-
VMware ESXi VM Network Configuration FAQs
-
Conclusion
In virtualized environments, network misconfiguration can lead to downtime, security risks, or performance bottlenecks. Getting your VMware ESXi VM network configuration right ensures reliable connectivity and smooth operations. This guide walks you through essential concepts and practical steps—from basic setup to advanced options—so you can build robust networks for your VMs.
What Is VMware ESXi VM Network Configuration?
VMware ESXi VM network configuration means connecting virtual machines to both physical and virtual networks within an ESXi host. This process defines how VMs talk to each other, reach other hosts, or access external resources. A solid configuration enables high availability, disaster recovery readiness, efficient traffic flow, and strong isolation when needed.
How to Set Up Standard Switches for VMware ESXi VM Network Configuration?
Standard switches (vSwitches) are the backbone of basic networking in ESXi hosts. They let you link VMs to physical adapters while controlling internal traffic flow.
To configure a standard switch using the VMware Host Client:
Log in to your ESXi host via web browser.
Click Networking on the left menu.
Under the Virtual switches tab, view existing switches or click Add standard virtual switch to create a new one.
Assign a name and select which physical adapters (vmnics) will connect this switch to your real network.
After creating your vSwitch:
Add at least one port group by clicking Add port group, entering a name (like "VM Network"), selecting your new switch, then setting an optional VLAN ID if needed.
For management tasks like vMotion or storage access, create separate port groups dedicated as VMkernel ports—these handle system-level traffic apart from regular VMs.
To connect a VM:
Go to Virtual Machines, right-click your chosen VM, select Edit settings, then under the Virtual Hardware tab add or edit its network adapter so it uses your new port group. Save changes when done.
Standard switches work best for standalone hosts or small setups because each host’s config stands alone—you’ll need manual updates if you expand later.
How to Use Distributed Switches for VMware ESXi VM Network Configuration?
Distributed switches (vDS) enable centralized management of networking across many ESXi hosts—a must-have for clusters managed by vCenter Server.
To set up a distributed switch:
Open vSphere Client connected to vCenter Server (required).
Click Networking, right-click your data center object, choose Distributed Switch, then select New Distributed Switch.
Follow prompts: give it a name; pick version based on compatibility; assign uplink ports that map back to physical NICs on each host.
Once created:
Right-click the distributed switch again; choose Add and Manage Hosts, pick which hosts join this switch; assign their physical adapters accordingly; migrate any existing VM connections as prompted.
Create distributed port groups by right-clicking the switch again—choose New Distributed Port Group, set its name/VLAN ID as needed.
Assign VMs just like with standard switches: edit their settings so their network adapter uses this new distributed port group.
Distributed switches offer more than just central control—they support features like NetFlow monitoring (for analyzing flows), traffic shaping policies (to prevent congestion), private VLANs (for tenant isolation), LACP link aggregation (for redundancy/bandwidth), ephemeral port groups (for stateless workloads), and consistent policy enforcement across all connected hosts. Note: Some features require recent vSphere versions—always check compatibility before deploying at scale!
How to Configure VLANs for VMware ESXi VMs?
VLANs segment traffic inside both small labs and sprawling enterprise networks—they boost security while keeping broadcast domains tight. In ESXi you assign VLAN IDs at the port group level so only certain VMs see specific segments of traffic.
To configure a VLAN:
Decide which port group should carry tagged packets—for example "Production" might use VLAN 10 while "Test" uses 20.
In Host Client go to Networking > Port groups, click Add port group, enter its name/select parent switch/set desired number in the VLAN ID field ("10" means packets get tagged as part of VLAN 10).
To allow trunk mode—that is letting all possible VLAN tags pass through—set VLAN ID as 4095 (“All”—useful only if guest OS will manage tagging itself).
After setup:
Edit any relevant VM’s settings so its adapter connects via this newly created port group; save changes before powering up!
Remember: Your upstream physical switch ports must match these assignments! If they’re set wrong—or left untagged when tags are expected—your VMs may lose connectivity entirely until fixed.
Advanced VLAN Design
For complex needs:
Choose between Virtual Guest Tagging (VGT)—where guest OS handles tags—and External Switch Tagging (EST)—where hypervisor strips/adds tags automatically based on assigned port group settings.
Use VGT only if running advanced appliances inside guests needing direct tag control!
EST fits most scenarios where admins want simple mapping between VMs/physical segments without extra complexity inside guests.
Private VLANs (PVLANs) provide even tighter isolation within shared subnets—a boon in multi-tenancy clouds but require careful planning plus matching support from both distributed switches AND upstream hardware!
Always coordinate with network teams managing core/edge devices—sample CLI snippets help ensure trunks match what’s configured inside vSphere:
interface GigabitEthernet1/0/24
 description Uplink-to-vmhost
 switchport trunk encapsulation dot1q
 switchport mode trunk
 switchport trunk allowed vlan 10,20
 spanning-tree portfast trunk
Never allow untrusted users access to trunked interfaces unless absolutely necessary—it opens risk of unauthorized cross-VLAN snooping.
Backing Up VMware ESXi VMs with Vinchin Backup & Recovery
After configuring your VMware ESXi VM network environment, safeguarding data becomes essential.
Vinchin Backup & Recovery is an enterprise-level solution designed specifically for professional virtual machine backup across over 15 mainstream virtualization platforms—including comprehensive support for VMware environments alongside Hyper-V, Proxmox VE/XCP-ng/oVirt/RHV/OpenStack/ZStack/XenServer/OLVM and others.
Key features such as quiesced snapshot creation on VMware platforms ensure application-consistent backups. Change Block Tracking accelerates incremental backups by transferring only changed data blocks after initial full backup cycles. Forever-incremental backup strategies minimize storage usage while maintaining rapid restore points. Granular restore allows precise file-level recovery from image-based backups without restoring entire disks. Data deduplication and compression further optimize storage efficiency across large-scale deployments—all contributing toward streamlined protection with minimal resource impact.
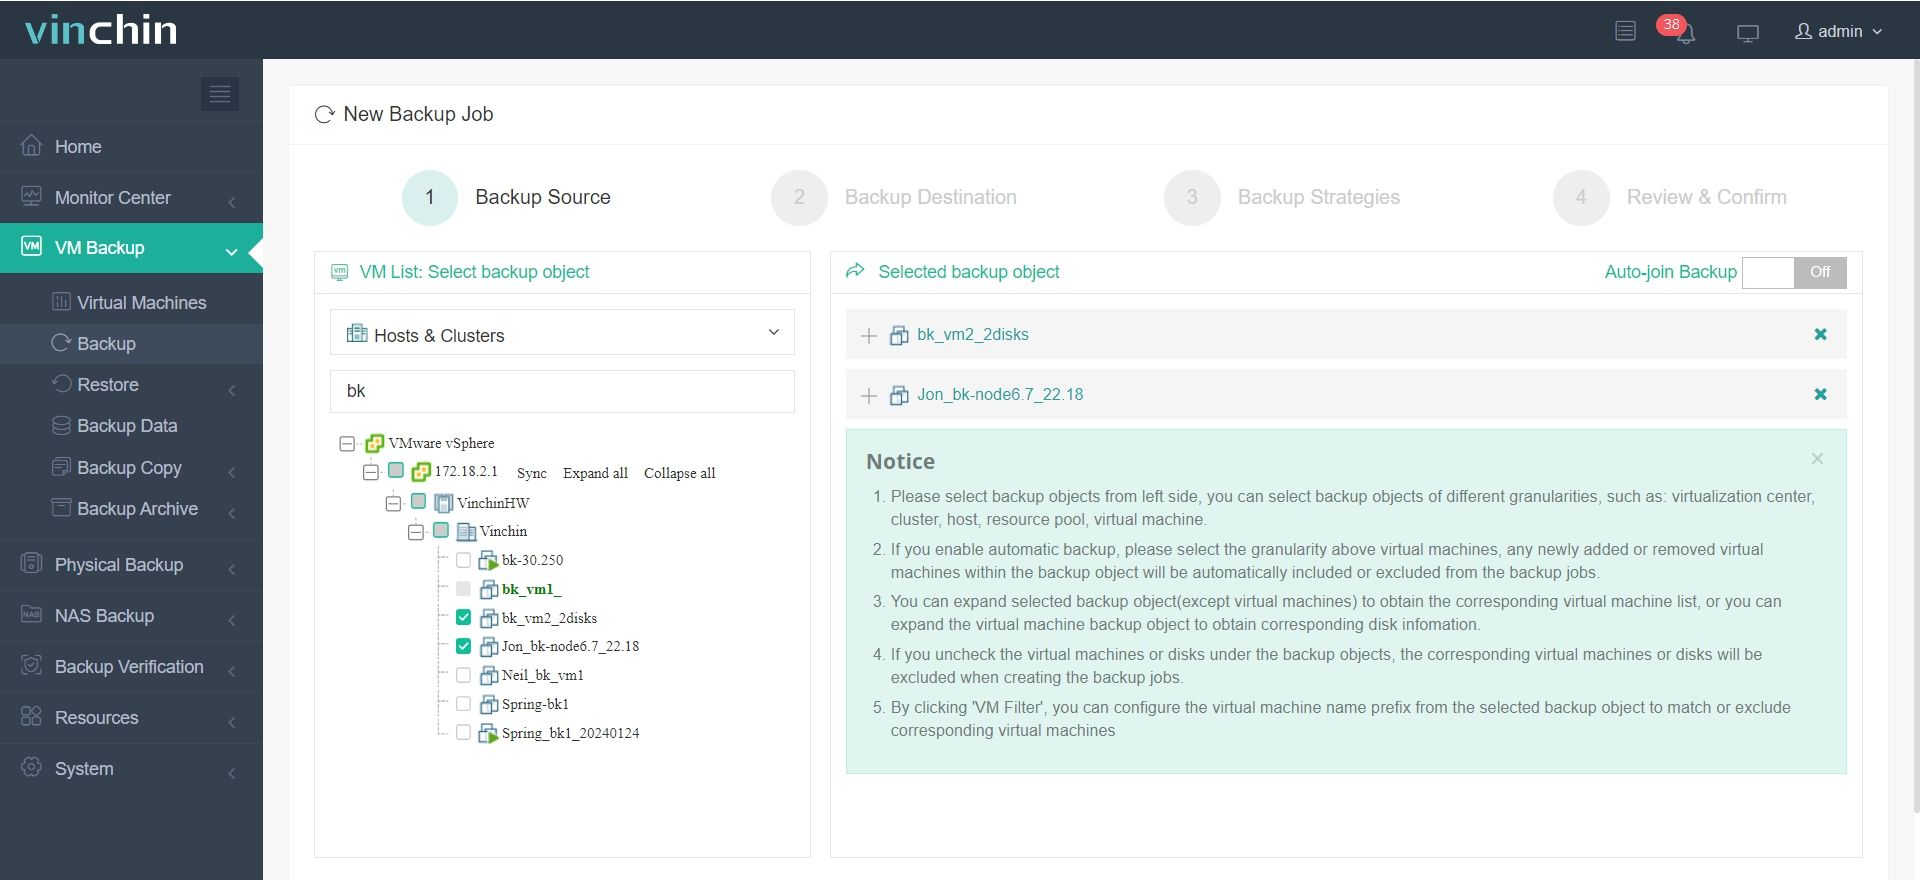
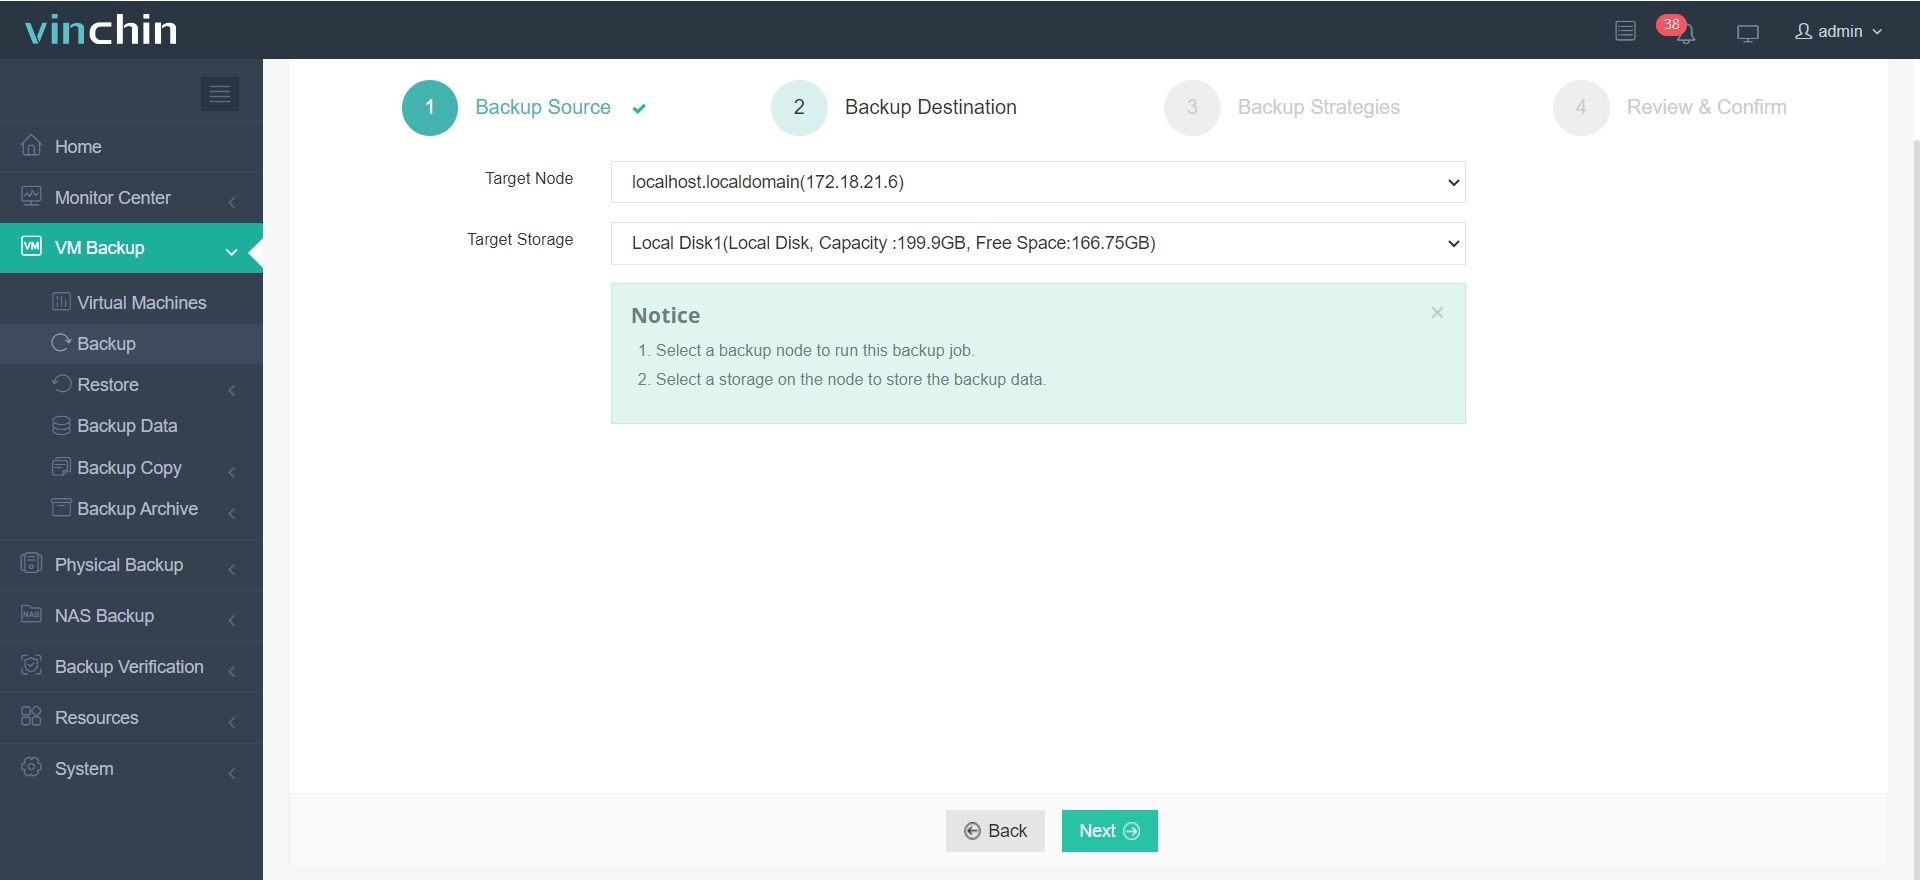
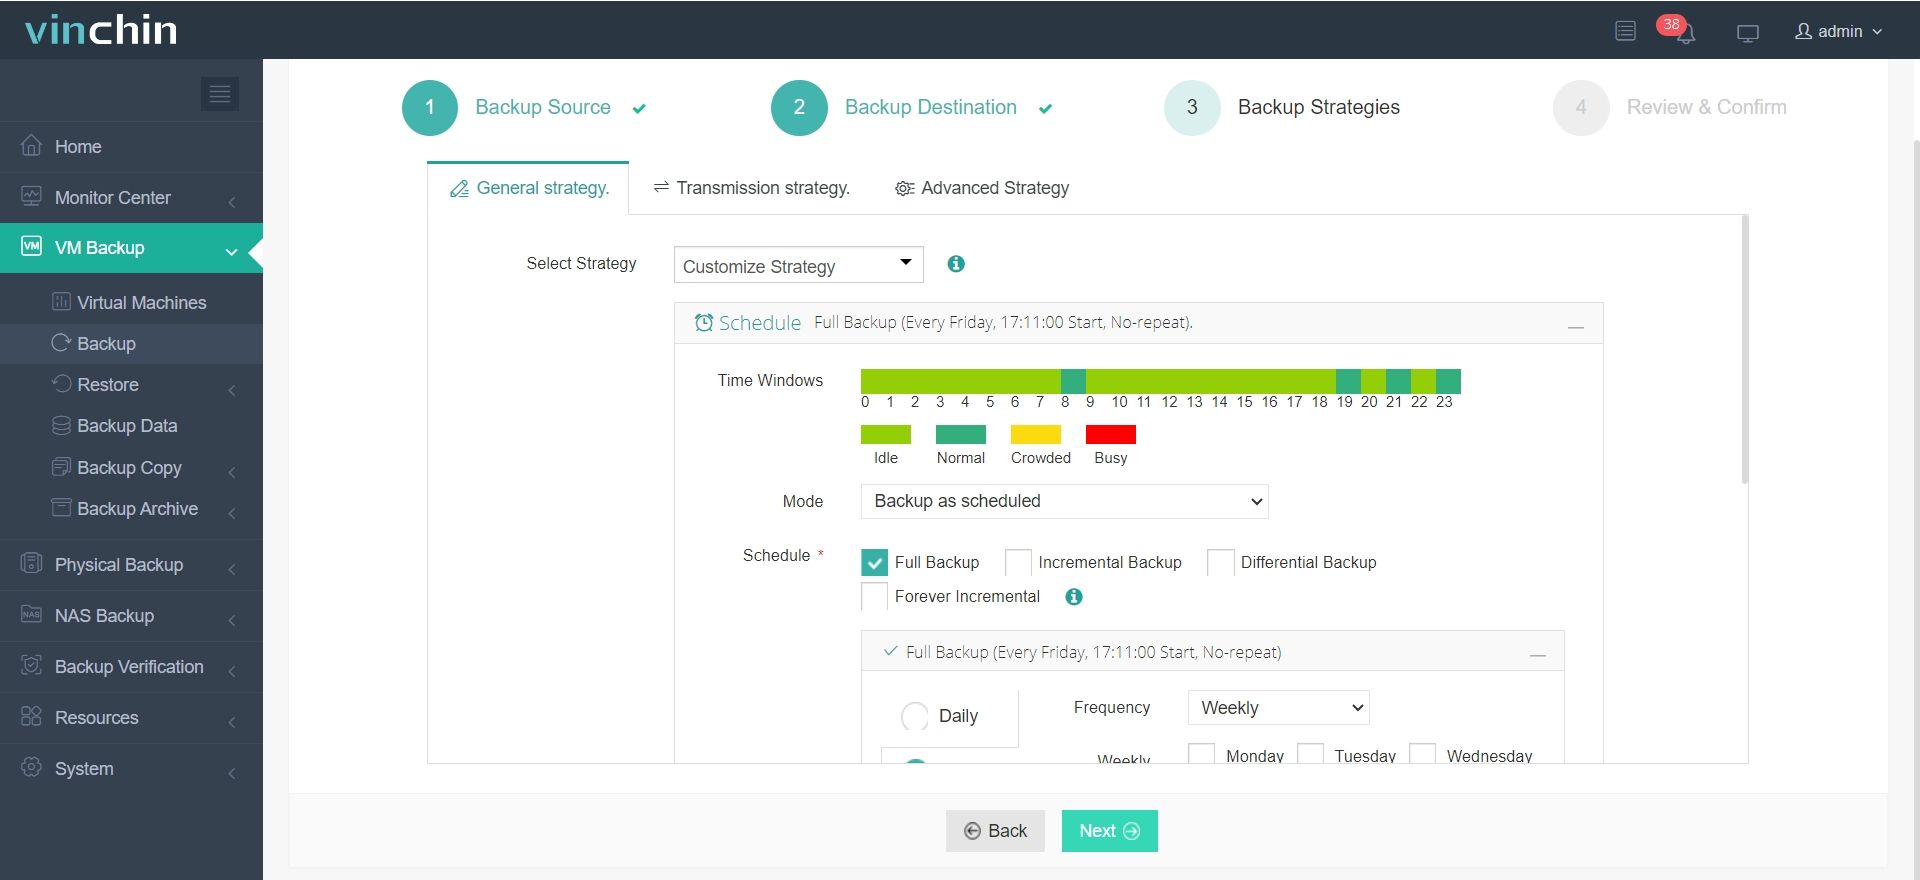
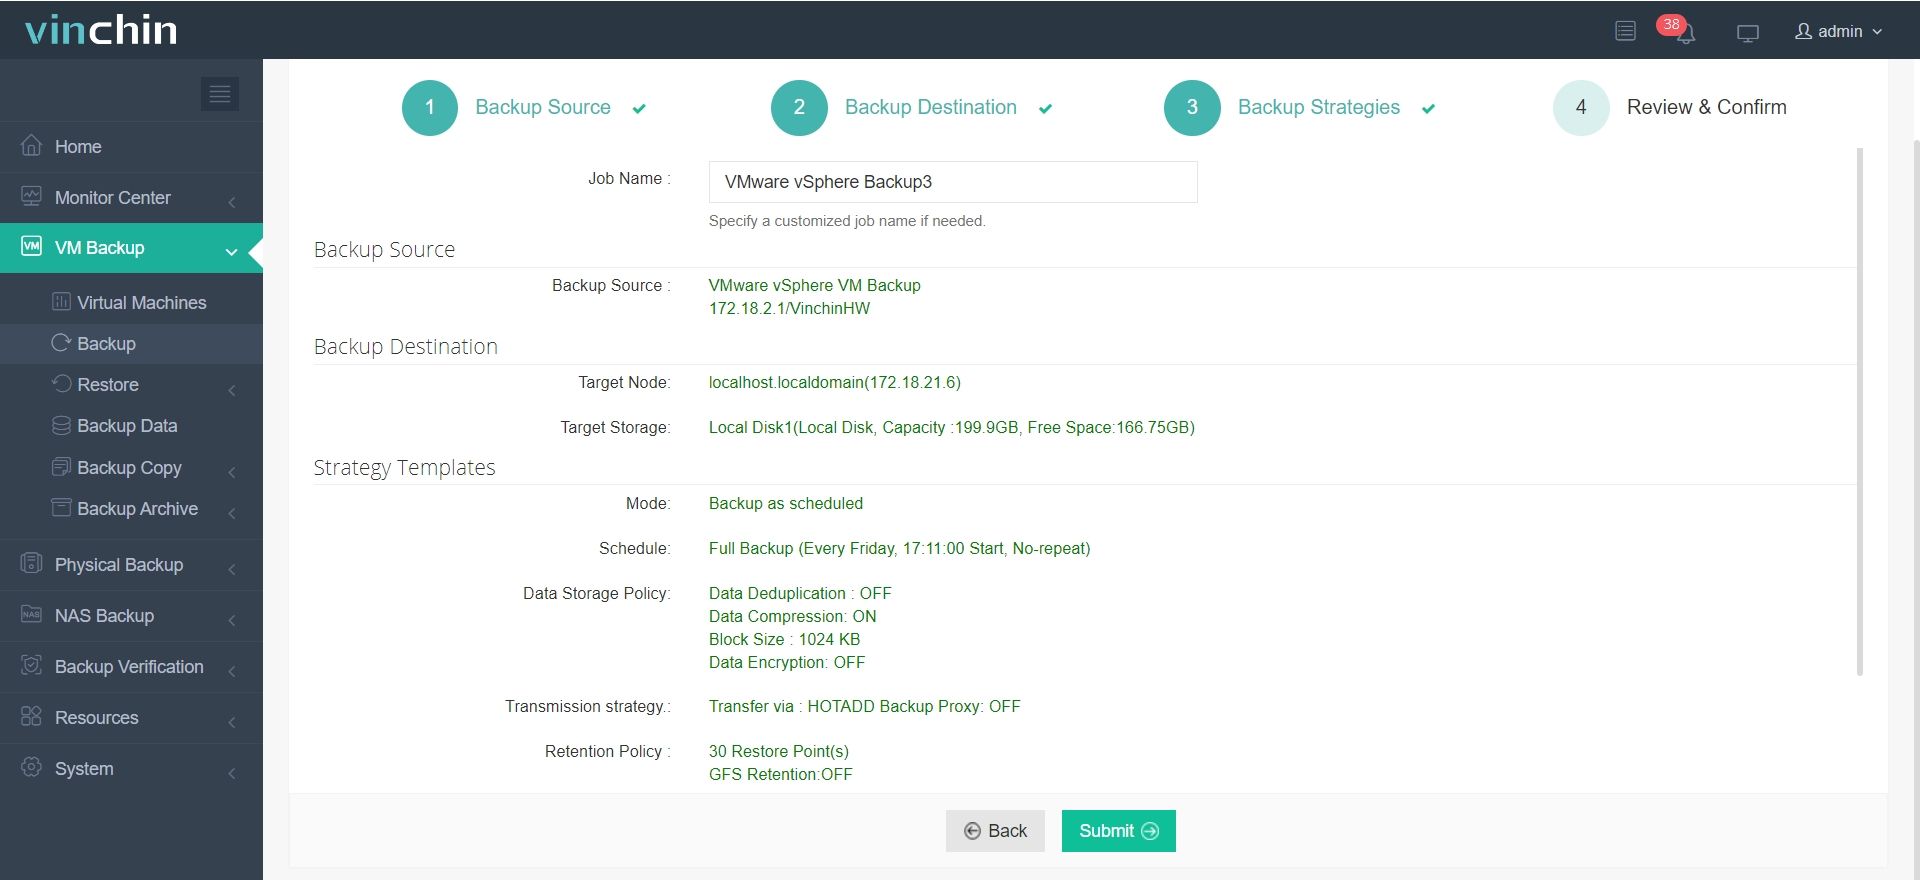
The Vinchin Backup & Recovery web console offers an intuitive interface that simplifies backup workflows into four straightforward steps:
Step 1: Select the VMware VM(s) you wish to back up

Step 2: Choose target backup storage

Step 3: Configure backup strategy including schedule and retention

Step 4: Submit job and monitor progress

Trusted globally by thousands of enterprises with top-rated customer satisfaction scores—Vinchin Backup & Recovery offers a fully featured 60-day free trial so you can experience robust protection firsthand. Click below to start your trial today!
VMware ESXi VM Network Configuration FAQs
Q1: How do I quickly verify my current vSwitch layout from command line?
A1: Run esxcfg-vswitch -l via SSH shell—the output lists all standard/distrubuted switches plus attached uplinks instantly.
Q2: What happens if two different port groups share same VLAN ID?
A2: Both become part of same logical broadcast domain—even across different hosts—as long as underlying trunks permit those tags through everywhere involved!
Q3: Can I migrate live-running VMs between two differently named but identically configured networks?
A3: Yes—but always double-check both source/destination have matching security/VLAN settings first else migrations may fail mid-flight.
Conclusion
Mastering vmware esxi vm network configuration helps keep virtual environments secure and efficient—from initial deployment through ongoing scaling efforts. By applying best practices alongside proven tools like Vinchin backup solutions you safeguard uptime while simplifying daily operations moving forward!
Share on:


