-
Scenarios of deleting a VM in Proxmox
-
How to Delete a VM in Proxmox Web Interface?
-
How to Delete a VM via Command Line?
-
How to Delete a VM Disk on Proxmox?
-
How to Delete VM Snapshots on Proxmox?
-
How to Recover Deleted VMs or Files on Proxmox?
-
Safely backing up Proxmox virtual machines with Vinchin
-
Proxmox How to Delete VM FAQs
-
Conclusion
Deleting a VM in Proxmox is common when you retire services or free resources. This guide shows when and how to remove VMs safely. We cover Web Interface and CLI methods, disk cleanup, snapshot removal, orphaned resource handling, and recovery paths. Each section moves from basic steps to production-ready checks. Follow along to build depth and handle edge cases in enterprise environments.
Scenarios of deleting a VM in Proxmox
You might delete a VM when a test instance ends or you migrate workloads. You may remove stale VMs to reclaim CPU, memory, and storage. In labs, you delete many trial VMs after experiments. In production, you retire VMs after service migration. You may clear VMs to avoid license fees or reduce attack surface. Always confirm need before removal. Plan around dependencies like HA, replication, network roles, and storage links to avoid side effects.
How to Delete a VM in Proxmox Web Interface?
Before removal, shut down the VM via Shutdown or Stop. Deleting a running VM can cause data loss. In the Web Interface, go to Datacenter or the specific node view. Select the VM entry. Confirm its status is offline. Click More if needed, then Remove. Type the VM ID when prompted. This action removes the VM config and usually its disks on local storage set to delete on removal.
After removal, check Datacenter > Storage for leftover volumes named vm-<ID>-disk-*. Click Remove to free space. Confirm you delete only unused disks. In clusters, ensure no other node references those disks. For shared storage, verify no external dependencies remain.
Manual Cleanup
After a VM removal, scan for artifacts. Check HA settings under Datacenter > HA; remove any entries for the deleted VM. In Datacenter > Replication, delete jobs referencing the VM. Review firewall rules tied to the VM ID. If cloud-init or custom hooks reference the VM, clear them. These steps prevent errors when IDs get reused.
Shared Storage Edge Cases
When disks live on Ceph/RBD, use RBD commands instead of file deletion. For example, run rbd ls <pool> and rbd rm <pool>/vm-<ID>-disk-<n> to clear images. For SAN or NFS volumes, remove mappings on the storage array side. Confirm no snapshots exist at array level. In multi-node setups, coordinate cleanup to avoid conflicts. Mistaken removal may break other VMs sharing the same LUN or export.
Production Checks
Before removal, verify VM backups exist. In scripts, query backups via API: pvesh get /nodes/<node>/storage/<storage>/content --content backup | grep <VMID>. Check VM status: pvesh get /nodes/<node>/qemu/<VMID>/status/current. Ensure no active locks: qm unlock <VMID> if “locked” errors appear. Confirm no running tasks in Tasks view to avoid mid-operation deletion.
How to Delete a VM via Command Line?
Log in to the Proxmox node via SSH. List VMs with qm list or containers with pct list. To stop a VM, run qm stop <VMID>. If it hangs, use qm shutdown <VMID> or force stop via qm stop. If locked, clear via qm unlock <VMID>. After the VM is offline, run qm destroy <VMID>. This removes config and linked disks if storage is set to delete on removal.
For LXC containers, run pct stop <CTID> then pct destroy <CTID>. This removes config and mounts. Note that pct destroy always deletes volume mounts; there is no keep-disk flag.
Keep Disks When Needed
To remove only config but keep disks, use qm destroy <VMID> --keep-disk. After that, disks remain on storage. You can attach them to another VM or delete manually later. For LVM-thin volumes, list with lvs. Remove orphaned volumes with lvremove only after confirming names. For ZFS pools, use zfs destroy on the dataset matching the VM disk. Always double-check to avoid deleting wrong volumes.
Orphaned Resource Cleanup via CLI
After destroying a VM, detect leftover resources. Use pvesh get /cluster/resources --type vm and filter on VMID to verify removal in cluster records. Remove HA entries with pvesh delete /cluster/ha/resources/<resource> for the VM. Delete replication jobs: find with pvesh get /cluster/replication and delete entries naming the VM. Clean firewall rules via API: pvesh get /nodes/<node>/firewall/rules then delete those referencing the VM's IP or ID.
API Automation and Scripts
For bulk deletion, scripts can query VM list and delete by criteria. Example:
bashCopyEditfor vmid in $(pvesh get /cluster/resources --type vm | jq -r '.[] | select(.status=="stopped").vmid'); do
  pvesh delete /nodes/<node>/qemu/$vmiddone
Before deletion, check backup: pvesh get /nodes/<node>/storage/<storage>/content --content backup | grep $vmid. Add error trapping: if deletion fails, log and continue. Implement rate limits or pauses to avoid API overload. Wrap commands in if checks to confirm VM is offline and unlocked. Use logging to audit actions.
How to Delete a VM Disk on Proxmox?
VM disks may persist after VM config is gone. In the Web Interface, open Datacenter > Storage, select storage, then view Content. Identify disks named vm-<ID>-disk-<n>. Click Remove on unused volumes. Confirm deletion. This frees space.
Via CLI, for directory storage, list files under /var/lib/vz/images/<VMID>/. Remove files with rm only after confirming names. For LVM-thin, run lvs | grep vm-<ID> then lvremove /dev/<vg>/vm-<ID>-disk-<n>. For ZFS, zfs list | grep vm-<ID> then zfs destroy <pool>/vm-<ID>-disk-<n>. For Ceph, use rbd ls <pool> and rbd rm <pool>/vm-<ID>-disk-<n> after ensuring no watchers remain. Double-check volume names to avoid accidents.
Cluster-Wide Cleanup
In multi-node clusters with local storage, connect to each node via SSH. Run the above checks per node. For shared storage like NFS or Ceph, run removal once from any node but confirm propagation. For CEPH, ensure RBD images are removed from all monitors. After deletion, monitor storage usage to verify space is reclaimed.
Edge Cases and Caution
If a disk fails to delete due to locks or watchers, inspect processes holding the volume. For RBD, use rbd status <image> to see watchers. Remove watchers safely or wait until they clear. For LVM, ensure no snapshots depend on the volume. For ZFS, ensure no clones exist. Include these checks in scripts to avoid incomplete deletion.
How to Delete VM Snapshots on Proxmox?
Snapshots can fill storage and block deletion. In the Web Interface, open the VM, click Snapshots, select a snapshot, then click Delete. Confirm. This merges snapshot data back into the base image. Be aware merge may impact I/O during the process.
Via CLI: run qm listsnapshot <VMID> to list. Delete via qm delsnapshot <VMID> <snapname>. Add --force if metadata is inconsistent. After deletion, verify with qm listsnapshot <VMID>. For LXC: use pct delsnapshot <CTID> <snapname>. Note hosted storage type affects behavior: Ceph/RBD snapshots do not merge but delete pointers; raw or qcow2 merges occur locally.
Snapshot Cleanup in Production
Automate snapshot pruning by age. Use scripts: list snapshots via qm listsnapshot, parse creation dates, then delete older than threshold. Tie scripts to monitoring alerts. Before deletion, ensure no backup or replication tasks run concurrently to avoid conflicts. Monitor I/O performance during merges.
Snapshot-Related Orphans
Sometimes snapshot metadata remains after errors. Use qm unlock <VMID> if stuck. Inspect /etc/pve/qemu-server/<VMID>.conf for stale snapshot entries. Remove them by editing config carefully or via qm delsnapshot --force. After cleanup, verify storage usage and performance.
How to Recover Deleted VMs or Files on Proxmox?
Recovery relies on backups or snapshots. Without those, recovery is risky. If you use Proxmox Backup Server or similar, restore from latest backup in Datacenter > Storage > Backup. Select the VM backup and click Restore. This recreates config and disks.
If you have snapshots, rollback via Snapshots tab or qm rollback <VMID> <snapname>. This overwrites current state. Use only when confident.
If config is gone but disks remain, recreate config manually. Locate disk paths with:
swiftCopyEditgrep -r "vm-<VMID>-disk" /etc/pve/storage.cfg /var/lib/vz/images/
Create a new VM with matching VMID. Attach disks via qm set <VMID> --scsi0 <storage>:vm-<VMID>-disk-0. Verify boot order with qm config <VMID> | grep boot. Adjust network and other settings to match original.
Filesystem-Level Recovery
For raw or qcow2 disks without snapshots, you may mount disk image on a recovery VM. Use qemu-nbd to expose the image, then run data recovery tools. This is time-consuming and may not recover full data. For LVM/ZFS without snapshots, recovery is near impossible unless you have volume snapshots or external backups.
RBD and Ceph Recovery
If disks lived on Ceph and you enabled RBD snapshots, restore from RBD snapshot: rbd snap rollback <pool>/vm-<VMID>-disk-<n>@<snapname>. If backup existed, restore via backup tool. Without snapshots or backups, recovery is unlikely.
Disaster Recovery Planning
Implement backup and retention policies before issues arise. Use Proxmox Backup Server or Vinchin to schedule full and incremental backups. Test restores regularly. Document recovery steps and automate alerts if backups fail. This ensures quick recovery when VMs delete accidentally.
Safely backing up Proxmox virtual machines with Vinchin
Before you delete a VM in Proxmox, back it up with Vinchin. Vinchin Backup & Recovery is a professional, enterprise-level VM backup solution supporting Proxmox, VMware, Hyper-V, oVirt, OLVM, RHV, XCP-ng, XenServer, OpenStack, ZStack, and over 15 platforms. It fits environments that need broad virtualization support.
It offers many features. Think forever-incremental backup, data deduplication and compression, V2V migration, throttling policy, GFS retention policy, and more. Forever-incremental backup cuts backup windows and storage use. Deduplication and compression shrink data further. V2V migration moves VMs across platforms. Many other options exist to meet varied needs.
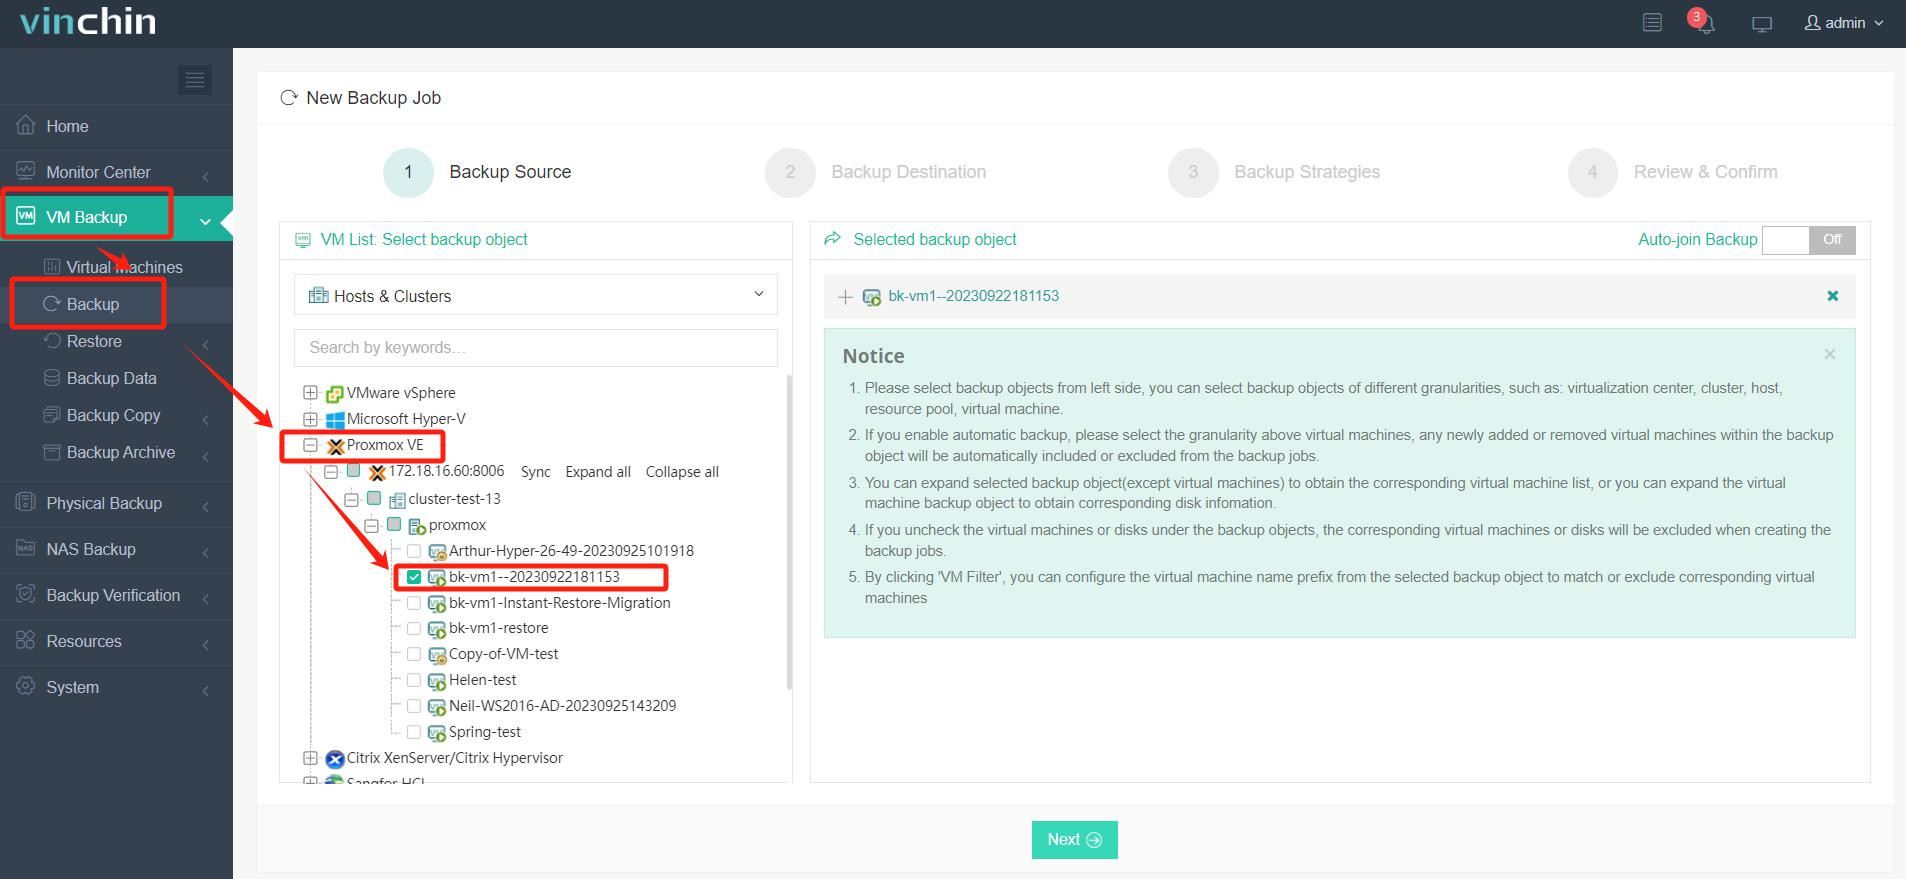
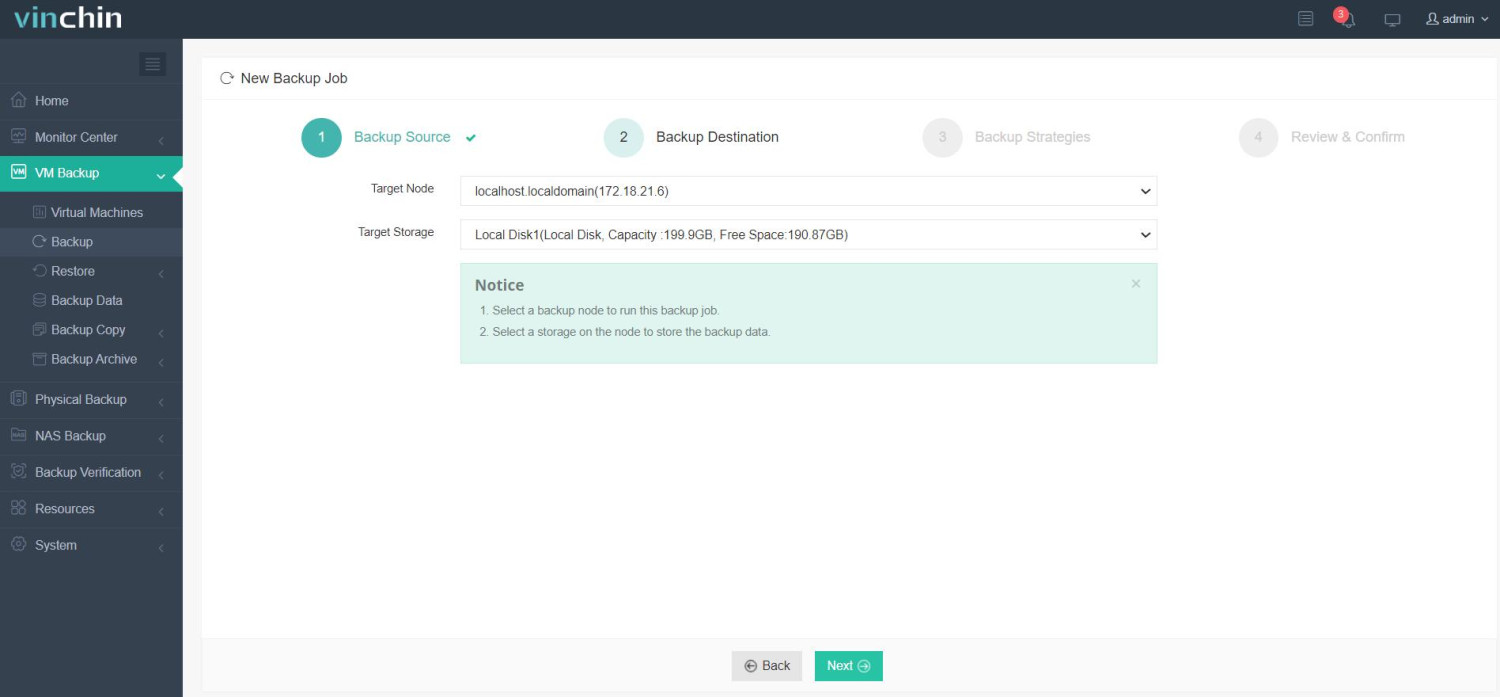
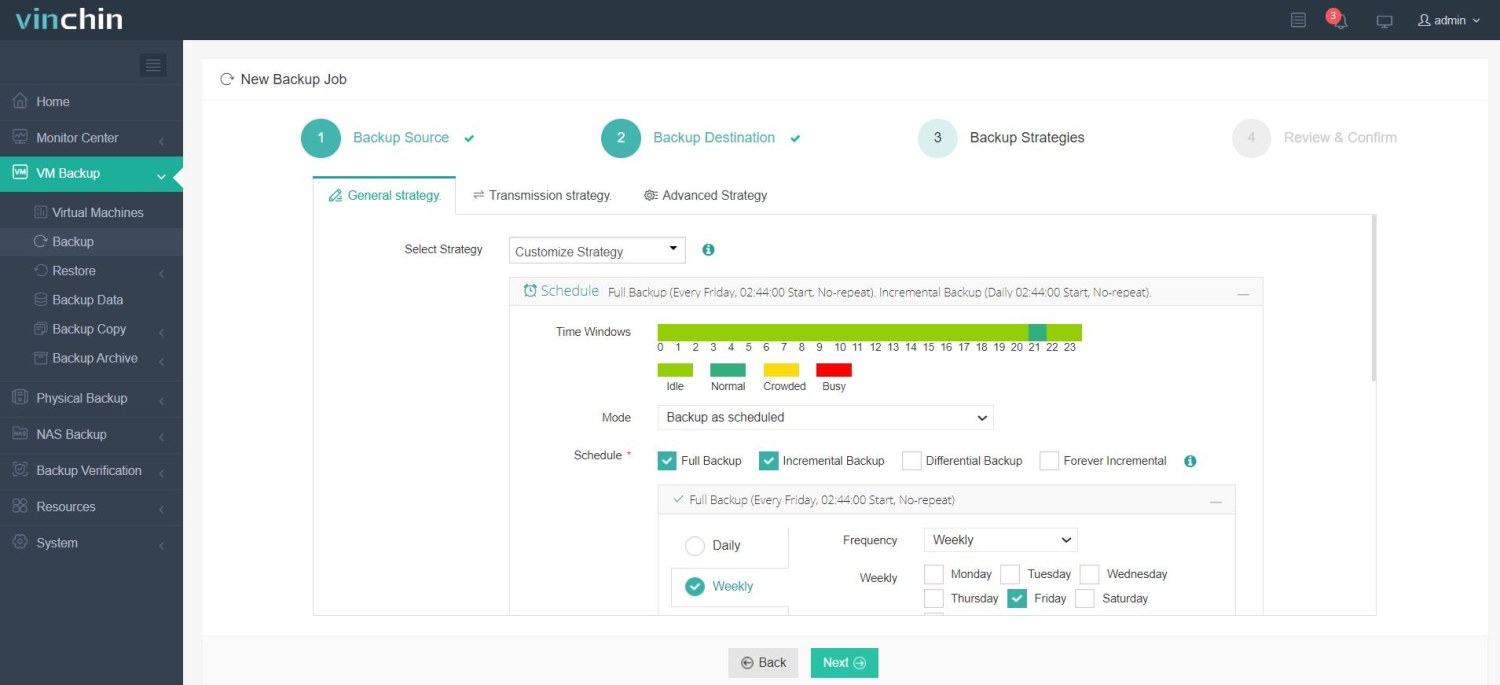
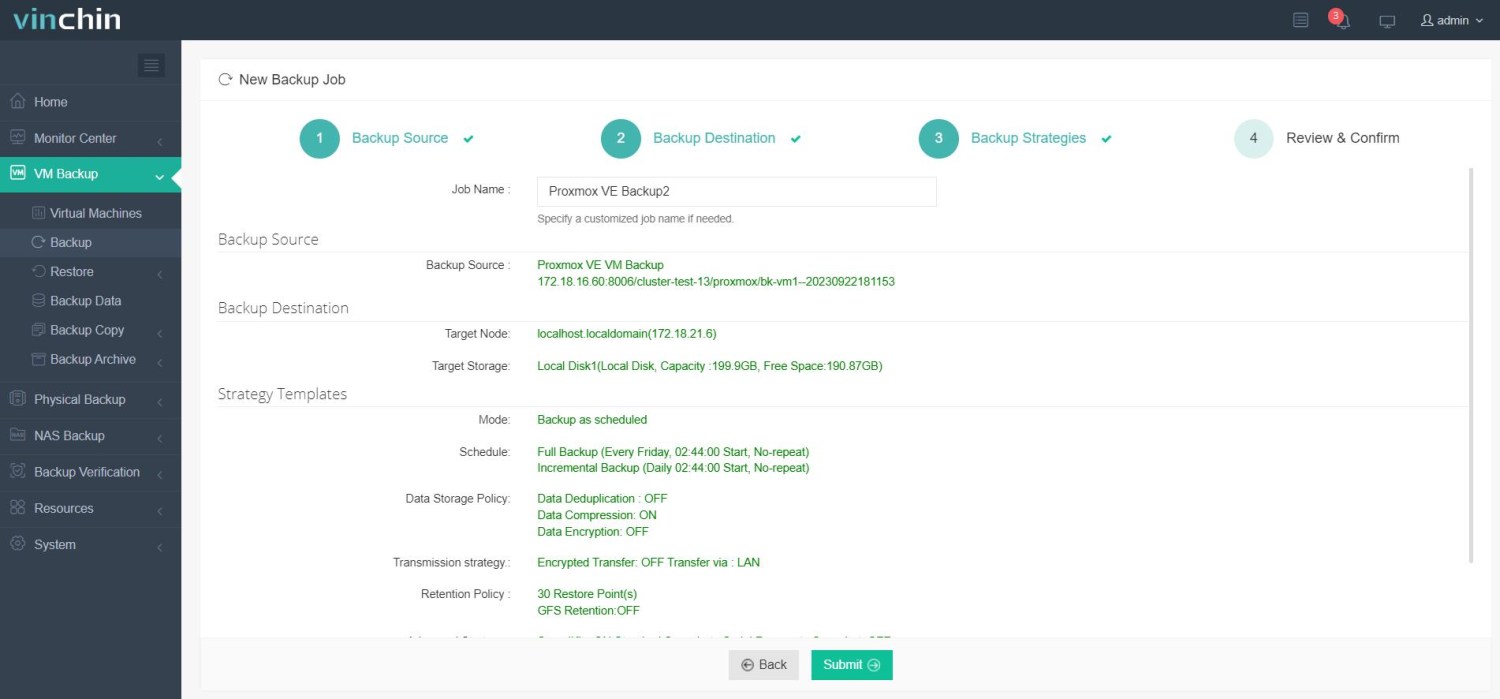
Vinchin's web console is very easy to use. To back up a Proxmox VM before deletion, follow four steps:
1. Select the Proxmox VM to back up;

2. Choose backup storage;

3. Configure backup strategies;

4. Submit the job.

Vinchin is trusted worldwide with a strong customer base and high ratings. Enjoy a 60-day full-featured free trial. Click the button below to download the installer and deploy easily.
Proxmox How to Delete VM FAQs
Q1: How do I delete a locked VM via CLI?
Use qm unlock VMID then qm destroy VMID
Q2: How to clean orphaned LVM volumes after VM removal?
List volumes with lvs | grep vm-<ID> then confirm and run lvremove
Q3: Can I recover a deleted VM without backups?
Only via snapshots or manual disk recovery on raw/qcow2 images, which is complex and may fail
Conclusion
VM deletion in Proxmox demands careful checks: shut down, clear snapshots, handle shared storage, and clean orphaned resources. Use both Web Interface and CLI methods with error handling and scripts for scale. Plan around HA and replication. For recovery, rely on backups or snapshots; manual recovery without them is risky. Vinchin offers enterprise backup to protect VMs and simplify restores.
Share on:


