-
To restore a Proxmox VM from the GUI
-
Restore Proxmox VM using the CLI
-
Simplify your Proxmox VE VM backup and recovery
-
Proxmox restore backup FAQs
-
Conclusion
Proxmox VE is an open-source virtualization platform that enables you to run multiple virtual machines and containers on a single physical host. It combines the functionalities of virtual machines (KVM) and containers (LXC), providing a centralized management interface for creating, configuring, and monitoring virtual machines and containers.
Proxmox VE offers built-in backup and restore capabilities, allowing you to regularly back up your virtual machines and containers and easily recover data when needed. You can set up backup schedules, choose between full backups or incremental backups, and store the backup data on local disks or remote locations.
The previous blog has talked about how to backup VMs in Proxmox VE. This blog will also give you a step-by-step guide of how to recovery VM in Proxmox VE.
Prerequisite for restoration:
You must have a backup of the virtual machine in question, and it is advisable to have accurate annotations specifying the tate of the backup.
Before initiating the restoration process, it is essential to power off the virtual machine that is to be restored.
To restore a Proxmox VM from the GUI
Restoring a backup in Proxmox VE involves a straightforward process.
1. Select VM > Backup, select the backup file > Restore
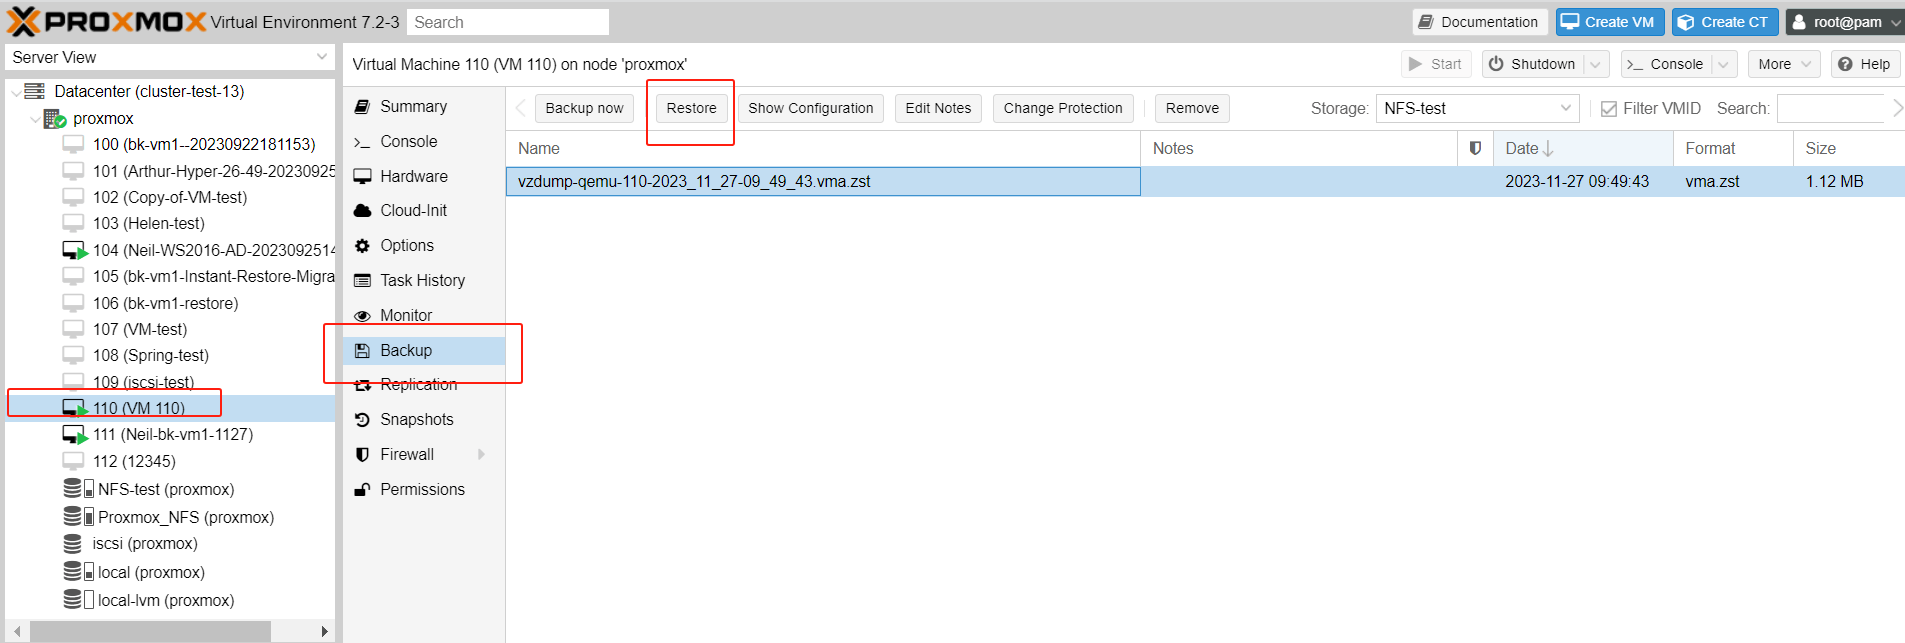
2. Following that, a new window will appear where you can configure the relevant restoration parameters.
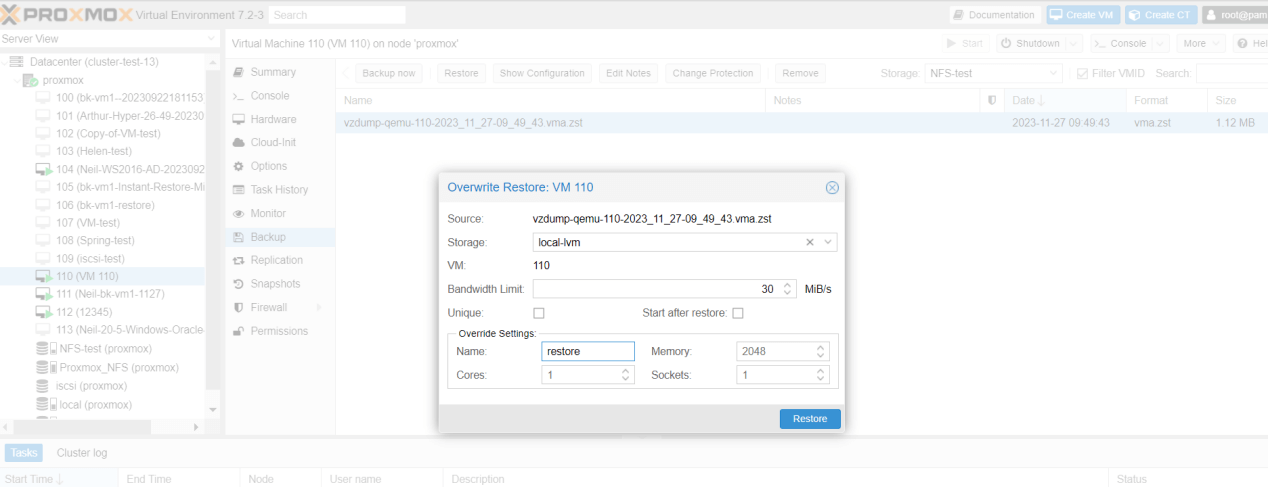
Backup parameter settings:
Storage: Select the storage destination where you want to restore the VM.
Bandwidth Limit: Specify the bandwidth limit for the restoration process. Use “0” to indicate no limit. When restoring from an external NFS/NAS storage, it’s possible to consume a significant amount of bandwidth, which could affect other running VMs.
Unique: Generate new unique attributes after restoration, such as regenerating MAC addresses.
Start after restore: Automatically start the VM after the restoration process.
Override Settings: Customize VM settings, including name, CPU, memory, and more.
Continue by clicking “Restore”, and you will be asked to confirm again with a “Yes” since this operation will erase all data in the current virtual machine. The restoration process will then commence.
3.Wait for the Restore to Complete: The restore process can take some time, depending on the size of the backup and the performance of your server. You can monitor the progress in the “Task Log” window that appears after you start the restore process. Once the task is complete, the log will display “TASK OK”.
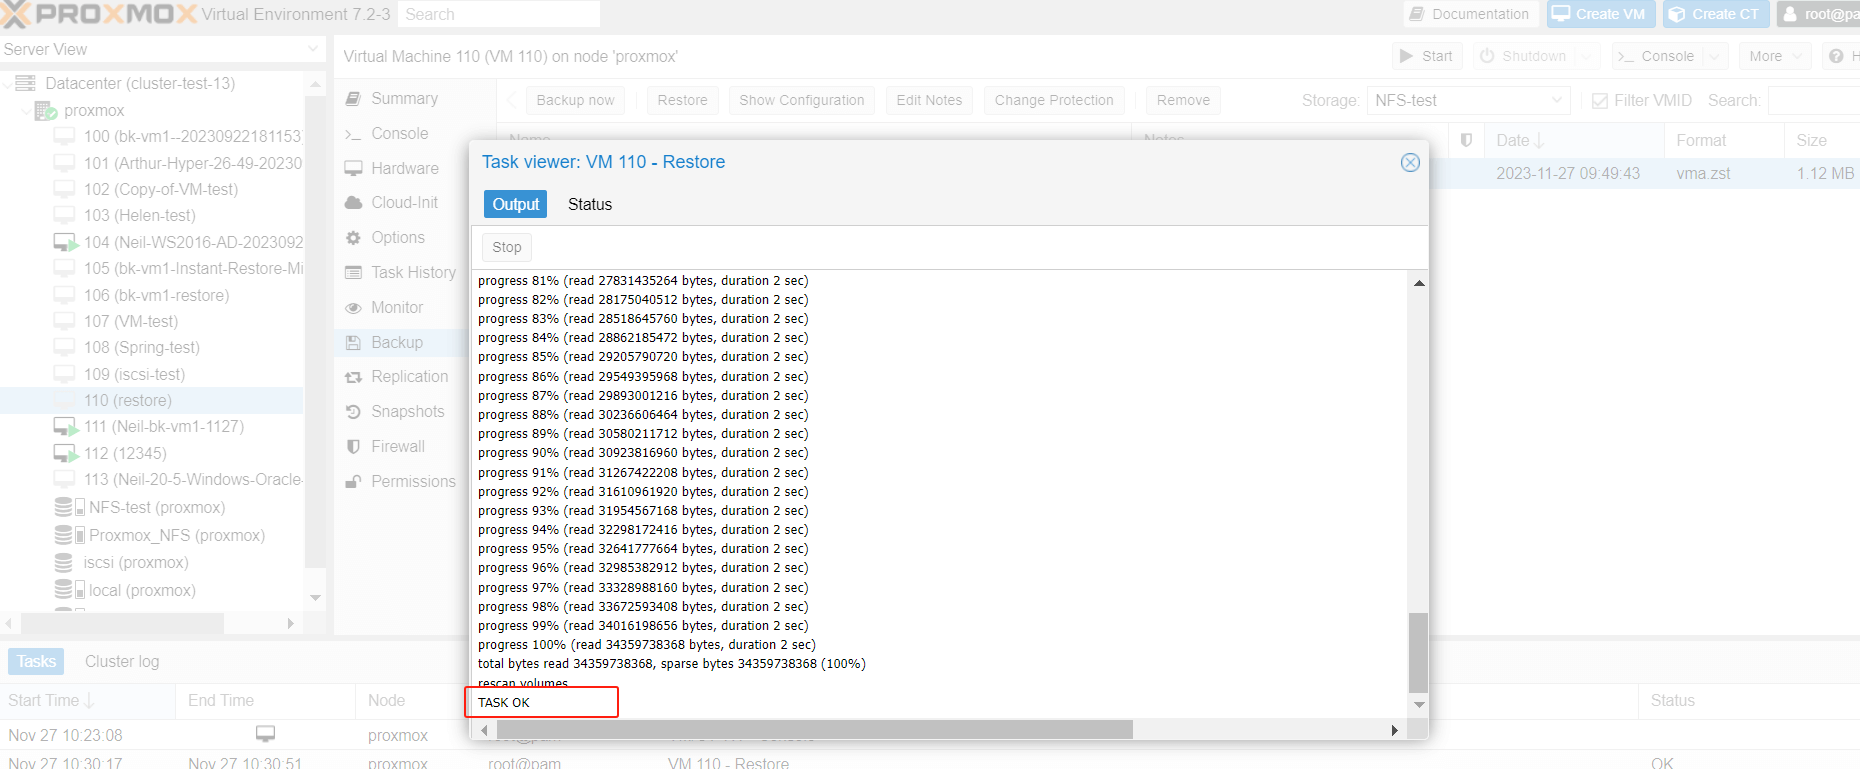
4.Check the Restored VM: After the restore process is complete, you can find the restored VM in the left panel, under the node you selected during the restore process. Click on the VM to check its configuration and start it.

Please be aware that after the restoration is complete, all data in the virtual machine from the moment of the backup to the time of the restoration will be lost.
Restore Proxmox VM using the CLI
Restoring a VM backup using the Command Line Interface (CLI) in Proxmox is also possible. Here’s a step-by-step guide:
1.Navigate to the Backup Directory: Navigate to backup files you want to restore. The default location for backups in Proxmox is under /var/lib/vz/dump/. You can use the cd command to navigate directories, for example, cd /var/lib/vz/dump/.
However, if your backups are not in this directory, you can use the “find” command to locate them. For example:
find / -name "*.vma.zst"
This command will search the entire filesystem for files ending with .vma.zst, which is one of the common extensions for Proxmox backup files. Depending on your system's configuration and the specific backup methods you're using, your backup files might also end with .vma.gz or .vma.lzo.

2. Identify the Backup File: Use the “ls” command to list all files in the current directory. Identify the backup file you want to restore. It will likely have a “.vma.lzo”, “.vma.zst” or “.vma.gz” extension and the filename will include the VM ID and the date the backup was made.

3.Restore the Backup: Use the “qmrestore” command to restore the backup. The format is “qmrestore backup_file_path vm_id”. For example, if your backup file is named “vzdump-qemu-107-2023_11_27-11_50_25.vma.zst” and you want to restore it as VM 115, you would use the command:
qmrestore /mnt/pve/NFS-test/dump/vzdump-qemu-107-2023_11_27-11_50_25.vma.zst 115
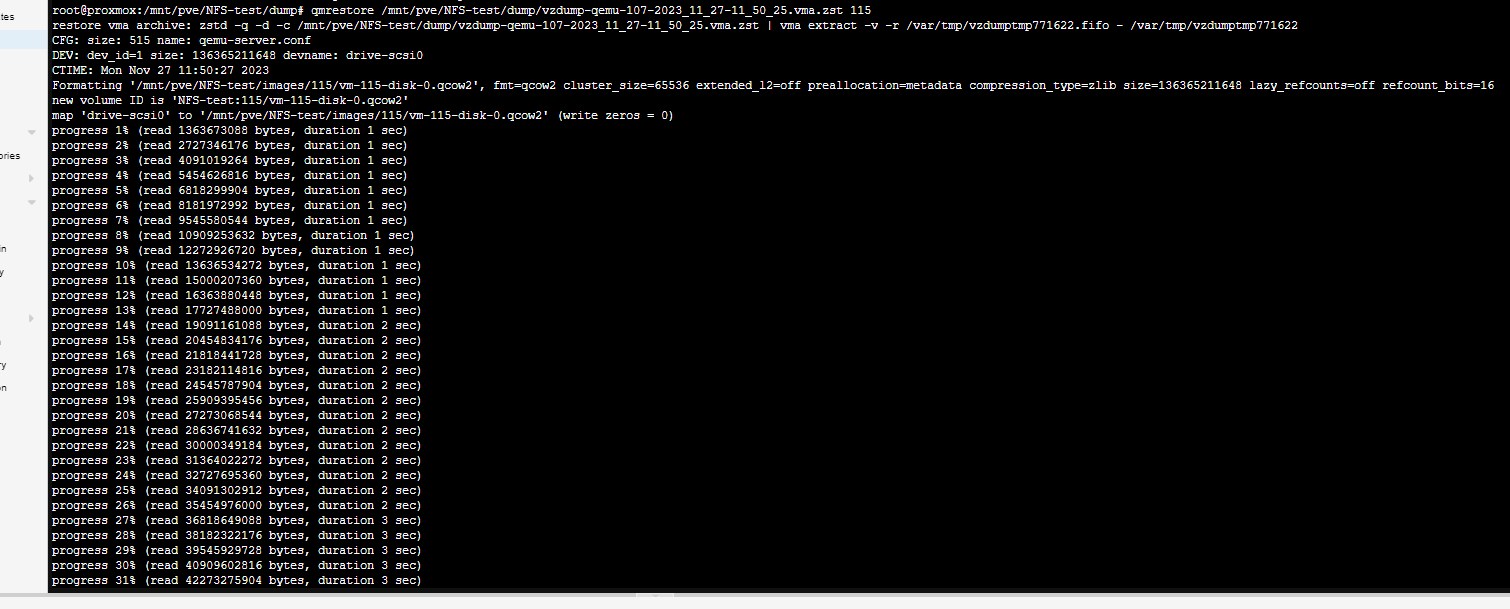
4.Wait for the Restore to Complete: The restore process will take some time, depending on the size of the backup. You can monitor the progress in the terminal.
5. Check the Restored VM: You can check the status of the restored VM using the “qm status vm_id” command, replacing “vm_id” with the ID of the restored VM. For example, “qm status 115”.

It’s running.
Simplify your Proxmox VE VM backup and recovery
Although Proxmox VE has built-in backup and recovery feature, it is always recommended to backup your PVE VMs and critical data with a professional solution.
Vinchin Backup & Recovery is a robust Proxmox VE environment protection solution, which provides advanced backup features, including automatic VM backup, agentless backup, LAN/LAN-Free backup, offsite copy, effective data reduction, cloud archive and etc., strictly following 3-2-1 golden backup architecture to comprehensively secure your data security and integrity.
For recovery, Vinchin Backup & Recovery provides instant VM recovery, which could shorten RTO to 15 seconds by running the VM directly through its backup. You can also choose file-level granular restore to extract specifical files from Proxmox VE VM backup.
Besides, data encryption and anti-ransomware protection offer you dual insurance to protect your Proxmox VE VM backups. You can also simply migrate data from a Proxmox host to another virtual platform and vice versa.
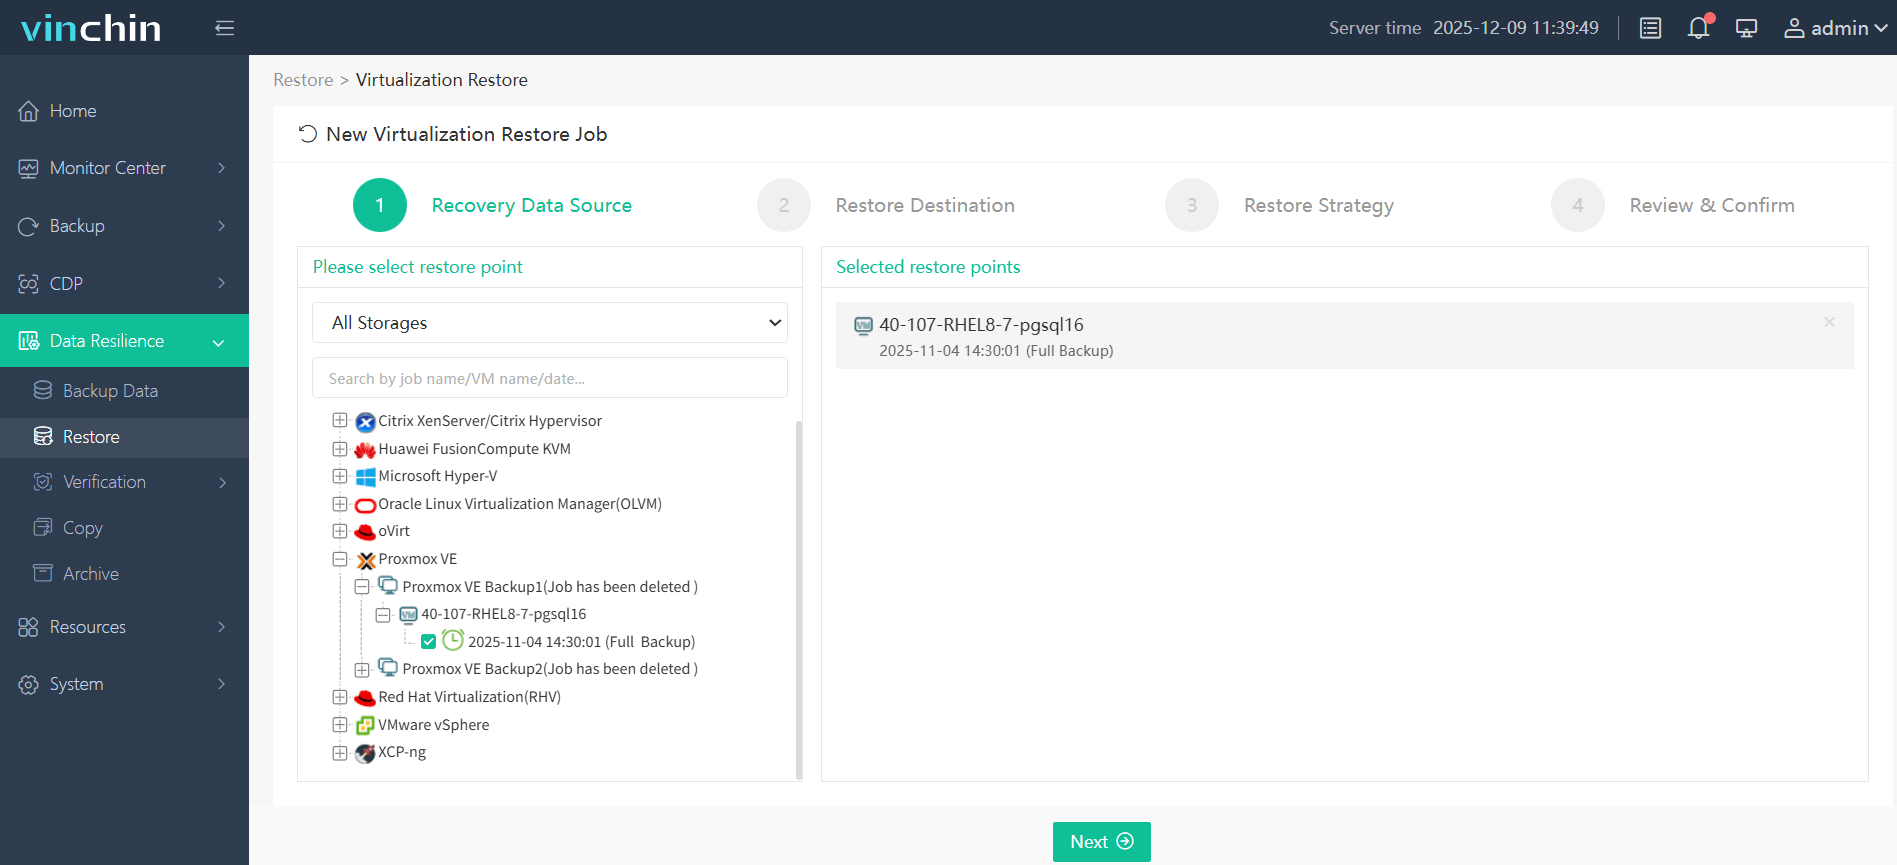
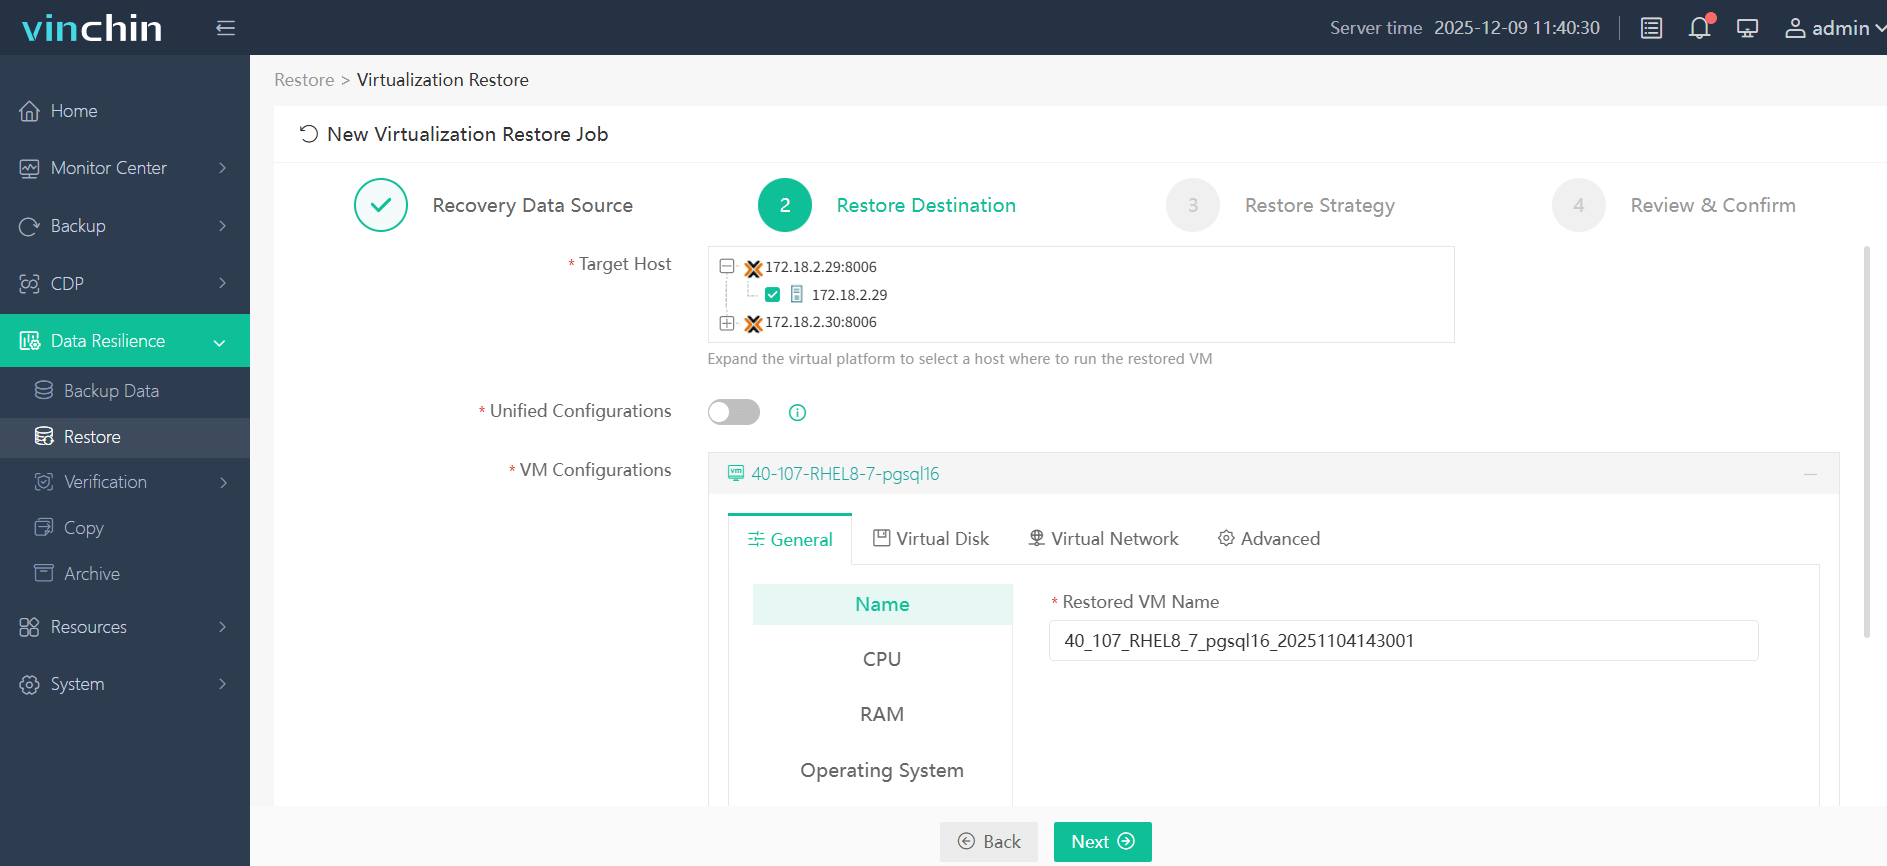
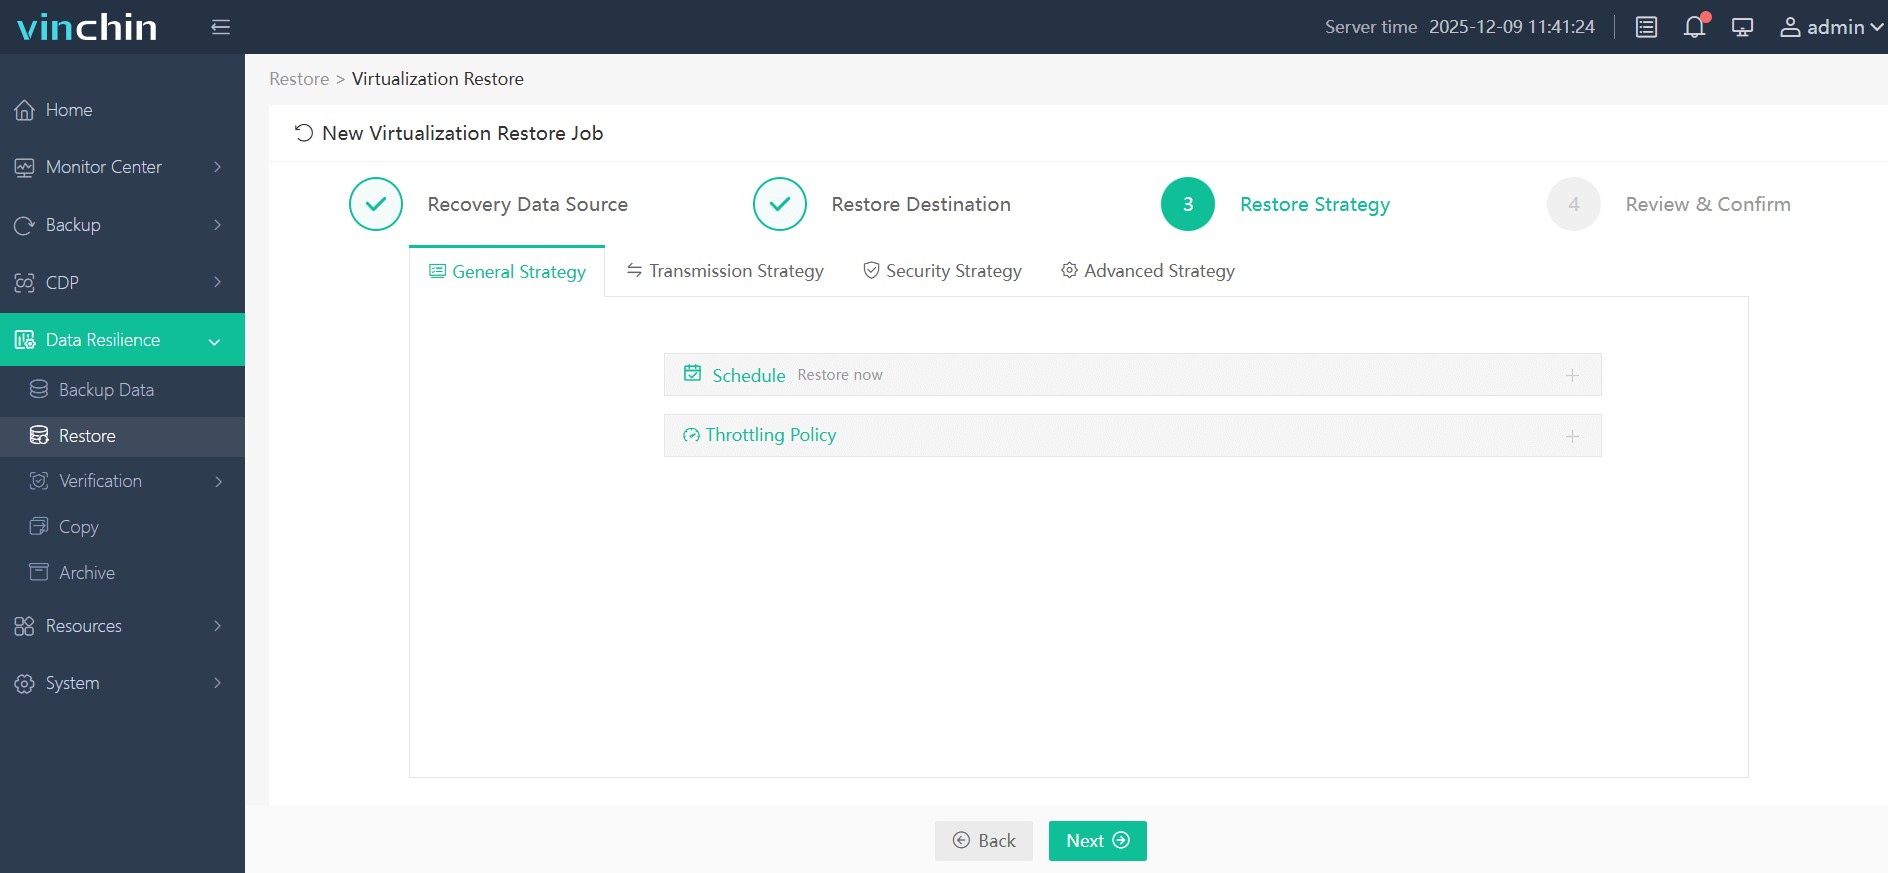
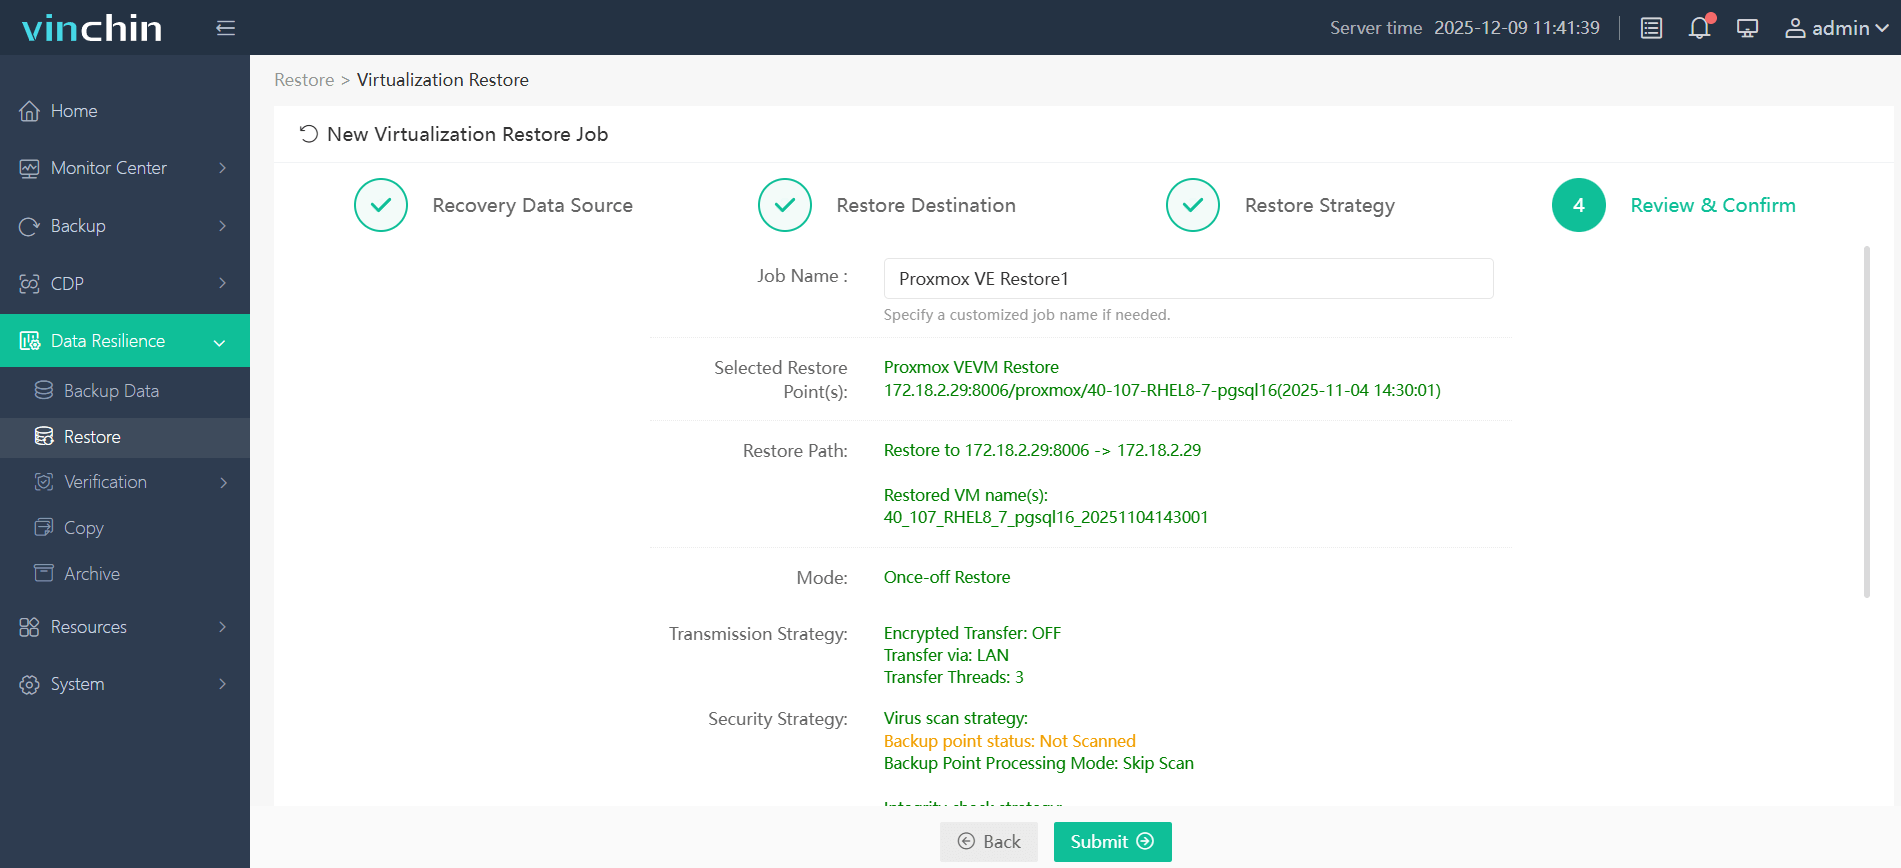
It only takes 4 steps for you to recovery the Proxmox VE VM:
1.Select the restore point.
2.Select the restore destination.
3.Select the restore strategy.
4.Review and submit the job.
Vinchin Backup & Recovery has been selected by thousands of companies and you can also start to use this powerful system with a 60-day full-featured trial! Also, contact us and leave your needs, and then you will receive a solution according to your IT environment.
Proxmox restore backup FAQs
1. Q: Can I restore individual files from a VM backup in Proxmox?
A: Yes. The granular restore feature offered by Vinchin Backup & Recovery allows you to extract individual files when perform restore job.
2. Q: Is it possible to restore backups to a different storage type in Proxmox?
A: Yes, you can restore backups to a different storage type in Proxmox, as long as the target storage is accessible by the Proxmox node and has sufficient space to accommodate the restored data. During the restoration process, you'll be prompted to select the destination storage.
Conclusion
Proxmox’s backup and restore functionality provides a reliable way to safeguard your virtual infrastructure and recover from unforeseen events. By regularly creating backups and understanding the restoration process, you can ensure the availability and integrity of your virtual machines and containers in Proxmox.
As always, remember that it’s crucial to keep regular backups of your data to prevent loss. You can choose Vinchin Backup & Recovery to easily backup and recover your Proxmox VE VMs. Don’t miss the free trial!
Share on:


