-
Preparing Prerequisites and Environment for oVirt Installation
-
How to Install oVirt Engine?
-
How to Set Up Hypervisor Hosts?
-
How to Configure Storage Domains & Networking?
-
How to Create & Manage Virtual Machines in oVirt?
-
Protect oVirt VMs with Vinchin Backup
-
oVirt install FAQs
-
Conclusion
oVirt is an open-source virtualization management platform for enterprise environments. It lets you control virtual machines (VMs), storage domains, and networks from a single web interface. This guide covers every stage of an oVirt install—from initial planning to advanced cluster optimization—so you can deploy with confidence.
Preparing Prerequisites and Environment for oVirt Installation
A successful oVirt install starts with careful preparation of hardware, network settings, DNS records, and shared storage.
Hardware Requirements and Sizing
For optimal performance and future scalability, a production oVirt Engine server should have at least 4 vCPUs, 16 GB RAM, and 100 GB disk space (preferably on RAID 1). For small labs or testing environments, 2 vCPUs and 8 GB RAM can be used, but expect limited capacity.
Each hypervisor host must support hardware virtualization (Intel VT-x or AMD-V) with at least 1 vCPU and 2–4 GB RAM per VM.
Networking is critical: at least one gigabit NIC per host is required. For larger deployments, consider dual or quad-port NICs, or even 10 Gbps links.
Validating DNS Configuration
Ensure all hosts, including the Engine, have Fully Qualified Domain Names (FQDNs) that resolve correctly both forward and reverse. Use commands like hostname -f and dig to verify DNS configuration.
Storage Preconfiguration
Shared storage is essential for live VM migration. Supported types include NFS, iSCSI, FCP, and GlusterFS. Ensure all hosts can access the chosen storage.
Network Segregation Best Practices
Use VLANs to isolate different types of traffic: management, VM data, and storage protocols, improving security and performance. Configure your network switches before starting the oVirt installation.
Browser Requirements & Security Settings
For optimal compatibility, use the latest versions of Chrome, Firefox, or Edge. Ensure SELinux is set to enforcing mode during installation. If any denials occur, use audit2allow tools instead of disabling SELinux.
How to Install oVirt Engine?
The self-hosted engine method deploys the management server as a highly available virtual machine (VM) within its own cluster. This is the recommended approach for most production environments.
1. Prepare the Deployment Host
Start by installing Enterprise Linux 9 on a physical machine or a reliable virtual machine. Ensure it is fully updated and has a static IP configured:
Run
sudo dnf update -yand reboot the system.Assign a static IP address with the command
nmcli.Set the hostname to match the planned Fully Qualified Domain Name (FQDN).
2. Configure Repositories and Install Packages
Enable the necessary repositories and install the required packages for oVirt:
Install the oVirt repository
Enable required modules:
sudo dnf module enable -y postgresql:12 javapackages-tools pki-depsInstall the oVirt engine appliance and other setup tools:
sudo dnf install -y ovirt-engine-appliance ovirt-hosted-engine-setup tmux
3. Validate Storage Configuration
Before proceeding with the installation, verify that the shared storage is accessible from the deployment host:
Ensure NFS or another shared storage is available.
Check access with the following commands:
showmount -e <storage-server-ip>
sudo mount -t nfs <storage-server-ip>:/ovirt/storage /mnt
After mounting, test write permissions:
touch /mnt/testfile && rm /mnt/testfile
Unmount the storage once validation is complete:
umount /mnt
4. Run Self-Hosted Engine Deployment
Start the deployment process using the hosted-engine setup tool. It’s recommended to use tmux to prevent session loss if disconnected.
Open a new tmux session:
tmux new-session -s hostedengine
Begin the deployment:
sudo hosted-engine --deploy
During the setup, you'll be prompted to configure:
Network bridges (e.g.,
ovirtmgmtfor management traffic).Data center names.
Engine VM's FQDN.
Storage domain type (e.g., NFS, iSCSI).
Resource allocation (e.g., 4 vCPUs and 16 GB RAM for production).
5. Troubleshooting During Installation
If installation fails, check the following:
Permissions on shared storage: Ensure proper permissions are set.
KVM virtualization: Make sure it's enabled in the BIOS if the hosted engine VM does not start.
DNS configuration: Double-check FQDN entries in the DNS server.
If errors occur, fix the underlying issue and rerun the deployment command:
sudo hosted-engine --deploy
6. Post-Install Verification
After the installation completes, verify the engine’s health and running services:
Run:
systemctl status ovirt-engine
To check the hosted engine health:
hosted-engine --check-health
How to Set Up Hypervisor Hosts?
Hypervisor hosts run VMs under central control from the Engine server.
There are two main ways:
Method 1: Deploying With oVirt Node ISO to Set Up Hypervisor Hosts
oVirt Node offers a minimal OS image optimized just for hosting VMs—it's quick to deploy!
Download from oVirt Node Download Page.
Write ISO onto USB stick or attach as virtual media via remote console tools like iLO/iDRAC/IPMI/KVM-over-IP etc.
Boot target server from this media;
follow prompts:
Choose language → Select disk (“Automatically configure partitioning”) → Set timezone/network (“Connect automatically with priority”) → Enter root password → Complete installation/reboot when done.
After reboot, run basic health checks locally via Cockpit web interface Login as root; verify CPU virtualization support via:
dmesg | grep kvm
lsmod | grep kvm
cat /proc/cpuinfo | grep vmx   # Intel CPUs
cat /proc/cpuinfo | grep svm   # AMD CPUs
Method 2: Using Standard Enterprise Linux Host to Set Up Hypervisor Hosts
This approach gives more flexibility if integrating into existing Linux infrastructure policies.
Install Enterprise Linux 9 normally; enable same repositories/modules as above; then add required package:
sudo dnf install -y ovirt-host
lsmod | grep kvm    # Confirm KVM loaded
grubby --args="fips=1" --update-kernel=ALL   # For FIPS compliance if needed
systemctl enable --now libvirtd vdsm
chronyd enable && chronyd start   # Ensure time sync!
Make sure BIOS has virtualization extensions enabled— otherwise KVM won't work!
Adding Hosts Into Your Cluster
In Administration Portal go to Compute → Hosts, click New, enter FQDN/IP/root password/data center/cluster info then click OK.
The Engine pushes configuration over SSH—no need for manual intervention after this point!
Wait until status changes from “Installing” through “Initializing” then finally “Up.”
How to Configure Storage Domains & Networking?
Configuring robust shared storage domains lets VMs move freely across hosts without downtime; proper networking keeps everything secure yet flexible.
Storage Domain Types Explained
Data domains hold actual VM disks—you must have at least one per data center before creating any VMs!
ISO domains store boot images used when provisioning new guests;
Export domains allow temporary transfer/export/import operations between clusters/environments.
Example: Creating an iSCSI Data Domain
First discover targets from each host shell:
iscsiadm -m discovery -t st -p <target-ip>
iscsiadm -m node --login
lsblk     # Confirm LUN visibility
In Administration Portal go under Storage → Domains → click New Domain, select type (iSCSI) then fill out address/LUN details accordingly.
Advanced Networking Features
Bond multiple NICs together either actively-backup (“mode=active-backup”) or aggregated (“mode=8023ad/lacp”). Assign logical networks/VLAN tags within portal under each cluster’s Networks tab—for example create untagged “Management” network plus tagged VLAN10 just for tenant VMs.
Network Quality-of-Service Controls
To limit bandwidth usage create QoS profiles under portal’s Configure menu then apply those profiles directly onto specific logical networks attached per VM profile.
Security Note
Always keep management interfaces separate from public-facing ones! Isolate iSCSI/NFS/FibreChannel traffic onto their own VLAN/subnet whenever possible.
How to Create & Manage Virtual Machines in oVirt?
With infrastructure ready it's time to spin up workloads!
Creating Your First Virtual Machine
Go into Administration Portal > Compute > Virtual Machines > click New > fill out name/cluster/os fields > assign CPU/memory/disk resources > attach boot disk/image/template > configure network interfaces > Save/Create.
Once the VM is created, start it and access the console (via SPICE, VNC, or RDP, depending on the guest OS) to proceed with the OS installation.
Installing Guest Agent Inside Each VM
For best integration always install guest agent software inside every supported guest OS—it enables accurate reporting/shutdown/time sync/etc:
On RHEL/CentOS guests run:
dnf install -y ovirt-guest-agent-common
systemctl enable --now ovirt-guest-agent
On Windows download agent ISO/tools bundle directly from oVirt Guest Tools page then follow included instructions.
Automating Deployments With Cloud-init Or API Calls
Want rapid scaling? Enable Cloud-init/Sysprep options when creating templates/images so every clone gets unique passwords/network keys injected automatically at first boot!
Or script entire deployments via REST API calls like so:
Example curl command line call— replace placeholders appropriately:
curl -X POST \
-H "Accept: application/xml" \
-H "Content-Type: application/xml" \
-u "admin@internal:<password>" \
-k \
-d "<vm><name>api-vm</name><cluster><name>Default</name></cluster></vm>" \
https://engine.ovirt.example.com/ovirt-engine/api/vms
Don't forget enabling API access rights within user profile settings first!
Protect oVirt VMs with Vinchin Backup
Once your oVirt environment is operational, safeguarding your virtual machines becomes essential. Vinchin Backup & Recovery is a professional, enterprise-level VM backup solution that supports over 15 mainstream virtualization platforms—including oVirt, VMware, Hyper-V, Proxmox, OLVM, RHV, XCP-ng, XenServer, OpenStack, ZStack and more.
For oVirt users in particular,Vinchin delivers robust protection features such as incremental backup for efficient storage use; advanced deduplication and compression to reduce backup size; seamless V2V migration between different platforms; schedule regular backup and repetitive backups for automation; and granular restore options for precise recovery needs.
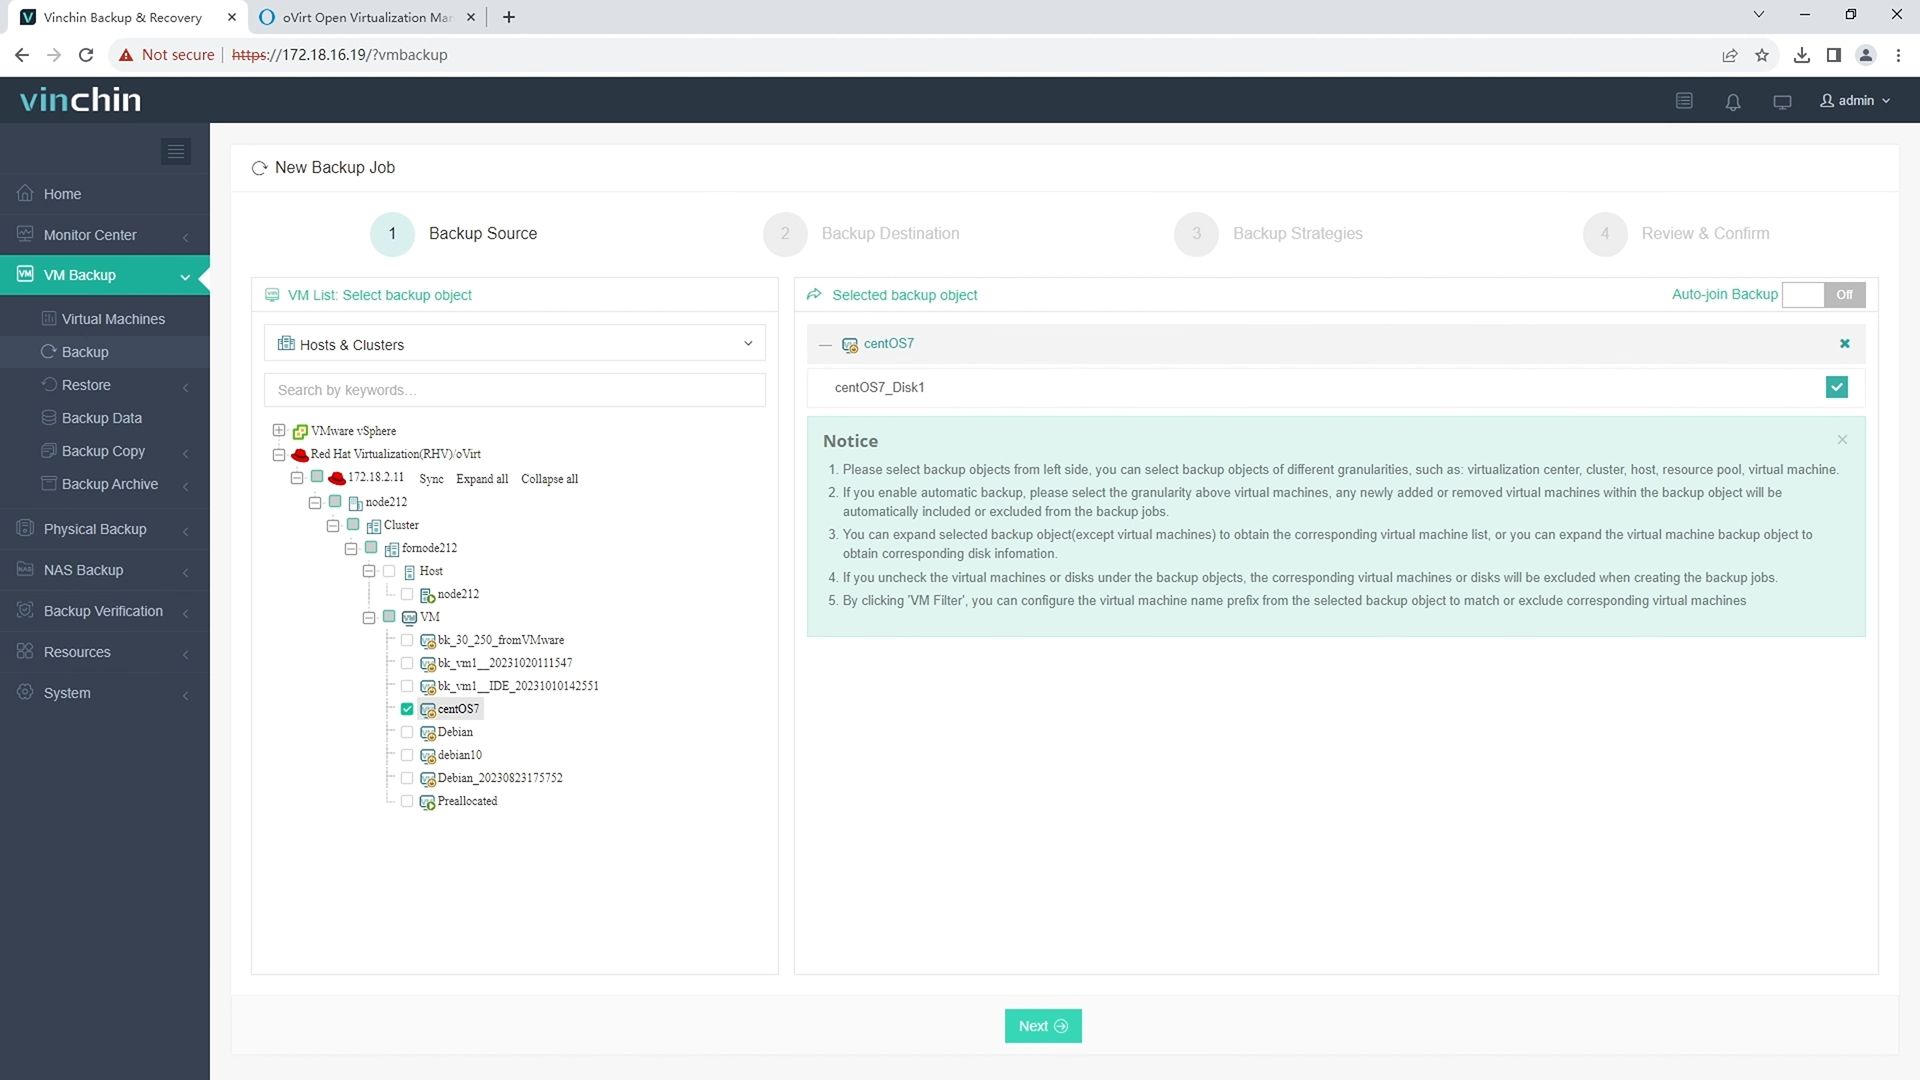
1. Just select oVirt VM on the host

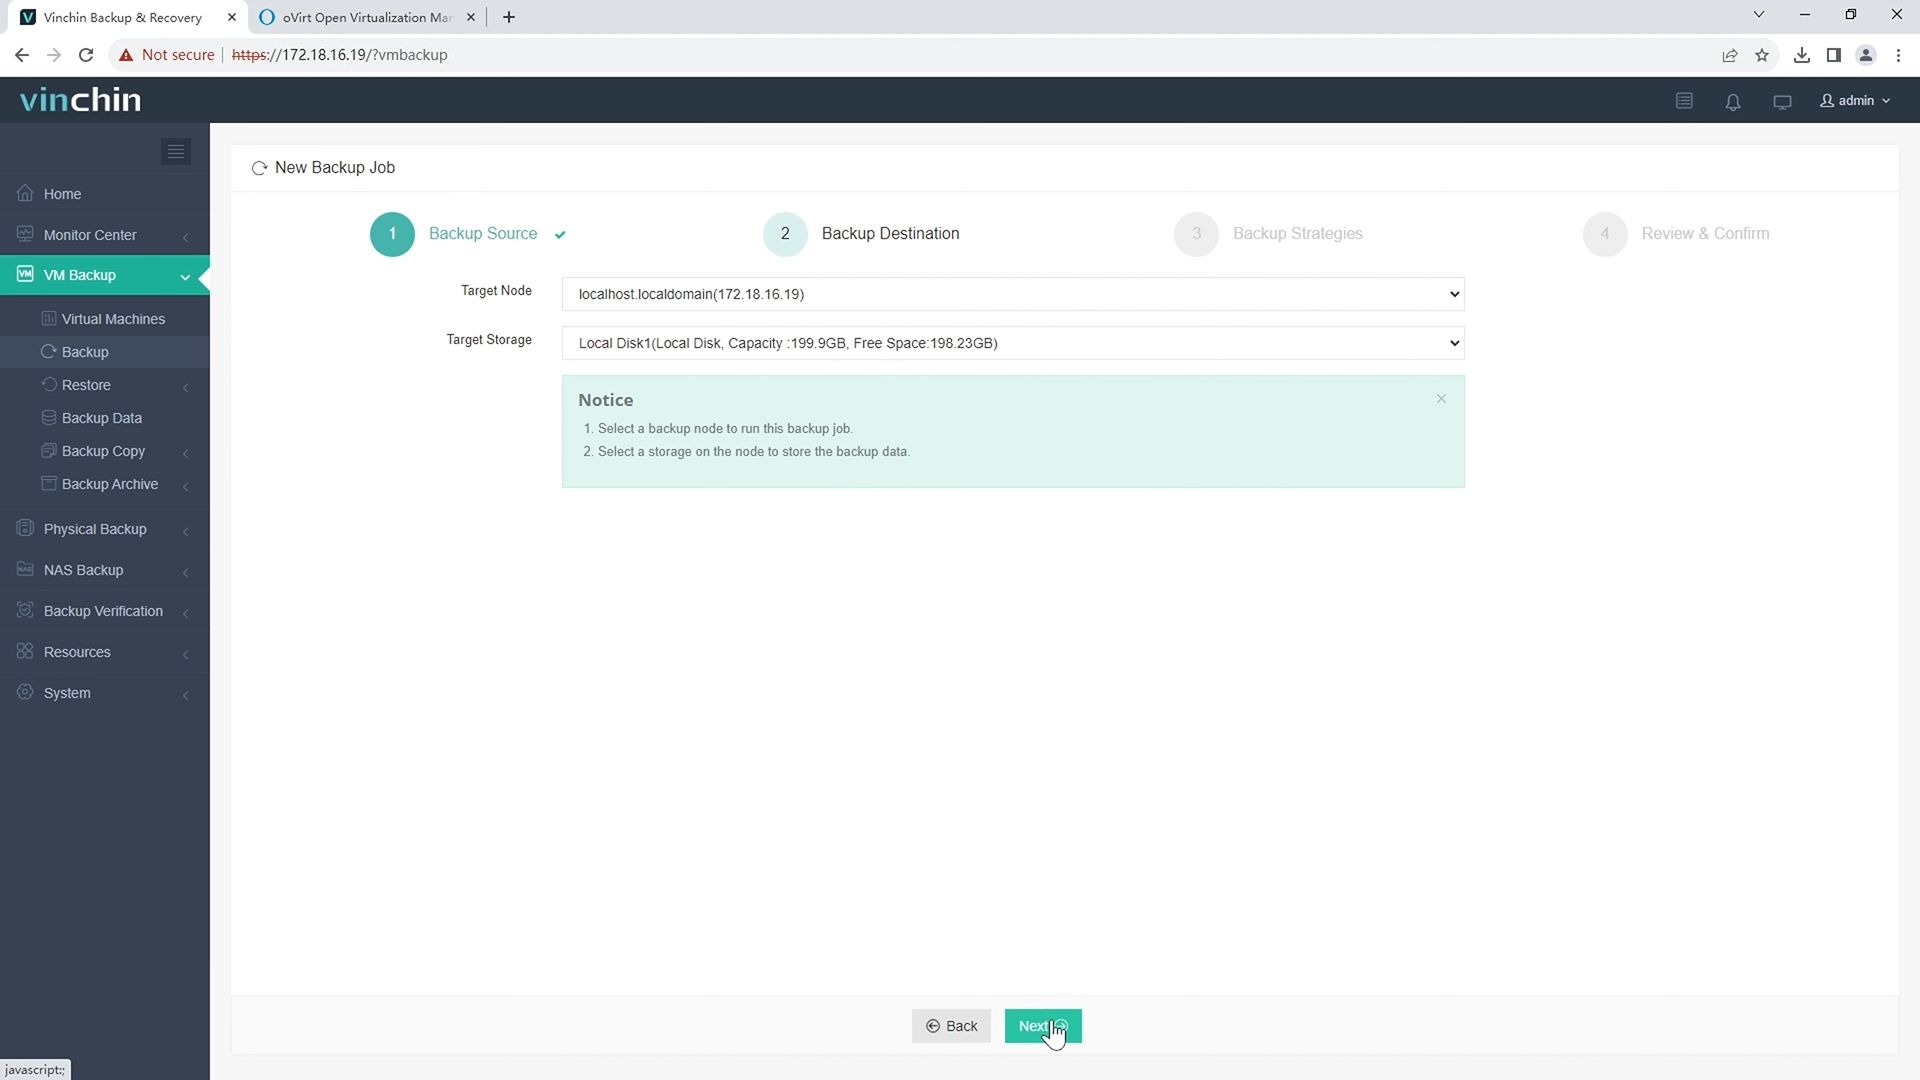
2.Then select backup destination

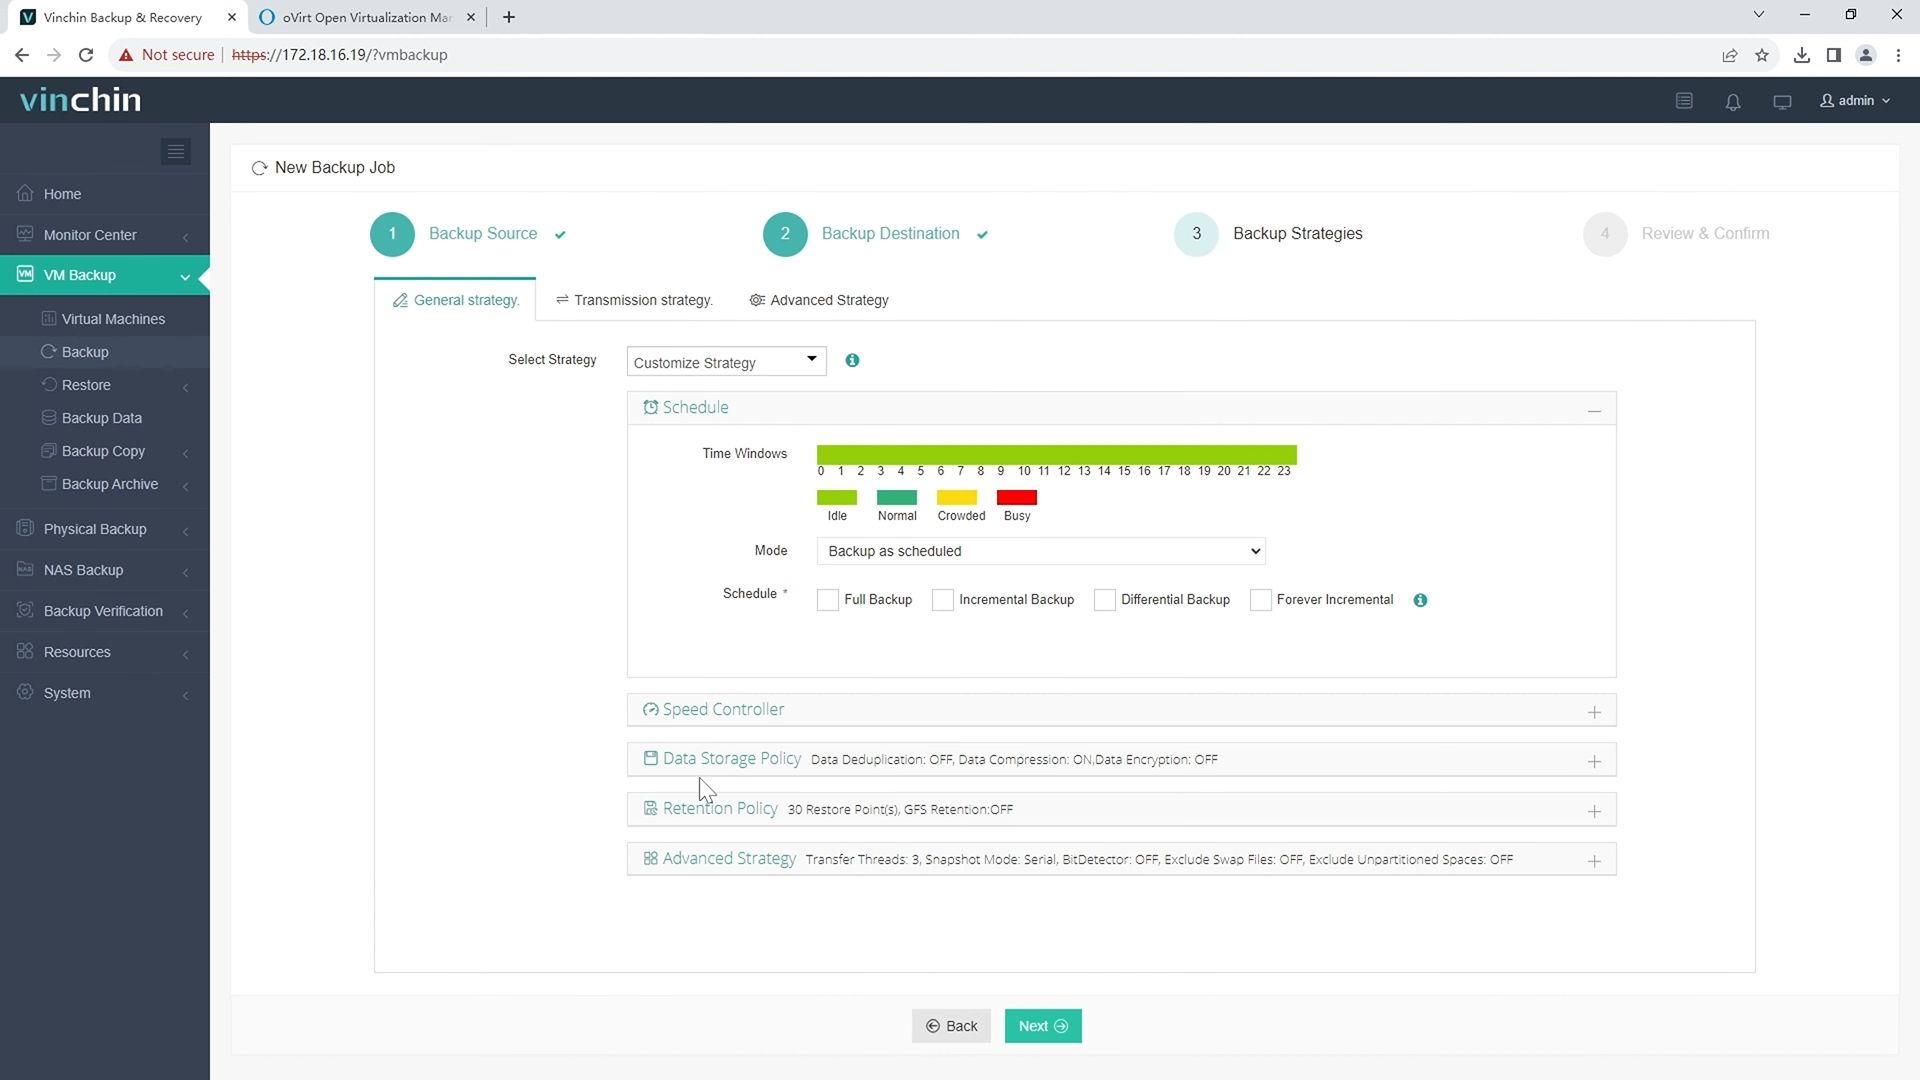
3.Select strategies

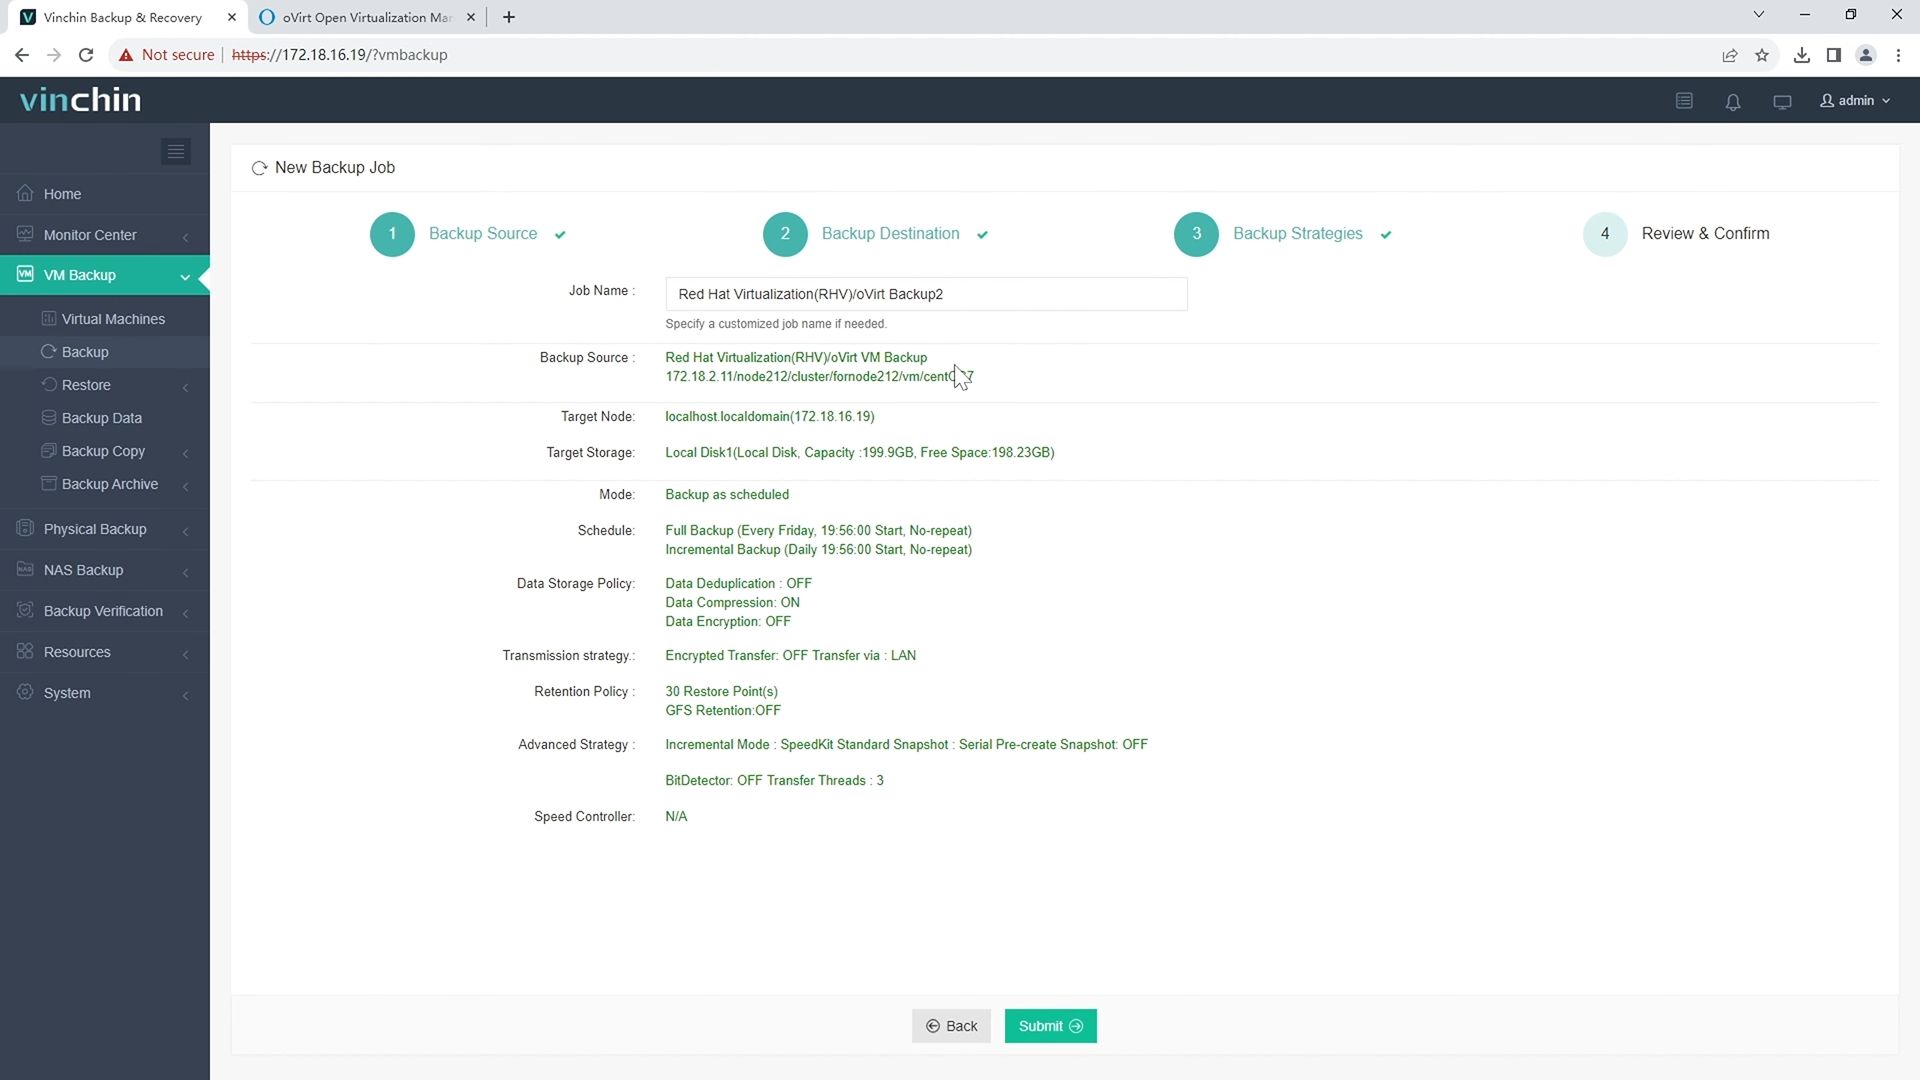
4.Finally submit the job 
To help users experience the power of Vinchin in real-world environments, Vinchin offers a 60-day free trial. For more information, please contact Vinchin directly or one of our local partners.
oVirt install FAQs
Q1: What should I do if my self-hosted engine certificate expires?
Run engine-setup --renew-certs --accept-defaults on the engine node promptly.
Q2: Why did my hypervisor host enter Non-operational state after reboot?
Check time synchronization (chronyc sources) first; also verify CPU flags (cat /proc/cpuinfo) match cluster policy requirements; confirm all shared storages are reachable again.
Q3: Can I automate mass creation of similar VMs?
Yes—enable Cloud-init/Sysprep when building templates OR use REST API calls/scripts targeting /api/vms; remember granting API access rights beforehand.
Conclusion
Completing an enterprise-ready oVirt install requires careful planning—from hardware sizing through advanced tuning—but rewards administrators with powerful centralized control over their virtualized workloads.
Vinchin makes protecting those workloads simple—try their solution risk-free today!
Share on:


