-
What is Hyper-V?
-
Method 1: Using Enhanced Session Mode to Share Folders Between Host and Guest on Hyper-V
-
Method 2: Using SMB Network Share (Internal Switch) to Share Folders Between Host and Guest on Hyper-V
-
Method 3: Share Folders Between Host and Guest on Hyper-V via Passthroughing Disk
-
How to Protect Hyper-V VM with Vinchin?
-
Hyper-V share folder FAQs
-
Conclusion
Efficient file sharing drives reliable operations. It enables configuration management, log aggregation, software deployment, and data exchange between isolated environments. Hyper-V hosts and guests run on the same hardware but in separate silos. You need a clear path for folder sharing. This guide details three core methods for folder sharing: Enhanced Session Mode (Windows guests), SMB Network Shares (cross-platform), and Passthrough Disks (high-performance/raw access).
What is Hyper-V?
Hyper-V is Microsoft's hypervisor built into Windows. It operates as an isolated instance with dedicated virtualized hardware resources (vCPU, vRAM, virtual storage, virtual NIC). You enable the Hyper-V feature via Turn Windows features on or off or install the Hyper-V role on Windows Server .
Key features for operations include Live Migration to minimize downtime during maintenance, Snapshots for point-in-time recovery (not a backup replacement), Dynamic Memory to optimize host RAM utilization, and Flexible Virtual Networking for complex topologies. These capabilities let you build scalable, resilient environments for test, dev, and production workloads.
Method 1: Using Enhanced Session Mode to Share Folders Between Host and Guest on Hyper-V
Enhanced Session Mode uses RDP redirection in the VMConnect tool. It works best for Windows guests and needs no network configuration.
Prerequisites: Hyper-V host running Windows 10/11 or Windows Server 2016+, and a supported Windows guest OS (8.1/10/11, Server 2012 R2+) with Integration Services installed. Linux guests require XRDP setup beyond this guide.
Enable Mode on Host:
1. Open Hyper-V Manager, select Hyper-V Settings.
2. Under Server turn on Enhanced Session Mode Policy.
3. Under User turn on Enhanced Session Mode.
Share Drives on Connect:
1. In Hyper-V Manager, right-click your VM and click Connect.
2. Click Show Options, select Local Resources, then More.
3. Check the host drives (for example, C:) under Drives.
4. Click OK, then Connect.
In Windows guests, open File Explorer and find host drives under Redirected drives and folders. In Linux guests, mounts appear under /mnt/hgfs (path may vary) .
Security Note: This method shares credentials during RDP initiation. Ensure strong host passwords.
Limitations: Only active during VMConnect sessions. No persistence when VMConnect closes.
Method 2: Using SMB Network Share (Internal Switch) to Share Folders Between Host and Guest on Hyper-V
This method creates a private network between host and guest. It works for any OS supporting SMB or NFS.
Prerequisites: Windows host with Hyper-V feature, guest OS with SMB/NFS client. Administrative rights on host and guest.
Setup Internal Virtual Switch:
1. In Hyper-V Manager, click Virtual Switch Manager.
2. Create a new Internal switch named InternalShare.
3. In Network Connections, right-click the new adapter, open Properties, set IPv4 to 192.168.100.1.
Share Host Folder:
1. On the host, right-click the folder, choose Properties > Sharing > Advanced Sharing.
2. Check Share this folder, name it HostShare.
3. Click Permissions, add a dedicated service account with Read/Modify rights.
Configure Guest VM:
1. In VM Settings, attach InternalShare to the guest's network adapter.
2. Boot the VM, set its IPv4 to 192.168.100.2.
3. In File Explorer, open \\192.168.100.1\HostShare and enter service account credentials.
Security Best Practices:
Use a dedicated service account with least privilege.
Enable SMB Signing and Encryption:
Set-SmbServerConfiguration -EncryptData $true
Set-SmbClientConfiguration -RequireEncryption $true
Restrict firewall rules to allow TCP 445 only on the internal adapter.
Disable SMB v1 if not required:
Disable-WindowsOptionalFeature -Online -FeatureName SMB1Protocol
Alternative IP Assignment: You can run a DHCP scope on the host for the internal switch.
Troubleshooting: Verify firewall rules, IP/subnet, and SMB features are enabled .
Method 3: Share Folders Between Host and Guest on Hyper-V via Passthroughing Disk
Passthrough disks grant a VM exclusive raw access to a physical disk or LUN. Use this for high-throughput databases or large media workloads.
Prerequisites: Spare physical disk or LUN attached to the host. Ensure no host partitions rely on the disk.
Procedure:
1. In Disk Management, right-click the target disk and select Offline.
2. In Hyper-V Manager, open VM Settings, click Add Hardware > SCSI Controller > Hard Disk > Add.
3. Select Physical hard disk, choose your offline disk, click OK.
4. Boot the VM, open Disk Management, bring the disk online, assign a drive letter.
Critical Limitations:
No Hyper-V snapshots or production checkpoints.
VSS-based backups may be inconsistent without vendor support.
Live Migration generally not supported .
Best Practices:
Take the disk offline before attaching to prevent corruption.
Use only when raw performance outweighs snapshot and migration needs.
How to Protect Hyper-V VM with Vinchin?
With sharing in place, you need reliable VM protection. Vinchin Backup & Recovery is a professional, enterprise-grade solution first for Hyper-V and then for VMware, Proxmox, oVirt, OLVM, RHV, XCP-ng, XenServer, OpenStack, ZStack, and 15 more platforms. Its robust features include forever-incremental backup to shrink windows and storage, data deduplication and compression to cut costs, V2V migration for seamless platform moves, GFS retention for rolling snapshots, plus many more like CBT, HotAdd, SpeedKit, throttling, encryption, granular restore, and cloud/tape archiving.
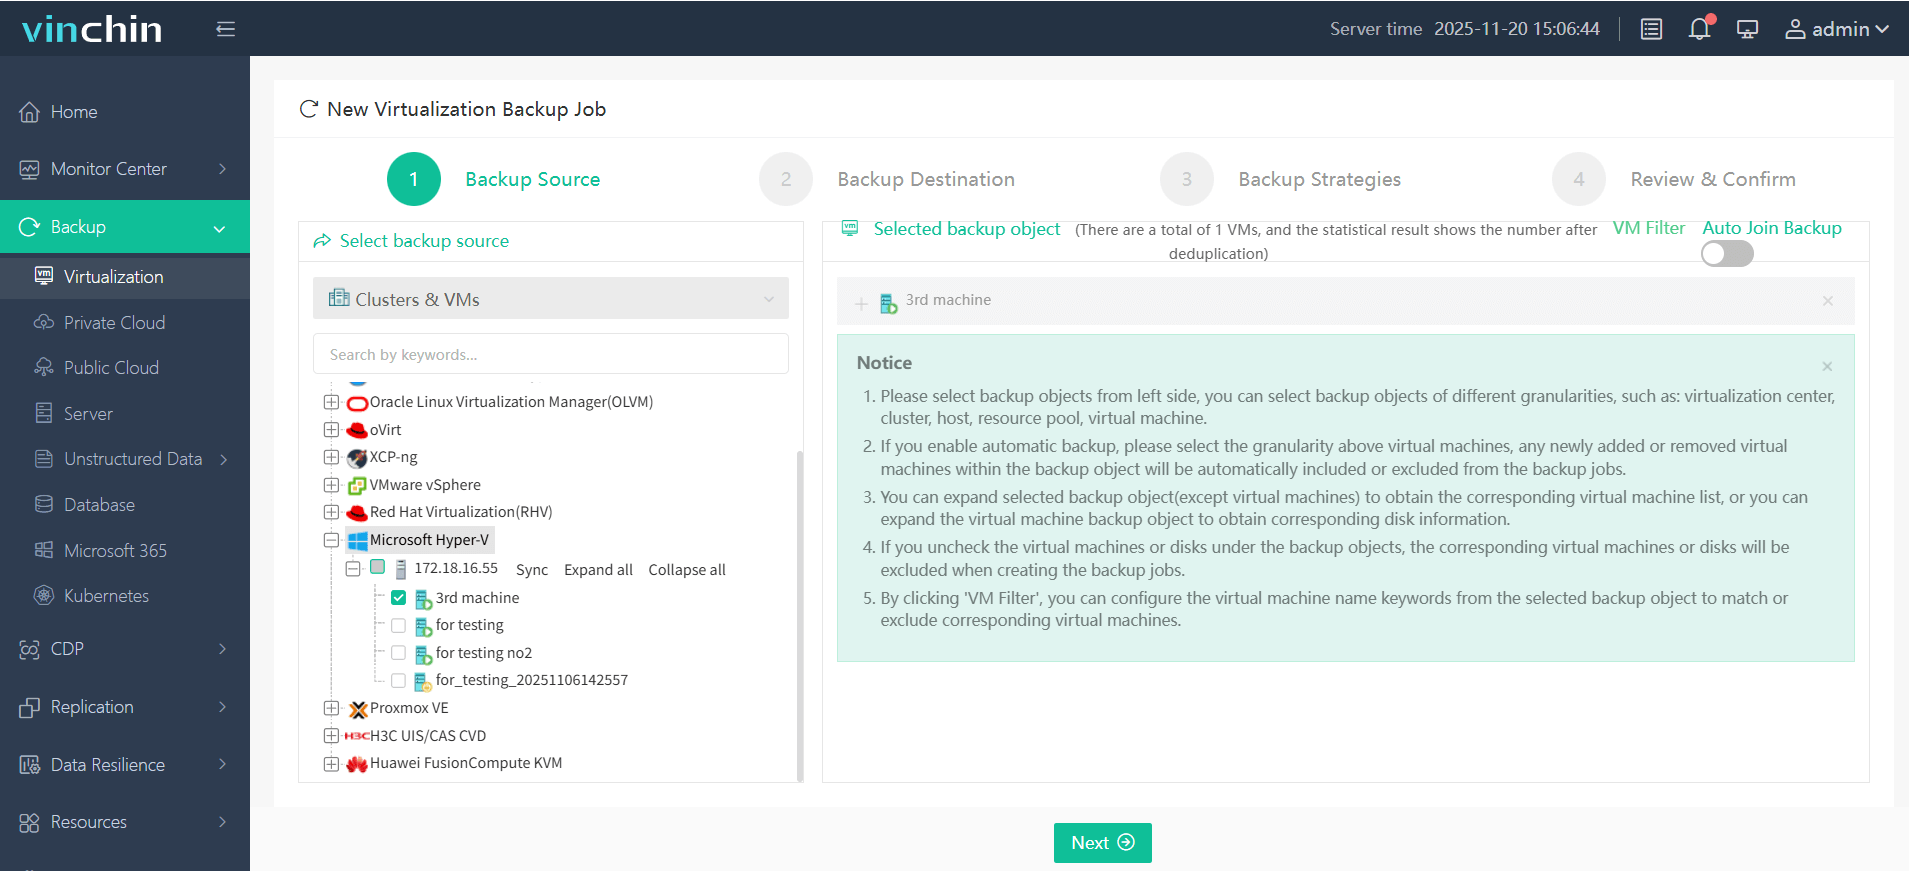
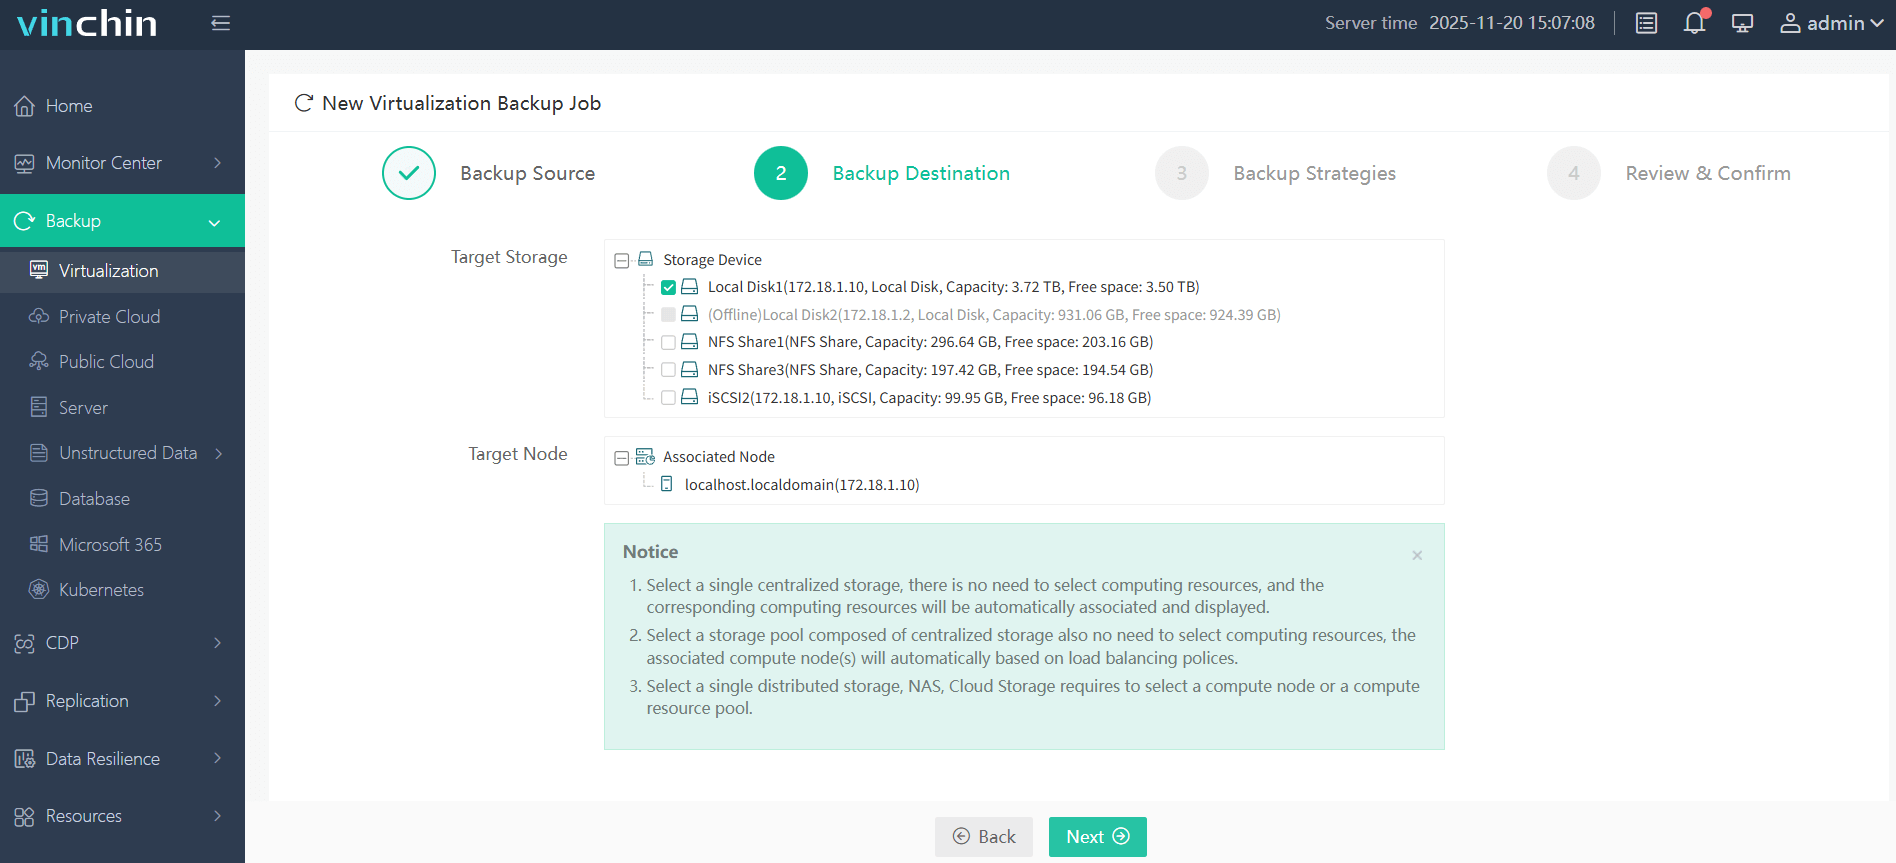
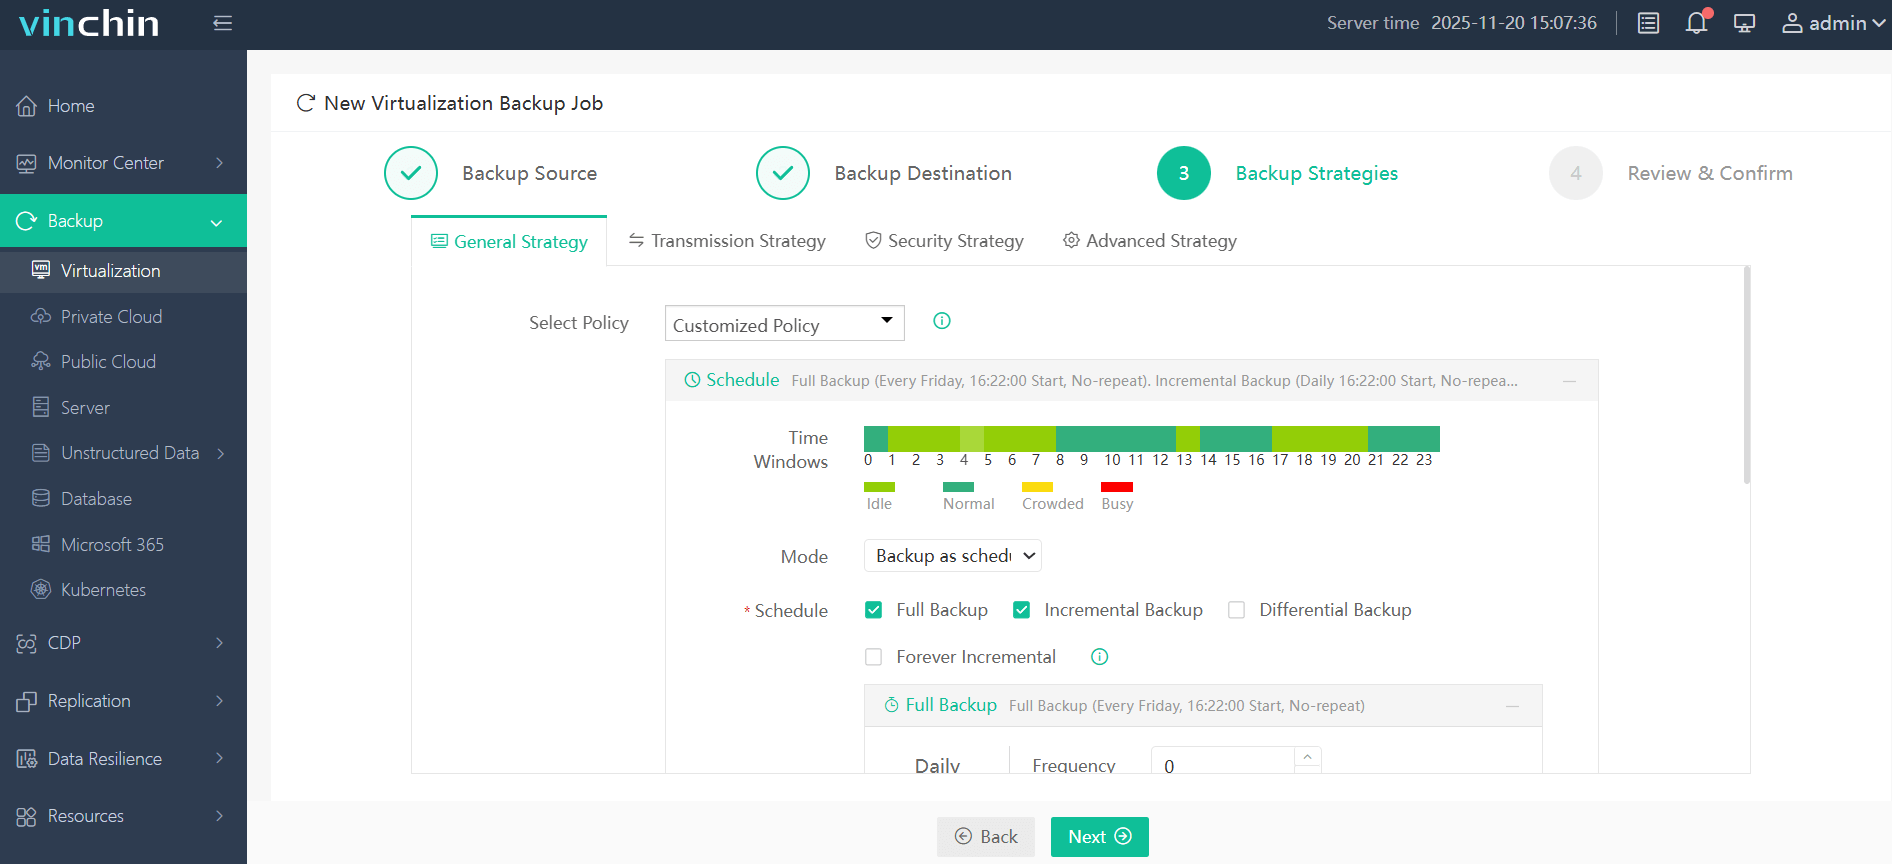
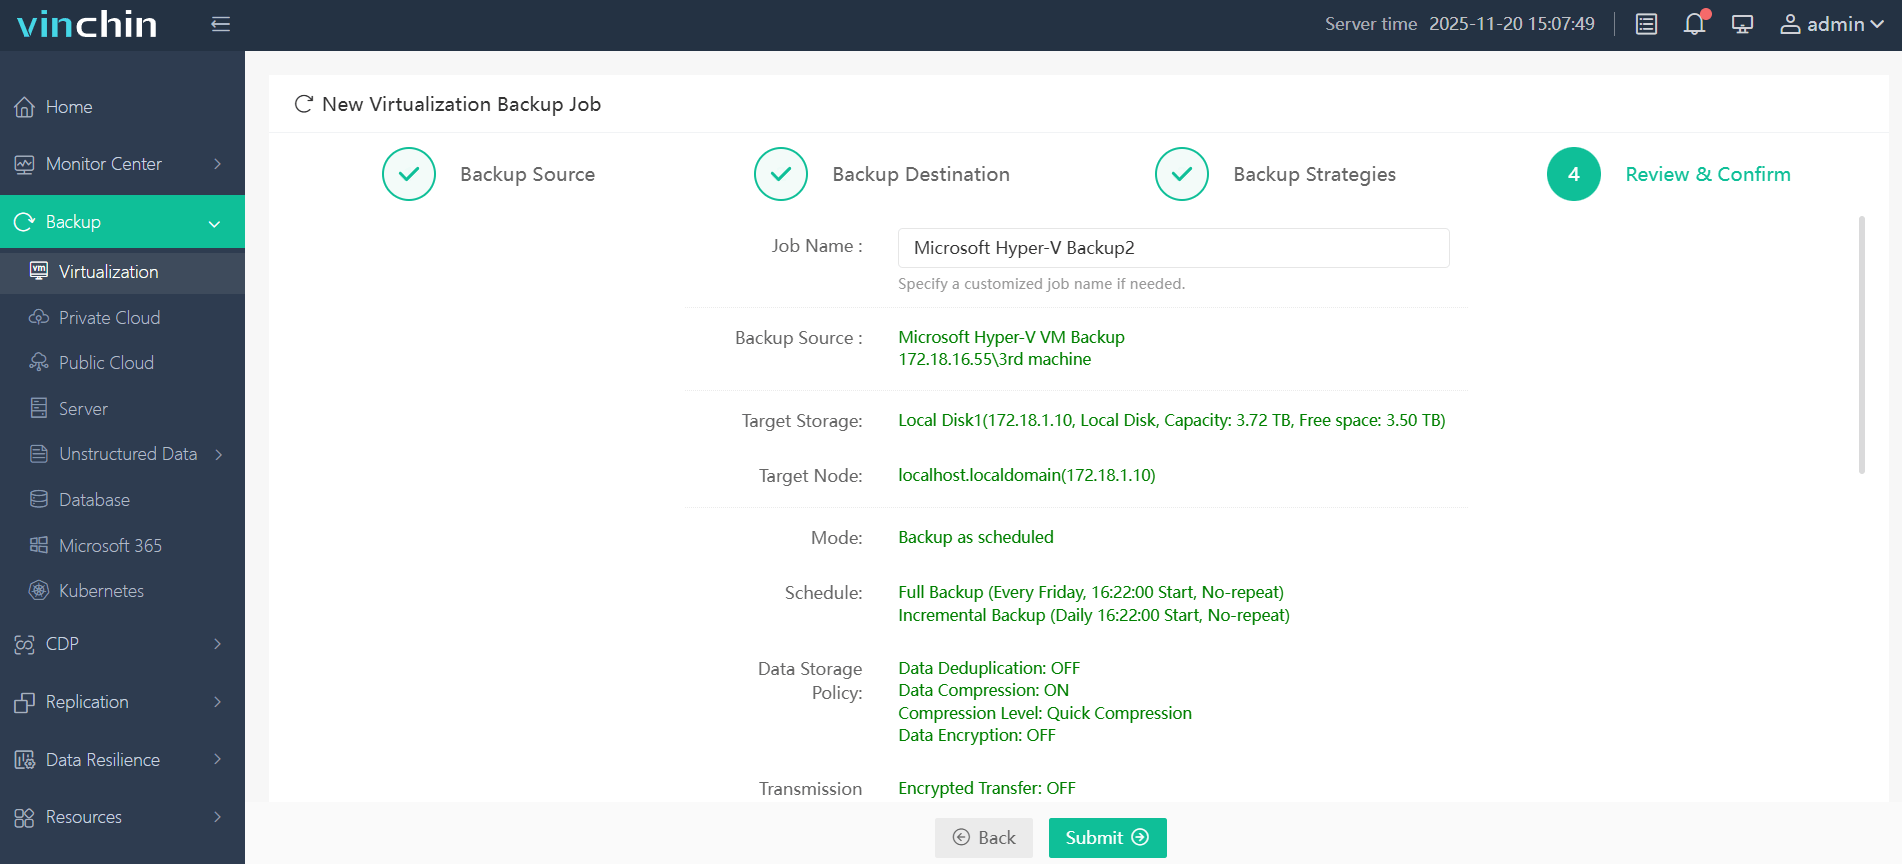
Vinchin's web console makes backups simple. To protect your Hyper-V VM:
1. Select the Hyper-V VM to back up.

2. Choose the target storage.

3. Pick the backup strategies.

4. Click Submit to launch the job.

Join thousands of global customers and enjoy a 60-day full-featured free trial. Download Installer and deploy in minutes.
Hyper-V share folder FAQs
Q1: Why can't my guest VM see the host share (SMB Method)?
Common causes include firewall blocks, wrong IP/subnet, disabled SMB feature, or incorrect credentials—verify internal switch assignment and adapter settings.
Q2: Does Enhanced Session Mode work when VM runs in background?
No. It requires an active VMConnect RDP session. For persistent access, use SMB Network Shares or Passthrough Disks.
Q3: How do I secure SMB Network Shares?
Apply NTFS and Share permissions with least privilege. Enforce complex passwords, enable SMB Encryption, restrict firewall rules to internal adapter, and disable SMBv1 if unused.
Q4: How do I access host shares in Linux guest?
Mount via CIFS:
sudo mount -t cifs //192.168.100.1/HostShare /mnt/host -o user=serviceAccount
Conclusion
Choose Enhanced Session Mode for quick Windows-to-Windows transfers without network setup. Use SMB Network Shares for persistent cross-platform access with fine-grained permissions and encryption. Opt for Passthrough Disks only when you need raw performance and can accept the loss of snapshots and live migration. Each method serves a distinct operational need.
Vinchin Backup & Recovery makes protecting your Hyper-V VMs just as simple. Try the 60-day full-featured free trial to safeguard your virtual infrastructure today.
Share on:


