-
What is Proxmox VGPU?
-
How to Enable VGPU in Proxmox
-
Vinchin VM Backup & Recovery for Proxmox
-
Proxmox VGPU FAQs
-
Conclusion
What is Proxmox VGPU?
Proxmox VGPU allows one physical NVIDIA GPU to be shared across multiple virtual machines (VMs). Instead of assigning a whole GPU to a single VM using PCI passthrough, VGPU splits the GPU's resources. This means multiple VMs can use hardware acceleration at the same time. It's ideal for AI, machine learning, remote desktops, and 3D applications.
Only supported NVIDIA data center GPUs can use VGPU. These include models like the A100, A40, T4, and L40. Consumer-grade cards, such as the GeForce RTX series, don't support VGPU because of licensing restrictions. For an updated compatibility list, visit NVIDIA's Qualified Hardware Catalog.
To use VGPU on Proxmox, you need:
Proxmox VE 8.3.4 or newer
A supported NVIDIA vGPU-enabled card
SR-IOV (or MDEV for older cards)
A valid NVIDIA vGPU software license
BIOS features like VT-d/AMD-V, IOMMU, and Above 4G Decoding enabled
Proxmox began officially supporting NVIDIA vGPU in 2024. It includes tools like pve-nvidia-vgpu-helper to simplify configuration.
How to Enable VGPU in Proxmox
Step 1: Check Hardware and BIOS Settings
Make sure your CPU and motherboard support virtualization and IOMMU. Enter the BIOS and enable:
VT-d (Intel) or SVM (AMD)
IOMMU
Above 4G Decoding
ARIs Support (if available)
After boot, verify IOMMU isolation:
for d in /sys/kernel/iommu_groups/*/devices/*; do echo ${d##*/}; doneYour GPU should appear in its own group. If not, passthrough may fail.
Step 2: Update Proxmox and Install VGPU Helper
Open Updates in the Proxmox GUI. Apply all upgrades and reboot. Then open Shell and run:
apt install pve-nvidia-vgpu-helper
pve-nvidia-vgpu-helper setup
This helper configures kernel modules, disables conflicting drivers (like nouveau), and sets up udev rules.
Step 3: Install NVIDIA Host Drivers
Download the latest vGPU KVM host drivers (e.g., branch 17.x) from NVIDIA’s enterprise portal. Transfer the .run file to your Proxmox host and run:
chmod +x NVIDIA-Linux-x86_64-*.run
./NVIDIA-Linux-x86_64-*.run
If your kernel is 6.8 or newer, older drivers may fail to compile. Apply DKMS patches such as the polloloco vgpu unlock repo.
Step 4: Enable SR-IOV or MDEV
For Ampere and Ada GPUs, enable SR-IOV virtual functions:
systemctl enable --now pve-nvidia-sriov@<GPU_PCI_ID>.service
To verify:
lspci -d 10de:
You should see virtual functions listed.
For older GPUs (e.g., Turing), use MDEV:
mdevctl start -u <UUID> -p 0000:01:00.0 --type nvidia-<profile>
Step 5: Attach vGPU to a VM
Go to your VM's Hardware tab. Click Add > PCI Device. Select the virtual function, check Use with mediated devices, and save.
Step 6: Install Guest Drivers
Inside the VM, install the guest driver matching your vGPU version. You can find it in the same NVIDIA download package.
Use nvidia-smi to verify that the vGPU is recognized.
Step 7: Set Up NVIDIA Licensing
NVIDIA requires a valid license server. You can run it in a container or VM:
docker run -d -p 7070:7070 --name nvidia-licensing nvidia/vgpu-license-server
Set firewall rules to allow TCP port 7070. In your guest VM, configure license server IP using the nvidia-smi vgpu tool.
Post-Setup Validation
Check driver status:
dmesg | grep -i vfio
nvidia-smi vgpu -q
Look for errors. If the vGPU is missing:
Recheck BIOS settings
Verify correct driver versions
Confirm licensing server connectivity
Vinchin VM Backup & Recovery for Proxmox
Once your Proxmox VGPU setup is stable, protecting your virtual machines becomes essential. Vinchin Backup & Recovery is a professional, enterprise-level virtual machine backup solution that supports Proxmox VE along with 15+ other platforms, including VMware, Hyper-V, oVirt, OLVM, RHV, XCP-ng, XenServer, OpenStack, and ZStack.
Vinchin offers full backup, incremental,differential backup, with scheduled and repetitive options. Key features include data deduplication and compression, V2V cross-platform migration, and LAN-free backup. It also supports encryption, GFS retention, CBT, and instant recovery for robust VM protection.
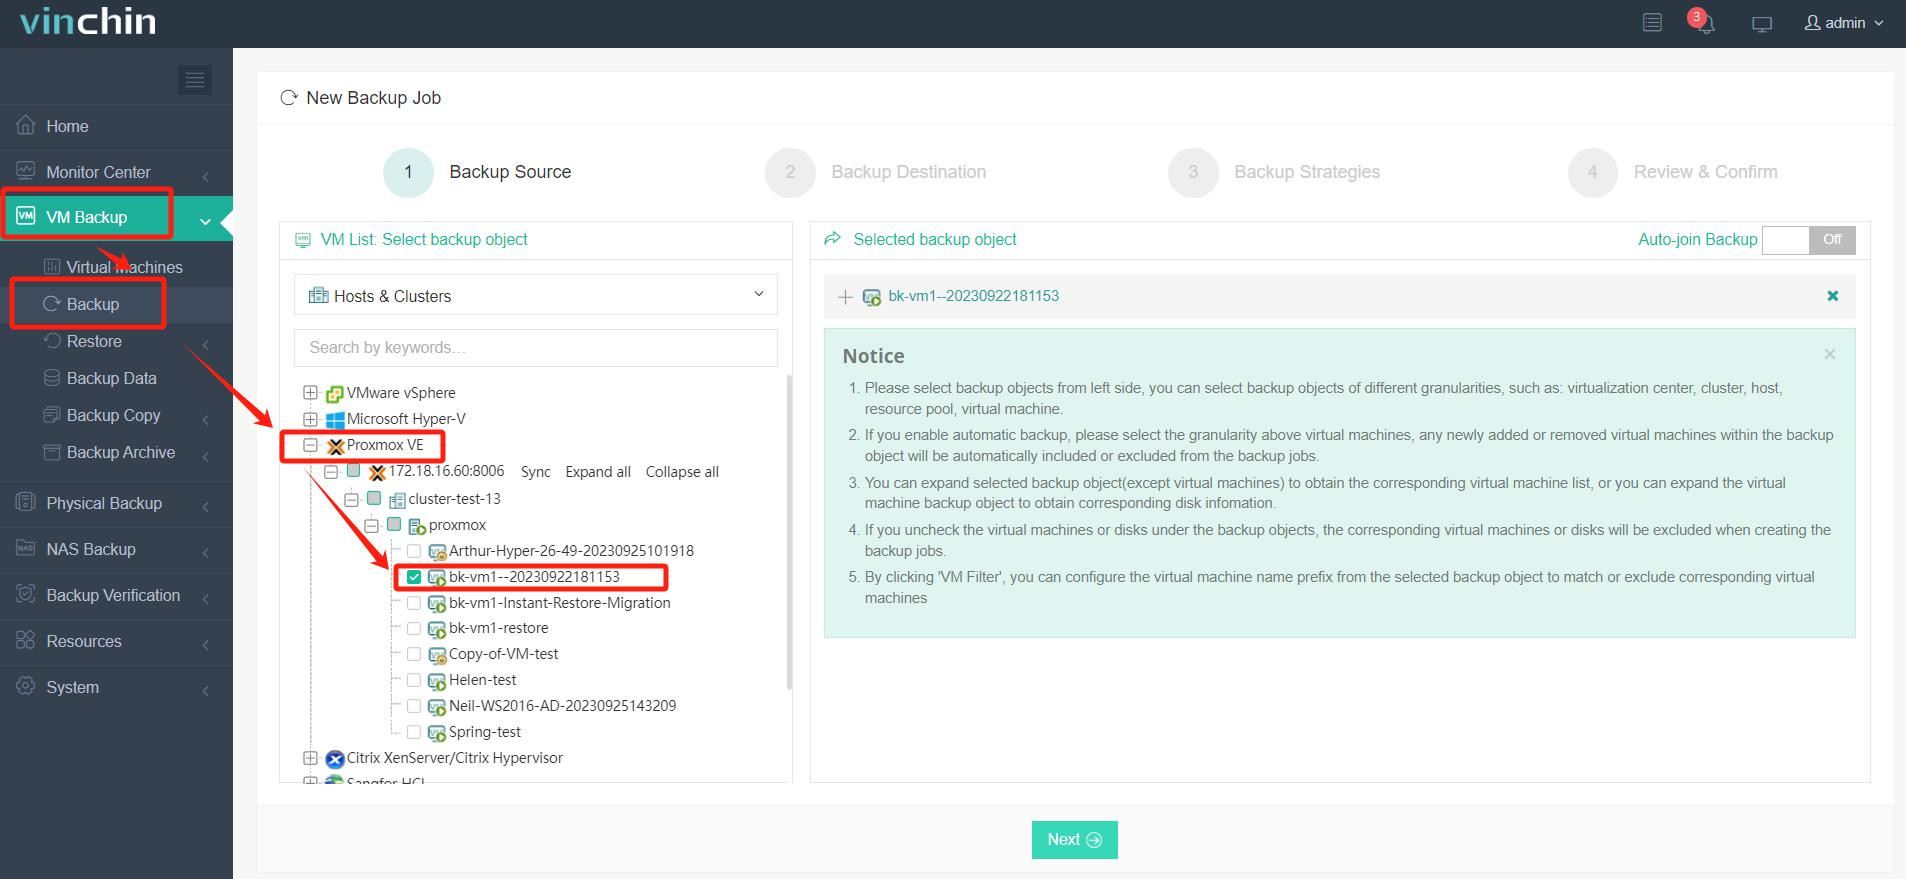
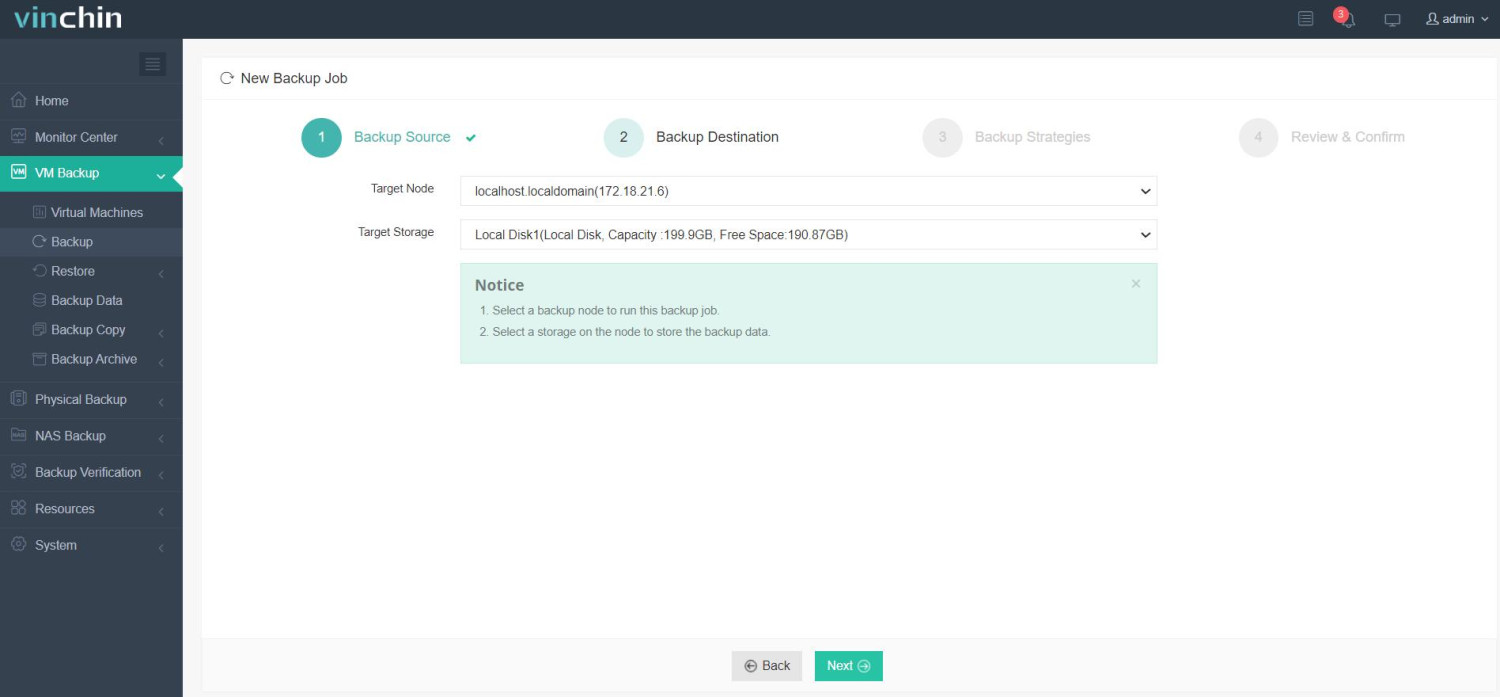
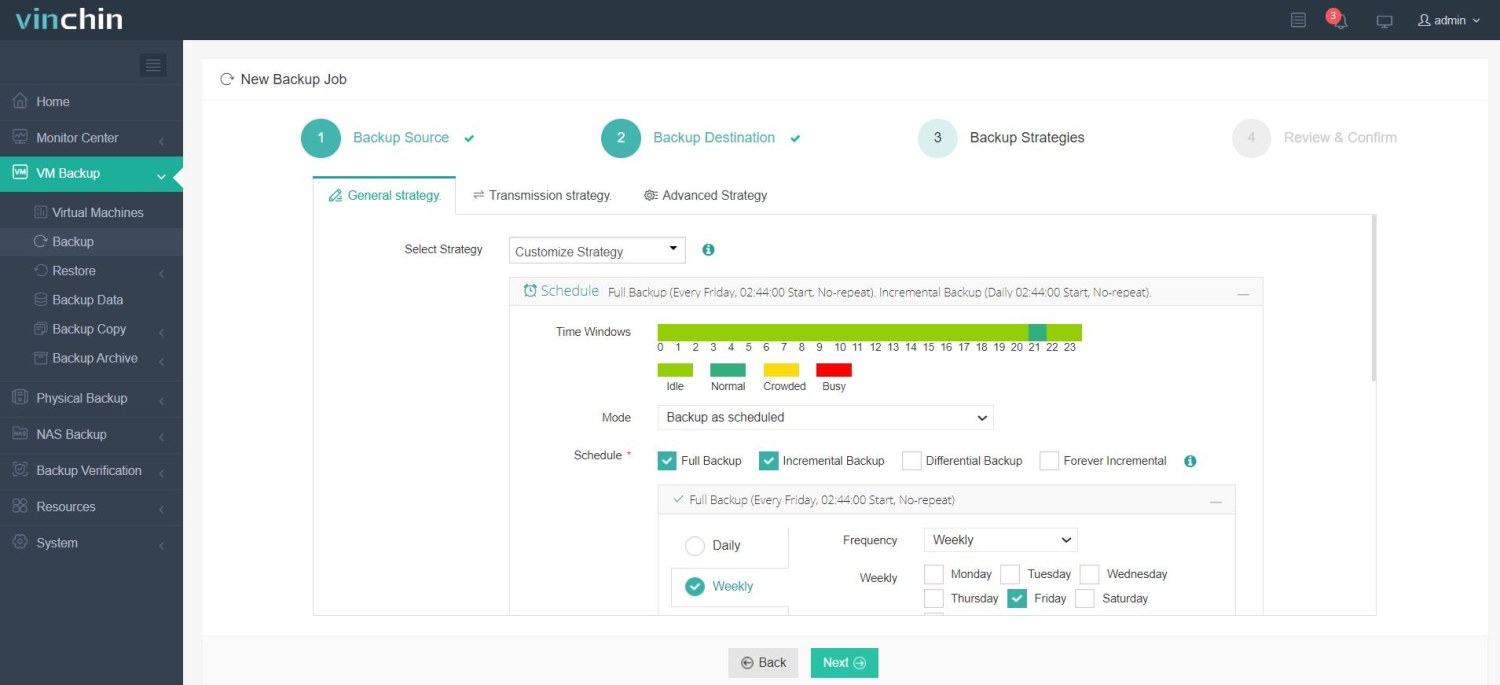
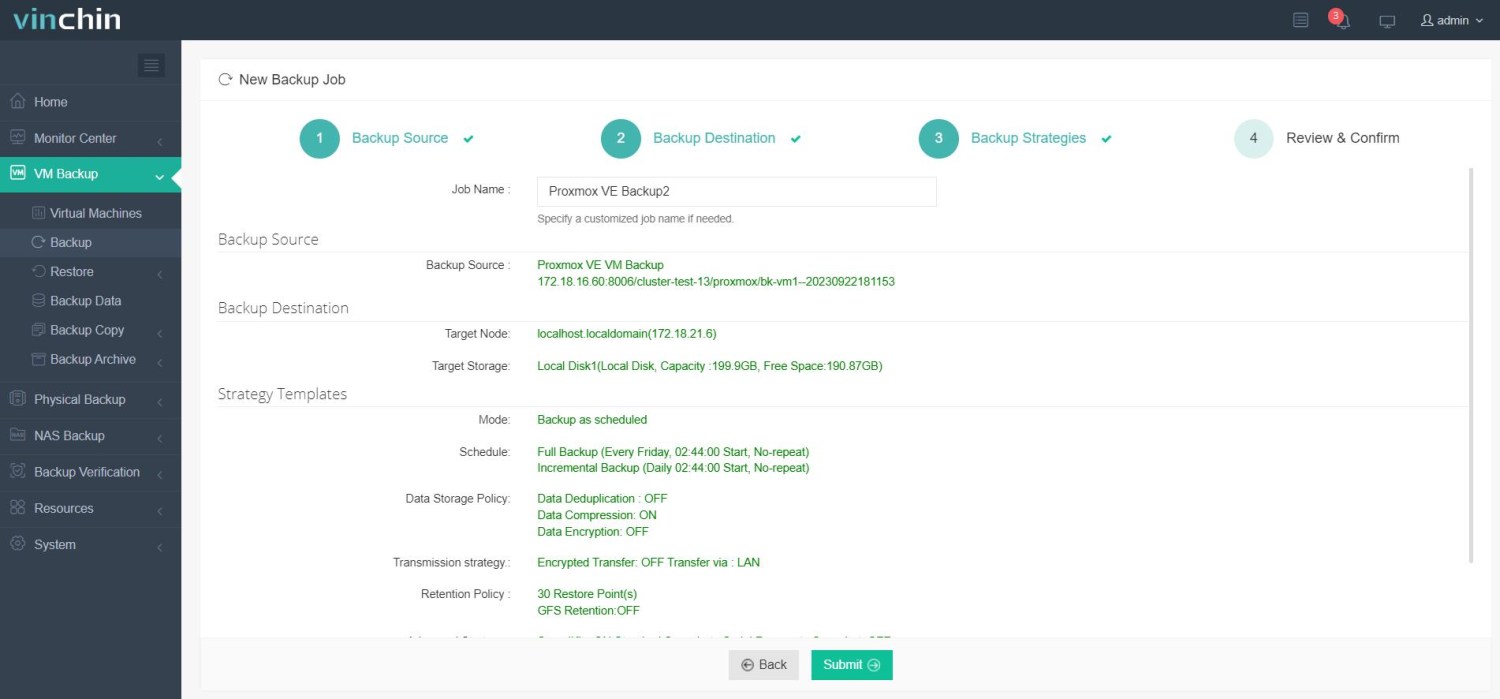
The web console is clean and user-friendly.Just, follow four simple steps:
1. Select the Proxmox VM to back up;

2. Choose backup storage;

3. Configure backup strategies;

4. Submit the job.

Vinchin is trusted worldwide for its performance and support. Experience it yourself with a 60-day full-feature free trial. Have questions or need help? Contact us anytime!
Proxmox VGPU FAQs
Q1. Which GPUs support vGPU on Proxmox?
Only supported NVIDIA data center GPUs like A100, A40, L40, and T4. Consumer GPUs like GeForce are not supported.
Q2. How do I install a license server?
You can use a Docker container: docker run -d -p 7070:7070 nvidia/vgpu-license-server
Q3. My vGPU isn't showing in the VM. What should I check?
Check BIOS for Above 4G Decoding, confirm driver versions, and use nvidia-smi vgpu -q to diagnose.
Conclusion
Proxmox VGPU enables GPU sharing across VMs for demanding apps like AI and 3D. With the right setup, it runs smoothly. Protect these workloads with a trusted backup solution that offers forever incremental backup, deduplication, and V2V migration. Try it free for 60 days—no risk, full features.
Share on:


