-
How Does Proxmox VE Handle VM Storage?
-
Issue 1: Why Doesn't My New Disk Show Up in Windows?
-
Issue 2: Why Is Disk Performance So Slow in My Windows VM?
-
Issue 3: Why Can't I Use My New Disk Yet?
-
Issue 4: Why Do I Still Get "Not Enough Space" Errors?
-
Protecting Your Proxmox Virtual Machines with Vinchin
-
Issues When Adding Hard Disks To Windows Virtual Machines In Proxmox VE FAQs
-
Conclusion
Adding hard disks to Windows virtual machines in Proxmox VE seems simple at first glance. Yet many administrators face unexpected problems—disks not showing up in Windows, slow performance after adding storage, confusing partition layouts, or space errors that make no sense. Why does this happen? What can you do about it? This guide explores common issues when adding hard disks to Windows virtual machines in Proxmox VE. We'll start with basics and build up to advanced troubleshooting so you can solve these problems confidently.
How Does Proxmox VE Handle VM Storage?
Before adding a disk to a VM, it's important to understand how storage works in Proxmox VE. The platform supports several storage backends:
LVM-Thin: flexible space allocation
ZFS: powerful features like snapshots
Ceph: scalable distributed storage
Disk passthrough: for direct device access
When you add a virtual disk via the web UI or CLI, you also choose its interface: IDE, SATA, SCSI (VirtIO SCSI controller), or VirtIO Block. Each has trade-offs:
IDE: slow but broadly compatible
SATA: faster, still uses emulation
SCSI + VirtIO: high performance via paravirtualized drivers
VirtIO Block: fast but limited flexibility (e.g., no hot-plugging)
Tip: For modern Windows VMs, SCSI with VirtIO SCSI controller is usually the best choice for performance and compatibility.
Issue 1: Why Doesn't My New Disk Show Up in Windows?
You've added a new virtual disk to your Windows VM in Proxmox VE—but nothing appears in File Explorer. Don't worry, this is one of the most common issues administrators face. Let's walk through how to fix it.
✅ Step 1: Confirm the Disk Was Added in Proxmox
In the Proxmox web interface:
Select the target VM
Go to the Hardware tab
Click Add > Hard Disk
Choose your storage backend (e.g.,
local-lvm, ZFS, or Ceph)Set the disk size and bus type (SCSI is recommended)
Confirm the operation
Restart the VM: click Shutdown, then Start
✅ Step 2: Check Inside Windows
After rebooting, log in to the VM and check for the disk:
Right-click the Start menu > choose Disk Management
Look at the bottom pane for a disk marked:
"Offline"
"Not Initialized"
"Unallocated"
If found:
Right-click > choose Online
Then Initialize Disk (choose GPT for >2TB or modern systems)
Right-click unallocated space > New Simple Volume
Follow the wizard to format as NTFS or ReFS
⚠ Common Cause: Missing Drivers
If you're using VirtIO SCSI (recommended for performance), older Windows versions might not detect the disk due to missing drivers.
Fix it like this:
In Proxmox > Add a CD/DVD Drive to the VM
Mount the
virtio-win.iso(download from the Fedora Project)Reboot and open the CD drive in Windows
Run the driver installer matching your OS
After installation, reboot the VM again
Tip: For Windows 11 22H2+, use virtio-win.iso version 0.1.240 or newer.
Still Not Showing Up?
Try these quick checks:
Is the disk listed under Device Manager?
Does it appear when you run
Get-Diskin PowerShell?Are there BIOS/UEFI boot order issues?
Did you attach the disk to the correct bus type?
If all else fails, try reattaching the disk using a different bus (e.g., switch from VirtIO to SATA temporarily for testing).
Issue 2: Why Is Disk Performance So Slow in My Windows VM?
You've added a new disk, but file copies are sluggish, applications stutter, and benchmarks are disappointing. What's going on? Disk performance issues in Proxmox VMs often boil down to controller choice, cache settings, and underlying storage performance.
✅ Step 1: Check the Disk Bus Type and Controller
The bus type you choose when adding the disk directly impacts performance:
IDE is old and slow. It's compatible with most systems, but not good for performance.
SATA is better than IDE but still not very fast, as it uses emulation.
VirtIO SCSI is the best option for performance. It supports hot-plug and multi-queue, making it flexible and fast.
VirtIO Block is also fast, but it doesn’t support features like hot-plugging, so it's less flexible than VirtIO SCSI.
Best practice: Use SCSI + VirtIO SCSI controller for modern Windows VMs.
Check the VM’s Hardware tab in Proxmox. If the disk is using IDE/SATA, consider re-adding it as SCSI. (Note: Data loss possible when changing bus types—back up first.)
✅ Step 2: Choose the Right Cache Mode
When adding or editing a disk, you'll see a Cache option:
No cache: Writes go directly and synchronously to the disk. This is the safest mode but also the slowest. Best for environments where data integrity is critical.
Write back: Offers the highest speed because writes are cached before being flushed to disk. However, it risks data loss during sudden power failures. Suitable for testing or setups with battery-backed cache.
Writethrough: A balance between speed and safety. Writes are cached but immediately flushed to disk, providing better data integrity than write back with moderately good performance. Ideal for production workloads needing both reliability and decent speed.
Recommendation: Use writethrough for production, and write back only if you can tolerate data loss or have additional protections.
For most general-purpose VMs, Write back offers a good balance—but only use it with battery-backed storage or backups in place.
✅ Step 3: Evaluate the Storage Backend
Your VM's disk performance is also limited by the host's storage configuration:
ZFS:
Use
recordsize=16Kfor NTFS-heavy workloadsDisable prefetch for random I/O VMs
Monitor I/O with
zpool iostatLVM-Thin:
Watch pool usage with:
lvs -o lv_name,data_percent
Thin pools can silently run out of space—causing write failures
Ceph:
Monitor network latency between nodes
Use
ceph -sto check cluster healthIO bottlenecks often stem from network congestion, not disk hardware
✅ Step 4: Benchmark to Confirm the Problem
Use tools inside the guest to measure performance:
Windows:
diskspd -b4K -d60 -o32 -t4 -Sh -r c:\testfile.dat
Linux host:
iostat -x 1
fio --name=test --rw=randrw --bs=4k --size=1G --numjobs=4 --time_based --runtime=60
Compare IOPS, latency, and throughput to expected values for your disk type.
✅ Step 5: Update VirtIO Drivers
Outdated VirtIO drivers can cause strange slowdowns or lockups. Always install the latest stable version from the VirtIO Downloads page.
Mount
virtio-win.isoInstall the storage driver that matches your OS
Reboot and retest
Issue 3: Why Can't I Use My New Disk Yet?
The disk shows up in Windows—great! But you still can't use it in File Explorer? That's because the disk needs to be initialized, partitioned, and formatted before it becomes usable.
✅ Step 1: Open Disk Management
In the Windows guest:
Right-click Start
Select Disk Management
✅ Step 2: Initialize the Disk
In the bottom pane, find the new disk (typically marked as:
Not Initialized
Unallocated
Right-click the disk name (left side), then:
Click Initialize Disk
Choose GPT unless you're dealing with legacy systems or <2TB drives (use MBR in that case)
✅ Step 3: Create and Format a New Volume
Once the disk shows as “Unallocated”:
Right-click the unallocated space
Choose New Simple Volume
Follow the wizard to:
Assign a drive letter
Format the disk (NTFS or ReFS)
Give it a label (optional)
Now you'll see the disk in File Explorer.
Advanced Tip: Use diskpart for Command-Line Control
If you prefer scripting or need advanced layout control:
diskpart
list disk
select disk X
# Replace X with your disk number
create partition primary
format fs=ntfs quick
assign letter=E
exit
⚠ Special Cases: Can't Extend or Format?
System partitions or recovery partitions may block expansion
In those cases, you may need to use third-party tools like GParted, or rearrange partition layout using
diskpartDynamic Disks allow advanced spanning but complicate snapshots and migrations—avoid unless necessary
Issue 4: Why Do I Still Get "Not Enough Space" Errors?
You expanded the disk in Proxmox—but Windows still says there's not enough space? You're not alone. Let's break it down.
✅ Step 1: Confirm the Disk Was Resized on the Host
In the Proxmox Hardware tab:
Select your VM
Right-click the disk > Resize Disk
Increase the size
Restart the VM
✅ Step 2: Extend the Partition Inside Windows
Expanding the virtual disk doesn’t automatically resize partitions. In the guest OS:
Open Disk Management
Right-click the main partition (usually C:)
Select Extend Volume
Complete the wizard
If there's no unallocated space immediately following the partition, Windows won’t allow the extension.
✅ Step 3: Watch for Hidden Partitions Blocking Expansion
Common on OEM Windows builds:
Recovery or system partitions may sit between your main partition and the unallocated space
You'll need to move or delete these (carefully!) using:
Third-party tools like GParted
Windows built-in tools like
diskpart
✅ Step 4: Thin Provisioning Pitfalls
If using LVM-Thin or ZFS, your logical disk size may be larger than your actual available storage.
On ZFS, check space with:
zfs list -t all -o name,volsize,referenced
On LVM-Thin:
lvs -o lv_name,data_percent
If the thin pool is full, write failures and strange space errors may occur—even if the VM thinks it has room.
✅ Step 5: Check Passthrough Disks and Permissions
If using physical disk passthrough, ensure it’s unmounted on the host
Check with:
lsblk
mount | grep sdX  # replace with your device
Also verify permissions:
ls -l /dev/disk/by-id/
Avoid setting world-writable permissions (chmod 777). Only allow access to the KVM/QEMU process owner.
✅ Step 6: Fragmentation and Filesystem Overhead
Heavy read/write workloads (e.g., SQL, file servers) can cause NTFS fragmentation, especially after expansion.
Run “Optimize Drives” inside Windows periodically to clean up space reporting issues.
Protecting Your Proxmox Virtual Machines with Vinchin
After managing your Proxmox virtual disks, protecting your VMs against data loss is crucial. Vinchin Backup & Recovery offers a professional backup and disaster recovery solution designed for virtualized environments like Proxmox VE.
Supporting over fifteen platforms—including VMware, Hyper-V, oVirt, RHV, XCP-ng, OpenStack, and more—Vinchin centralizes management with an intuitive console.
Its key features include incremental backup to reduce backup time and storage use, advanced data deduplication and compression, seamless cross-platform V2V migration, granular file-level restore, scheduled automated backups, and instant recovery—ensuring business continuity with simple, scalable management.
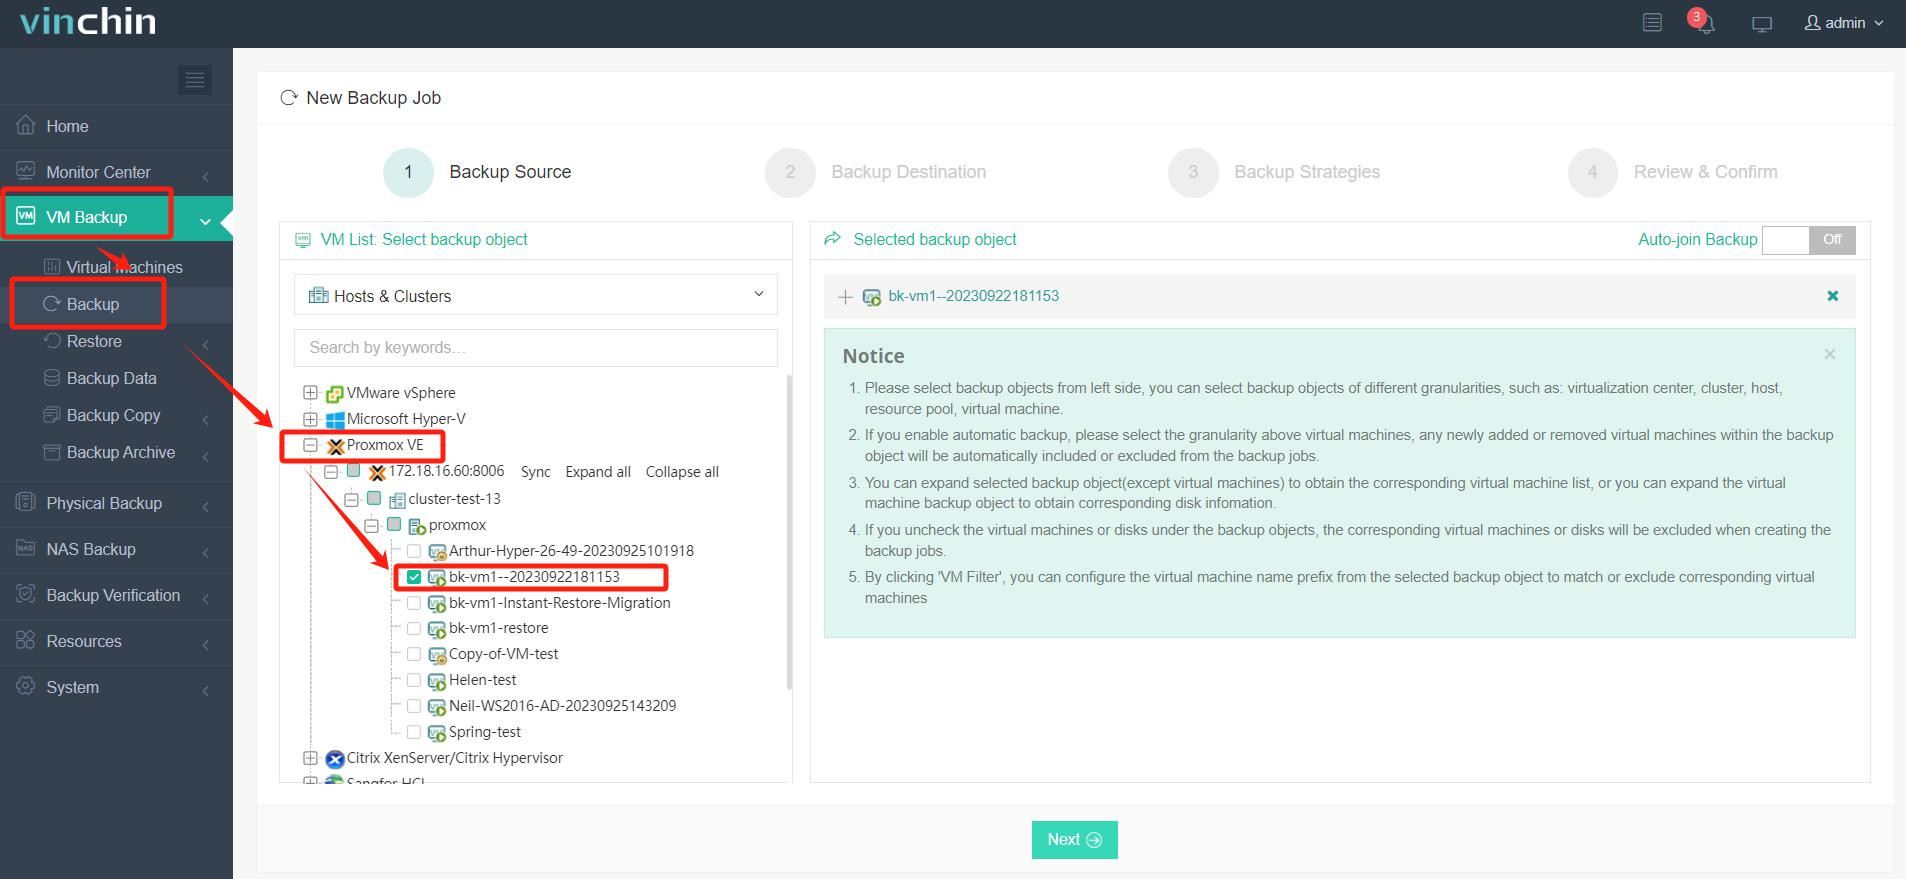
1. Select the Proxmox VM to back up;

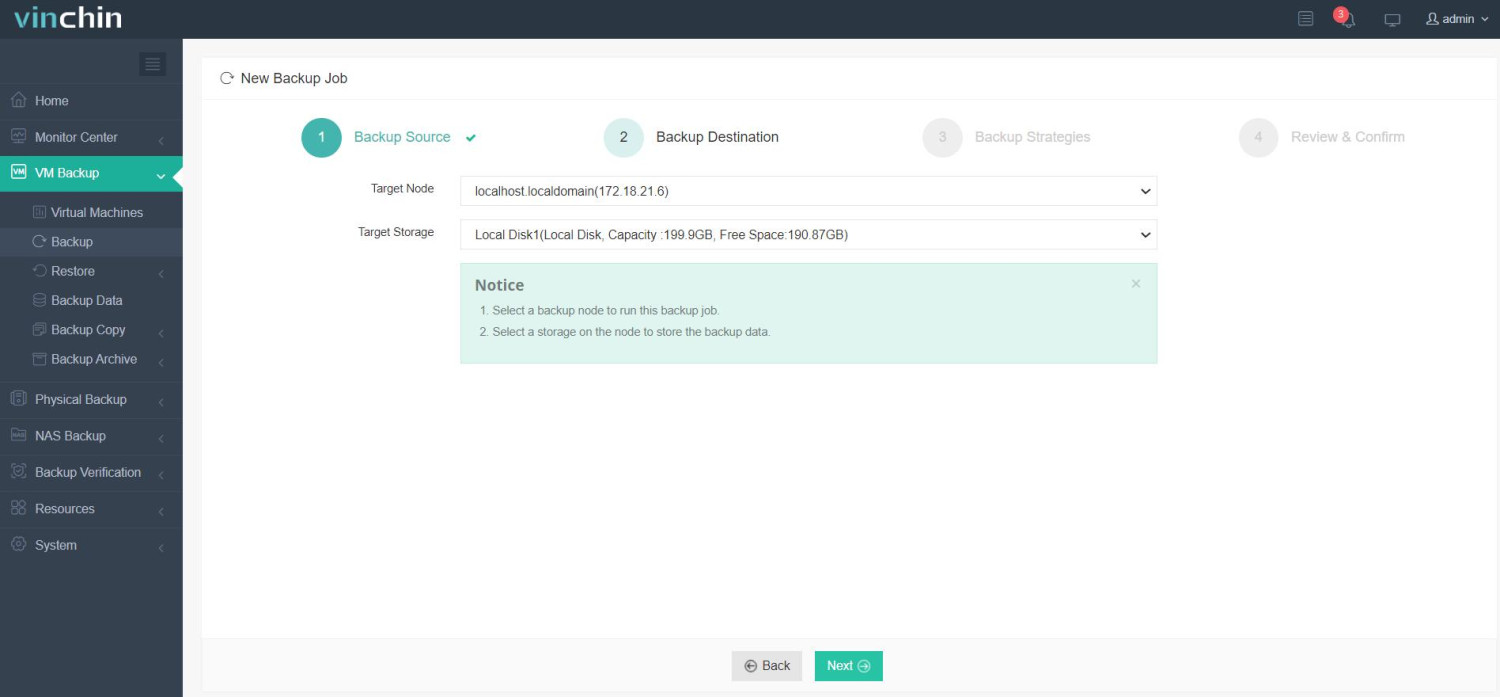
2. Choose backup storage;

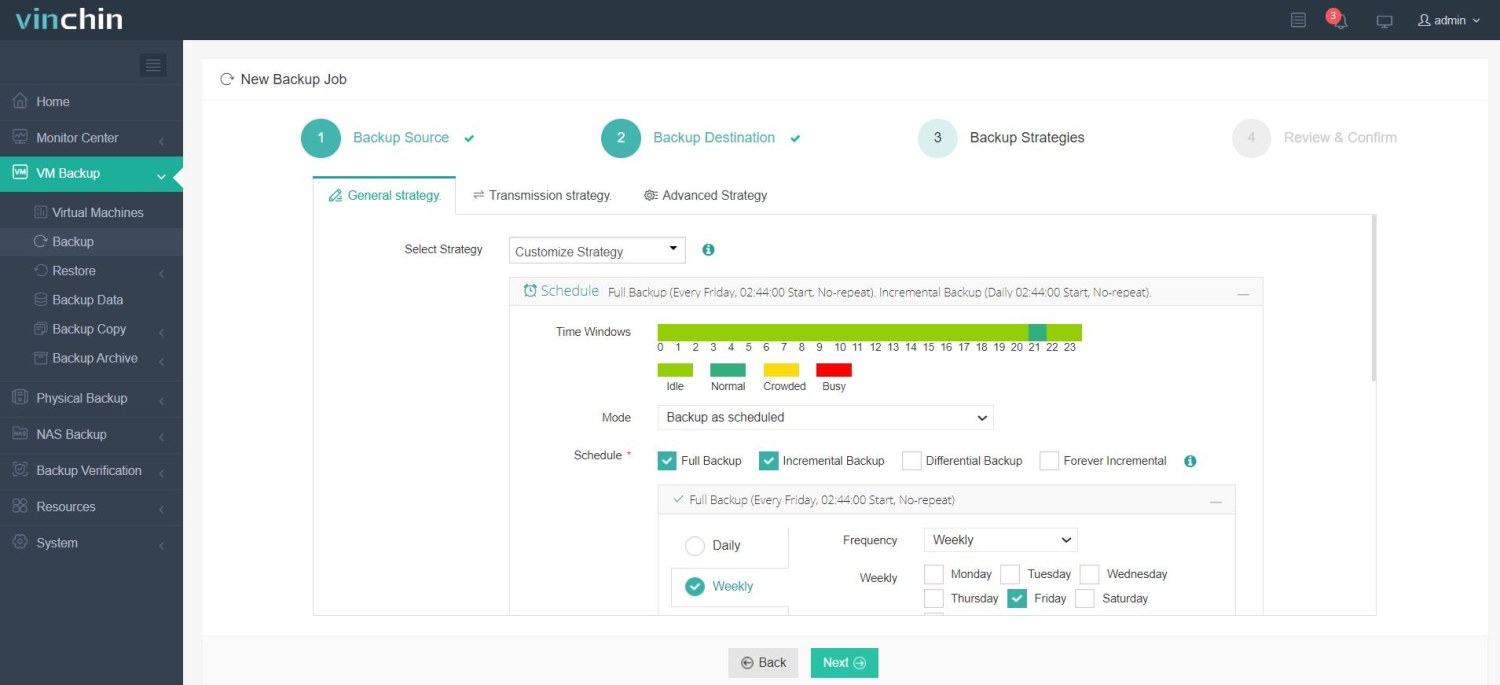
3. Configure backup strategies;

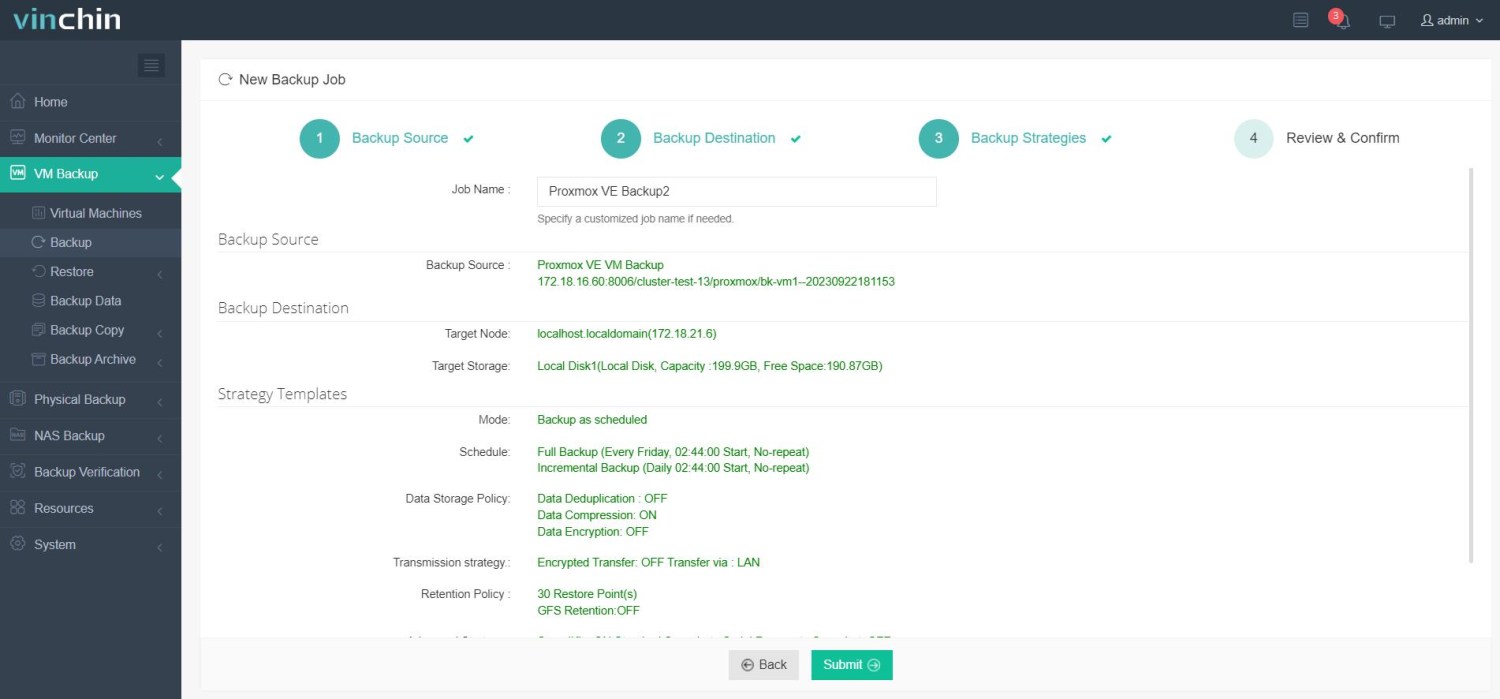
4. Submit the job.

With a proven track record, trusted by thousands of organizations around the globe, Vinchin offers a comprehensive 60-day free trial. IT teams can fully explore its features and assess its value, all without any commitment or risk.
Issues When Adding Hard Disks To Windows Virtual Machines In Proxmox VE FAQs
Q1: How do I safely automate adding large numbers of data disks across many VMs?
A1: Use scripted CLI commands such as "qm set" combined with cloud-init/Powershell routines inside each guest; test thoroughly before bulk deployment.
Q2: What should I check if my thin-provisioned pool suddenly reports full despite low usage shown inside my VMs?
A2: Examine actual backend allocation ("zfs list", "lvs") since deleted files may linger until fully trimmed/discarded by supported guest drivers.
Conclusion
Adding hard disks to Windows VMs in Proxmox VE brings challenges—from detection quirks and driver headaches to tricky partition management and security concerns—but careful planning solves most problems fast! Always verify every step along the way—and remember Vinchin delivers robust backup protection so mistakes never become disasters.
Share on:


