-
What is Hyper-V USB Passthrough?
-
Why USB Passthrough Matters in Virtualization
-
Native USB Passthrough Limitations in Hyper-V
-
Method 1: Access USB Devices in Enhanced Session Mode
-
Method 2: Enable Hyper-V USB Passthrough via Remote Desktop Protocol
-
Method 3: Take the USB Device Offline and Add It to the Virtual Machine
-
Protect Your VMs with Vinchin Backup & Recovery
-
Hyper-V USB Passthrough FAQs
-
Conclusion
Microsoft Hyper-V is a widely adopted hypervisor that provides a robust platform for virtualization in both enterprise and development environments. One common requirement in virtualized systems is the ability to pass physical USB devices from the host to a virtual machine, a feature commonly known as USB passthrough. While Hyper-V does not support USB passthrough natively as directly and flexibly as some other hypervisors like VMware or VirtualBox, there are several methods available to achieve similar functionality. This article explores the available approaches to USB passthrough in Hyper-V.
What is Hyper-V USB Passthrough?
Hyper-V is a popular type of hypervisor. If you want to transfer a large amount of data to a Hyper-V virtual machine via a USB device, then Hyper-V USB passthrough is exactly what you need.
Hyper-V USB passthrough is a technology that allows a USB device on a physical host to be directly connected to a virtual machine, enabling the VM to have exclusive access to the device as if the physical device were directly plugged into the VM.
Specifically, Hyper-V implements USB device passthrough through the following steps:
1. Device Identification and Assignment: First, Hyper-V identifies the USB devices connected to the host machine and allows the administrator to select which devices will be passed through to specific virtual machines.
2. Device Isolation: Once selected, Hyper-V removes these USB devices from the host's device tree and assigns them to the designated virtual machine. At this point, the host will no longer have direct access to the devices, and control will be handed over to the virtual machine.
3. Driver Loading and Communication: When the virtual machine starts, it loads the appropriate USB device drivers and communicates directly with the device as if it were physically connected to the VM. Throughout this process, Hyper-V ensures efficient and secure communication with the device.
However, Hyper-V does not natively support traditional USB passthrough (such as VMware's direct connection method), and similar functionality must be achieved through alternative methods.
Why USB Passthrough Matters in Virtualization
USB passthrough allows virtual machines to access physical USB devices connected to the host system. This is essential in scenarios such as:
Using USB dongles for software licensing
Connecting to USB storage devices for backup or data transfer
Interfacing with USB hardware such as printers, scanners, or specialized industrial equipment
Development and testing of USB peripherals
In environments using Hyper-V, the lack of native support requires alternative configurations to meet these needs.
Native USB Passthrough Limitations in Hyper-V
Hyper-V does not provide direct USB passthrough in the same way VMware or VirtualBox do. Specifically:
There is no option in Hyper-V Manager to simply "attach USB device" to a VM.
Hyper-V is designed to be more isolated for performance and security reasons, limiting direct hardware access.
However, there are workarounds that can be used to achieve USB passthrough functionality.
Method 1: Access USB Devices in Enhanced Session Mode
Accessing USB devices in Enhanced Session Mode is a feasible way to enable Hyper-V USB passthrough. If your Hyper-V host is running on Windows 8.1 or Windows 10, you can skip this step, as Enhanced Session Mode is enabled by default.
Step 1: Open Hyper-V Manager, right-click the host name in the main interface, and select “Hyper-V Settings.”
Step 2: In the server list on the left, select “Enhanced Session Mode Policy,” and check “Allow enhanced session mode.”
Step 3: In the user list on the left, select “Enhanced Session Mode,” check the “Use enhanced session mode” option on the right, then click “Apply” > “OK.”
Step 4: After enabling Enhanced Session Mode, power on the virtual machine. In the pop-up virtual machine connection configuration window, click the “Show Options” button, then go to the “Local Resources” tab and click “More” to select the USB device you want to connect. Finally, click “Connect” to establish the Hyper-V USB connection and easily transfer files.
Method 2: Enable Hyper-V USB Passthrough via Remote Desktop Protocol
Step 1: Right-click “This PC,” select “Properties” > “Advanced system settings.”
Step 2: In the pop-up window, go to the “Remote” tab, check both “Allow Remote Assistance connections to this computer” and “Allow remote connections to this computer,” then click “OK.”
Step 3: Press Win+R, enter mstsc, and press Enter to open Remote Desktop Connection, then click “Show Options.”
Step 4: Go to the “Local Resources” tab and click “More.”
Step 5: Expand the drives list and select the USB device you want to connect, then click “OK.”
Step 6: Return to the General tab, enter the IP address and username of the virtual machine, and then click “Connect.”
Method 3: Take the USB Device Offline and Add It to the Virtual Machine
You can also take the USB device offline and then add it to the Hyper-V virtual machine.
Step 1: Press Win+R, enter diskmgmt.msc, and press Enter to open the Disk Management tool.
Step 2: In Disk Management, locate your USB device, right-click it, and select “Offline.”
Step 3: Launch Hyper-V Manager, right-click the virtual machine that needs USB access from the main interface, and select “Settings.”
Step 4: In the pop-up window, navigate to “SCSI Controller,” then choose “Hard Drive” and click “Add.”
Note: You can only add the drive to an IDE controller when the VM is turned off, but you can add it to the SCSI controller whether the VM is on or off.
Step 5: Click “Physical Hard Disk,” select your connected USB device, and click “OK” to enable Hyper-V USB connection.
Note: To remove a Hyper-V USB drive, go to SCSI Controller > Hard Drive, select the connected USB drive, and click Delete.
Protect Your VMs with Vinchin Backup & Recovery
With the methods above, you’ve unlocked a straightforward path for moving large files, media, or specialized hardware streams into your VMs. But once that data is inside the virtual machine, you still need a rock-solid protection strategy to guard against accidental deletion, disk failure, or ransomware. That’s where Vinchin Backup & Recovery comes in.
Vinchin Backup & Recovery is an advanced data protection solution that supports a wide range of popular virtualization platforms, including VMware, Hyper-V, XenServer, Red Hat Virtualization, Oracle, Proxmox, etc., and database, NAS, file server, Linux & Windows Server. It provides advanced features like agentless backup, forever incremental backup, V2V migration, instant restore, granular restore, backup encryption, compression, deduplication, and ransomware protection. These are critical factors in ensuring data security and optimizing storage resource utilization.
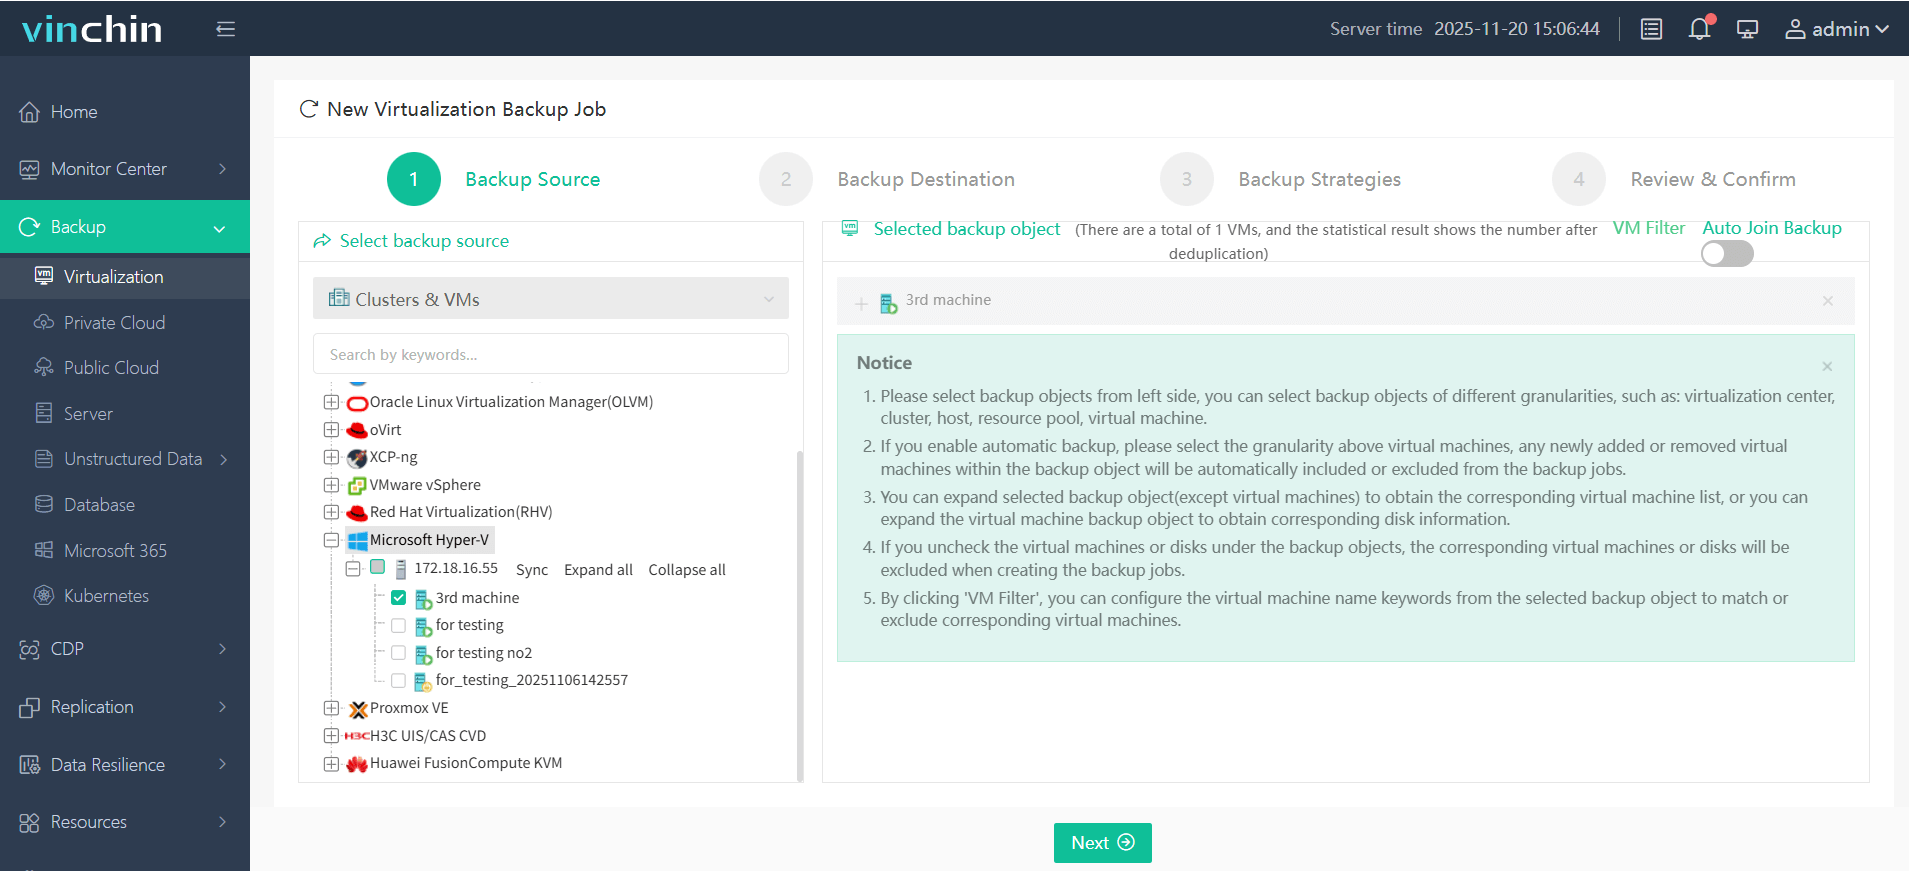
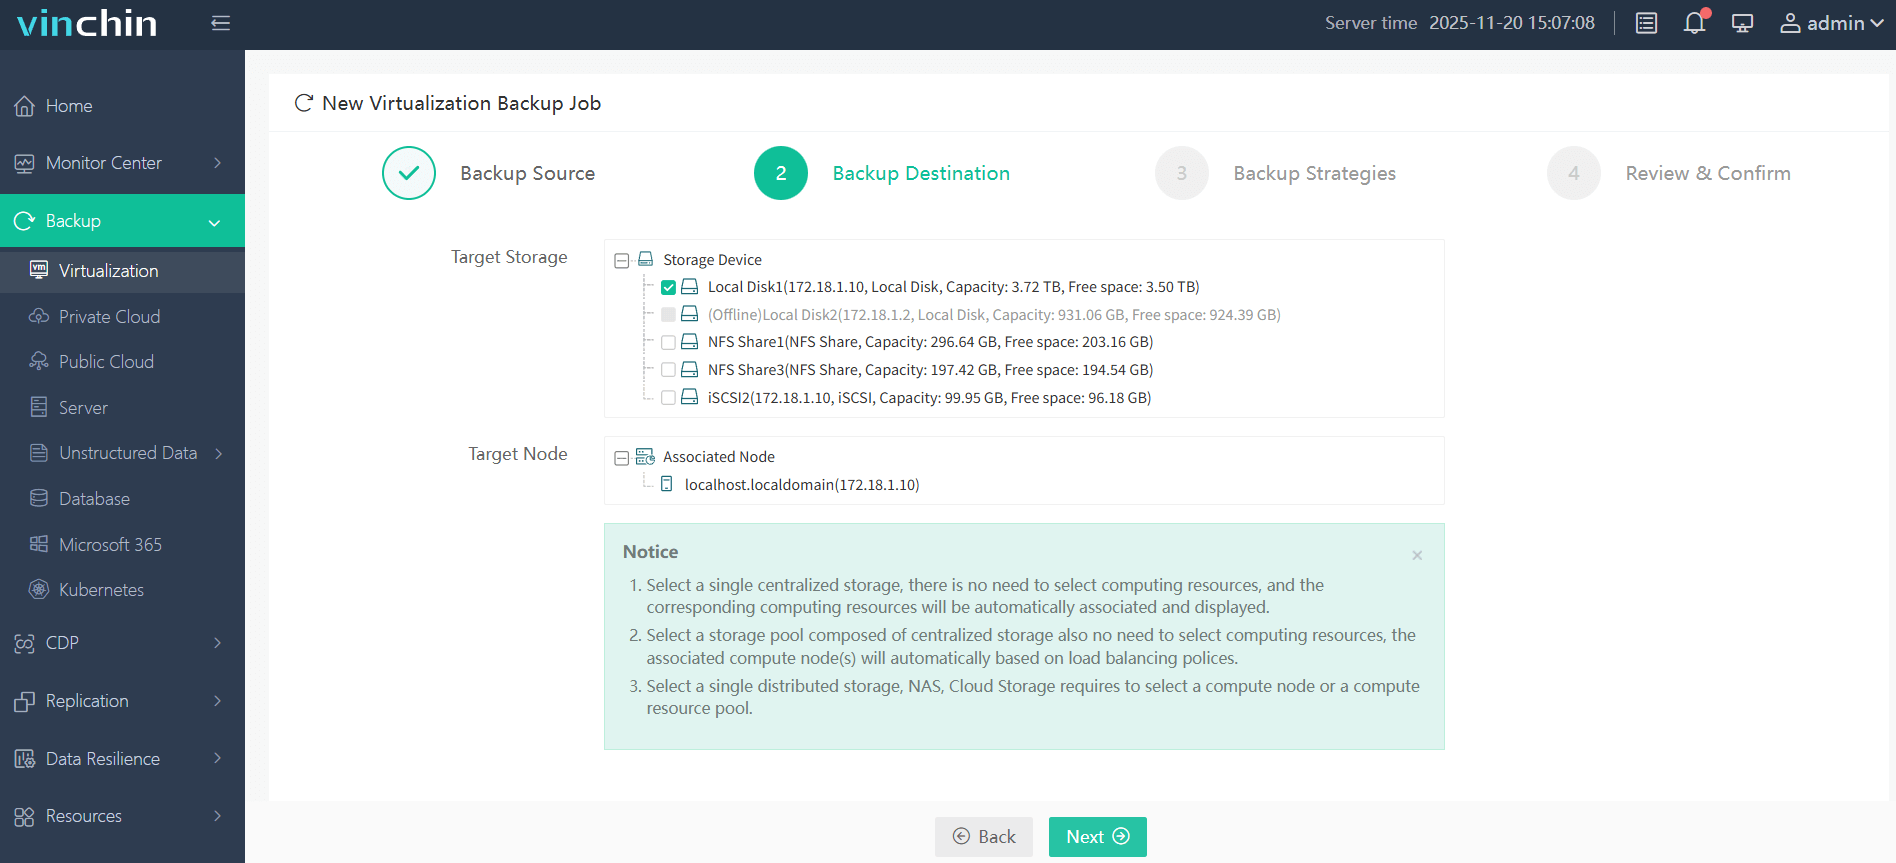
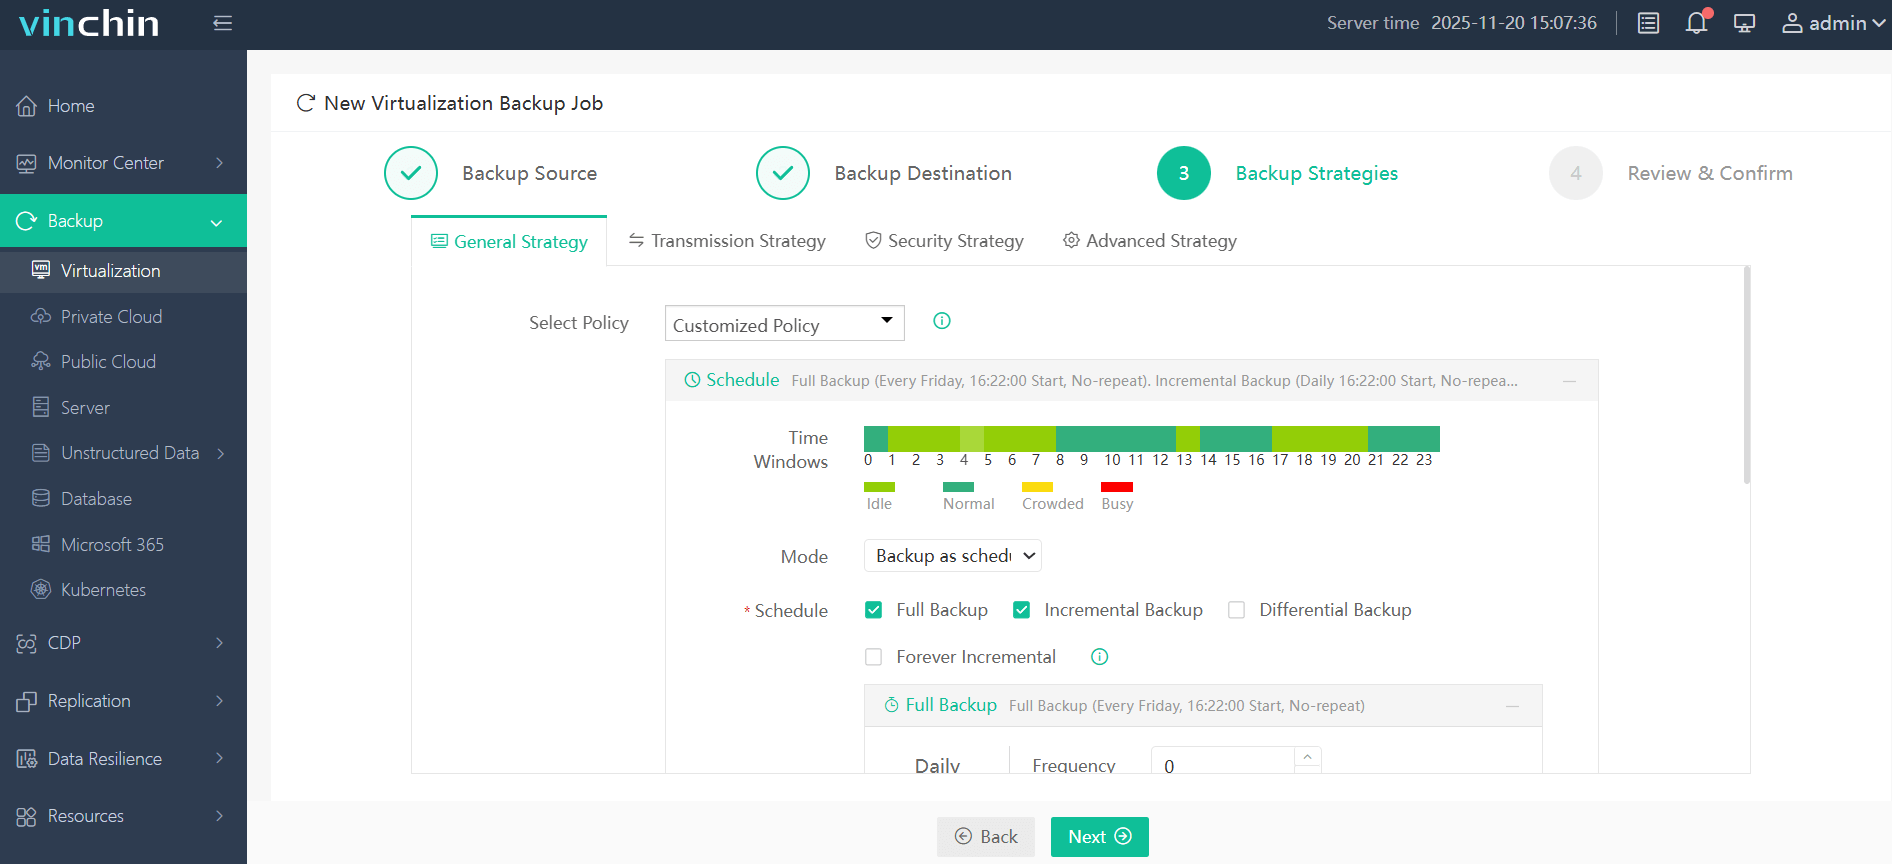
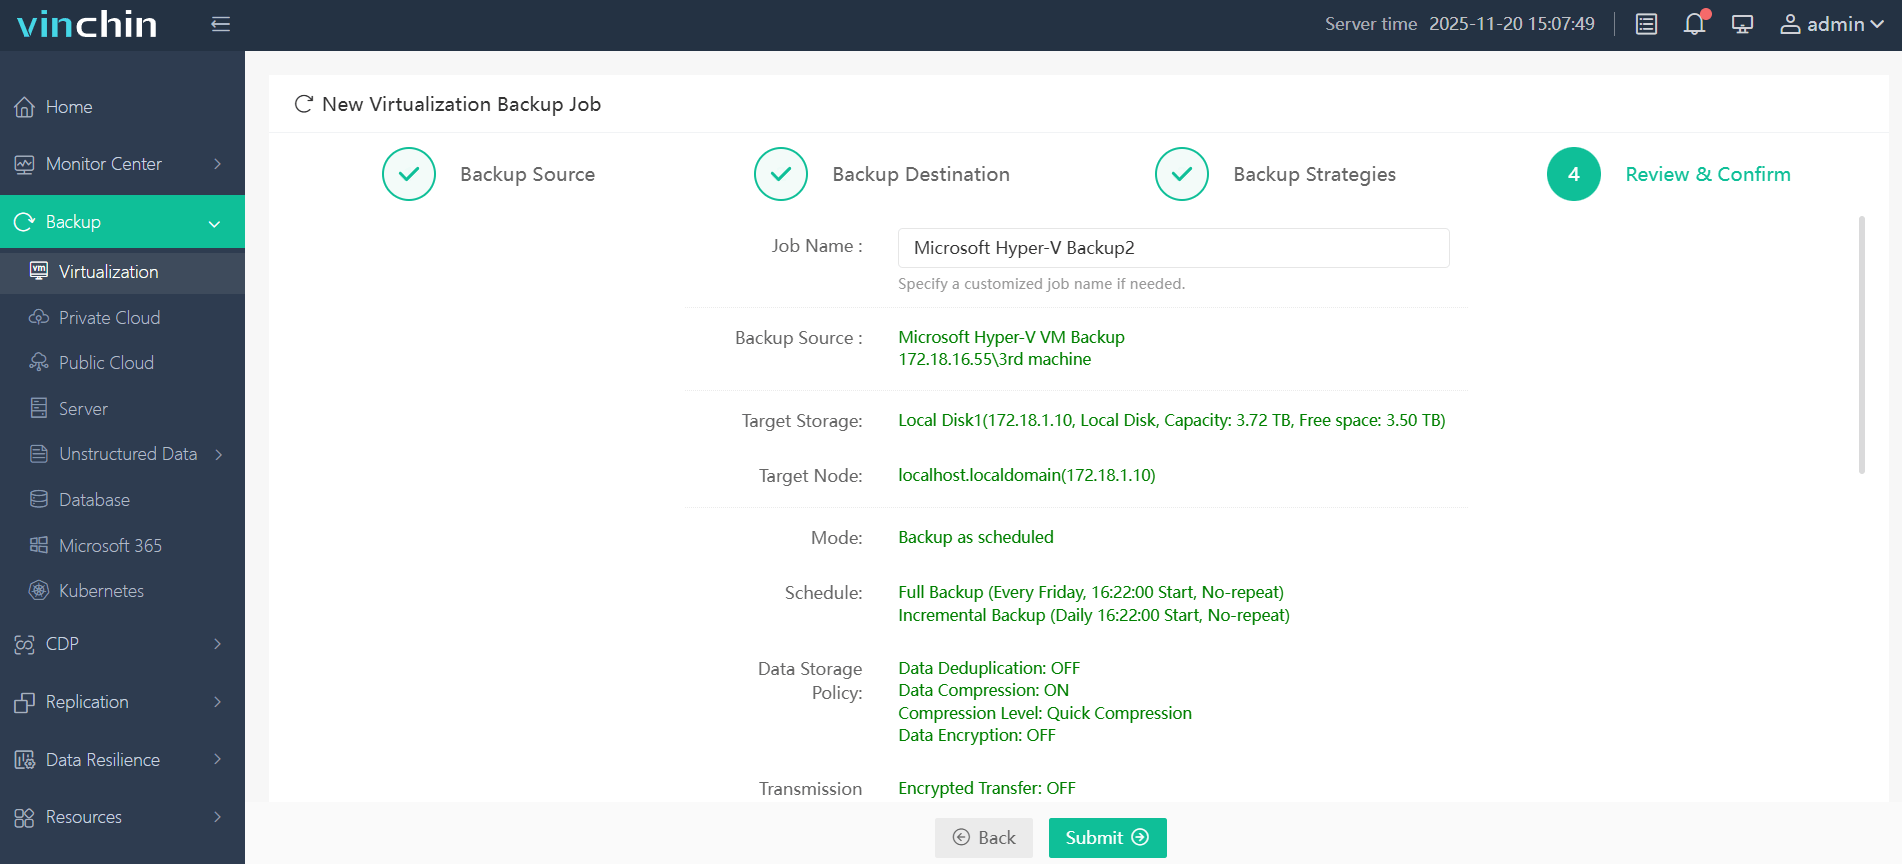
It only takes 4 steps to backup your Hyper-V VMs with Vinchin Backup & Recovery:
1.Select the backup object.

2.Select backup destination.

3.Configure backup strategies.

4.Review and submit the job.

Discover the power of this comprehensive system firsthand with a free 60-day trial! Leave your specific needs, and you will get a customized solution that fits your IT environment perfectly.
Hyper-V USB Passthrough FAQs
1. What is Enhanced Session Mode, and how does it help?
Enhanced Session Mode allows USB redirection from a client (usually when connecting via Hyper-V Manager or Remote Desktop). It's limited to Windows guests and specific USB device classes.
2. Can I pass through a USB dongle (e.g., license key) to a VM?
Yes, but not directly. You must use USB over IP software or hardware-based USB device servers.
Conclusion
While Hyper-V may not offer native, one-click USB passthrough like some other virtualization platforms, the methods outlined above provide reliable and secure ways to bridge physical USB devices into your VMs. By understanding these workarounds and selecting the approach that best fits your environment—whether you prioritize simplicity, performance, or isolation—you can extend Hyper-V’s capabilities to meet virtually any USB-device integration need.
Share on:


