-
What Is PowerCLI?
-
How to Download PowerCLI?
-
How to Install PowerCLI Module on Windows?
-
How to Install VMware PowerCLI on Linux?
-
PowerCLI Commands to Manage vSphere
-
How to backup virtual machines with Vinchin?
-
FAQ
-
Conclusion
PowerCLI is one of the most effective and consistent tools to manage VMware vSphere and vCloud, through which you can control all aspects of VMware vSphere, including VM provisioning, storage, modifications, and more. Here in this blog, we'll learn what is it, how to download and install the tool, and some basic management PowerCLI commands.
What Is PowerCLI?
PowerCLI is a collection of PowerShell modules from VMware that manages its infrastructure from the command prompt. The PowerCLI installation comes with PowerShell commands that are particular to VMware allowing users to interact with VMware environments. You can use the tool to manage settings, create new objects, and automate tasks for ESXi, vSphere, vCenter, etc.
PowerCLI 5.1 and earlier versions are PSSnapin, which has cumbersome installation steps and limited access to the public, but since PowerCLI 6.0, a PowerShell module replaces Snapin. VMware is creating a PowerCLI version for PowerShell core (7.0+) solely for now, which could be used in Windows, Linux, and macOS.
How to Download PowerCLI?
Prerequisites:
The latest PowerCLI 13.0.0 is compatible with the following:
| OS Type | .NET Version | PowerShell Version |
|---|---|---|
| Windows | .NET Framework 4.7.2 or later | PowerShell 5.1 |
| .NET Core 3.1 | PowerShell 7.x | |
| Linux | .NET Core 3.1 | PowerShell 7.x |
| macOS | .NET Core 3.1 | PowerShell 7.x |
Download a PowerCLI via the web:
1. The PowerShell Galalry link using the package manager of PowerShell.
2. Zip the archive of the module from the VMware website.
How to Install PowerCLI Module on Windows?
Install the PowerCLI module from PowerShell Gallery online
Make sure you have the NuGet package manager in place.
1. Find the module.
Find-Module -Name VMware.PowerCLI
2.1 Install modules for all users (install the latest version by default).
Install-Module -Name VMware.PowerCLI
2.2 Install for the current user without admin privileges.
Install-Module -Name VMware.PowerCLI -Scope CurrentUser
2.3 Check the version after installation.
Get-PowerCLIVersion
3.1 Whether to participate in VMware Customer Experience Improvement Program.
No:
Set-PowerCLIConfiguration -Scope User -ParticipateInCEIP $false
Yes:
Set-PowerCLIConfiguration -Scope User -ParticipateInCEIP $true
3.2 List all cmdlets.
Get-Command -Module *VMWare*
Or
Get-Module -ListAvailable VMware* | Select Name,version
4. Update the PowerCLI module.
Update-Module -Name VMware.PowerCLI
5. Install a specific version.
5.1 Find available versions.
Find-Module -Name VMware.PowerCLI -AllVersions|select version
5.2 Input the needed version number.
Install-Module -Name VMware.PowerCLI -RequiredVersion 12.7.0.20091289
Copy files to install the PowerCLI module offline
1. Find the module in PowerShell Gallery.
Find-Module -Name VMware.PowerCLI
2. Download and keep the module files to a directory.
Save-Module -Name VMware.PowerCLI -Path <path>
3. Copy the downloaded files to a machine disconnected to the internet from C:TempModules directory. Put the files to C:WindowsSystem32WindowsPowerShellv13.0Modules.
4. Unblock the downloaded files.
cd "C:Program FilesWindowsPowerShellv13.0Modules"
Get-ChildItem * -Recurse | Unblock-File
Use a ZIP archive to install the PowerCLI module offline
1. Copy the downloaded ZIP archive to a device not using the internet.
2. Extract the files to the Windows directory that contains the modules.
C:WindowsSystem32WindowsPowerShellv13.0Modules
How to Install VMware PowerCLI on Linux?
1. Run sudo -i command to get privileges.
2. Update the package repository and packages installed on the Linux system.
apt-get update
3. Install curl (client URL) to move data to and from a server.
apt-get install curl
4. Add the Microsoft repository with PowerShell included.
curl https://packages.microsoft.com/keys/microsoft.asc | sudo apt-key add -
curl -o /etc/apt/sources.list.d/microsoft.list
https://packages.microsoft.com/config/ubuntu/20.04/prod.list
5. Update the repository.
apt-get update
6. Install PowerShell in Linux.
apt-get install powershell
7. Open a PowerShell session in Linux with pwsh command.
8. Install PoweCLI and then press y or a to continue.
Install-Module -Name VMware.PowerCLI
9. Check the PowerCLI version installed.
Get-Module VMware.PowerCLI -ListAvailable
10. Run the exit command to exit from PowerShell.
PowerCLI Commands to Manage vSphere
1. Check the connection to the server and verify if a certificate error exists.
Connect-VIServer
2. Solve a certificate error problem.
Set-PowerCLIConfiguration -InvalidCertificateAction Ignore
3. Connect to vCenter or ESXi server.
Connect-VIServer hostname/IPaddress
4. Ignore the self-signed SSL certificate block.
Set-PowerCLIConfiguration -Scope AllUsers -InvalidCertificateAction Warn
5. List VMs of the connected server.
Get-VM
6. Create, start, and turn off a VM.
New-VM –Name MunVMname -VMHost mun-VM1 –ResourcePool Production –DiskGB 20 –DiskStorageFormat Thin –Datastore MUN_MSA2000_Prod1
Start-VM -VM MUNVMname
Shutdown-VMGuest -VM MunVMname -Confirm:$False
7. Move a running VM to another host with VMotion.
Get-VMHost VM1|Get-Vm| Move-VM –Destination (Get-VMHost VM2)
8. Copy a file to all VMs.
Get-VM | Copy-VMGusetFile -Source path -Destination C:PS - LocalToGuest -GuestUser administrator -GuestPassword password
How to backup virtual machines with Vinchin?
Whatever tool you choose to use to administer your VMware vSphere environment, be sure to backup your virtual machines (VMs) and be ready in case data loss occurs. Consider Vinchin Backup & Recovery to fully protect your vCenter, vSphere, and ESX/ESXi hosts in advance.
Easy VM backup: make frequent VM backups automatically under schedules and mail notifications.
Fast VMware backup: accelerate backup with CBT-enabled incremental backup and HOTADD transmission while reducing 50% of data sizes with data reduction technologies.
Cross-platform migration: convert VMware to other 10+ hosts and vice versa without extra tools in 4 steps.
Instant recovery: guarantee business continuity by retrieving crashed VM in 15s from backups or an offsite backup copy saved in another data center.
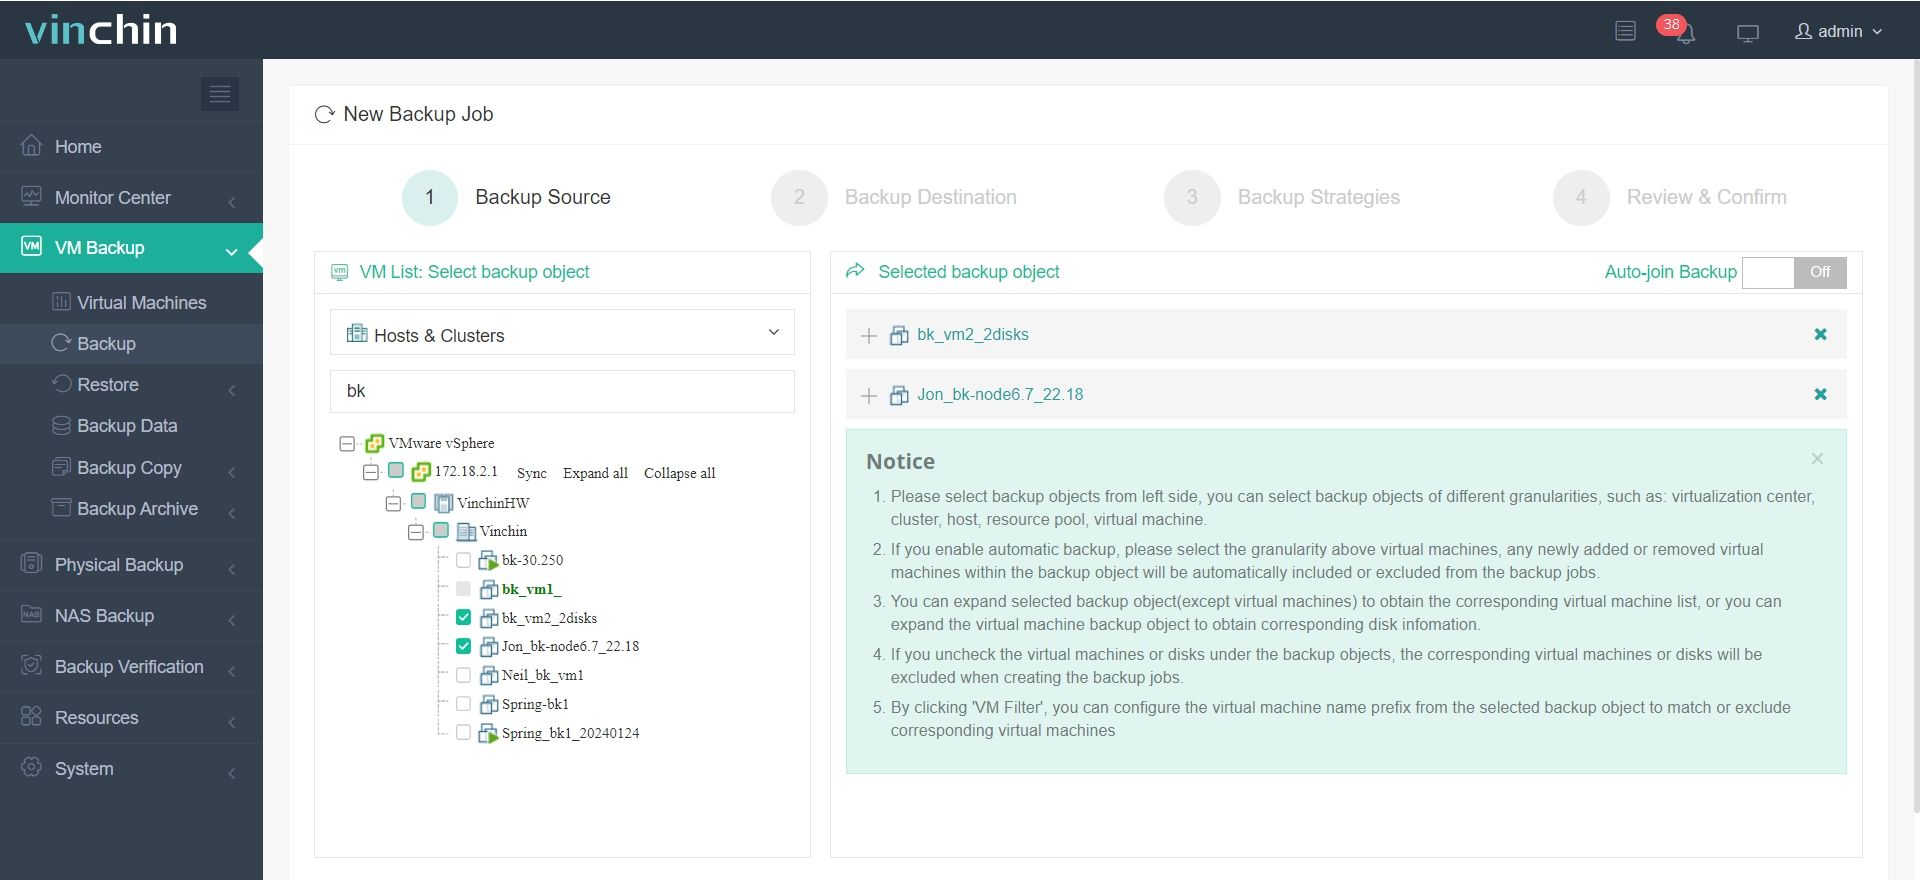
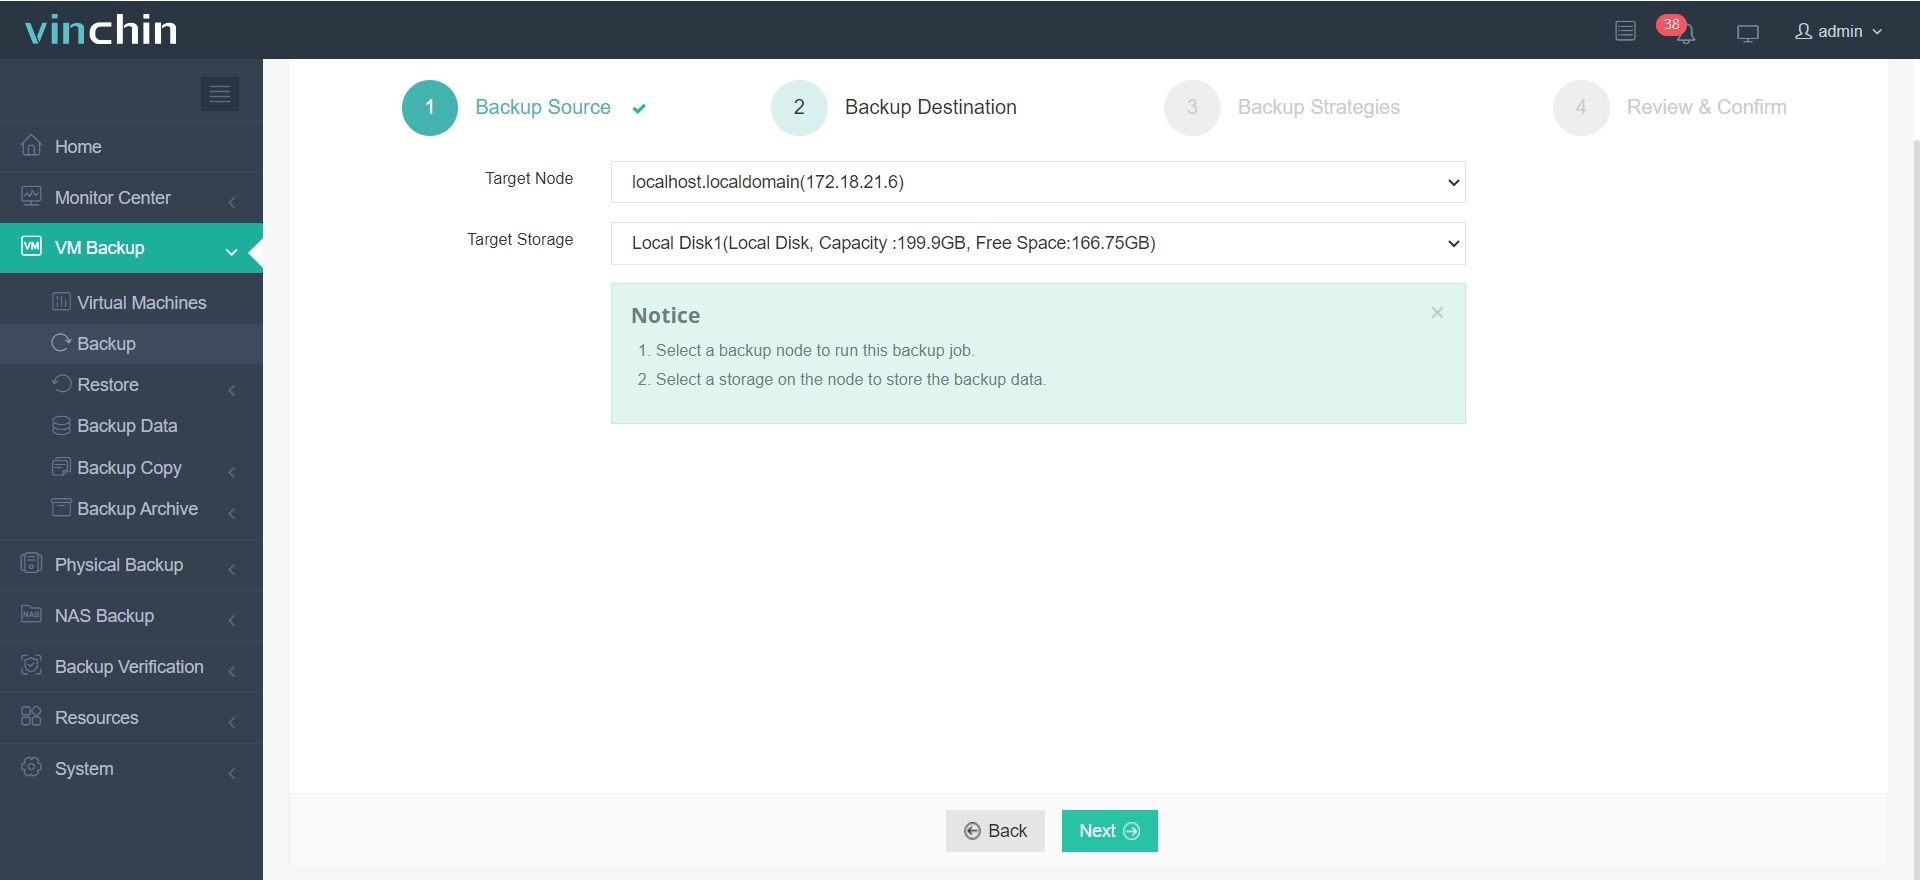
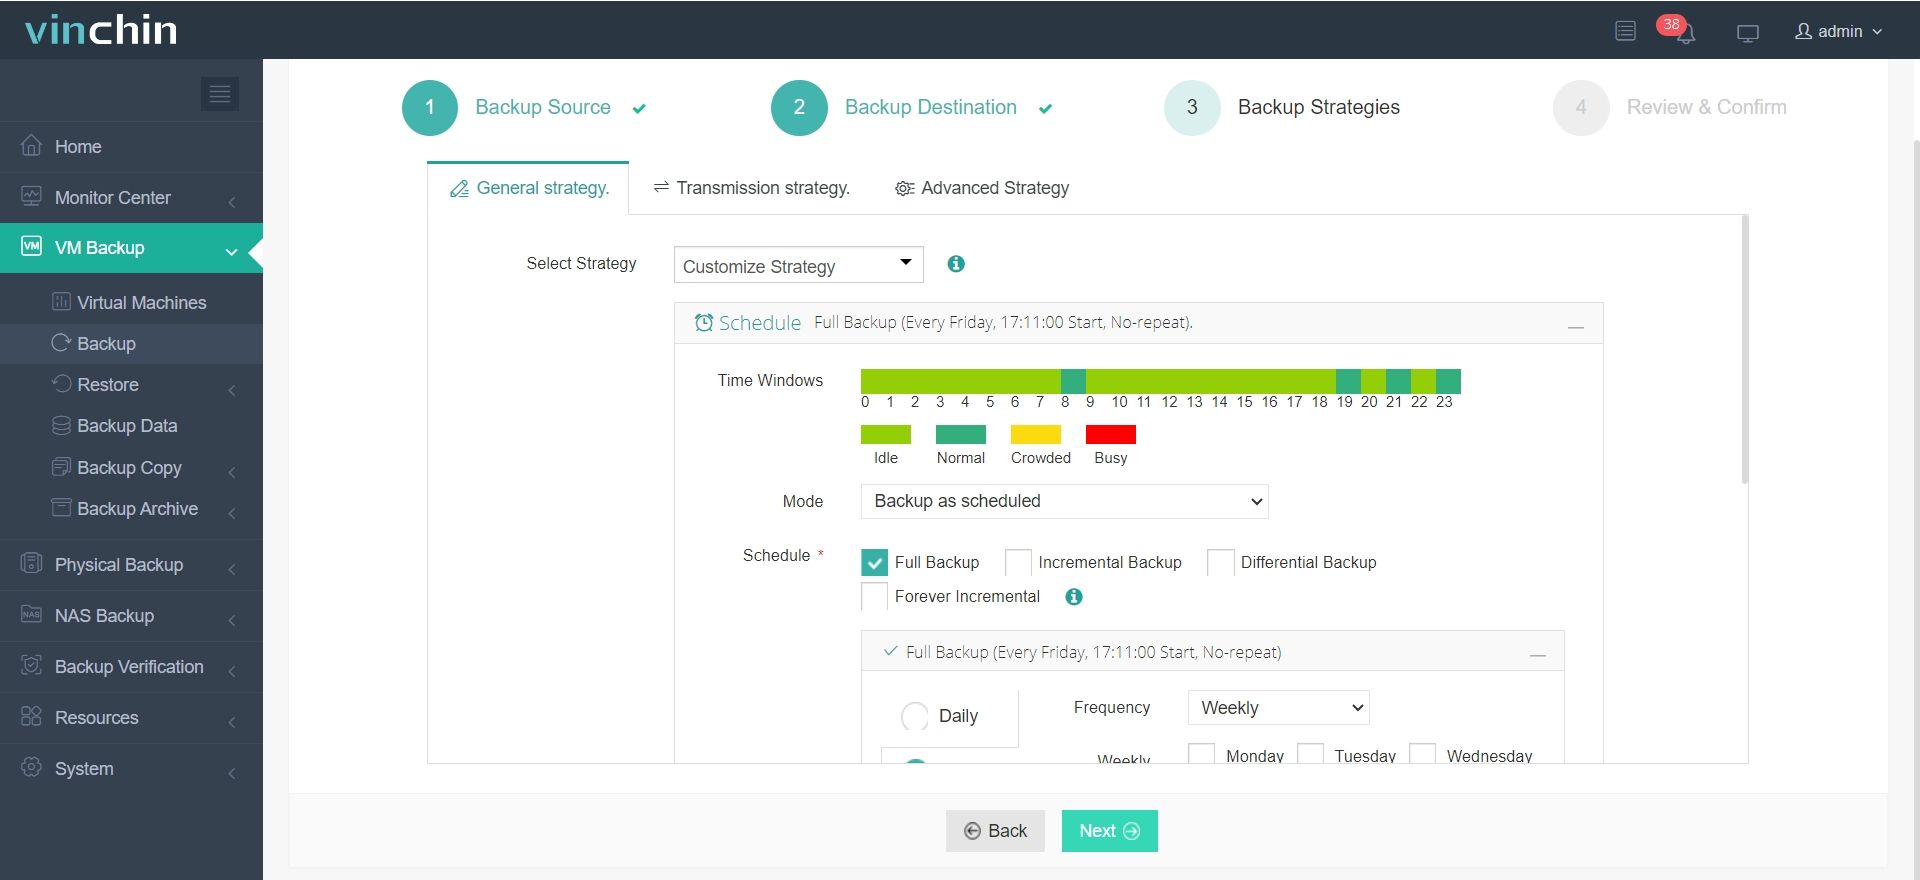
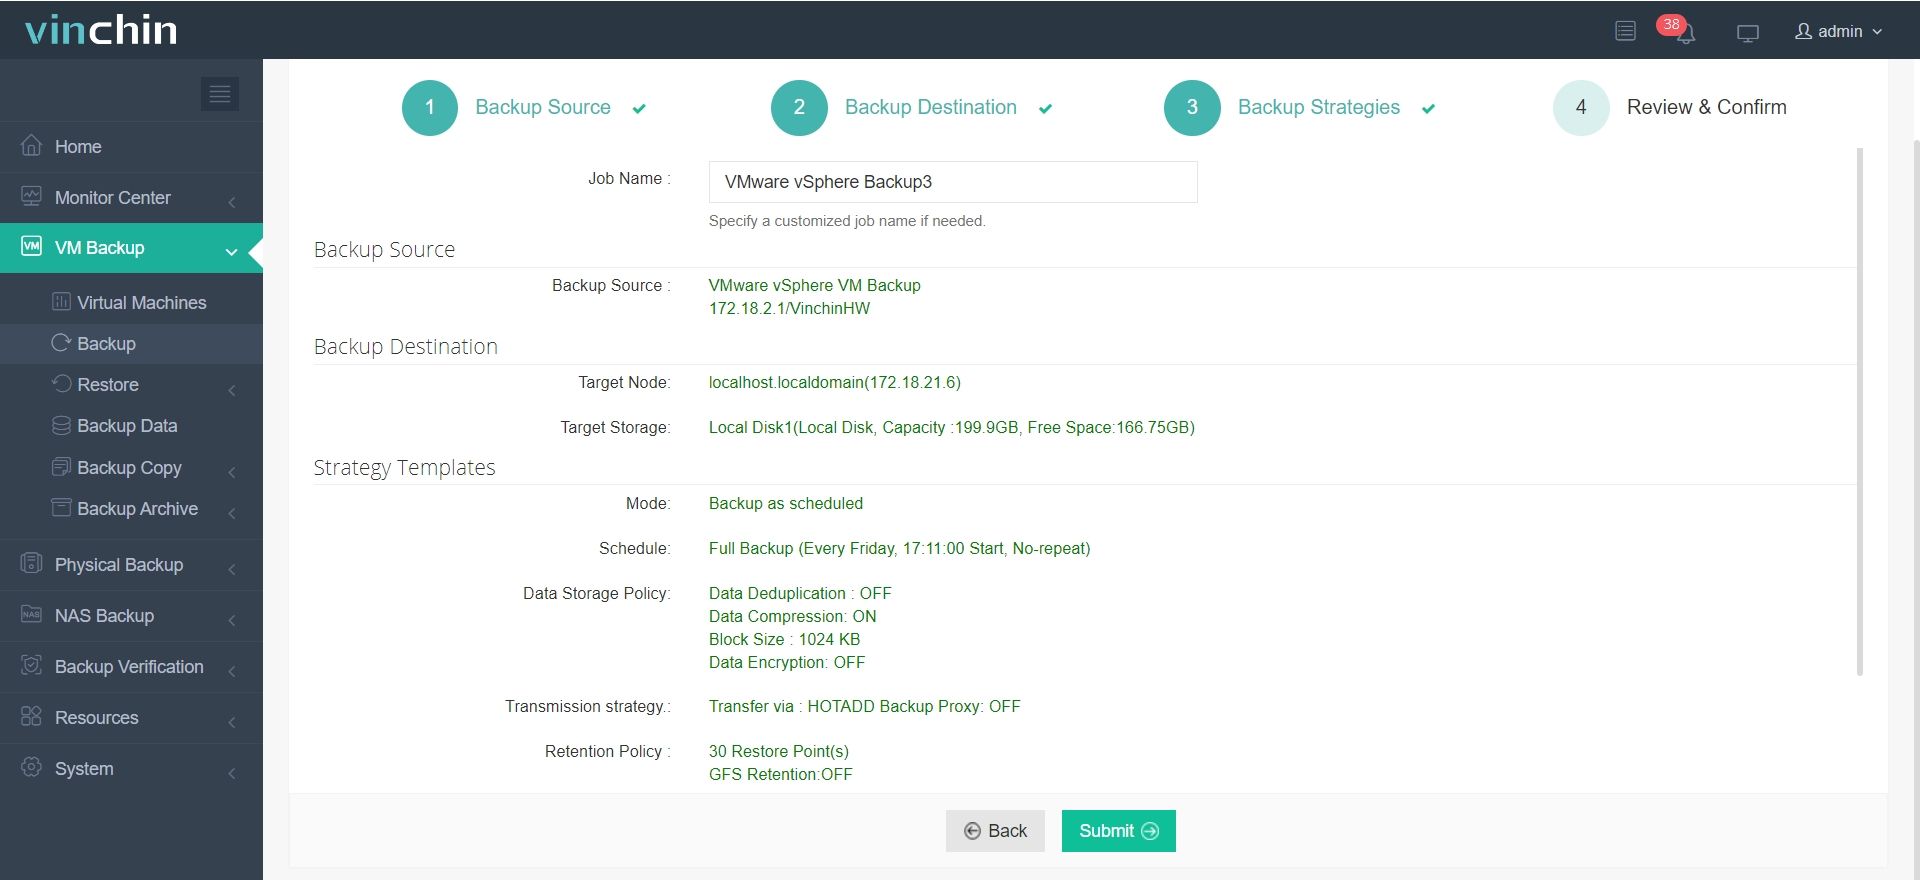
It is easy to create a backup in 4 steps:
1. Select the VMware VMs
2. Select the backup storage

3. Select the backup strategies

4. Submit the job

Vinchin Backup & Recovery also secures your backups in the Vinchin server with multiple technologies, such as backup storage protection protecting from malware and data encryption with AES-256 standard. You can get a 60-day free trial below to test all the features interested in.
FAQ
Q1. How do I install PowerCLI without admin rights?
Use Find-Module -Name VMware.PowerCLI > Install-Module -Name VMware.PowerCLI -Scope CurrentUser > verify with Get-PowerCLIVersion
Q2. How do I install PowerCLI offline?
Use Save-Module -Name VMware.PowerCLI -Path <path> > copy to C:\Program Files\WindowsPowerShell\v1\Modules > Get-ChildItem * -Recurse | Unblock-File
Q3. How do I list all PowerCLI cmdlets?
Run the command below:
Get-Command -Module VMware.PowerCLI
Conclusion
Various online or offline methods are used to install PowerCLI as PowerShell modules on both Windows and Linux. The PowerCLI could manage WMware environments via cmdlets. Either way, back up your critical data beforehand to prevent data corruption or loss. Use Vinchin Backup & Recovery for full protection of VMware VMs.
Share on:


