-
What Are oVirt Screenshots?
-
How to Capture oVirt VM Screenshots in 3 Ways?
-
Troubleshooting Common Issues with oVirt Screenshot Capture
-
Protect Your VMs with Vinchin Backup & Recovery
-
oVirt Screenshots FAQs
-
Conclusion
Capturing the state of a virtual machine (VM) is a common task for system administrators. Whether you need to document an error message or maintain visual records for compliance, screenshots are a useful tool. In oVirt, taking VM screenshots differs from traditional desktop systems, requiring the use of backend services and APIs. This guide will explain what oVirt screenshots are, how they work, and provide step-by-step methods for capturing them, regardless of your experience level. We'll also cover advanced tips, including multi-monitor support, and troubleshoot common issues. Finally, we'll introduce how Vinchin Backup can safeguard your VMs, addressing common real-world questions.
What Are oVirt Screenshots?
oVirt screenshots allow you to capture exactly what appears on a running VM's display at any given moment. This feature helps with debugging issues when console access isn't possible or when you need visual documentation for audits or reports. Unlike desktop operating systems that offer a simple screenshot button or shortcut key combination, oVirt handles this process using backend services and APIs.
When you request a screenshot in oVirt—whether through automation or manually—the system uses its VDSM service to call Libvirt's screenshot API. Libvirt then instructs QEMU (the underlying hypervisor) to grab the screen image from the VM's framebuffer. The result is returned as a PPM (Portable Pixmap) file encoded in base64 format via the REST API response. You can decode this string into an image file for viewing or further processing.
It's important to understand that this feature is designed mainly for quick diagnostics—not as a replacement for full monitoring tools or video recording solutions. Screenshot requests are synchronous; you receive your image as soon as the system completes processing your call.
How to Capture oVirt VM Screenshots in 3 Ways?
There are several ways operations administrators can capture screenshots from their oVirt-managed VMs—ranging from beginner-friendly manual steps to advanced automation scripts suitable for large-scale environments.
Before diving into each method in detail, let’s compare them side-by-side:
| Method | Complexity | Automation | Output Format | Best For |
|---|---|---|---|---|
| REST API | High | Yes | PPM (raw) | Scripting/CI pipelines |
Libvirt (virsh) | Medium | Yes | PPM | Host-level admin tasks |
| Console Viewer | Low | No | PNG/JPEG | Ad-hoc debugging |
Method 1: Using the oVirt REST API to Capture oVirt VM Screenshots
The most direct way—ideal for those comfortable with scripting—is through the REST API provided by oVirt Engine itself.
First off, why does this method matter? It lets you automate screenshot collection across many VMs without logging into each host individually—a big win if you're managing dozens or hundreds of machines!
Here's how it works:
1. Send a POST request like this:
   POST /vms/{vm:id}/screenshot
   Accept: application/xml
   Authorization: Bearer <your_token>
Replace {vm:id} with your actual VM ID number and supply valid authentication credentials using an access token generated by logging into your oVirt web portal.
2. The response contains XML data similar to:
<base64>iVBORw0K...</base64>
3. Decode this base64 string back into binary data using standard tools such as base64 -d on Linux/MacOS:
echo "iVBORw0K..." | base64 -d > screenshot.ppm
4. Convert .ppm files into more common formats like PNG using ImageMagick's convert utility:
convert screenshot.ppm screenshot.png
Method 2: Using Libvirt Directly to Capture oVirt VM Screenshots
If you have SSH access directly onto hosts running KVM/QEMU hypervisors managed by oVirt—or if you're troubleshooting outside normal management channels—you can use libvirt's native command-line tool virsh.
Why choose this route? Sometimes network issues prevent easy access via central APIs; other times granular control at host level is needed during deep-dive investigations.
Steps:
1. Identify which domain name corresponds with your target VM by running:
virsh list --all
Look up either its name or UUID value shown in output columns.
2. Run this command (note explicit flag):
virsh screenshot <domain> --file screenshot.ppm
Replace <domain> with either name or UUID found above; specify output filename as desired.
3. As before: convert .ppm files into PNG/JPEG images using ImageMagick if needed for easier sharing/viewing later on desktops/browsers.
Domain Identification Tip:
If unsure about exact domain names used internally versus friendly labels seen in web UI—always double-check using virsh list --all. This avoids confusion between similarly named machines across clusters!
Method 3: Capturing Screenshots from the oVirt VM Console
For most users who prefer point-and-click interfaces—or need only occasional manual captures—the easiest path involves opening remote graphical consoles provided by SPICE/VNC protocols within oVirt's web interface itself:
Here's how:
1. Log into your main dashboard online; click Compute then Virtual Machines.
2. Select desired machine; hit Console button which launches Remote Viewer applet (or another supported client).
3. Inside opened window look under File menu; select Screenshot option presented there.
4. Choose where you'd like saved copy stored locally—usually offered as PNG/JPEG depending upon viewer capabilities/platform defaults set up previously during installation/configuration phases!
This approach saves images instantly ready-to-use without extra conversion steps required after-the-fact—a great fit when documenting errors quickly during live support sessions!
Troubleshooting Common Issues with oVirt Screenshot Capture
Even with straightforward features, issues can arise. Here are some common problems and their solutions:
Screenshot Not Supported in UI?
oVirt doesn't have a dedicated "Take Screenshot" button in the main dashboard. All screenshots must be captured through the REST API or by accessing the console.
PPM File Won't Open?
Most image viewers don’t support the raw .ppm format. Always convert the .ppm file to a more common format (e.g., PNG) before opening or sharing it:
convert screenshot.ppm screenshot.png
Screenshot Is Blank or Corrupted?
This could indicate an issue with the guest OS graphics pipeline, possibly due to missing video drivers or headless mode being enabled.
Ensure that the QXL/video drivers are installed in the guest OS.
Check the display state using:
virsh domdisplay <domain>
This should return a valid graphics URI (e.g.,
spice://127...).
Permission Denied?
Ensure the correct roles and permissions are assigned. Refer to the RBAC settings to make sure users have the necessary rights to perform the screenshot action.
Network Issues Causing API Failures?
Sometimes, connectivity problems can interfere with API requests. Verify firewall, NAT, and routing settings between your client and server. If issues persist, try restarting relevant services to identify and resolve the problem.
Protect Your VMs with Vinchin Backup & Recovery
Beyond capturing screenshots in oVirt, safeguarding entire VMs requires robust backup strategies. Vinchin Backup & Recovery offers an enterprise-class solution designed for platforms like oVirt/RHV, VMware, Hyper-V, Proxmox VE, XCP-ng, XenServer, OpenStack, and more (15+ virtualization platforms supported).
Vinchin provides:
incremental backup to minimize storage and speed up backups after the initial full copy.
Advanced deduplication and compression to reduce backup size.
Seamless cross-platform V2V migration.
Flexible scheduling with GFS retention.
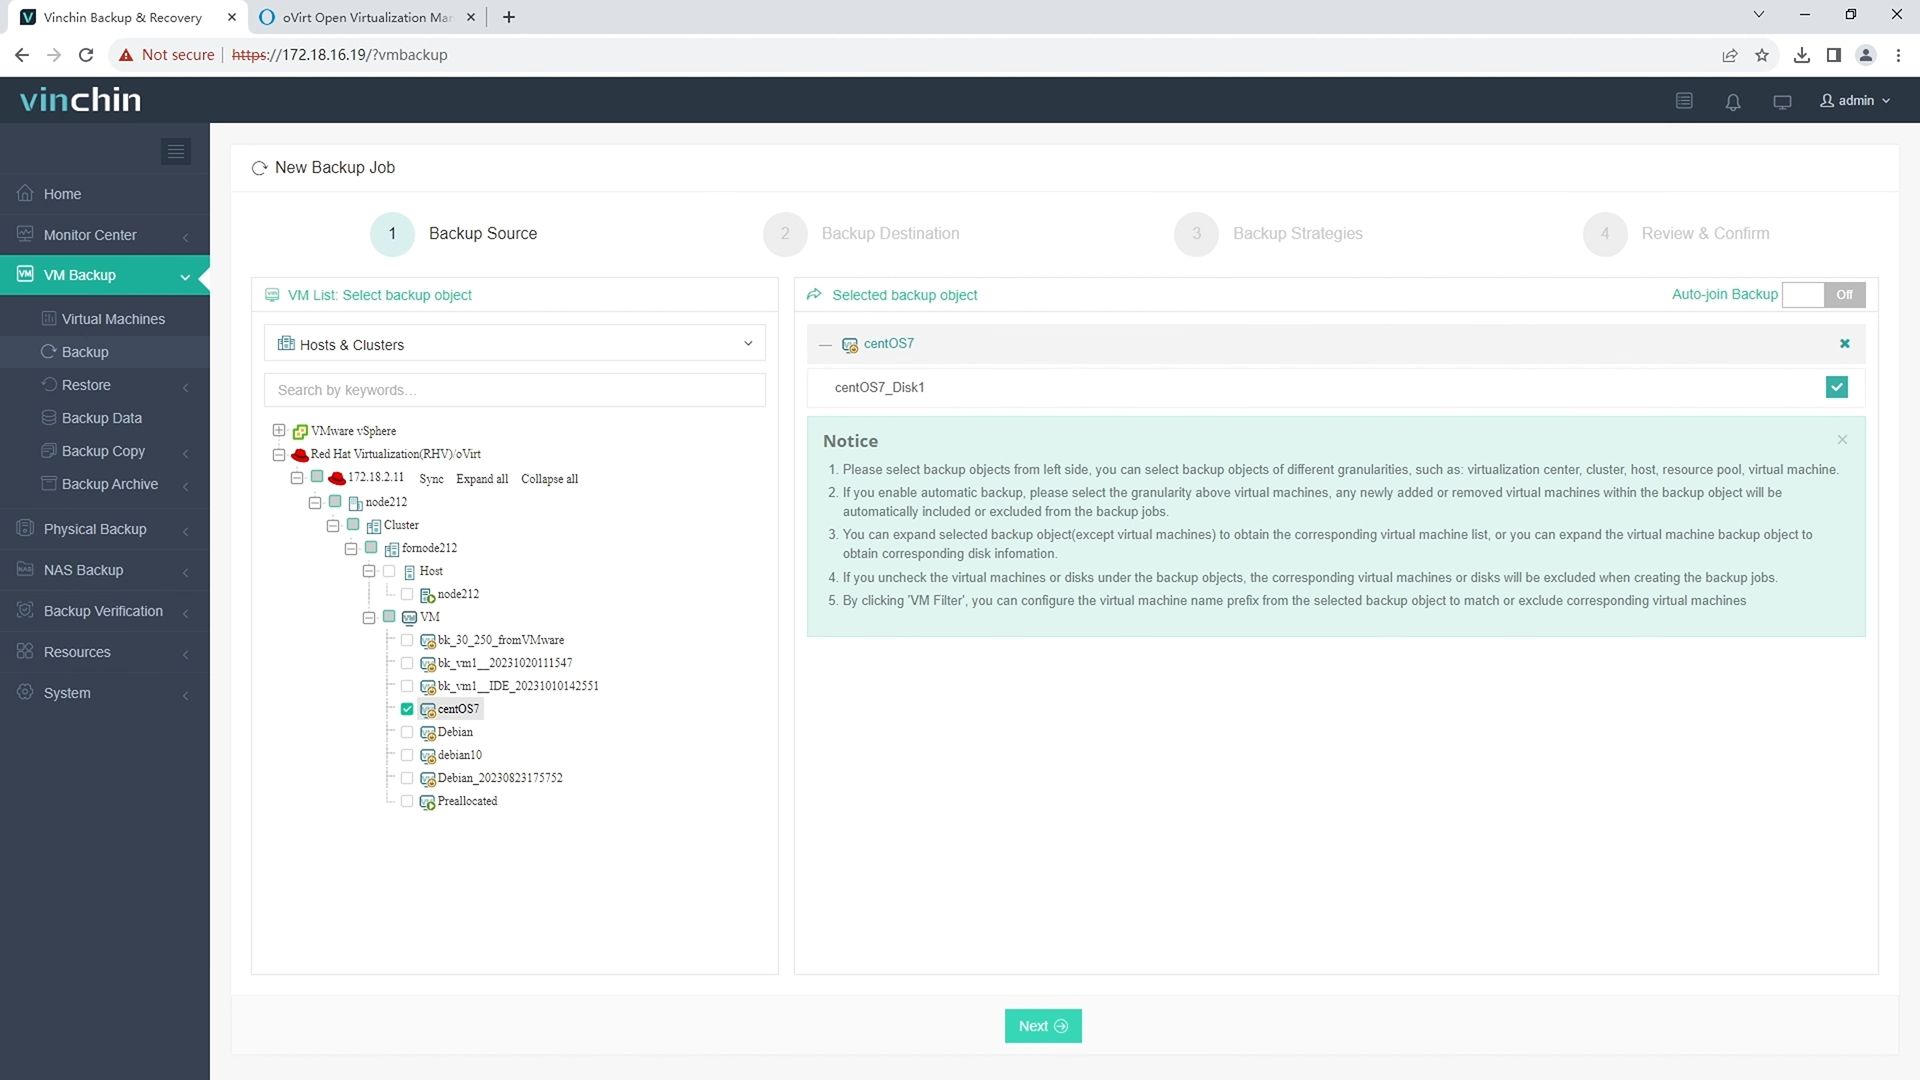
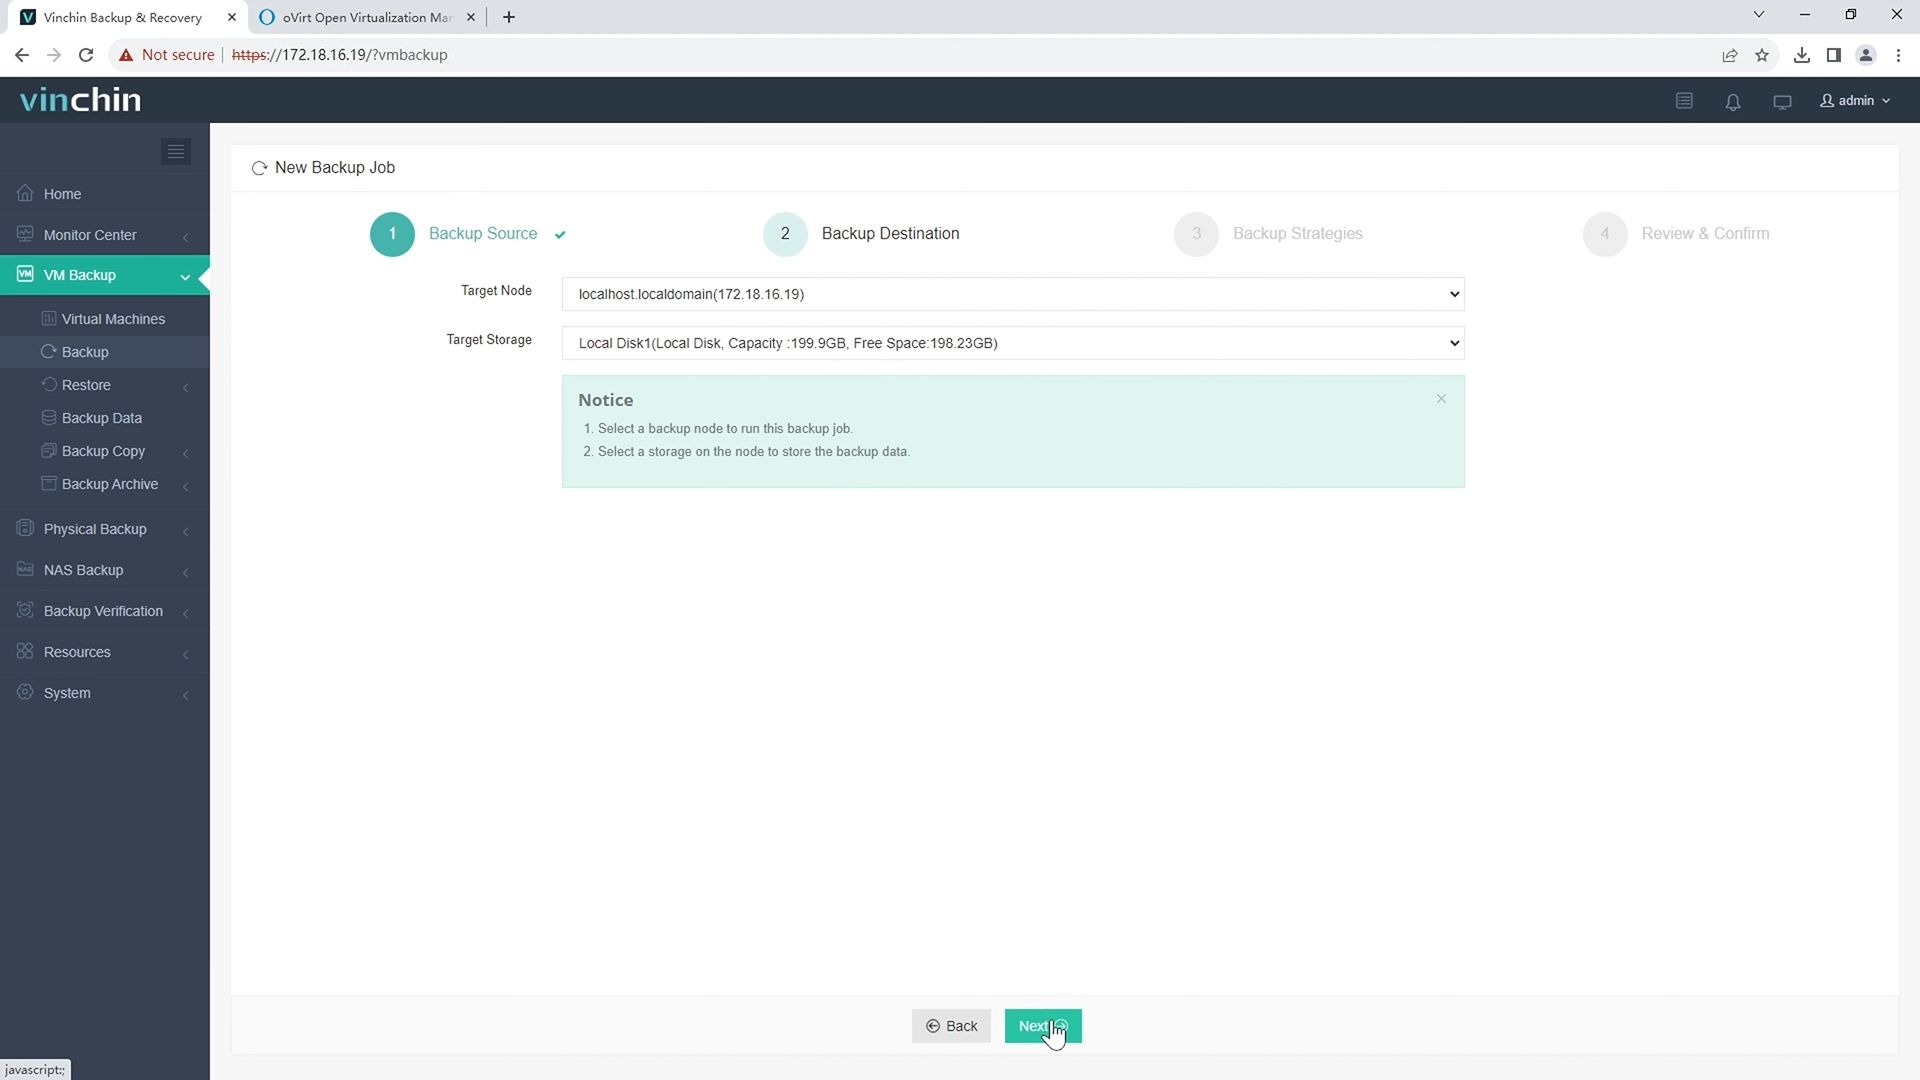
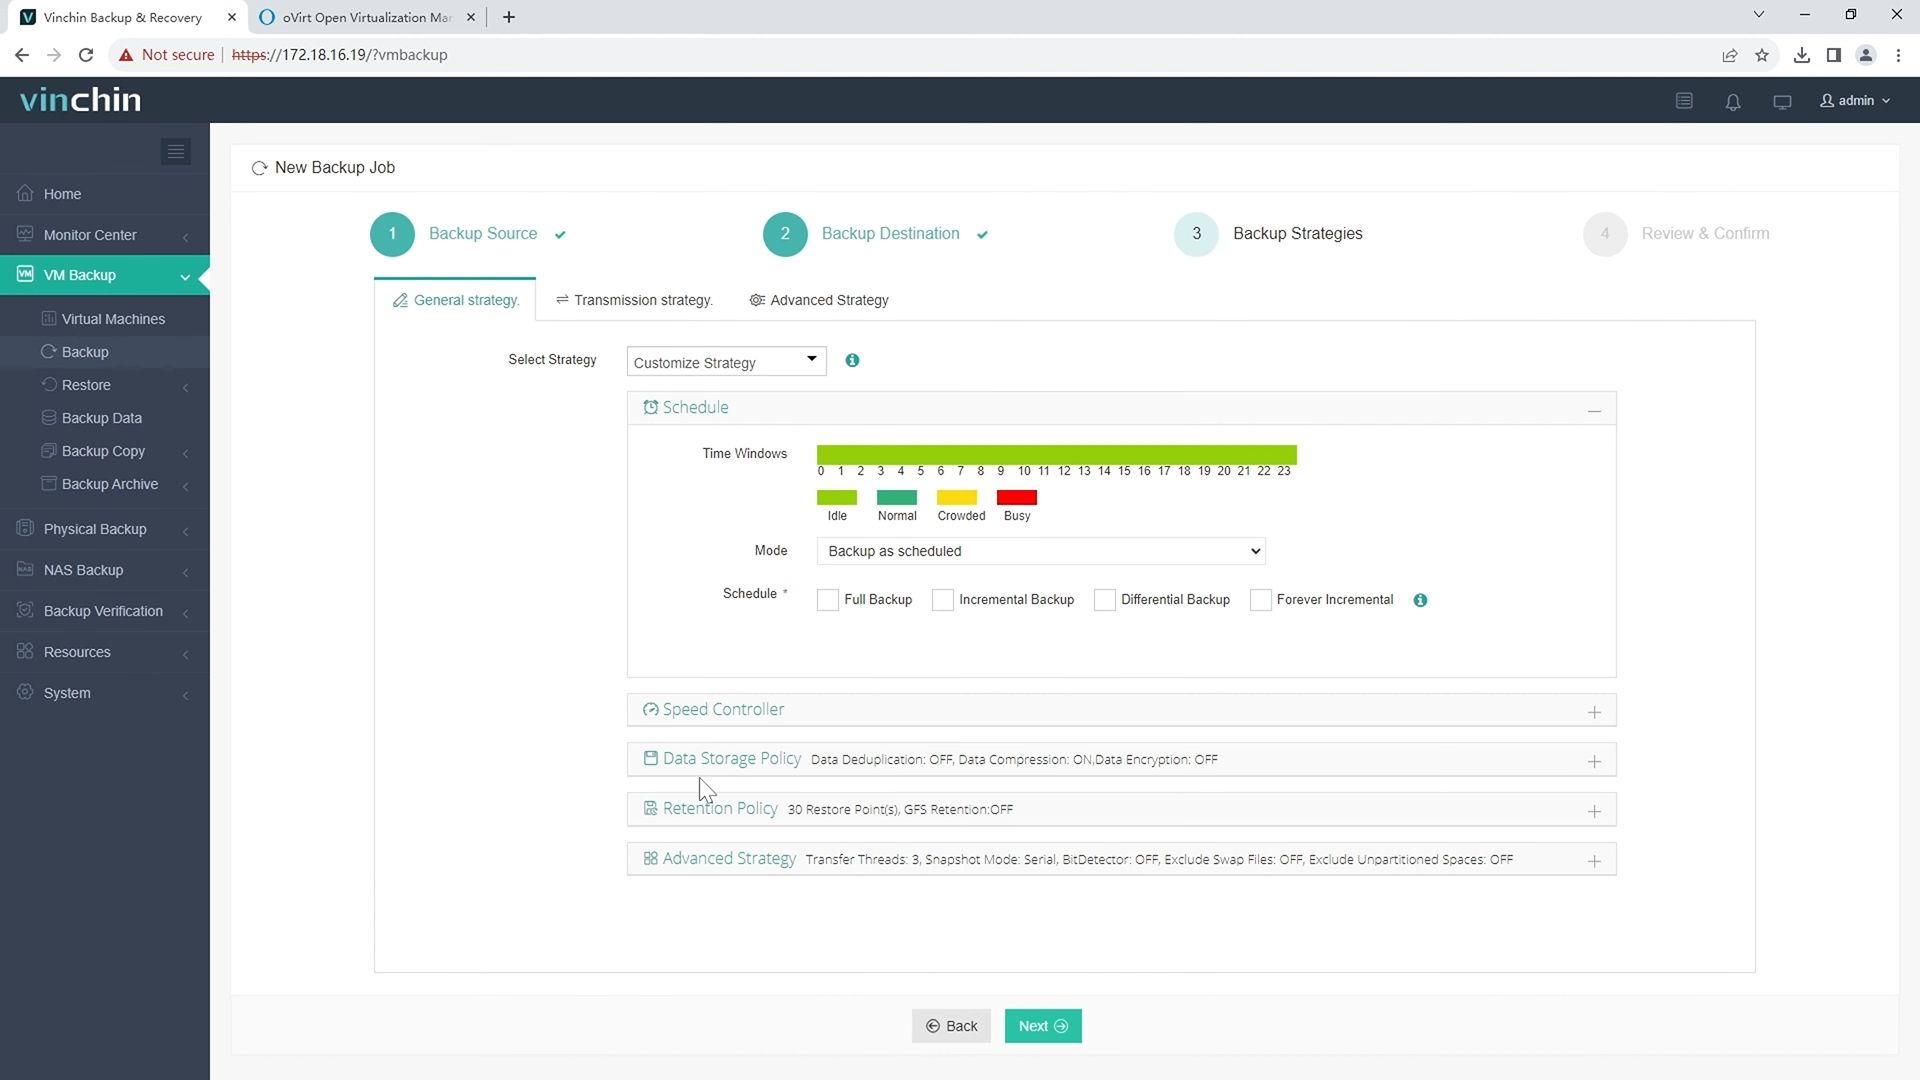
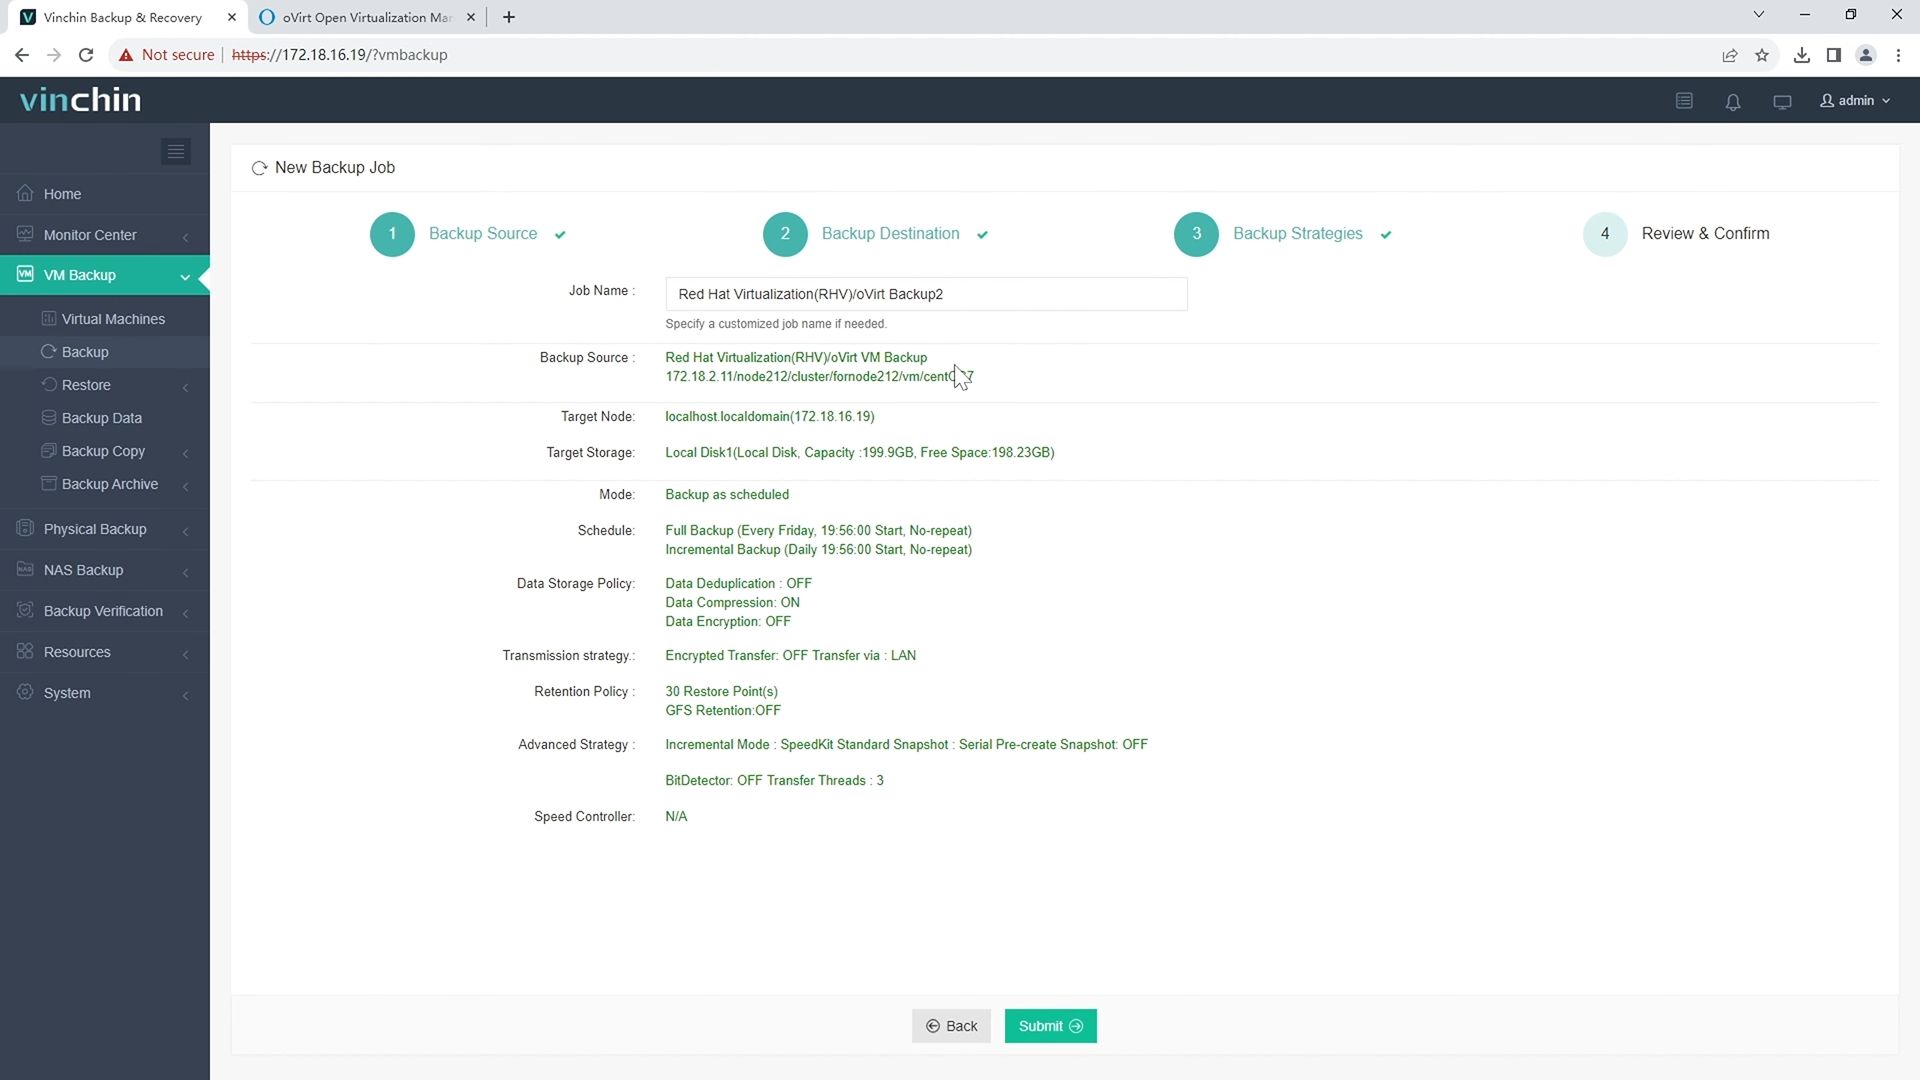
The user-friendly web-based console makes it easy to manage backup tasks with a simple four-step process, ensuring efficient and reliable protection at scale.
1. Just select oVirt VM on the host

2.Then select backup destination

3.Select strategies

4.Finally submit the job 
To help users experience the power of Vinchin in real-world environments, Vinchin offers a 60-day free trial. For more information, please contact Vinchin directly or one of our local partners.
oVirt Screenshots FAQs
Q1: Can I schedule automatic periodic screenshots of my VMs?
A1: Yes—use cron jobs combined with scripts calling the REST API regularly according to your chosen interval settings.
Q2: What should I do if my automated script fails because my token expired?
A2: You need to revoke the expired token and generate a new access token. Update your script with the new token, then rerun the process. Make sure to set up token renewal or automation to prevent future issues.
Conclusion
Capturing accurate snapshots of running VMs in oVirt requires multiple methods, from manual to automated API-based solutions. For complete protection, trust Vinchin's backup solutions, designed to meet the needs of modern hybrid cloud datacenters, ensuring robust, scalable, and reliable data security across all platforms.
Share on:


