-
What Is Proxmox Homelab?
-
Why Choose Proxmox for Homelabs?
-
How to Set Up Proxmox Homelab from Scratch?
-
Configuring ZFS Storage for Your Proxmox Homelab
-
How to Migrate an Existing Lab to Proxmox Homelab?
-
How to Backup Virtual Machines with Vinchin Backup & Recovery in Proxmox Homelab?
-
Proxmox Homelab FAQs
-
Conclusion
Building a homelab is one of the best ways to learn about IT systems, experiment with new technology, or run personal services at home. Many IT professionals and hobbyists choose Proxmox for their homelabs because it’s powerful, flexible, and free to use. In this guide, you’ll discover what a Proxmox homelab is, why it’s so popular among tech enthusiasts, how to set one up from scratch or migrate your existing lab—and how to keep your virtual machines safe with reliable backups.
What Is Proxmox Homelab?
A Proxmox homelab is a home-based environment where you use Proxmox Virtual Environment (VE) to run virtual machines (VMs) and containers on your own hardware. This setup lets you simulate enterprise IT systems, test software updates before rolling them out at work, or host personal projects like media servers or firewalls—all without risking production data.
You can build a proxmox homelab using almost any hardware that supports virtualization extensions—old desktops, laptops with enough RAM, or dedicated servers like Dell R720s or HP MicroServers are all common choices. Proxmox acts as a type 1 hypervisor running directly on bare metal for maximum performance. Its web-based interface makes managing VMs simple from any browser on your network.
Why Choose Proxmox for Homelabs?
Proxmox stands out in the world of homelabs because it’s open source yet offers enterprise-grade features without licensing costs. Its web UI is clear and intuitive—you can create VMs or containers in just a few clicks while monitoring resource usage live.
Proxmox supports clustering if you want to expand your lab across multiple nodes later on—a great way to learn about high availability setups at home! There’s an active community ready to help troubleshoot issues via forums or detailed documentation. Whether you want to experiment with networking setups like VLANs or run complex workloads such as databases alongside lightweight containers—Proxmox gives you all the tools needed in one platform.
How to Set Up Proxmox Homelab from Scratch?
Starting your own proxmox homelab doesn’t require much experience—just some basic hardware knowledge and patience during installation.
First, gather suitable hardware:
Minimum requirements: 64-bit CPU with VT-x/AMD-V support; at least 8GB RAM; SSD storage recommended.
For better reliability: ECC RAM if available; network card supporting SR-IOV; separate SSDs for VM storage improve performance.
Many users repurpose old PCs—but small servers like Dell R720s offer more expansion options if you plan ahead!
Download the latest Proxmox VE ISO from the official website before starting installation.
1. Create a Bootable USB Drive
Use Rufus (or similar tool) to write the ISO file onto a USB stick—select your device and image file then click Start.
2. Install Proxmox VE
Insert USB into target machine; boot from USB drive; select Install Proxmox VE when prompted.
Accept EULA
Choose target hard disk (if using multiple disks consider ZFS here—see next section)
Set location/time zone
Enter admin password/email
Configure network settings (Ethernet preferred over Wi-Fi for stability)
3. Access Web Interface
After install completes remove USB stick then reboot server.
On another computer open browser go to https://<your-server-ip>:8006
Log in using username root plus password set earlier.
4. Configure Updates & Repositories
By default Proxmox expects paid subscription repo which isn’t needed for most labs.
In web UI go: Datacenter > Updates > Repositories
Disable enterprise repo; add community (“No-Subscription”) repo instead;
Refresh list then upgrade packages as prompted.
5. Upload ISO Images & Create VMs
Select node name > local storage > switch to Content tab, click Upload, pick guest OS images (.iso).
Click Create VM, follow prompts—set CPU/memory/disk/network per workload needs.
6. Set Up Networking
By default bridge named vmbr0 connects VMs/containers directly onto home LAN.
For isolated networks create additional bridges (like vmbr1)—leave IP blank if not routing traffic externally.
Advanced users can edit /etc/network/interfaces directly—for VLAN tagging add bridge_vlan_aware yes under bridge config block.
7. Start Your VMs & Experiment
Power on VMs via web UI; install operating systems inside each VM window;
Try different services—from Linux servers running Docker stacks through Windows test environments!
Configuring ZFS Storage for Your Proxmox Homelab
ZFS is one of the most powerful storage options available in proxmox homelabs—it combines filesystem flexibility with built-in RAID-like redundancy plus features like snapshots and compression that protect against data loss while saving space.
Why choose ZFS? It offers:
Data integrity checking (detects silent corruption)
Snapshots/rollbacks (restore previous states instantly)
Built-in compression/deduplication
Flexible RAID levels—even across mismatched disks
To set up ZFS during installation:
When prompted during disk selection choose “ZFS” instead of ext4/LVM-thin;
If using multiple drives pick desired RAID level (RAID1, RAID10 etc.) according to number/type of disks present;
This creates pool automatically used by default VM storage backend (“local-zfs”).
If adding ZFS after install:
1. Identify unused disks (lsblk)
2. Create pool via shell: zpool create <poolname> <disk1> <disk2>
3. Add pool into web UI: go Datacenter > Storage > Add > ZFS
4. Assign new pool as storage location when creating future VMs/disks
Want snapshots? Right-click any VM disk stored on ZFS backend then select “Snapshot”—you can roll back changes anytime!
Full instructions are available at Proxmox Wiki – ZFS.
ZFS does use extra RAM compared with simpler filesystems—aim for 16GB+ total memory if possible when enabling deduplication/compression features heavily used by many VMs simultaneously.
How to Migrate an Existing Lab to Proxmox Homelab?
Already have a lab running another hypervisor? Migrating everything into your new proxmox homelab takes careful planning but pays off long-term by unifying management under one platform!
Begin by backing up all existing VMs first—shut down each guest cleanly then copy their disk images (qcow2, vmdk, etc.) onto external drive/NAS share along with notes about CPU/RAM/network configs per machine;
Steps:
1. Install fresh copy of Proxmox VE following earlier instructions above;
2. Prepare storage pools within web UI—local disks/ZFS pools/NAS shares all supported;
3. For each migrated VM click “Create VM”, skip OS media selection (Do not use any media) then delete default disk entry under Disks tab;
4a.Linux guests: Mount external drive containing exported image(s); import using shell command:
qm disk import <vmid> <path-to-disk-image> <storage-pool>
Example: qm disk import 101 /mnt/backup/vm101.qcow2 local-zfs
4b.Windows guests: Before migration ensure VirtIO drivers installed inside original system—or mount virtio-win ISO after import so Windows recognizes new virtual devices;
5.Attach imported disk(s): Under Hardware tab find Unused Disk entry → Edit → select correct bus type (VirtIO Block Device recommended unless missing drivers);
6.Set boot order via Options tab → double-click Boot Order → enable imported disk/move topmost slot;
7.Start migrated VM & verify successful bootup—in case of errors check logs under Monitor tab;
Networking may need adjustment depending whether MAC addresses/IP assignments changed between platforms.
How to Backup Virtual Machines with Vinchin Backup & Recovery in Proxmox Homelab?
To ensure robust protection for your proxmox homelab workloads, consider Vinchin Backup & Recovery—a professional enterprise-level backup solution supporting over fifteen mainstream virtualization platforms including VMware, Hyper-V, oVirt, OLVM, RHV, XCP-ng, XenServer, OpenStack, ZStack and especially full integration with proxmox environments.
Vinchin Backup & Recovery delivers advanced capabilities such as forever-incremental backup strategies that save time and space; efficient data deduplication and compression; granular restore options allowing precise recovery down to individual files; scheduled automated backups; cross-platform V2V migration between supported hypervisors—and strong encryption ensuring data security throughout every operation—all managed through an intuitive centralized console designed for simplicity even at scale.
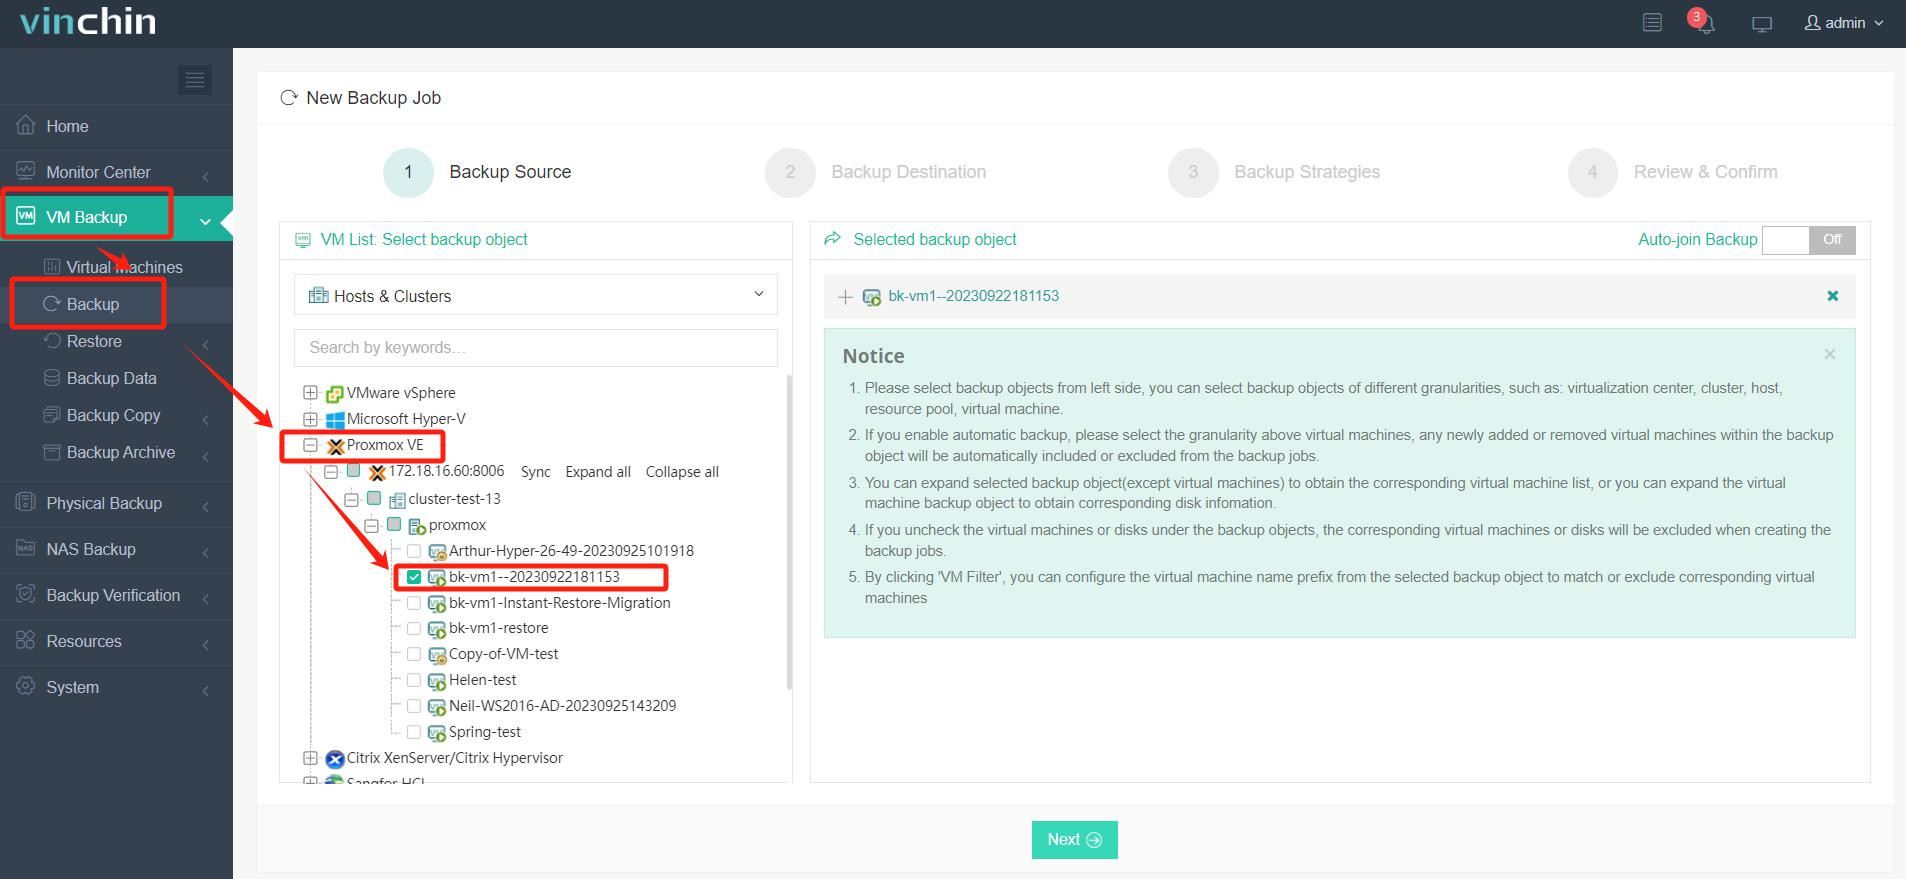
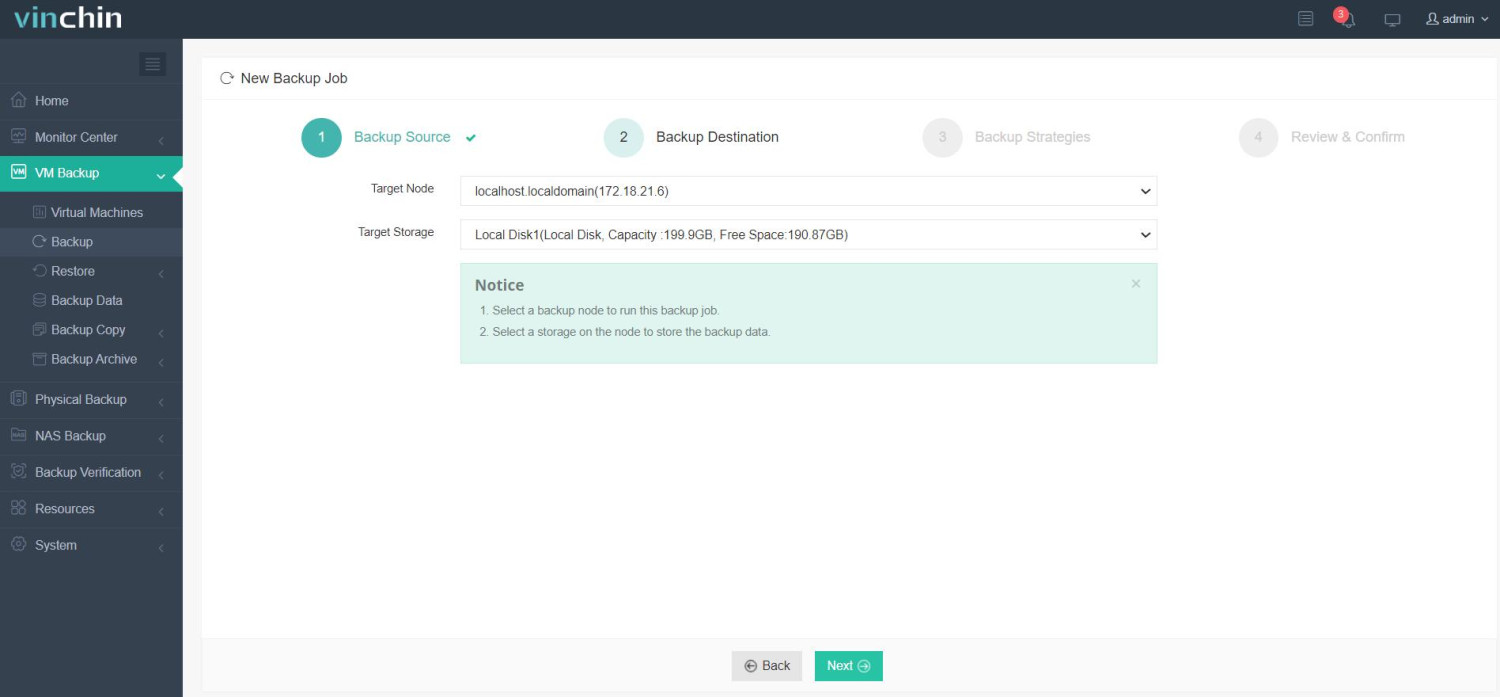
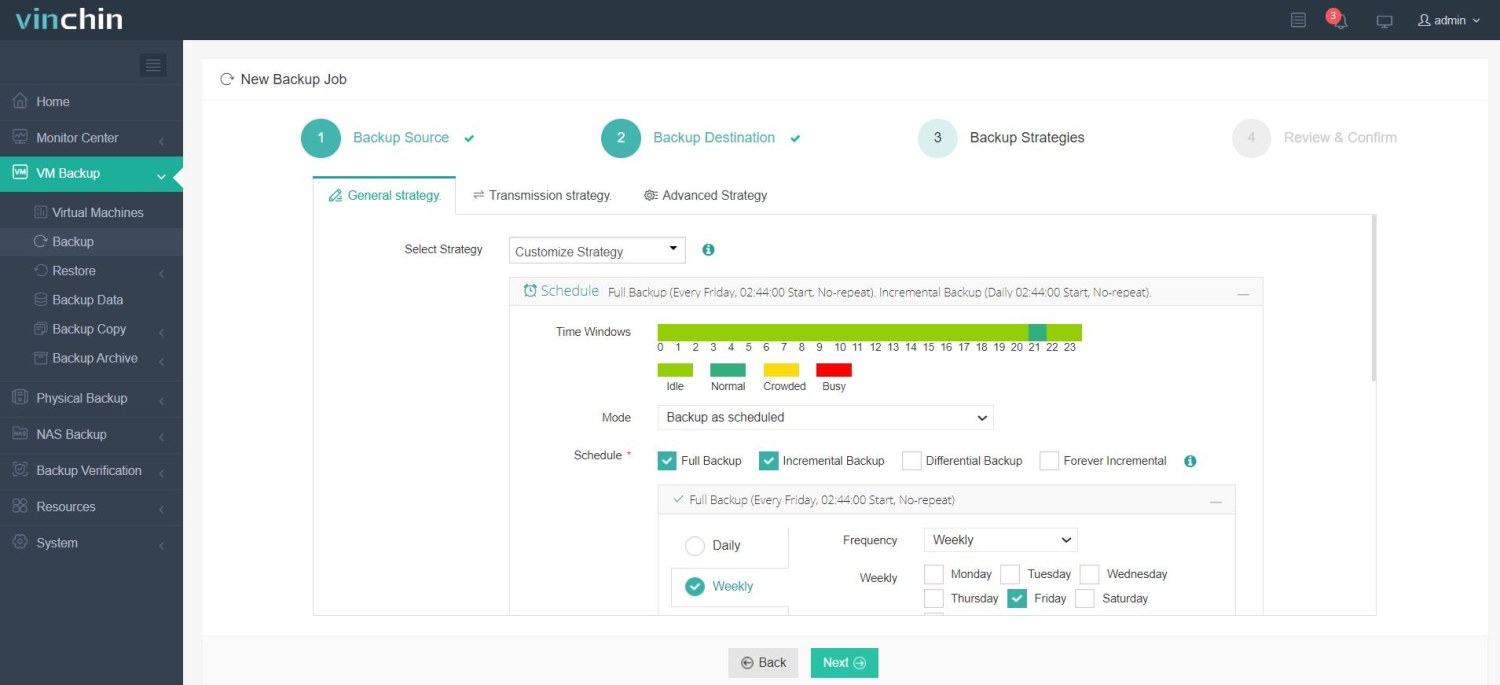
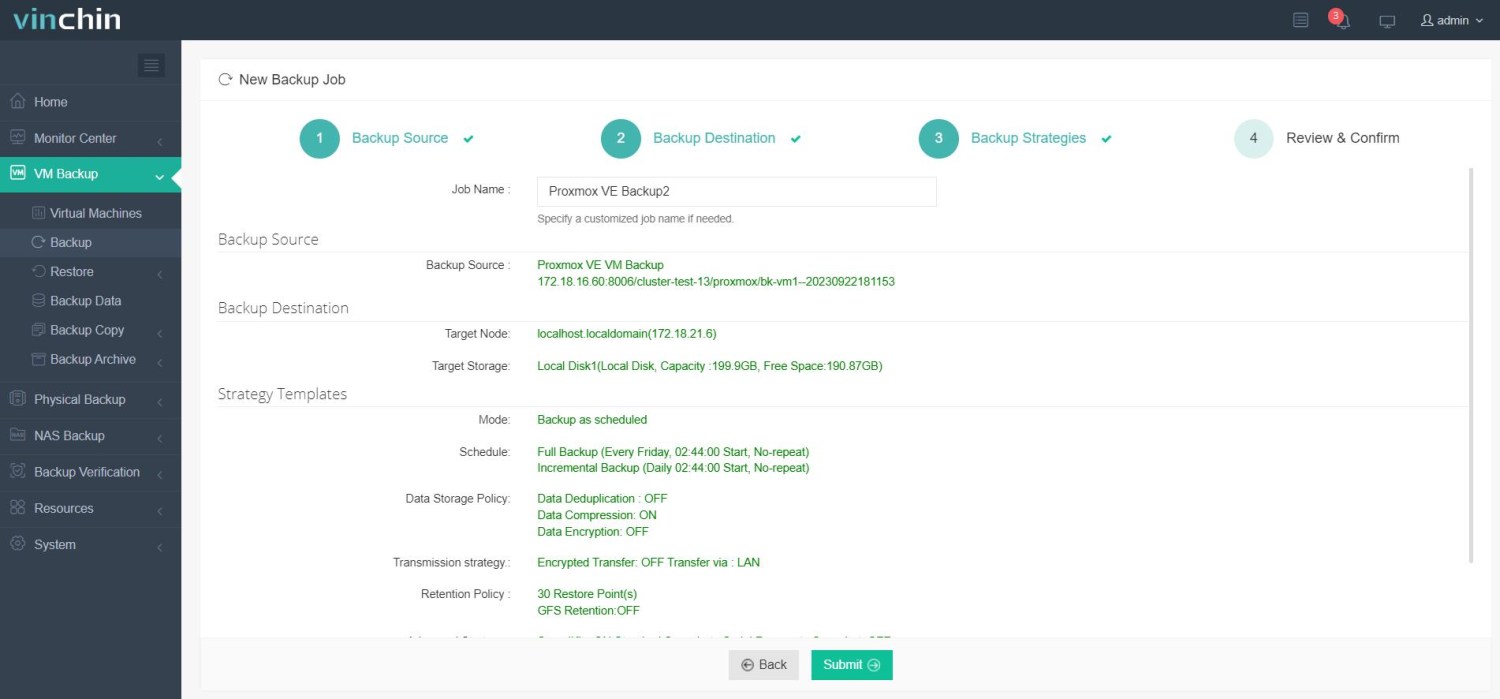
Backing up a proxmox virtual machine with Vinchin Backup & Recovery is straightforward thanks to its user-friendly web interface:
Step 1: Select the proxmox VM you wish to back up

Step 2: Choose your preferred backup storage destination

Step 3: Configure backup strategy—including schedule and retention policies

Step 4: Submit the job and start protecting your environment

Thousands of organizations worldwide trust Vinchin Backup & Recovery for reliable enterprise data protection—experience its full power risk-free today with a 60-day fully featured trial by clicking below!
Proxmox Homelab FAQs
Q1: Can I run my proxmox homelab on an old PC with only 8GB RAM?
Yes—but limit simultaneous VMs/containers based on available memory; SSD improves responsiveness noticeably even on older CPUs.
Q2: What should I do if I forget my server's IP address?
Check router DHCP client list—or connect monitor/keyboard locally log into shell run ip addr.
Q3: My newly created VM won’t start—is there an easy fix?
Double-check that its virtual hard drive appears first under Boot Order option—and confirm enough free resources exist on chosen storage backend/node.
Conclusion
A proxmox homelab helps you learn modern IT skills safely at home—from simple experiments through advanced migrations—with robust protection thanks to Vinchin’s backup solutions included every step of the way! Start building today—and enjoy peace of mind tomorrow knowing your data stays secure no matter what happens next!
Share on:


