-
What Is Restoring SQL Server Database?
-
Prerequisites for Database Restore
-
Why Restore Database from Backup Fails?
-
How to Restore SQL Server Database from Backup Using SSMS?
-
How to Restore SQL Server Database from Backup Using T-SQL?
-
Performing Point-in-Time Recovery
-
Handling File Path Conflicts During Restore
-
Vinchin Backup & Recovery for Enterprise-Level SQL Server Protection
-
SQL Server Restore Database from Backup FAQs
-
Conclusion
Restoring a SQL Server database from backup is one of the most important skills for any operations administrator. Whether you are recovering after an outage, migrating data to new hardware, or testing changes in a safe environment, knowing how to restore databases keeps your business running smoothly. This guide covers everything you need—from basic concepts to advanced recovery techniques—using both SQL Server Management Studio (SSMS) and T-SQL commands. We’ll also look at common problems and how to avoid them. Ready to master this essential task?
What Is Restoring SQL Server Database?
Restoring a SQL Server database means copying data from a backup file back into your SQL Server instance. This process can help recover lost or corrupted data, move databases between servers, or roll back unwanted changes by returning the system to an earlier state.
SQL Server supports several types of backups: full backups capture all data; differential backups record only changes since the last full backup; transaction log backups save every change made since the last log backup. Each type plays a role in how you restore your database depending on your needs and recovery model (simple or full). Understanding these basics helps you choose the right approach for each situation.
Prerequisites for Database Restore
Before starting any restore operation, make sure you have what you need:
First, confirm that you have valid backup files—these usually end with .bak for full or differential backups and .trn for transaction logs. You must also have sufficient permissions on your SQL Server instance; typically members of sysadmin, dbcreator, or db_backupoperator roles can perform restores.
If restoring onto another server—or even just another location—check that file paths match up. If they don’t exist on the target system, be ready to specify new locations using either SSMS’s “Relocate all files” option or T-SQL’s MOVE clause during restore.
Always ensure there is enough free disk space where both data (.mdf) and log (.ldf) files will be placed after restoration. If your database uses encryption (Transparent Data Encryption), keep the certificate or key used for encryption handy—you’ll need it before starting any restore.
Finally, consider testing restores regularly in non-production environments so there are no surprises when disaster strikes.
Why Restore Database from Backup Fails?
Even experienced admins run into trouble when restoring databases. Most failures fall into predictable categories:
Active connections often block restores because SQL Server cannot overwrite databases while users are connected. Permissions issues may prevent access if your account lacks required roles like sysadmin or dbcreator.
Corrupt or incomplete backup files cause errors—always verify integrity before using them (see next section). Sometimes restores fail due to mismatched versions; newer-format backups cannot be restored onto older SQL Servers.
File path conflicts happen if original locations do not exist on the target machine; always check paths before starting (and use MOVE/relocate options if needed). Missing encryption keys stop encrypted database restores cold—keep those certificates safe!
If you see messages about backing up “the tail of the log,” it means uncommitted transactions exist; take one last log backup before proceeding if possible.
For specific error codes:
Error 3154 (“The backup set holds a backup of a database other than...”) usually means you're trying to overwrite an existing DB without specifying REPLACE.
Error 1834 points toward file access problems—make sure no other processes lock those files.
Check details in SQL Server’s error logs whenever something goes wrong—they often point straight at root causes.
How to Restore SQL Server Database from Backup Using SSMS?
Most administrators prefer SSMS because its graphical interface makes complex tasks easier—even under pressure during outages!
Start by opening SQL Server Management Studio and connecting to your server instance. In Object Explorer, right-click Databases then select Restore Database... In the Source area choose Device, click the ellipsis (...) button beside it, then click Add in the pop-up window and browse for your .bak file(s).
Once selected, review settings under Destination—by default SSMS fills in original DB name but you may enter another name if creating a copy instead of overwriting existing data.
Under Backup sets to restore, tick boxes next to each relevant set (full/differential/log). If replacing an existing DB entirely—for example after corruption—go to Options tab and check both Overwrite the existing database (WITH REPLACE) as well as Close existing connections to destination database if users might still be connected elsewhere.
For multi-step restores involving differentials or logs:
1) First select only full backup(s), then under “Recovery state” choose “Leave this database non-operational...” which matches NORECOVERY mode;
2) Next repeat process adding differential/logs as needed;
3) For final step select “Restore with Recovery” so DB comes online ready for use again.
Clicking OK starts restoration—and once finished SSMS displays confirmation message at bottom right corner of screen!
Remember: Overwriting production systems should always be done carefully—with tested procedures—instead of rushing during emergencies whenever possible!
How to Restore SQL Server Database from Backup Using T-SQL?
T-SQL gives experienced users precise control over every aspect of restoration—including scripting repetitive jobs across many servers automatically via PowerShell/batch tools if desired!
To start simple:
USE [master];
RESTORE DATABASE [YourDatabase]
FROM DISK = N'C:\Backups\YourDatabase.bak'
WITH FILE = 1,
     NOUNLOAD,
     STATS = 5;
If overwriting an existing DB add WITH REPLACE:
RESTORE DATABASE [YourDatabase]
FROM DISK = N'C:\Backups\YourDatabase.bak'
WITH REPLACE,
     STATS = 5;
When restoring under another name—or onto different storage paths—you must first discover logical filenames inside .bak:
RESTORE FILELISTONLY FROM DISK = N'C:\Backups\YourDatabase.bak';
Then use those names with MOVE clauses:
RESTORE DATABASE [NewDatabase]
FROM DISK = N'C:\Backups\YourDatabase.bak'
WITH MOVE 'LogicalDataName' TO 'E:\SQLData\NewDatabase.mdf',
     MOVE 'LogicalLogName' TO 'E:\SQLData\NewDatabase_log.ldf',
     STATS = 5;
For multi-stage restores involving differentials/logs:
1) Full backup first with NORECOVERY;
2) Differential/logs next—all except last one also get NORECOVERY;
3) Final step uses RECOVERY (or omit option since RECOVERY is default).
Example:
-- Full
RESTORE DATABASE [YourDB] FROM DISK='C:\Full.bak' WITH NORECOVERY;

-- Differential
RESTORE DATABASE [YourDB] FROM DISK='C:\Diff.bak' WITH NORECOVERY;

-- Transaction Log(s)
RESTORE LOG [YourDB] FROM DISK='C:\Log1.trn' WITH NORECOVERY;
RESTORE LOG [YourDB] FROM DISK='C:\Log2.trn' WITH RECOVERY;
Skipping NORECOVERY too soon breaks continuity—you cannot apply further logs afterward! Always double-check sequence order against msdb history tables if unsure:
SELECT * FROM msdb.dbo.backupset WHERE database_name='YourDB';
Automate error handling by wrapping commands inside TRY/CATCH blocks:
BEGIN TRY
    RESTORE DATABASE [TestDB] FROM DISK='C:\Backup.bak' WITH NORECOVERY;
    RESTORE LOG [TestDB] FROM DISK='C:\Log.trn' WITH RECOVERY;
END TRY
BEGIN CATCH
    SELECT ERROR_MESSAGE() AS ErrorMessage;
END CATCH
Performing Point-in-Time Recovery
Sometimes disasters strike between scheduled backups—a user deletes records at noon but yesterday’s nightly job ran at midnight! Point-in-time recovery lets you roll forward only as far as needed using transaction logs plus STOPAT options.
In SSMS: After selecting source device/files during normal restore steps above—
1) On “Restore Options” page tick “Leave this database non-operational...” after applying full/differential sets,
2) When restoring transaction logs switch tabs then enable “Point in time” box,
3) Enter exact date/time just prior unwanted event occurred,
4) Complete wizard ensuring final step brings DB online (“Restore with Recovery”).
With T-SQL syntax looks like this:
-- Full + Differential w/ NORECOVERY first...
RESTORE DATABASE [SalesDB] FROM DISK='D:\FullBackup.bak' WITH NORECOVERY;

-- Optional Differential...
RESTORE DATABASE [SalesDB] FROM DISK='D:\DiffBackup.bak' WITH NORECOVERY;

-- Log up until moment needed!
RESTORE LOG [SalesDB] FROM DISK='D:\TransLog.trn'
WITH STOPAT = '2024-06-01 11:59:00', RECOVERY;
Be careful—the STOPAT value must match actual times recorded inside log chain! Use msdb tables (backupset, backupmediafamily) if unsure about available timestamps within archives (Microsoft Docs).
Handling File Path Conflicts During Restore
Restores often fail when physical storage layouts differ between source/target systems—for example moving from D drive on old hardware onto E drive now!
In SSMS go straight into “Files” tab during setup wizard then tick box labeled “Relocate all files...” so new folders get used automatically based upon current defaults/configuration rather than legacy values embedded inside .bak metadata itself!
With T-SQL always run RESTORE FILELISTONLY first so logical names become visible; then supply explicit destinations via MOVE parameters matching whatever folder structure exists today—not yesterday!
Example:
RESTORE FILELISTONLY FROM DISK=N'D:\OldServer\DB_Backup.bak';

RESTORE DATABASE [MigratedDB]
FROM DISK=N'D:\OldServer\DB_Backup.bak'
WITH MOVE 'MyDataFile' TO 'E:\SQLData\MigratedDB.mdf',
     MOVE 'MyLogFile' TO 'E:\SQLLogs\MigratedDB_log.ldf',
     STATS=10;
Always double-check permissions/access rights wherever placing output files—lack thereof triggers errors like Msg 5133 (“Directory lookup failed...”).
Vinchin Backup & Recovery for Enterprise-Level SQL Server Protection
For organizations seeking robust protection beyond native tools, Vinchin Backup & Recovery stands out as an enterprise-level solution supporting today’s mainstream databases—including Microsoft SQL Server, Oracle, MySQL, MariaDB and PostgreSQL/PostgresPro. With comprehensive compatibility across these platforms, it delivers advanced features such as batch database backup management, multiple level data compression options tailored for efficiency and speed, incremental backups that minimize storage usage and network load on supported engines like SQL Server and Oracle, flexible retention policies including GFS retention strategy for compliance needs, and built-in ransomware protection safeguarding critical assets against modern threats—all designed with enterprise reliability in mind.
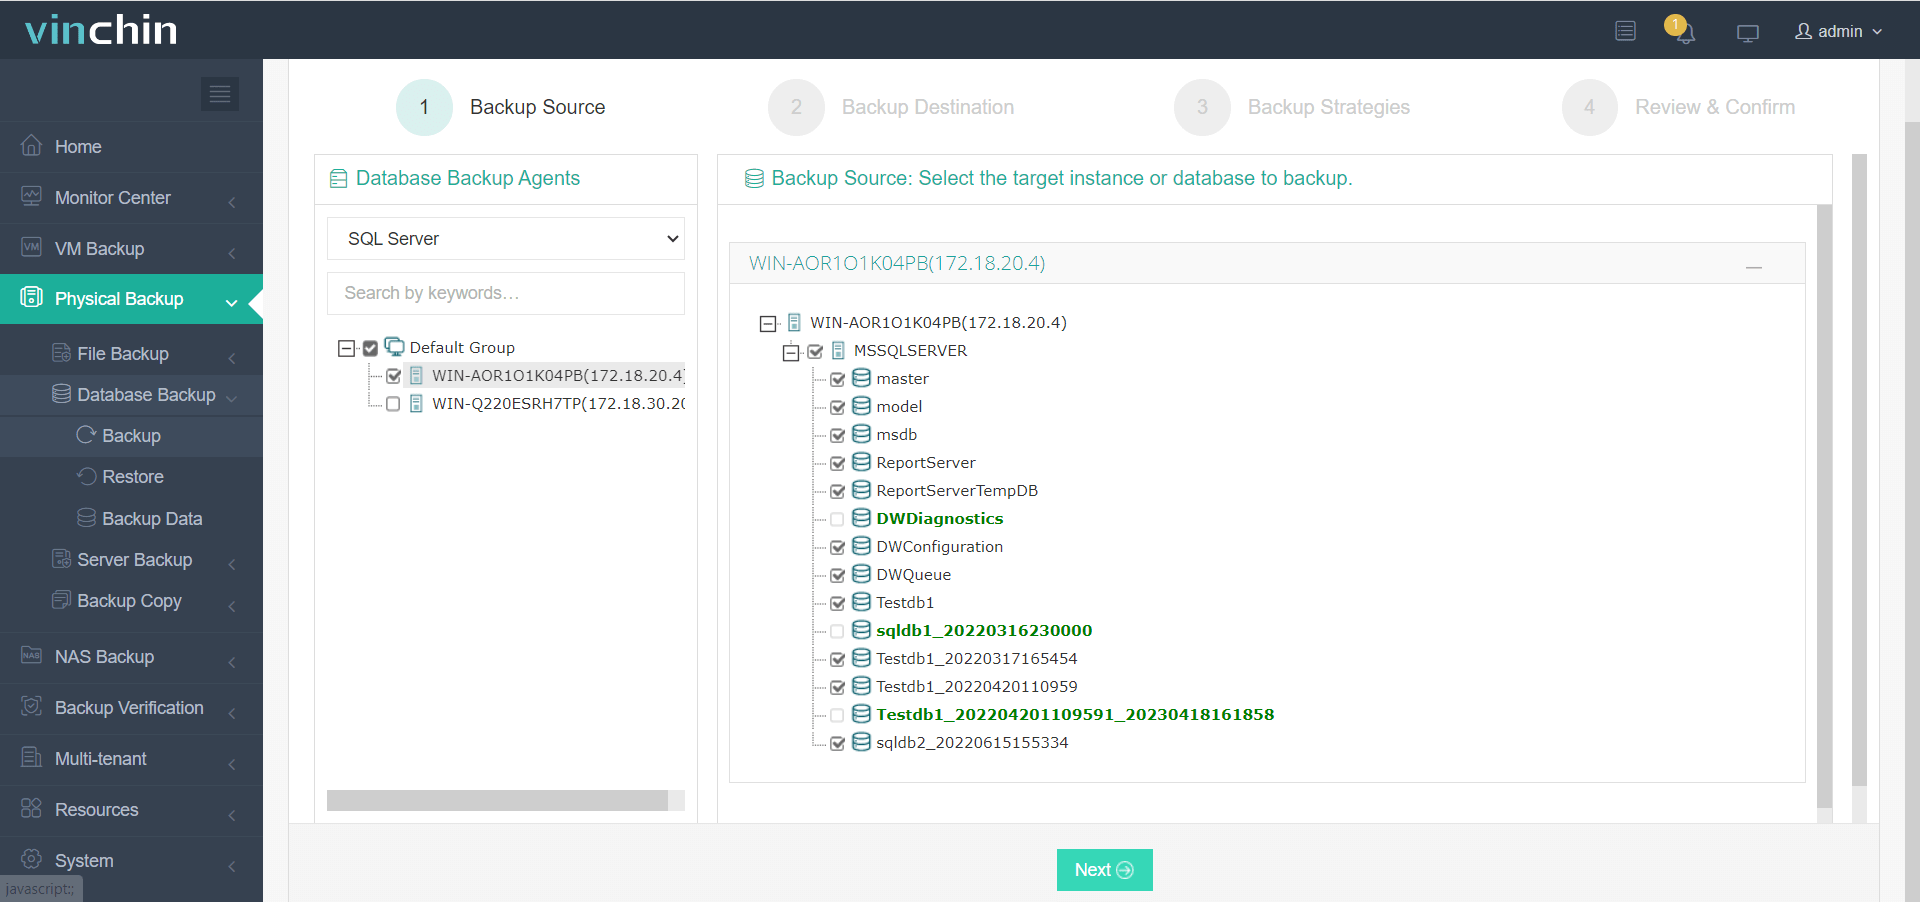
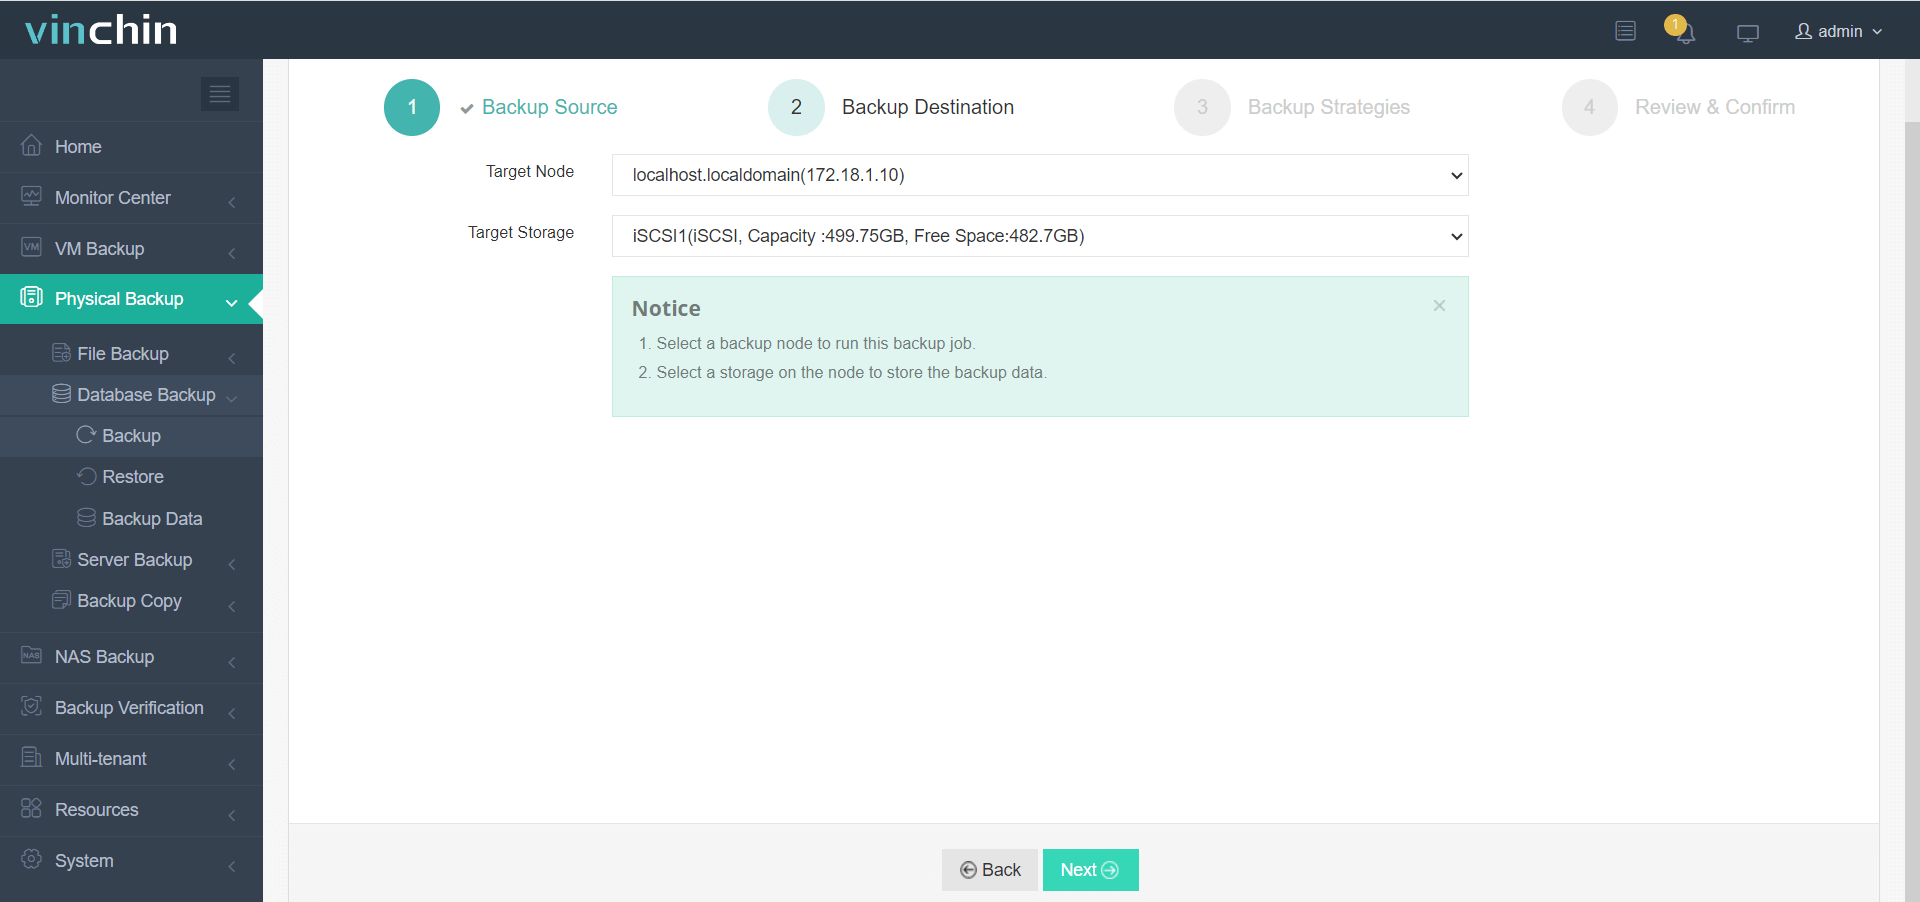
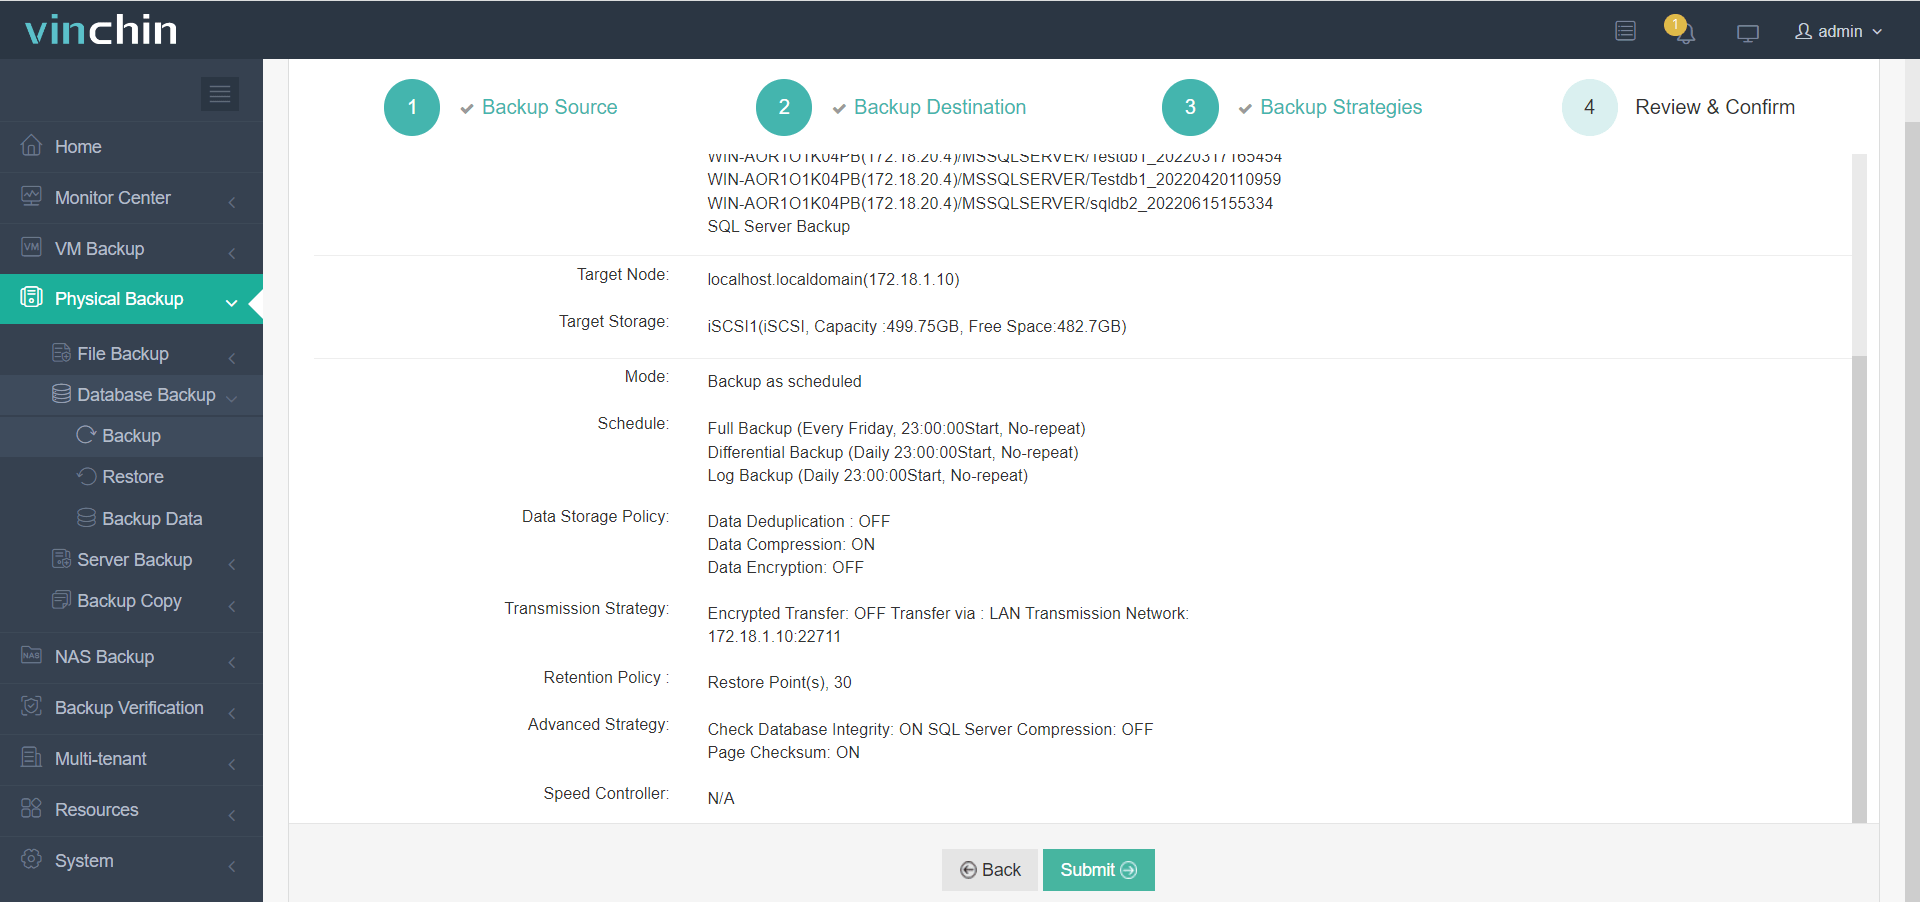
Vinchin Backup & Recovery offers a streamlined web console that makes protecting your databases remarkably intuitive. The typical workflow involves four clear steps:
Step 1. Select the SQL Server database to back up;

Step 2. Choose your preferred storage destination;

Step 3. Define detailed strategies including schedule and retention policy;

Step 4. Submit your job.

Recognized globally by thousands of enterprises with top industry ratings—and backed by strong customer trust—you can try Vinchin Backup & Recovery risk-free today with a fully featured 60-day trial by clicking below!
SQL Server Restore Database from Backup FAQs
Q1: Can I estimate how long my restore will take?
A1: Yes—use STATS=5 during T-SQL restores or monitor progress via sys.dm_exec_requests DMV views while jobs run.
Q2: How do I safely test my latest production backup?
A2: Perform RESTORE VERIFYONLY against recent .bak/.trn files first; optionally complete test restores onto isolated development servers away from live workloads.
Q3: What happens if my target folder doesn’t exist during restore?
A3: Either create missing directories manually beforehand—or specify alternative locations using MOVE clauses within RESTORE statements.
Conclusion
Restoring a SQL Server database from backup protects business continuity whether facing disaster recovery scenarios or planned migrations. By following these steps—from verifying integrity through handling complex point-in-time needs—you reduce risk dramatically. For automated protection tailored specifically toward enterprise needs consider Vinchin’s robust solutions today.
Share on:


