-
What is vSphere resource pool?
-
Benefits of vSphere resource pool
-
How to create resource pool in vCenter?
-
How to edit the resource pool?
-
How to remove a resource pool?
-
How to add a VM to resource pool?
-
How to remove a VM from resource pool?
-
How to backup vSphere VM with Vinchin Backup & Recovery?
-
Conclusion
Resource pools are very useful in virtualization that bring a touch of finesse to resource management. Think of them as organizers that bring together elements such as CPU, memory, and storage. Additionally, they do more than just organize; they subtly allocate these resources to virtual machines, following a set of rules and priorities defined by you.
Resource pools are also appealing because of their ability to adjust resources as your organization's needs change. This ensures that your virtual environment stays fine-tuned and perfectly aligned with the dynamic pace of your business. Resource pools are also about fairness. They ensure fair distribution so that everything stays in harmony.
What is vSphere resource pool?
In vSphere, resource pools enable you to allocate and oversee computing resources in a virtual environment. They offer a means to divide and prioritize resources among ESXi VMs while managing their usage, ensuring optimal performance for each VM, even during high-demand periods.
Now, let's delve into the specifics:
Hierarchy: It's like a family tree of resources. The root pool is the big boss overseeing all physical resources in the cluster. Create child resource pools under it to customize resource allocation.
Resource Allocation: You're the chef, allocating CPU, memory, storage, and network resources per pool. Each VM gets its tailored portion.
Resource Sharing: You set rules for priority. During crunch times, vSphere follows your rules to distribute resources efficiently.
Benefits of vSphere resource pool
VMware vSphere resource pool is essential to efficiently manage computing resources in virtualized environments, ensuring fair distribution, improved performance, and flexible resource allocation to meet varying workload demands.
Performance Isolation: vSphere provides the ability to isolate resources into separate pools, ensuring that the performance of one virtual machine doesn't impact others. As a result, your virtual machines can consistently enjoy top-notch performance, regardless of any circumstances.
Resource Management: Resource management made easy. Think of resource pools as folders - each folder can represent a project. This structured approach simplifies management and allocates resources more efficiently.
Flexible Resource Allocation: vSphere's resource pool adapts to changing work scenarios, ensuring that virtual infrastructures run at peak efficiency.
However, any superhero has limits. If the resource pool vSphere is over-allocated and resource demand exceeds available resources, the virtual machine may not be able to get enough resources, resulting in performance degradation.
How to create resource pool in vCenter?
Creating a resource pool in vCenter is like setting up personalized zones for your virtual resources. This helps you allocate your computing power just the way you want it. Here's your friendly step-by-step guide on how to do it:
1. Using the vSphere Client, connect to vCenter Server
2. Right-click a parent object for the resource pool > choose New Resource Pool
3. Enter name > Define the allocation of CPU and memory resources > click OK
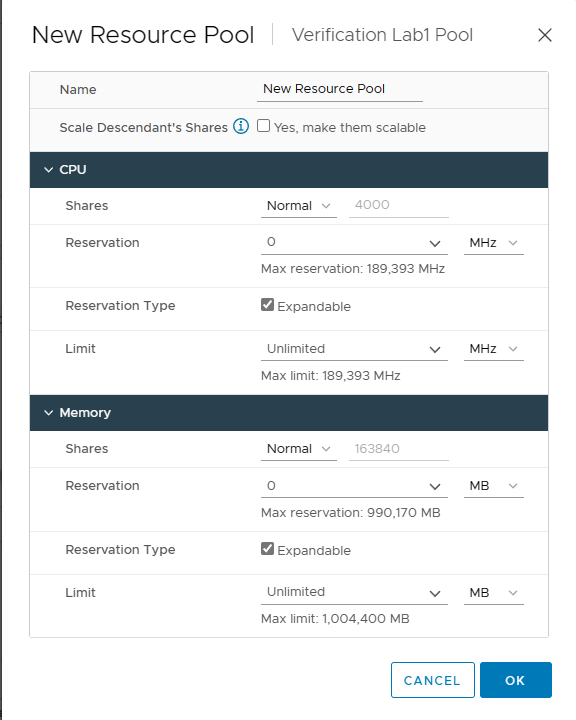
Once you have created a vCenter resource pool, you are able to adjust it as needed. This allows you to improve resource utilization and make your virtual environment efficient and coordinated.
How to edit the resource pool?
To edit resource pool in vSphere Client, follow these steps:
1. In vSphere Client, right-click the resource pool > select Edit Resource Settings
2. Click OK
How to remove a resource pool?
To move resource pool in vSphere Client, follow these steps:
1. In vSphere Client, right-click the resource pool > hit Delete
2. In jump-out page, click Yes
With these steps, you will be able to master resource pool management in vCenter. In addition, to ensure that virtual machines get just the right amount of compute power and memory space, you can add them to a resource pool. Here's how to add and remove virtual machines:
How to add a VM to resource pool?
To add a VM to resource pool, follow these steps:
1. In vSphere Client, right-click the virtual machine > click Migrate
2. Select a migration type > hit Next > choose a resource pool > click Next
3. Select VM Network > click Next > choose vMotion priority > hit Next
4. Click Finish 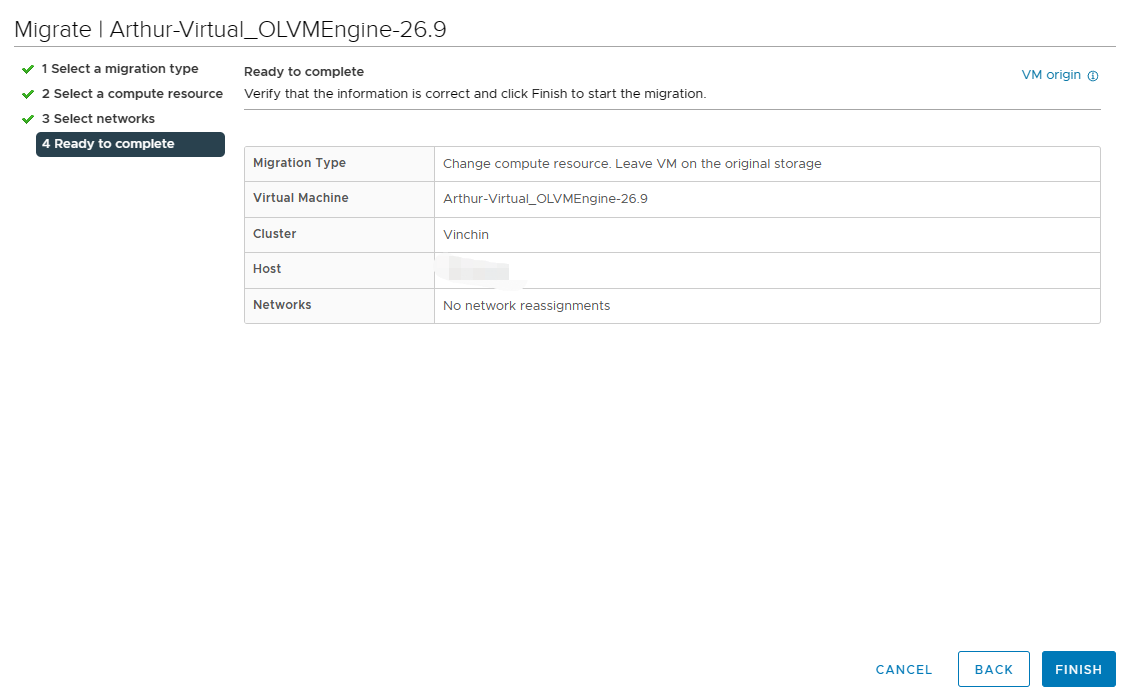 How to
How to remove a VM from resource pool?
To remove a VM from resource pool, following these steps:
1. In vSphere Client, right-click the VM
2. Select Move to folder > select Folder> click OK
And if you want to delete it:
1. Right-click the VM > choose power > click power off
2. Select Delete from Disk > click OK
How to backup vSphere VM with Vinchin Backup & Recovery?
vSphere resource pools are the core of intelligent resource allocation and management in virtual environments. VMs are the entities that benefit from the resource pools, receiving the right mix of CPU, memory, and etc. At the same time, VM backups play an important role in protecting and recovering critical data, adding a layer of security to the entire system.
Vinchin Backup & Recovery is a solution that specializes in VM backup and recovery which provides a user-friendly management interface to configure backup policies for vSphere 8/7/6/5/4. And to ensure the security, Vinchin supports encryption of backup VM.
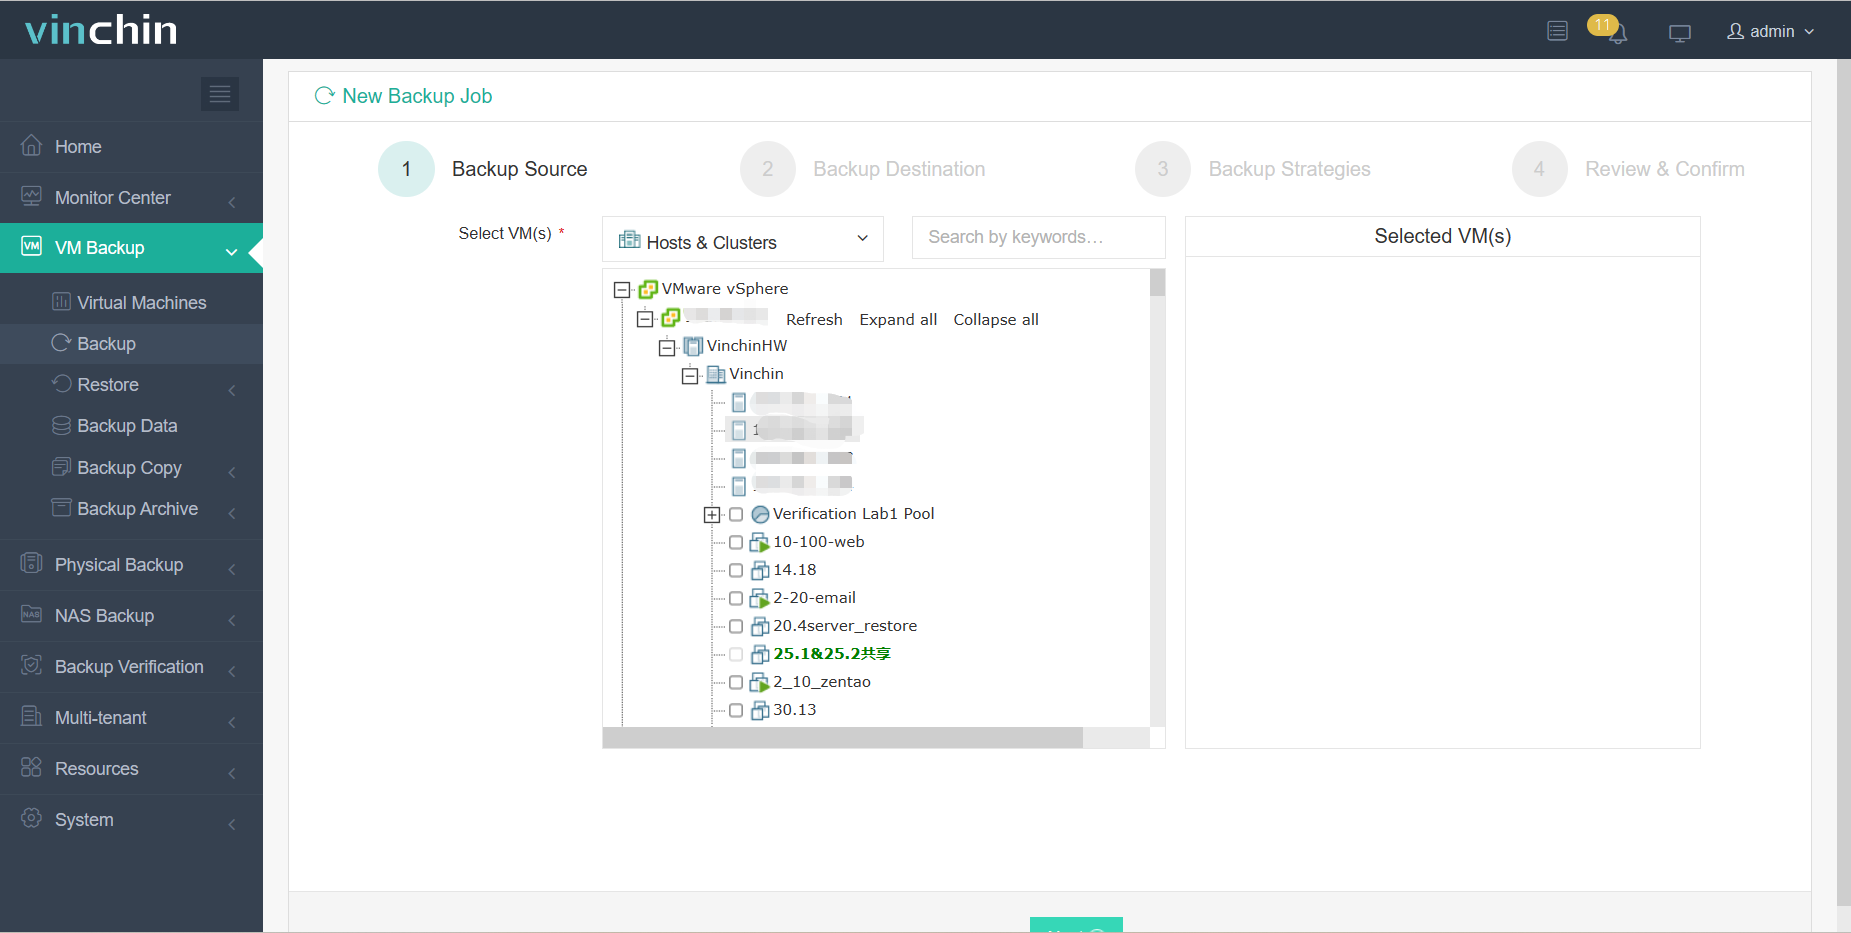
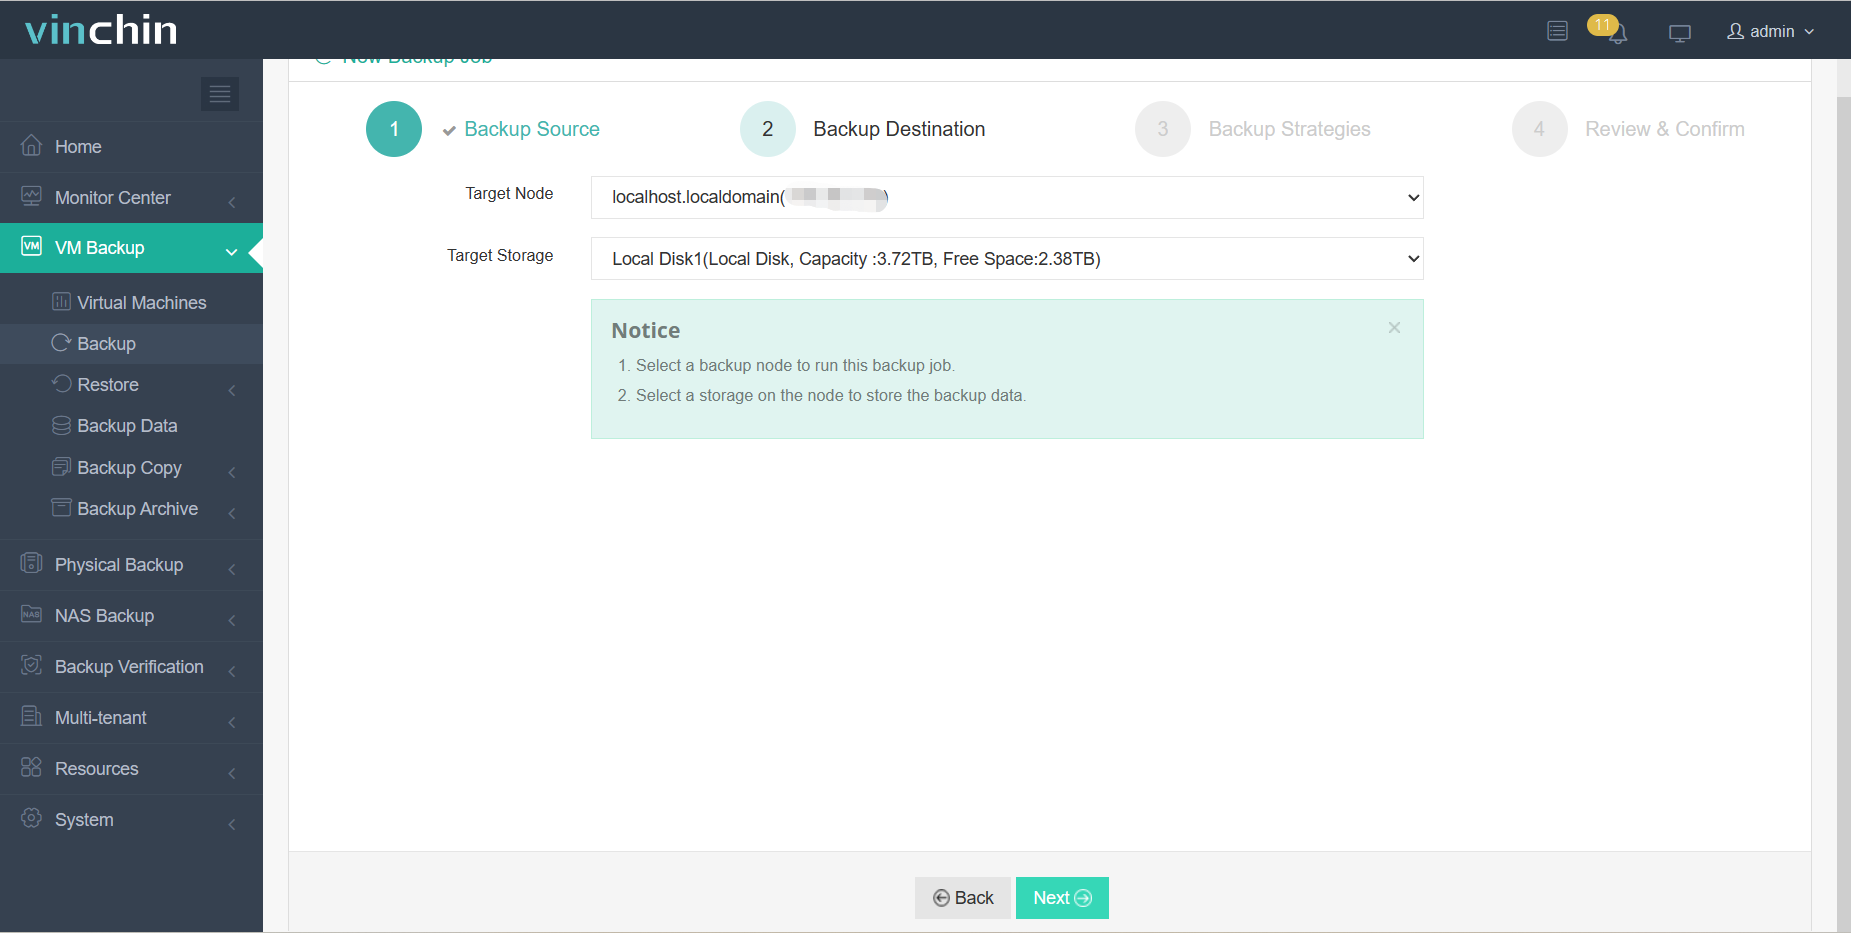
To back up vSphere VMs with Vinchin Backup & Recovery, following these steps:
1. Choose VM Backup
2.Specify Backup Destination
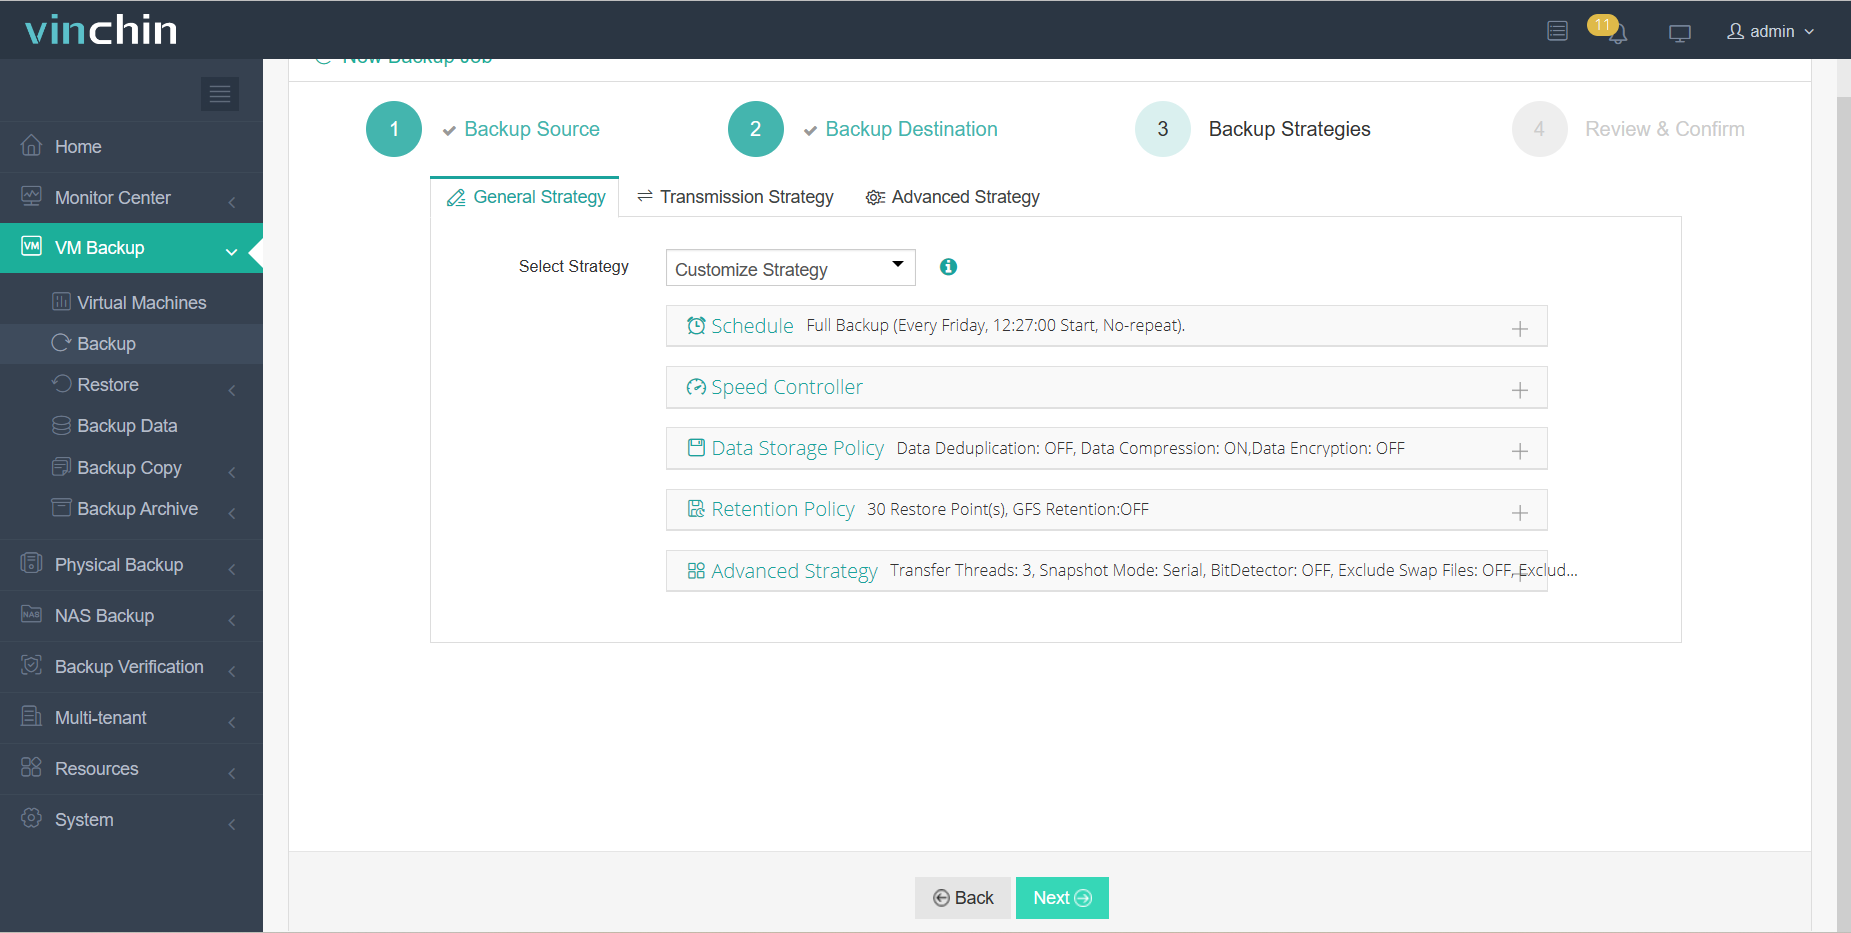
3.Define Backup Strategies
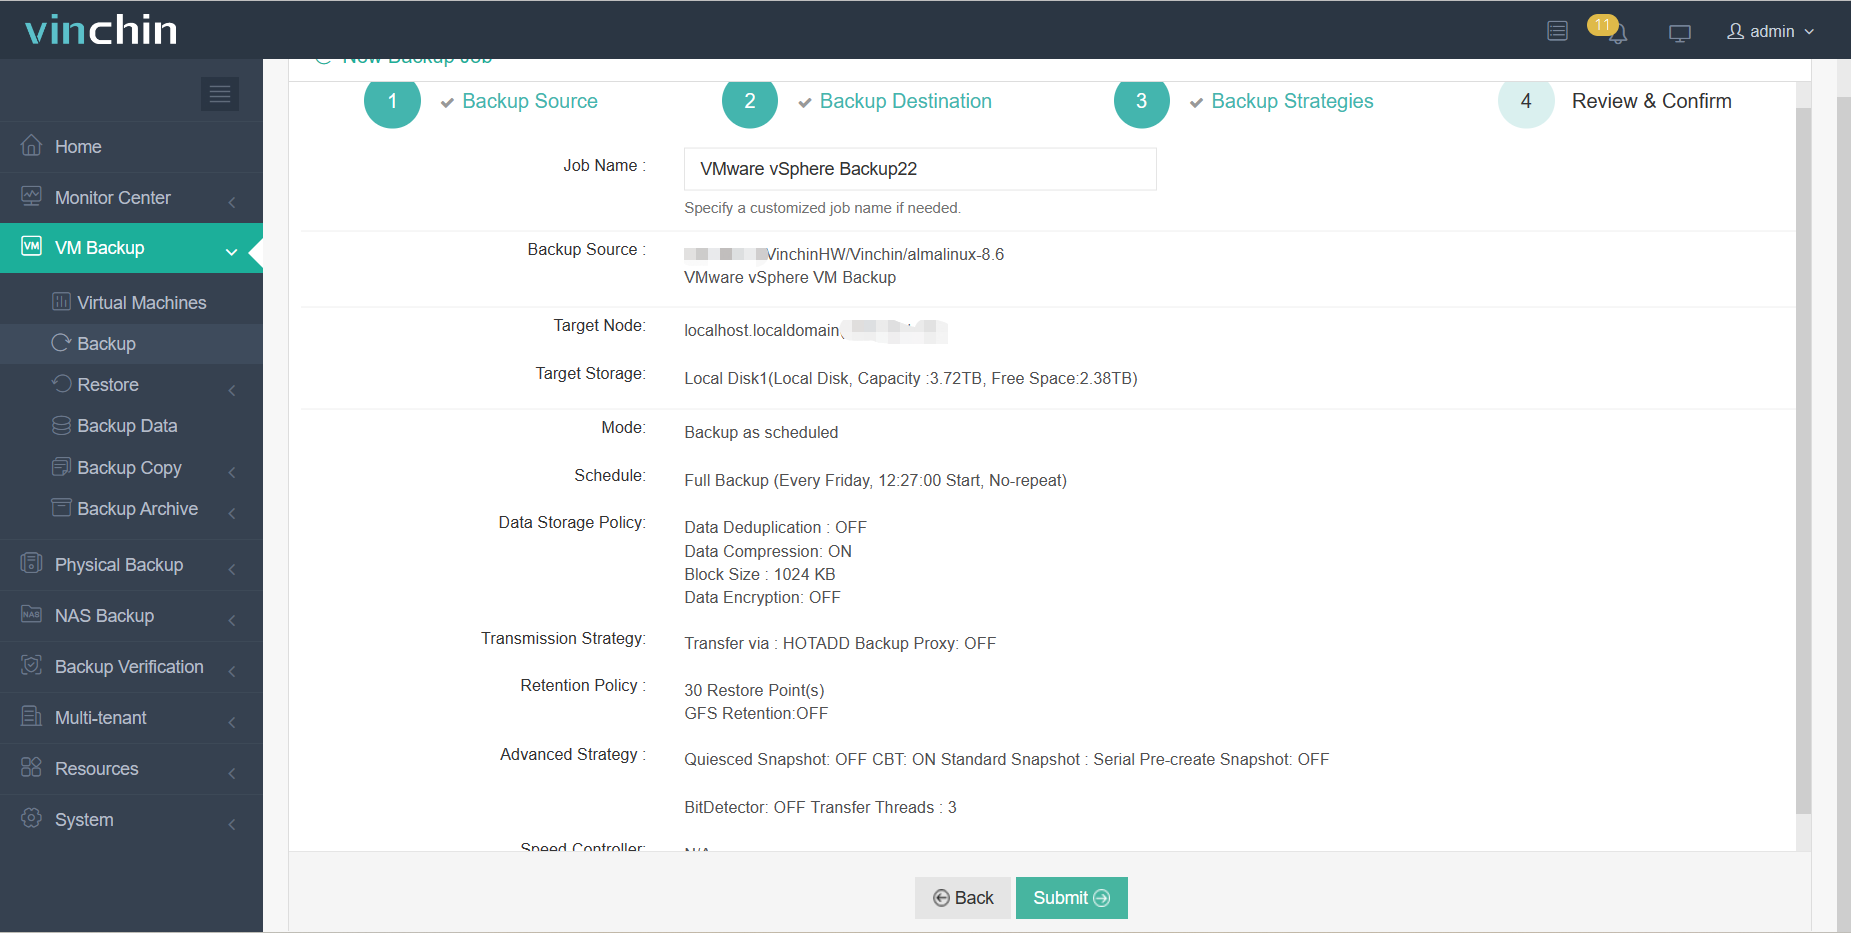
4.Click OK
Vinchin provides a free 60-day trial, allowing you to immediately experience it. If you require a customized solution, please contact us or our local partners directly. Vinchin gives video tutorials as a helpful resource if you have any issues. If you require any extra assistance, our team is always ready for consultation.
Conclusion
In vSphere, resource pooling optimizes resource utilization and performance by dynamically allocating physical resources to virtual machines. Efficient resource management and reliable backups are key to maintaining virtualized environments.
Vinchin Backup & Recovery is a professional solution for backing up vSphere virtual machines, enabling you to easily configure and monitor backup tasks. Ensure the stability of your virtual environment and business continuity.
Share on:


