-
What is Cloud-Init?
-
How Cloud-Init Works
-
How to Create a Virtual Machine Template Using Cloud-Init?
-
Backup Proxmox VM with Vinchin solution
-
Proxmox Cloud-init FAQs
-
Summary
In a virtualized environment, automating virtual machine configuration is key to improving efficiency. Proxmox VE is a popular open-source virtualization platform, while Cloud-Init is a tool used for initializing cloud instances. By combining PVE and Cloud-Init, we can quickly create and configure VM images. This article provides a detailed explanation of how to use Cloud-Init on PVE to build your own images.
What is Cloud-Init?
Cloud-Init is an industry-standard set of tools aimed at standardizing the initialization and installation process across different operating system distributions on cloud servers. Cloud-Init runs inside the guest machine and applies custom configurations to the guest during initialization. Imagine being a cloud service provider needing to initialize thousands of VMs daily for clients, possibly using different operating systems, assigning various IP addresses, SSH keys, hostnames, etc., according to customer requirements. How do you manage that? Cloud-Init was created precisely to solve this problem.
Initially developed by Canonical, the company behind Ubuntu, Cloud-Init now supports most Linux distributions and FreeBSD systems. Today, the majority of public cloud platforms use Cloud-Init for system configuration, and it also supports some private cloud environments (KVM, OpenStack, LXD, etc.), effectively becoming the de facto standard.
This brings us back to Proxmox. Since Proxmox is used to deploy and manage VMs, it is naturally suited for Cloud-Init scenarios and can even be considered an essential component.
When applying for compute resources on public clouds like AWS or Google Cloud, service providers typically require users to select a system image and perform some basic configurations (hostname, SSH key, etc.), then create the system based on that. Cloud-Init was born in this context to automate the injection of user data into system instances.
The main goal of Cloud-Init is to define configuration options that are independent of the operating system, such as hostname, networking configuration, etc.
Features of Cloud-Init:
Set default locale
Set hostname
Generate and configure SSH private keys
Configure temporary mount points
How Cloud-Init Works
Cloud-Init runs on the first boot of an instance and configures it according to metadata and user data provided by the user. This data is typically in YAML format and can include the following:
Meta-data: Describes basic instance information such as instance ID, hostname, etc.
User-data: Defines the specific configurations and scripts to be executed when the instance starts.
How to Create a Virtual Machine Template Using Cloud-Init?
1. Download the appropriate Cloud Image for your desired system (Proxmox VE supports two Cloud Image types: nocloud v1 and configdrive v2). Here, we’ll use Debian 11 as an example. You can download it directly using “wget” in PVE or download it elsewhere and then upload via SFTP.
2. Create a VM and make sure the SCSI controller is set to VirtIO SCSI. You don’t need to create a hard disk—if you do, detach and delete it.
3. Add a CloudInit device in the hardware settings of the VM you created.
4. Use SSH or tools like Xftp to upload the image file to the PVE server (skip this step if you used “wget”). Then, use the following command to import the disk image into the VM. After successful import, an unused disk will appear in the VM's hardware section in the PVE panel.
qm importdisk 900 debian-11-nocloud-amd64.qcow2 local-lvm
5. Double-click the unused disk to enable it, select SCSI for Bus/Device type, and set it as the first boot device under Options → Boot Order.
6. Edit the Cloud-Init settings and fill in the desired configuration. Cloud-Init will use the VM name as the hostname.
User: In the Debian 11 template system, the default user is "debian". If you're setting up root or other user logins, input the username here. If left blank, the default user will be used.
Password: Enter the password for the user specified above. It's recommended to set a password here; otherwise, you may not be able to log into the system via the console.
DNS Domain: You can input the domain name for the VM. If left blank, it inherits the domain from the PVE host.
DNS Server: If the VM uses a different DNS server, input it here. Otherwise, it inherits the DNS settings from the PVE host.
SSH Public Key: The public key for SSH login to the VM. Enables key-based SSH login.
IP Configuration: If left blank, the VM will use DHCP to get IPv4 and IPv6 addresses. You can define a specific IP address, subnet mask, and gateway for the VM here.
7. Resize the disk and start the VM. The first boot may take some time. If it seems stuck, try rebooting.
8. If the Cloud-Init configuration does not take effect, log in to the VM using the PVE console and run “cloud-init -v” to check whether Cloud-Init is installed. If there’s no output, install it using the following commands:
# CentOS
yum install cloud-init -y
# Debian
apt install cloud-init -y
9. Then, perform the initial configuration for the Debian system. Once everything is set, right-click the VM and save it as a template. You can then use it to quickly create new virtual machines.
Backup Proxmox VM with Vinchin solution
Vinchin Backup & Recovery offers a comprehensive suite of advanced features to safeguard Proxmox VE environments, ensuring data security and integrity through adherence to the 3-2-1 backup rule.
Its capabilities include automated VM backups, agentless backup and LAN-Free options, as well as offsite copy for robust disaster recovery. Instant recovery and efficient data reduction techniques, alongside cloud archiving options, further enhance data management. Additionally, the solution incorporates data encryption and ransomware protection mechanisms for an extra layer of security. It also facilitates seamless V2V migration between supported virtual platforms, ensuring flexibility and ease of data transfer.
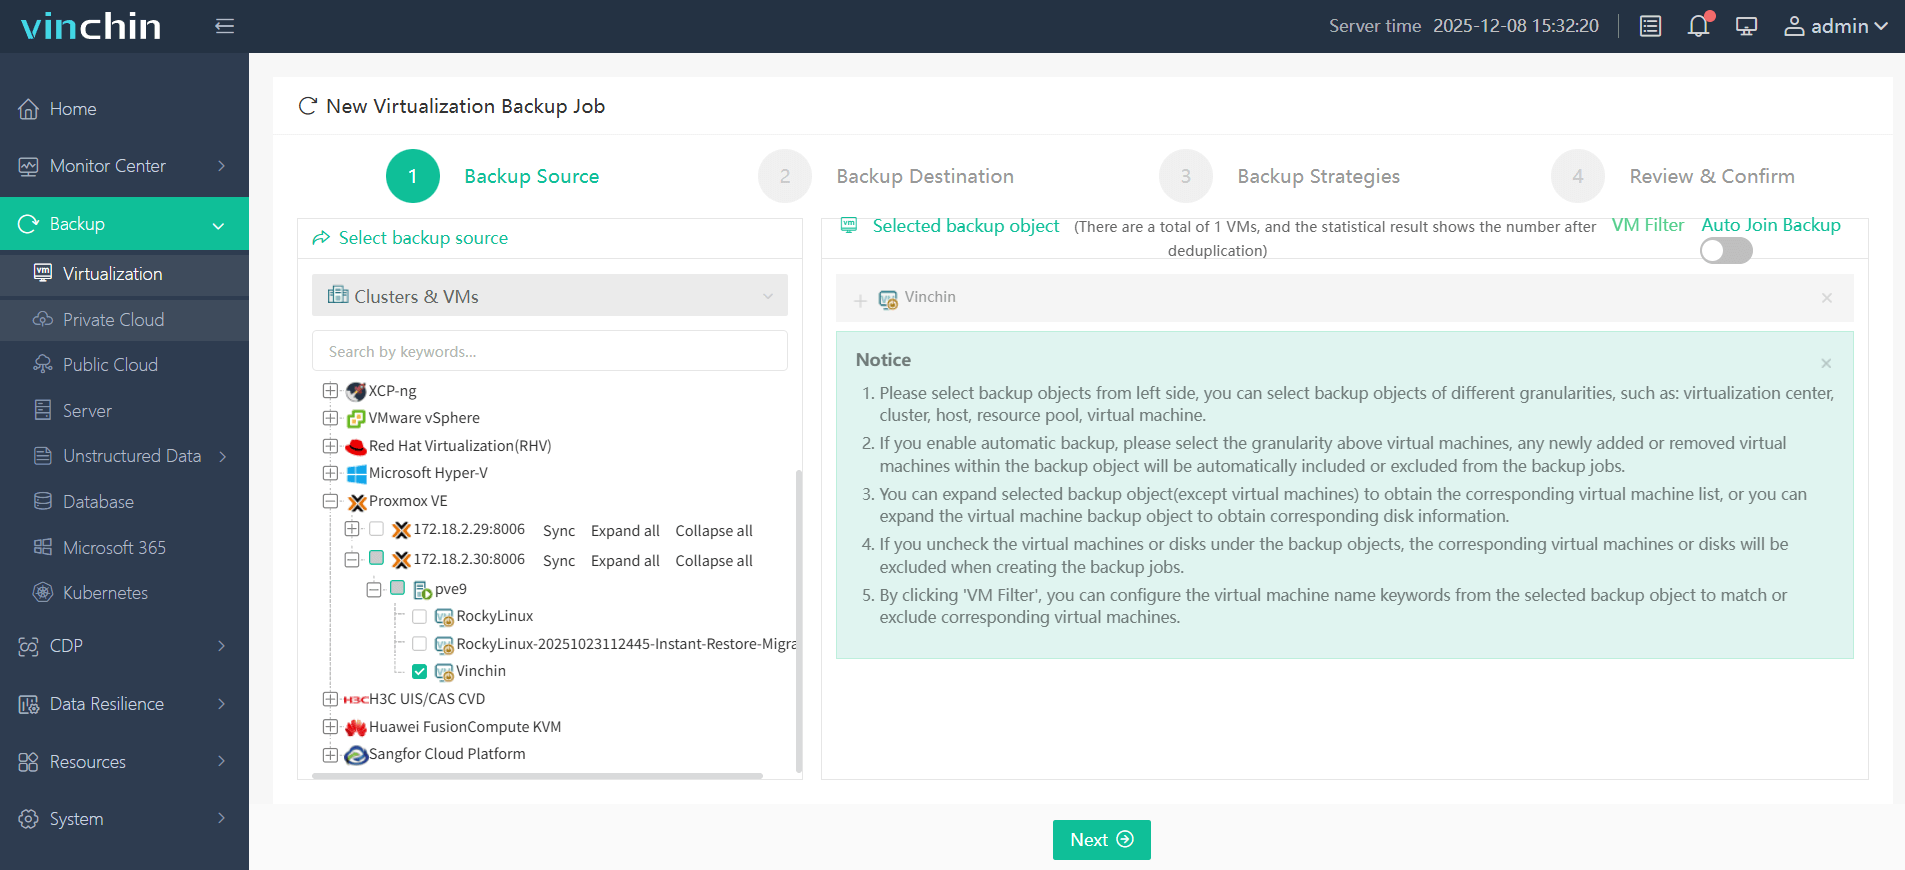
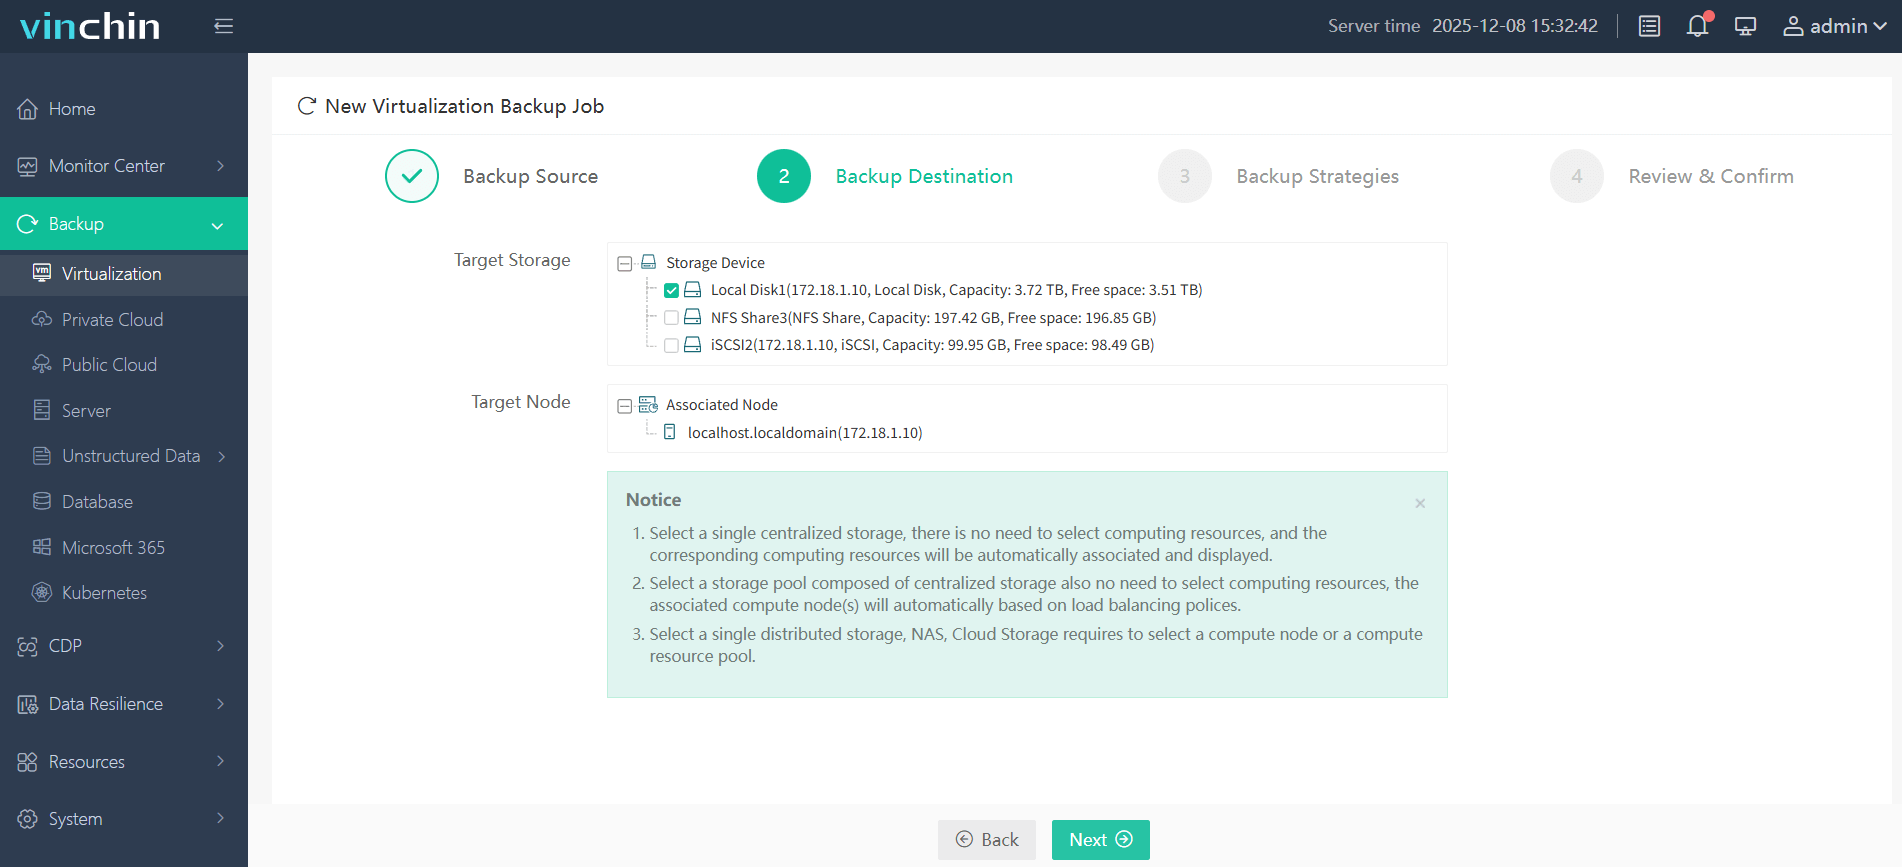
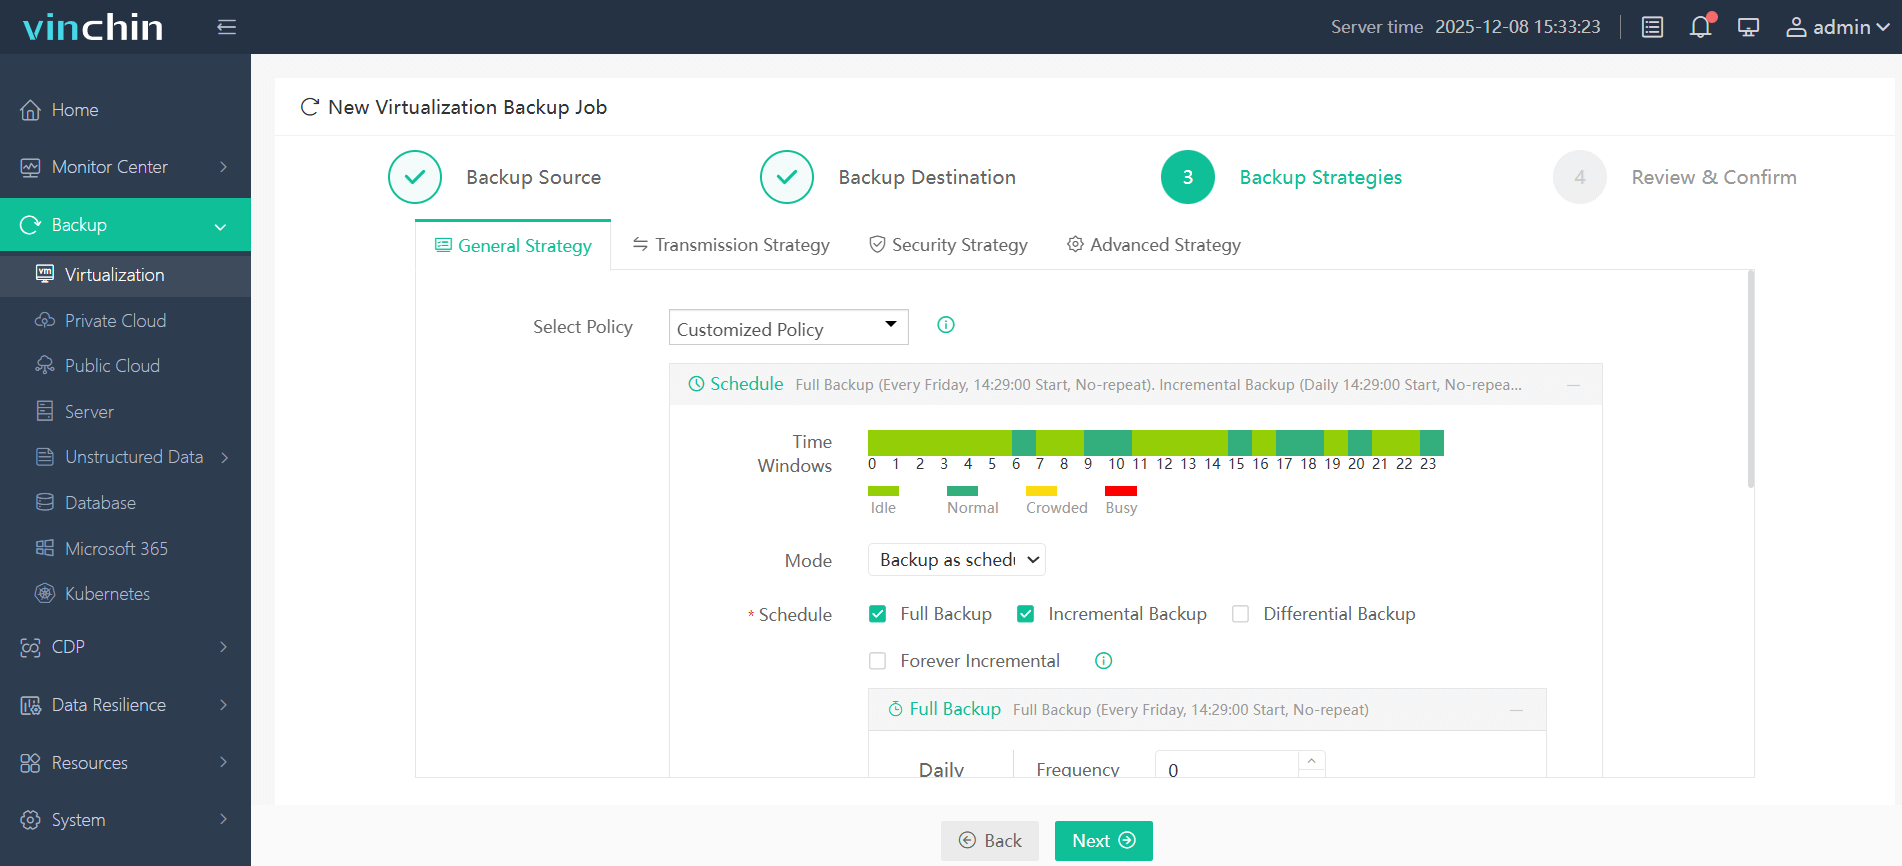
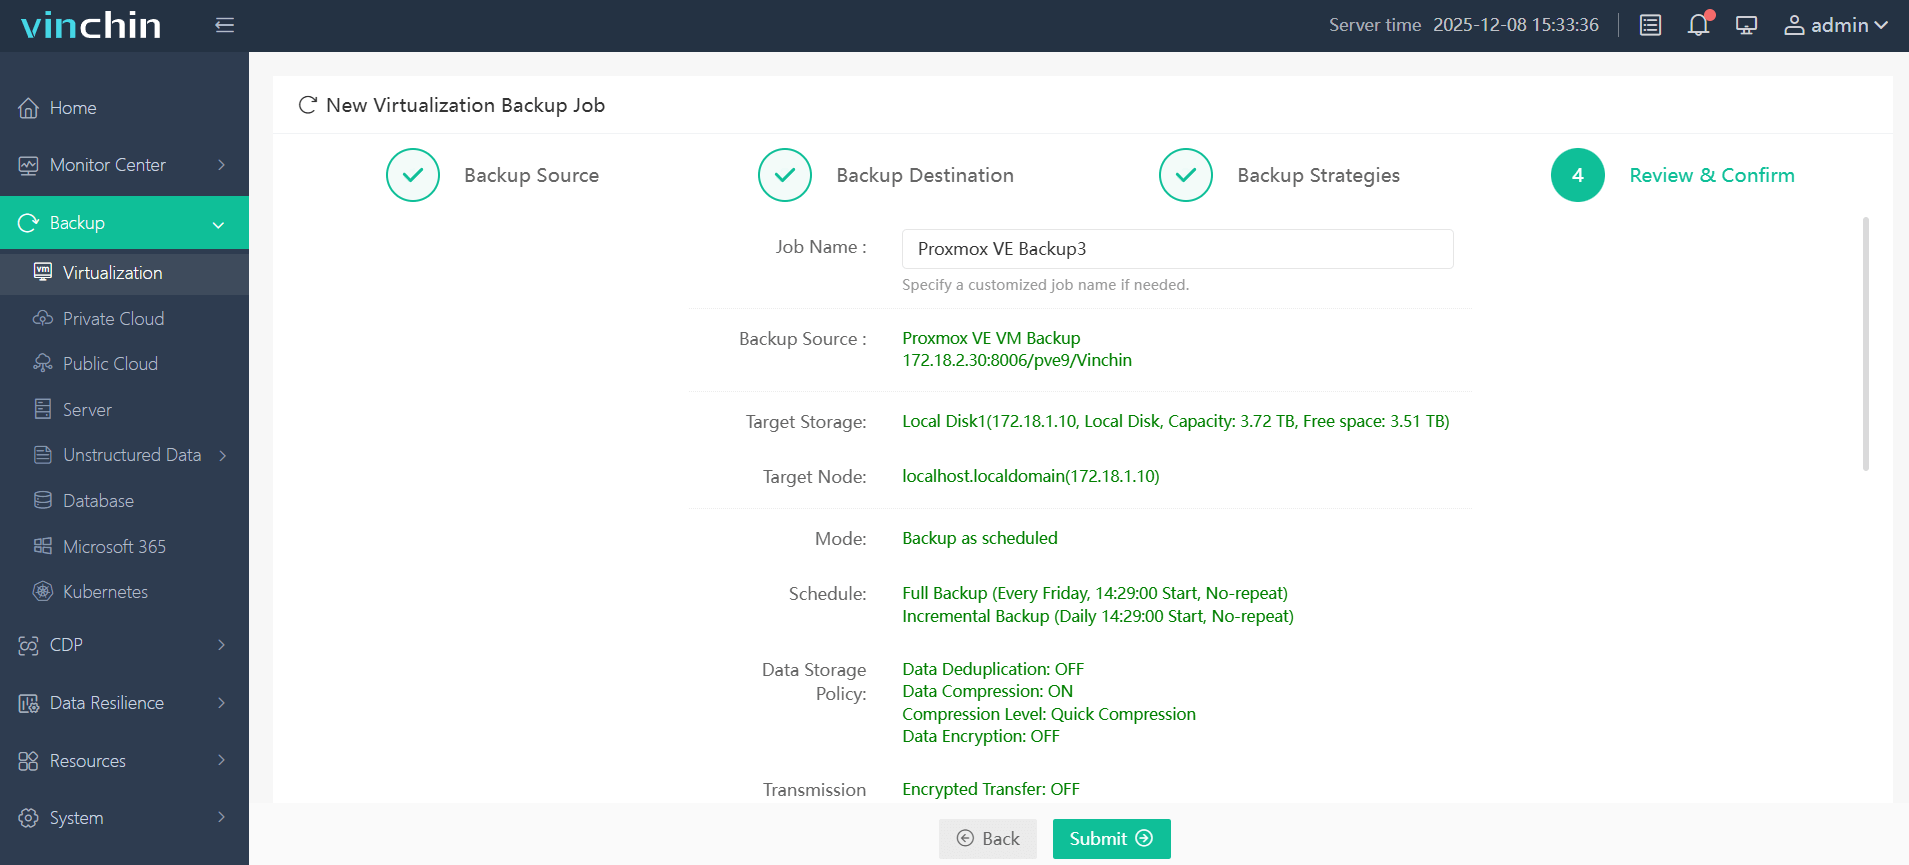
It only takes 4 steps for you to backup Proxmox VE VMs:
1. Select the backup object.

2. Select backup destination.

3. Configure backup strategies.

4. Review and submit the job.

Thousands of companies globally have already adopted Vinchin Backup & Recovery for their data protection needs. You can begin exploring its extensive capabilities with a comprehensive 60-day trial, fully equipped with all features. Contact us with the details of your Proxmox VE setup, and you will receive a customized solution that fits seamlessly with your IT landscape.
Proxmox Cloud-init FAQs
1. Hosts file /etc/hosts will reset after restart. How to solve it?
Modify the content of the /etc/cloud/cloud.cfg file and comment or delete update_etc_hosts
2. Where is the Cloud-Init configuration stored in Proxmox?
The generated configuration is stored as an ISO-like image mounted to the VM as a CD-ROM drive (usually IDE2 or SATA0). The file is generated from /etc/pve/nodes/<node>/qemu-server/<vmid>.conf settings.
Summary
Cloud-Init is a powerful and flexible tool that significantly simplifies the initialization and configuration process of cloud instances. By predefining configuration files, users can automate various initialization tasks, enhancing deployment efficiency and consistency. Whether in public or private cloud environments, Cloud-Init is an indispensable configuration management tool.
Share on:


