-
What is PCI Passthrough in Proxmox?
-
Hardware Requirements and Compatibility
-
Validating Hardware Support Before Setup
-
Enabling IOMMU in the BIOS
-
Configuring Proxmox VE for PCI Passthrough
-
Preparing Devices for Passthrough Assignment
-
Assigning Devices To Virtual Machines Using Web UI
-
Post-Passthrough Validation Inside Guest Operating System
-
Advanced Tips & Troubleshooting Scenarios
-
Enterprise-Level Backup Solution for Your Proxmox VMs
-
Proxmox PCI Passthrough FAQs
-
Conclusion
PCI passthrough is one of the most powerful features in Proxmox VE. It allows you to assign physical PCIe devices—like GPUs, network cards (NICs), or storage controllers—directly to your VMs. This can boost performance, reduce latency, and enable advanced workloads that require direct hardware access. But how do you set it up? In this guide, we’ll walk through everything from basic concepts to advanced troubleshooting so you can master pci passthrough proxmox in your environment.
What is PCI Passthrough in Proxmox?
PCI passthrough lets a VM control a physical PCIe device as if it were installed directly on its own motherboard. When you assign a device using pci passthrough proxmox, that device becomes invisible to the host system until released by the VM—it’s true hardware isolation.
Why does this matter? Some workloads need direct access to specialized hardware for speed or compatibility reasons:
Assigning a GPU for machine learning or video encoding.
Passing through a high-speed NIC for network appliances.
Giving a storage controller to ZFS or other file systems inside a VM.
At the heart of this feature is IOMMU (Input-Output Memory Management Unit). IOMMU maps device memory accesses securely between VMs and physical RAM. On Intel platforms this is called VT-d; on AMD it’s known as AMD-Vi or SVM Mode. Without IOMMU support at both CPU and motherboard level, pci passthrough proxmox won’t work reliably—or at all.
Most modern server-class CPUs support these features natively but always check your specific model’s documentation before starting.
Hardware Requirements and Compatibility
Before configuring pci passthrough proxmox, make sure your hardware supports it fully—otherwise you may run into frustrating roadblocks later on.
First: CPU Support
Intel CPUs must support VT-d.
AMD CPUs need AMD-Vi/SVM Mode.
Check your processor specs online if unsure; look for “VT-d” (Intel) or “AMD-Vi”/“SVM” (AMD).
Second: Motherboard Support
Not all chipsets implement full IOMMU functionality—even if your CPU does! Server boards usually work best; some consumer boards cut corners here.
Look up your board model on its manufacturer’s site or search community forums for success stories with pci passthrough proxmox.
Third: Device Compatibility
Most PCIe devices can be passed through—including GPUs (NVIDIA/AMD/Intel), NICs, USB controllers, RAID cards—but some have quirks:
Multi-function devices may require passing all functions together.
SR-IOV capable cards can present multiple “virtual” functions for sharing among VMs.
If possible, test with spare hardware first before deploying critical workloads!
Fourth: Firmware Settings
Update BIOS/UEFI firmware before starting—older versions may lack key virtualization options required by Proxmox VE 7.x+.
Validating Hardware Support Before Setup
It pays off to check compatibility before making changes:
1. Boot into Proxmox shell.
2. Run lscpu — confirm virtualization flags are present (vmx for Intel; svm for AMD).
3. Check available PCI devices:
lspci -nnk
Identify which devices you want to pass through later.
4. Search dmesg logs:
dmesg | grep -i iommu
If nothing appears about IOMMU being enabled after boot—even after enabling BIOS settings—you may need different hardware or firmware updates.
By confirming these points now, you avoid wasted time troubleshooting unsupported setups later!
Enabling IOMMU in the BIOS
Enabling IOMMU at firmware level is essential—the rest of pci passthrough proxmox depends on it working correctly from power-on:
1. Reboot your server and enter BIOS/UEFI setup (Delete, F2, or similar during boot).
2. Find virtualization settings under Advanced > CPU Configuration or Chipset menus.
For Intel: Enable VT-d/Intel Virtualization Technology for Directed I/O.
For AMD: Enable SVM Mode, AMD-Vi, or simply IOMMU depending on menu wording.
3. Set any found option related to “IOMMU,” “VT-d,” or “SVM Mode” to Enabled.
4. If available, enable ACS (Access Control Services)—this helps isolate multi-function devices into separate groups so they don’t interfere with each other during assignment.
5. Save changes (F10) and exit BIOS/UEFI setup.
If unsure whether settings took effect after rebooting into Proxmox again:
dmesg | grep -e DMAR -e IOMMU
You should see lines like DMAR: IOMMU enabled (Intel) or AMD-Vi: IOMMU enabled (AMD).
Without proper firmware configuration here, no amount of software tweaking will get pci passthrough proxmox working!
Configuring Proxmox VE for PCI Passthrough
With firmware ready, let's configure Proxmox itself step by step:
Step 1: Determine Your Bootloader Type
Proxmox uses either GRUB (most common) or systemd-boot depending on installation method:
Run:
efibootmgr -v
If output mentions systemd-boot, that’s what you’re using; otherwise assume GRUB unless custom-installed otherwise.
Why does this matter? The way we set kernel parameters differs between them—and those parameters are crucial for activating pci passthrough proxmox features at boot time!
Step 2: Edit Kernel Boot Parameters
Kernel parameters tell Linux how to handle virtualization extensions during early startup:
For GRUB users:
1. Open /etc/default/grub in an editor:
nano /etc/default/grub
2. Find line beginning with GRUB_CMDLINE_LINUX_DEFAULT.
3a.On Intel CPUs add:
quiet intel_iommu=on iommu=pt
3b.On AMD CPUs add:
quiet amd_iommu=on iommu=pt
Note: Modern kernels often auto-enable AMD-Vi if SVM/IOMMU are set in BIOS—but adding both flags ensures reliability across updates!
4.Save file (Ctrl+X, then Y, then Enter).
5.Update GRUB config so changes take effect next reboot:
update-grub
For systemd-boot users:
1.Open /etc/kernel/cmdline:
nano /etc/kernel/cmdline
2.Add appropriate parameters as above (intel_iommu=on iommu=pt OR amd_iommu=on iommu=pt) at end of line after existing entries like root/zfs info.
3.Save file then refresh bootloader config:
proxmox-boot-tool refresh
What do these flags mean?
intel_iommu=on: Enables VT-d engine on supported Intel chipsets;amd_iommu=on: Activates equivalent feature on supported AMD chipsets;iommu=pt: Sets pass-through mode so unused devices aren’t blocked from assignment;quiet: Reduces console noise during boot—not strictly required but keeps logs tidy!
Step 3: Load VFIO Kernel Modules
VFIO (“Virtual Function IO”) modules allow secure handoff of PCIe devices from host OS kernel space directly into guest VMs via QEMU/KVM stack:
Edit /etc/modules file so these modules load automatically every boot:
nano /etc/modules
Add lines at bottom if not already present:
vfio
vfio_iommu_type1
vfio_pci
vfio_virqfd      # Optional but improves interrupt handling stability!
Save file when done (Ctrl+X, then Y).
Step 4: Update Initramfs & Reboot Server
Updating initramfs ensures new drivers/configurations are included right from earliest stages of Linux startup process:
Run both commands below as root/sudo user:
update-initramfs -u -k all
reboot
After reboot completes successfully proceed immediately to verification steps below—don’t skip them!
Step 5: Verify That Everything Is Working So Far
Once back online run following checks:
Check that IOMMU was activated properly—
dmesg | grep -e DMAR -e IOMMU
Look for confirmation messages such as "DMAR: IOMMU enabled" (Intel) OR "AMD-Vi: Found" / "IOMMU enabled" (AMD).
Check interrupt remapping status—
dmesg | grep 'remapping'
Expect lines like "DMAR-IR: Enabled IRQ remapping..." indicating correct operation—a must-have especially when passing GPUs/NICs requiring MSI/MSI-X interrupts inside guests!
If either command returns nothing relevant double-check earlier steps carefully before proceeding further with pci passthrough proxmox configuration!
Preparing Devices for Passthrough Assignment
Now comes actual device preparation—the heart of any successful pci passthrough proxmox deployment! Here’s how you ensure safe handoff from host kernel into guest VM context...
Check Device Isolation Using IOMMU Groups
Each PCIe device sits within an "IOMMU group." Devices sharing same group cannot be assigned independently—they must move together due to shared bus resources/hardware limitations imposed by chipset design itself!
To list groups clearly run—
find /sys/kernel/iommu_groups/ -type l | sort | while read link; do \
group=$(echo $link | cut -d'/' -f5); \
device=$(basename $link); \
echo "Group $group : $(lspci -nns $device)"; done;
Identify target device(s)—if grouped alone great! If not try moving card(s) physically between slots OR enabling ACS ("Access Control Services") override in BIOS if available...
As last resort only consider adding kernel parameter—
pcie_acs_override=downstream,multifunction
to break up stubborn groups—but beware security implications since strict isolation guarantees are lost when using override tricks!
Blacklist Host Drivers So They Don’t Claim Device First
For many GPUs/NICs/storage controllers default Linux drivers grab control too early preventing clean VFIO handoff... Solution? Blacklist those drivers explicitly—
Edit /etc/modprobe.d/blacklist.conf :
For NVIDIA GPUs add lines—
blacklist nouveau
blacklist nvidia
blacklist nvidiafb
blacklist nvidia_drm
For AMD GPUs add—
blacklist amdgpu
blacklist radeon
For Intel iGPUs add—
blacklist i915
Save file when done! Note—for headless servers only; don’t blacklist primary display adapter used by host console unless alternate remote management path exists...
Bind Device IDs To VFIO Driver At Boot Time
Find vendor/device IDs using—
lspci -nnk        # Look up format [vendorID]:[deviceID]
# Example output snippet...
# 01:00.0 VGA compatible controller [0300]: NVIDIA Corporation GP107GL [Quadro P400] [10de:1cb3]
#           ^^^^^^^^^^^^^^^^^^^^^^^^^^^^^^^^^^^^^^^^^^^^^^^^      ^^^^ ^^^^
#            Description                                         Vendor Device IDs respectively!
#
# If card has audio function too you'll see something like...
# 01:00.1 Audio device [0403]: NVIDIA Corporation GP107GL High Definition Audio Controller [10de:0fb9]
#
# Both IDs must be bound together!
#
nano /etc/modprobe.d/vfio.conf       # Add line below replacing IDs accordingly...
options vfio-pci ids=10de:1cb3,10de:0fb9
#
update-initramfs -u -k all           # Rebuild initramfs again!
reboot                               # One more reboot needed...
Now VFIO driver claims those exact IDs automatically every time system boots—no manual intervention required going forward...
Assigning Devices To Virtual Machines Using Web UI
With groundwork complete assigning actual hardware via web interface is straightforward yet powerful...
1.Select target VM under left navigation tree inside web UI dashboard;
2.Go to Hardware tab;
3.Click bolded button labeled Add, choose option "PCI Device";
4.In dialog select "Raw Device" mode then pick desired entry matching earlier lspci output;
5.For multi-function cards check boxes "All Functions" AND "Primary GPU" where applicable;
6.Advanced options include toggling "PCI Express", "ROM-Bar", etc.—enable only if recommended by vendor docs/community guides specific to card type/model!
7.Click bolded button labeled "Add".
Start/restart VM afterwards—the guest operating system should now detect real physical device just like bare metal install would...
Post-Passthrough Validation Inside Guest Operating System
Assigning isn’t enough—you want proof everything works as intended! Here’s how admins validate success quickly regardless whether running Windows/Linux guests...
On Linux Guests
Open terminal window inside guest OS run—
lspci | grep VGA         # Should show expected GPU model/vendor string...
lsmod | grep vfio_pci    # Should confirm vfio-pci module loaded actively...
dmesg                    # Scan log buffer near end looking out specifically errors/warnings mentioning passed-through device(s)!
glxinfo                  # Useful sanity check confirming OpenGL renderer matches expected discrete GPU name/version...
ethtool <interface>      # For NICs confirms link speed/features match expectations...
smartctl                 # For storage controllers validates SMART data visible/pollable etc...
On Windows Guests
Open Device Manager look under Display Adapters/Sound Controllers/etc.—passed-through items appear without warning triangles/exclamation marks once correct drivers installed...
If error code appears ("Error 43" common w/NVIDIA cards): See troubleshooting tips below regarding hypervisor signature hiding/workarounds!
Optional tool suggestion—for deep dives use NirSoft DevManView utility which gives detailed breakdown including driver version/date/status fields per detected component...
Advanced Tips & Troubleshooting Scenarios
Even experienced admins hit snags sometimes... Here are proven solutions covering most frequent issues seen deploying pci passthrough proxmox today—
Always set VM machine type = q35 + OVMF UEFI firmware combo wherever possible—it maximizes compatibility especially w/GPU assignments!
Pass ALL functions belonging same card together e.g., graphics + HDMI audio block else Windows/Linux guests may fail initialization silently!
Install latest official drivers INSIDE GUEST OS—not host—for whatever card/controller being assigned…
NVIDIA Error Code 43 workaround—in VM config (.conf file under
/etc/pve/qemu-server/<vmid>.conf) append line:args:-cpu host,kvm=on,hv_vendor_id=null. This hides KVM/QEMU signature fooling driver checks…Some older/midrange AMD GPUs suffer reset bug preventing reuse across multiple starts/stops without cold reboot… Solution? Install open-source
vendor-resetDKMS module on host side following GitHub instructions closely…If facing interrupt mapping errors try adding kernel parameter:
vfio_iommu_type1.allow_unsafe_interrupts=1. Use only as temporary measure pending proper fix since disables strict safety checks…Passing USB controllers often requires entire hub/group due chipset design limits… Confirm grouping via earlier scripts/lspci output…
NVMe SSDs timing out? Add kernel flag:
nvme_core.default_ps_max_latency_us=0.
Remember—always document every change made along way so rollback/troubleshooting remains easy even months later…
Enterprise-Level Backup Solution for Your Proxmox VMs
Once you've configured advanced workloads using PCI passthrough in Proxmox VE, it's crucial to safeguard those virtual machines against data loss events—from accidental deletion to ransomware attacks or hardware failure—which brings us seamlessly to backup strategy considerations tailored specifically for enterprise environments like yours.
Vinchin stands out as a professional-grade virtual machine backup solution designed precisely with enterprise needs in mind—and offers robust support not just for Proxmox VE but also VMware vSphere/ESXi/vCenter, Hyper-V, oVirt/RHV/OLVM, XCP-ng/XenServer/Citrix Hypervisor, OpenStack KVM clouds/ZStack/Huawei FusionCompute/H3C CAS UIS/Sangfor HCI environments—a total of over fifteen mainstream virtualization platforms worldwide! Since you're working with Proxmox here specifically, Vinchin's native integration ensures seamless protection workflows tailored exactly around this platform's architecture alongside others mentioned above should hybrid infrastructure come into play down the road.
Key highlights include forever-incremental backup technology—which minimizes storage usage by capturing only changed blocks after an initial full backup—as well as built-in deduplication/compression engines that dramatically reduce backup footprint without sacrificing restore speed. Vinchin also enables cross-platform V2V migration between supported hypervisors, giving IT teams flexibility during upgrades/cloud transitions. Other standout features cover scheduled/repetitive backups, data encryption, multi-thread transmission, GFS retention policy, and granular restore capabilities—all accessible via an intuitive web-based console designed even non-specialists can master quickly.
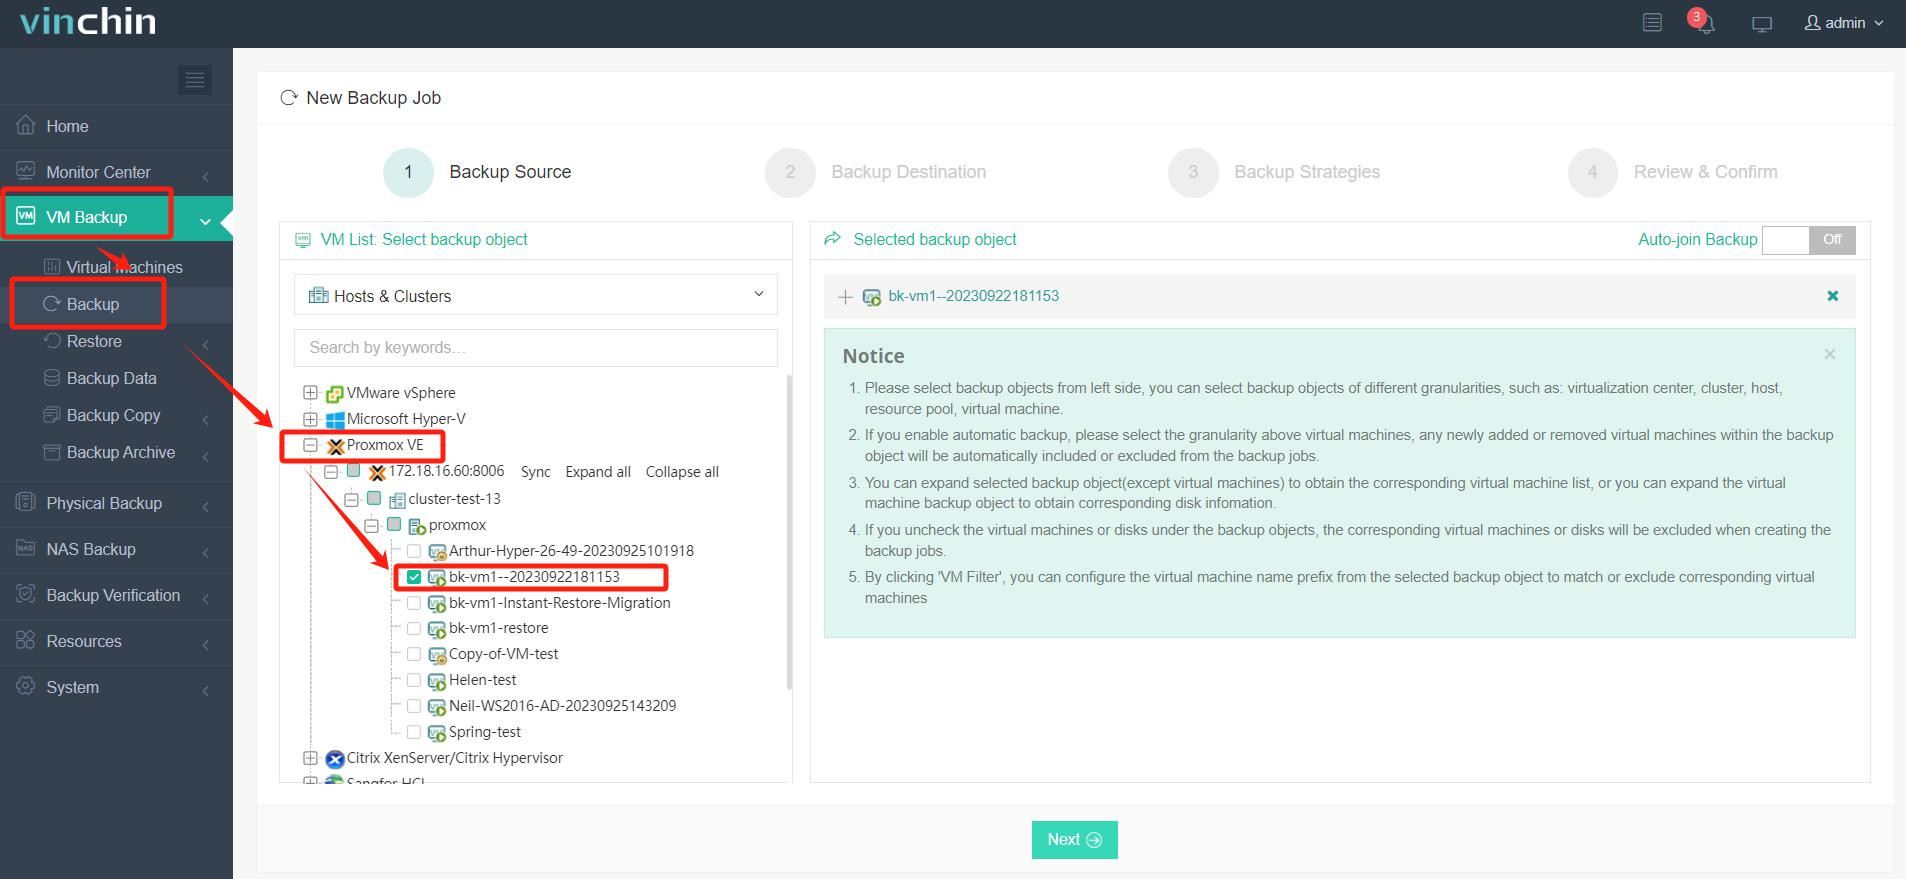
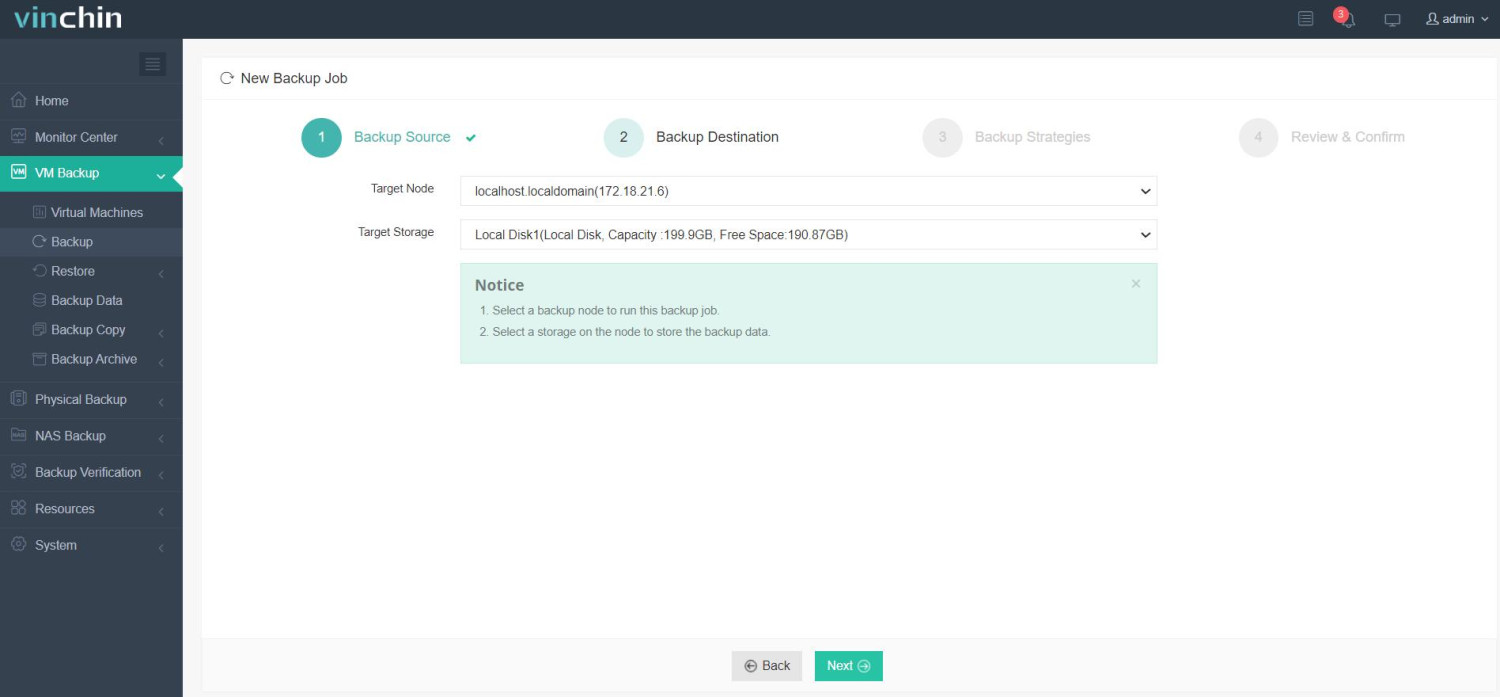
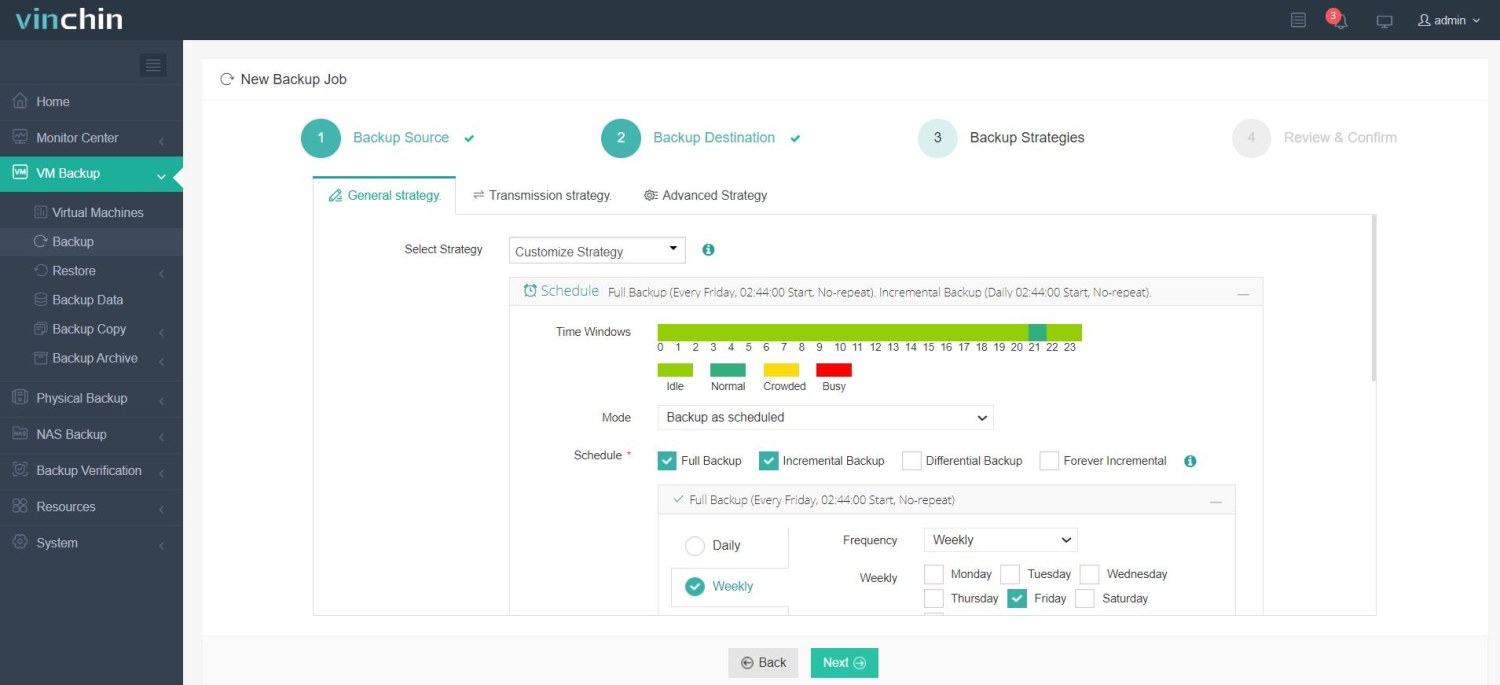
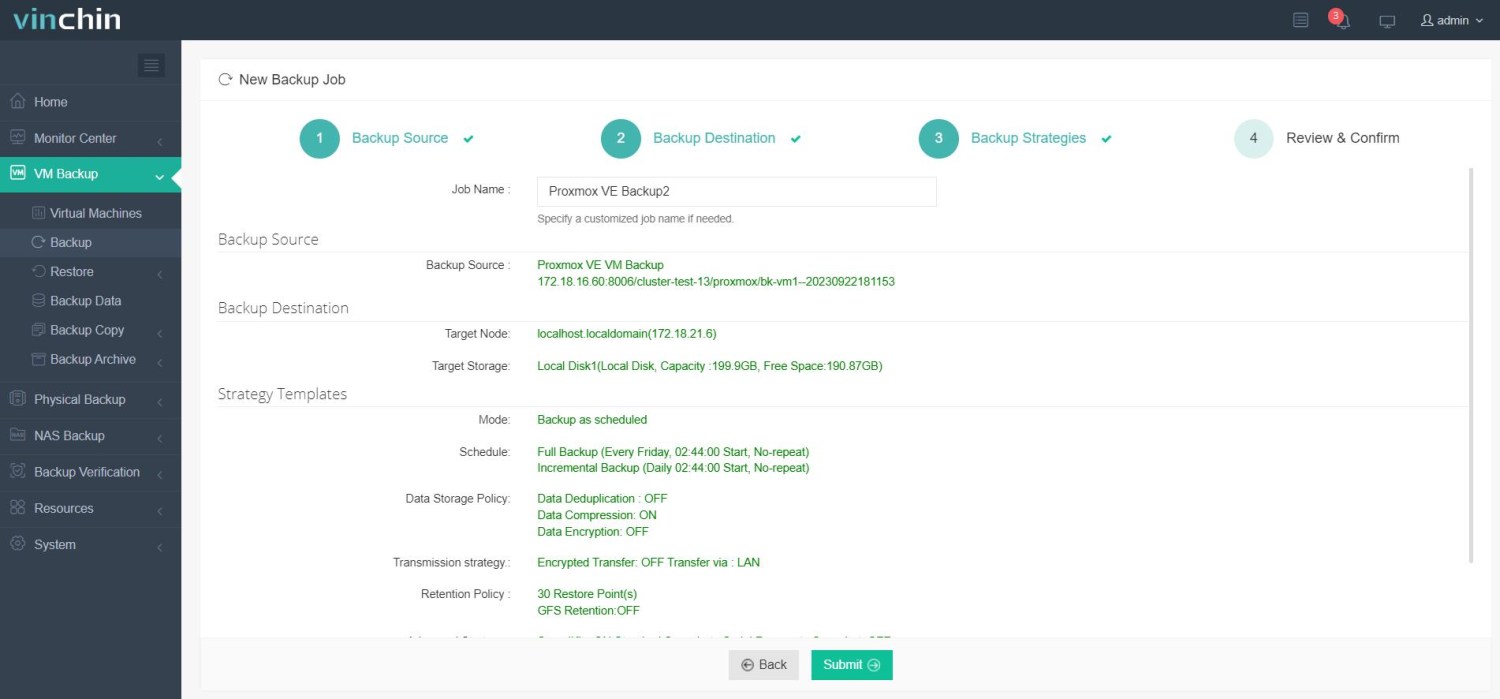
Backing up a Proxmox VM takes just four streamlined steps within Vinchin's web interface:
(1) Select the target VM from inventory;

(2) Choose preferred backup storage;

(3) Configure backup strategies;

(4) Submit job—with progress monitoring built right in.

No complex scripting required,and recovery operations are equally straightforward thanks to instant restore/granular recovery tools built atop Vinchin's reliable engine architecture trusted globally by thousands of organizations large and small alike. Download their fully-featured free trial valid sixty days, and experience effortless deployment firsthand—just click below, get started, and protect what matters most today!
Proxmox PCI Passthrough FAQs
Q1: How can I safely revert my server back if my passed-through GPU causes black screen after reboot?
A1: Connect remotely via SSH, edit blacklist/vfio.conf files, remove problematic entries , update initramfs, then reboot; fallback using integrated graphics port if available.
Q2: Why does my USB controller disappear from both host & guest after assignment ?
A2: Many USB hubs/controllers share their group; always pass entire group rather than single function whenever possible.
Q3: What performance gain should I expect compared with emulated virtual hardware ?
A3: Near-native speeds – typically over90%of bare-metal throughput – provided no bottlenecks elsewhere( e.g., insufficient CPU/RAM allocation ).
Conclusion
PCI passthrough unlocks Proxmox VE's full potential by granting VMs direct hardware access, delivering near-native performance for GPUs, NICs, and storage controllers. Success hinges on strict hardware compatibility (CPU, motherboard IOMMU support) and precise configuration—enabling IOMMU in BIOS, binding devices to VFIO drivers, and isolating functions correctly. While setup demands attention to detail, the payoff in reduced latency and specialized workload support is substantial. Always validate groups via lspci/dmesg, and leverage Proxmox’s Web UI for assignment. Master these steps, and PCI passthrough becomes a transformative tool in your virtualization arsenal.
Share on:


