-
What is Proxmox GPU Passthrough?
-
Prerequisites for GPU Passthrough on Proxmox
-
How to Set Up GPU Passthrough on Proxmox?
-
Don't Forget to Back Up Your VM!
-
Proxmox GPU Passthrough FAQs
-
Conclusion
GPU passthrough gives a VM direct access to a physical GPU. It boosts performance for compute or graphics tasks. This article shows how to set up GPU passthrough on Proxmox VE.
What is Proxmox GPU Passthrough?
GPU passthrough binds a host GPU to a VM via VFIO. The host kernel detaches the GPU and hands it to the guest. This yields near-native performance. Proxmox VE leverages KVM and VFIO modules to handle this binding. You must verify hardware support and configure IOMMU. Expect to adjust BIOS and kernel so the host gives exclusive control to the VM.
Prerequisites for GPU Passthrough on Proxmox
Before you begin, confirm CPU, motherboard, BIOS, and GPU support. The CPU must support IOMMU: Intel VT-d or AMD-Vi. BIOS must enable those options and 4G decoding or Above 4G decoding.
Warn: Passing through the host's primary GPU may render the host unreachable without out-of-band access such as IPMI or KVM-over-IP. Some systems need disabling CSM/legacy boot if you pass the only GPU used for host console. For UEFI VMs, the GPU ROM must support UEFI GOP; otherwise SeaBIOS works but limits features. Load VFIO modules: vfio, vfio_pci, vfio_iommu_type1 (and vfio_virqfd on older Proxmox). Check IOMMU groups isolate GPU and its audio; avoid sharing with critical devices. Use Proxmox API or lspci -nnk to inspect groups.
Warning on ACS Override
Some hardware lacks proper ACS grouping. You can add pcie_acs_override=downstream or use vfio_iommu_type1.allow_unsafe_interrupts=1. Use only if needed. ACS override may introduce security or stability risks. Prefer hardware with native isolation.
How to Set Up GPU Passthrough on Proxmox?
1. Host Configuration
First, enable IOMMU in BIOS or UEFI. Enable “Intel VT-d” or “AMD IOMMU” and “Above 4G decoding” if present. Disable CSM if using UEFI for the host console on the GPU. Reboot into Proxmox VE.
Edit GRUB safely. For Intel run:
sed -i 's/GRUB_CMDLINE_LINUX_DEFAULT="[^"]*/& intel_iommu=on iommu=pt/' /etc/default/grub
For AMD run:
sed -i 's/GRUB_CMDLINE_LINUX_DEFAULT="[^"]*/& amd_iommu=on iommu=pt/' /etc/default/grub
If ACS override is needed, append pcie_acs_override=downstream after space. Then run update-grub and reboot. Verify IOMMU activation: cat /proc/cmdline | grep iommu and dmesg | grep -e DMAR -e AMD-Vi. You should see interrupt remapping enabled.
2. Load and Blacklist Modules
Create a dedicated modprobe file for VFIO:
echo -e "vfio\nvfio_pci\nvfio_iommu_type1" > /etc/modules-load.d/vfio.conf
On older Proxmox, also load vfio_virqfd. Blacklist GPU drivers via separate files. For NVIDIA:
echo "blacklist nouveau" > /etc/modprobe.d/blacklist-nouveau.confecho "blacklist nvidiafb" > /etc/modprobe.d/blacklist-nvidia.conf
For AMD:
echo "blacklist amdgpu" > /etc/modprobe.d/blacklist-amdgpu.confecho "blacklist radeon" > /etc/modprobe.d/blacklist-radeon.conf
For Intel iGPU:
echo "blacklist i915" > /etc/modprobe.d/blacklist-i915.conf
After blacklisting, regenerate initramfs: update-initramfs -u. Debug initramfs issues: journalctl -b 0 | grep vfio. Reboot and confirm lsmod | grep vfio.
3. Verify IOMMU Grouping
Run:
pvesh get /nodes/<nodename>/hardware/pci --pci-class-blacklist ""
or inspect /sys/kernel/iommu_groups. Identify the GPU and its audio function group. Ensure no critical devices share the group. If grouping is broad, use ACS override in GRUB, then reboot and recheck. Confirm ACS messages in logs: dmesg | grep ACS.
Use lspci -tv to map devices to CPU sockets. This helps optimize NUMA locality. Choose host CPU and VM CPU pinning to align with GPU’s NUMA node.
4. Host Module Binding (Advanced)
If auto-binding fails, specify IDs in VFIO config:
echo "options vfio-pci ids=1234:5678,abcd:ef01" > /etc/modprobe.d/vfio-ids.conf
Replace with vendor:device IDs from lspci -nn. Add softdep if needed:
echo "softdep <drivername> pre: vfio-pci" > /etc/modprobe.d/<drivername>.conf
Update initramfs and reboot. Confirm GPU binds to vfio-pci via lspci -nnk.
5. VM Configuration
Under Machine and firmware, choose q35 chipset. For UEFI, select OVMF. Ensure firmware variables partition ≥1MB (Proxmox auto handles). Verify GPU ROM supports UEFI GOP. If not, use SeaBIOS but expect limits.
In the VM's Hardware tab, click Add then PCI Device. Select GPU address (e.g., 00:02.0). Check All Functions if audio is separate. Enable PCIe (pcie=on). If it’s the only GPU, check Primary GPU (x-vga=on). Via CLI:
qm set <VMID> -machine q35 -hostpci0 01:00.0,pcie=on,x-vga=on
For multifunction:
qm set 100 -hostpci0 01:00.0,rombar=0 -hostpci1 01:00.1
Tie this config to the VM used for GPU tasks.
6. Guest OS Setup
Install the guest OS normally. Windows: load official GPU drivers ≥ version 465 for NVIDIA to avoid Code 43. Hide hypervisor: add CPU args:
args: -cpu 'host,kvm=off,hv_vendor_id=proxmox'
If vendor locks driver, dump GPU ROM or spoof IDs in VM advanced settings. Linux: install drivers, test CUDA/OpenCL or graphical apps. A local monitor attached to GPU or RDP/VNC inside guest is needed; Proxmox console won’t show GPU output.
Don't Forget to Back Up Your VM!
To ensure your Proxmox VMs are protected during GPU passthrough configuration or future updates, it's essential to have a reliable backup solution in place. Vinchin Backup & Recovery is a professional, enterprise-level VM backup solution that supports Proxmox VE along with other leading platforms like VMware, Hyper-V, XenServer, oVirt, and more. With features like agentless backup, CBT-based incremental backup, instant recovery, and automatic scheduling, Vinchin helps safeguard your Proxmox virtual environment with minimal effort. Whether you're running compute-intensive workloads or GPU-accelerated VMs, Vinchin ensures your data and configurations remain safe and recoverable.
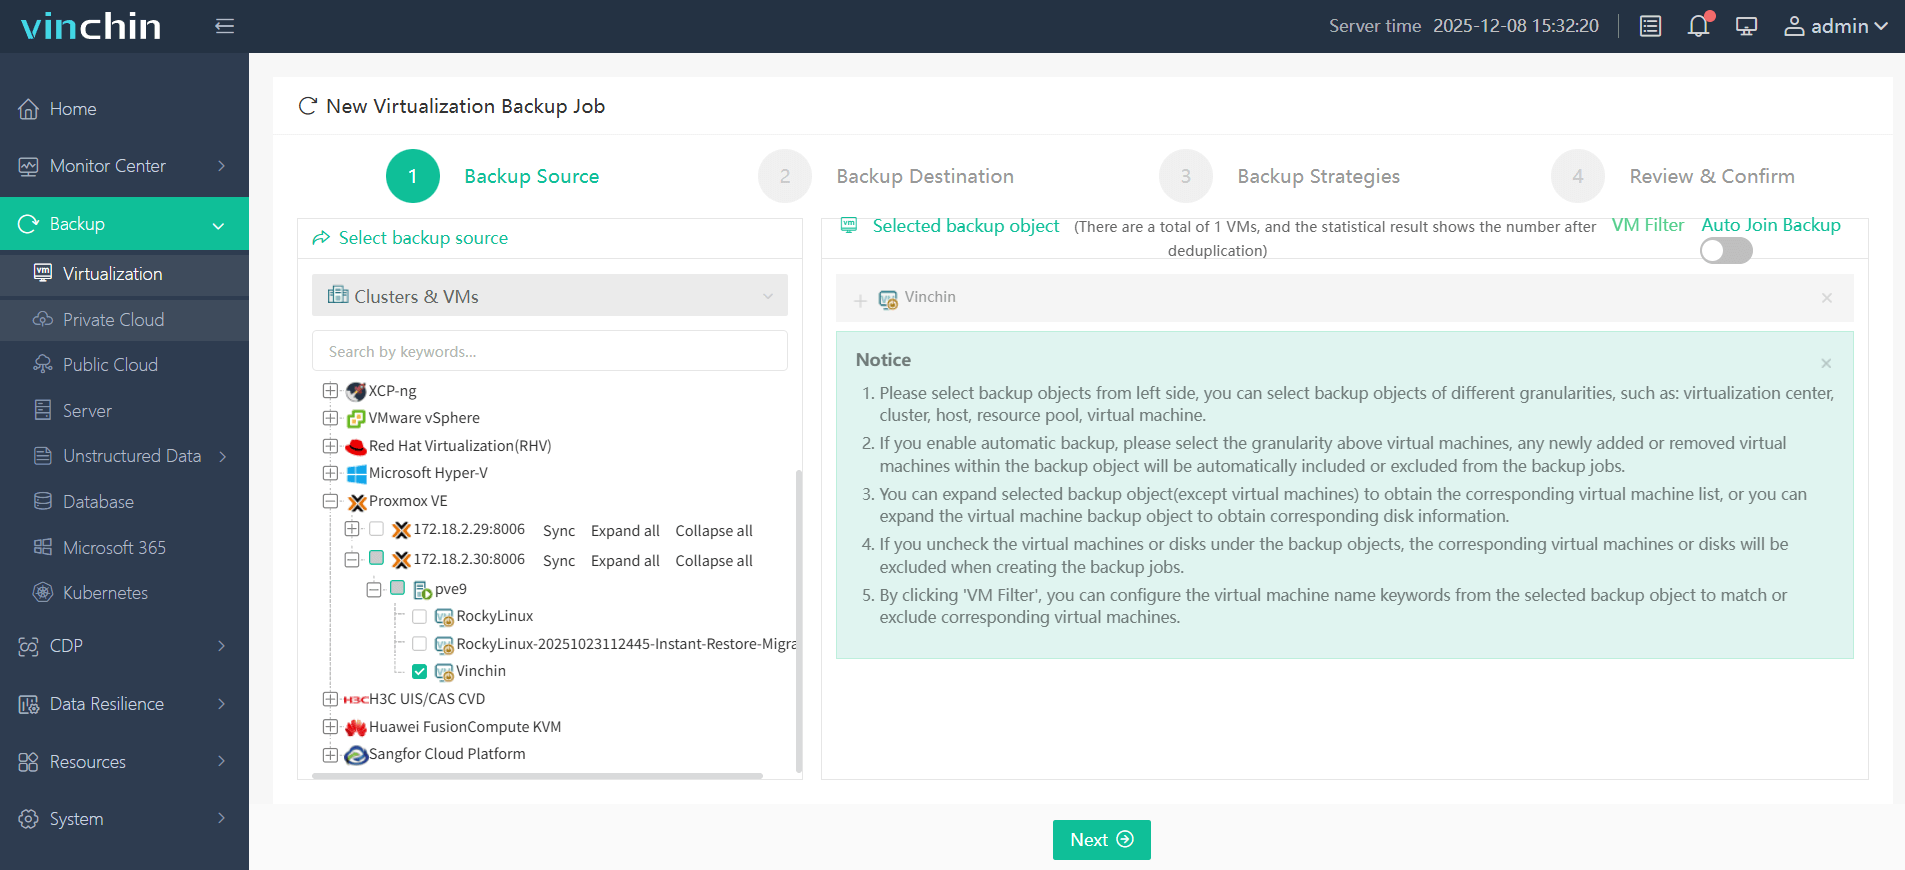
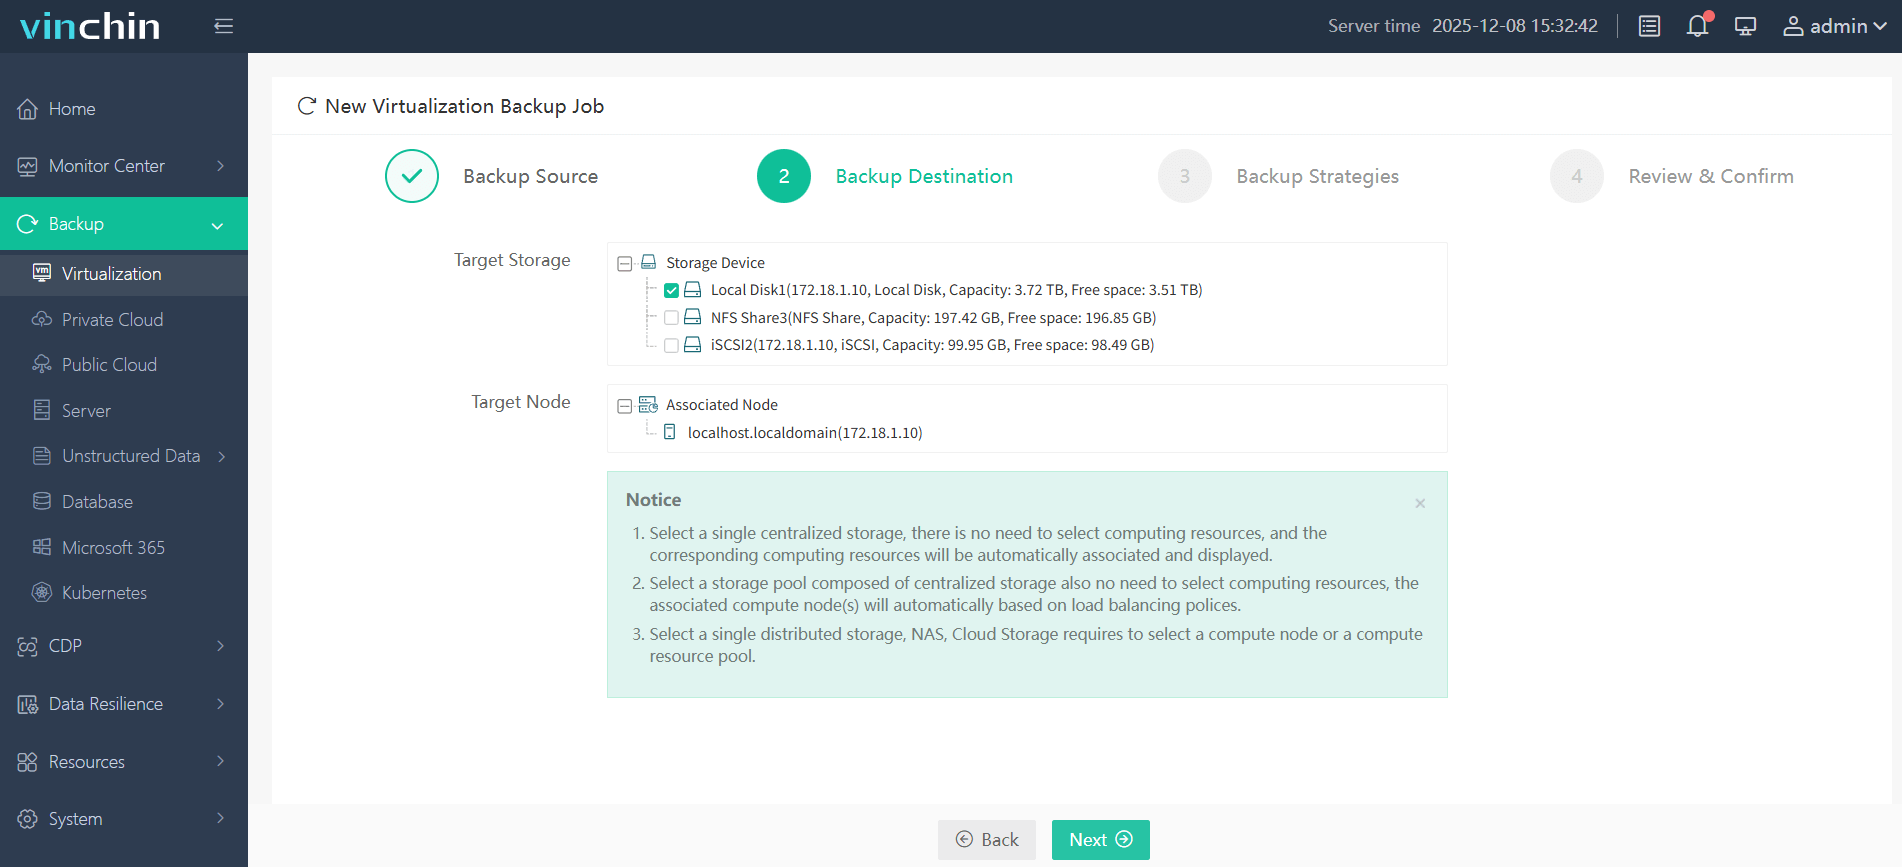
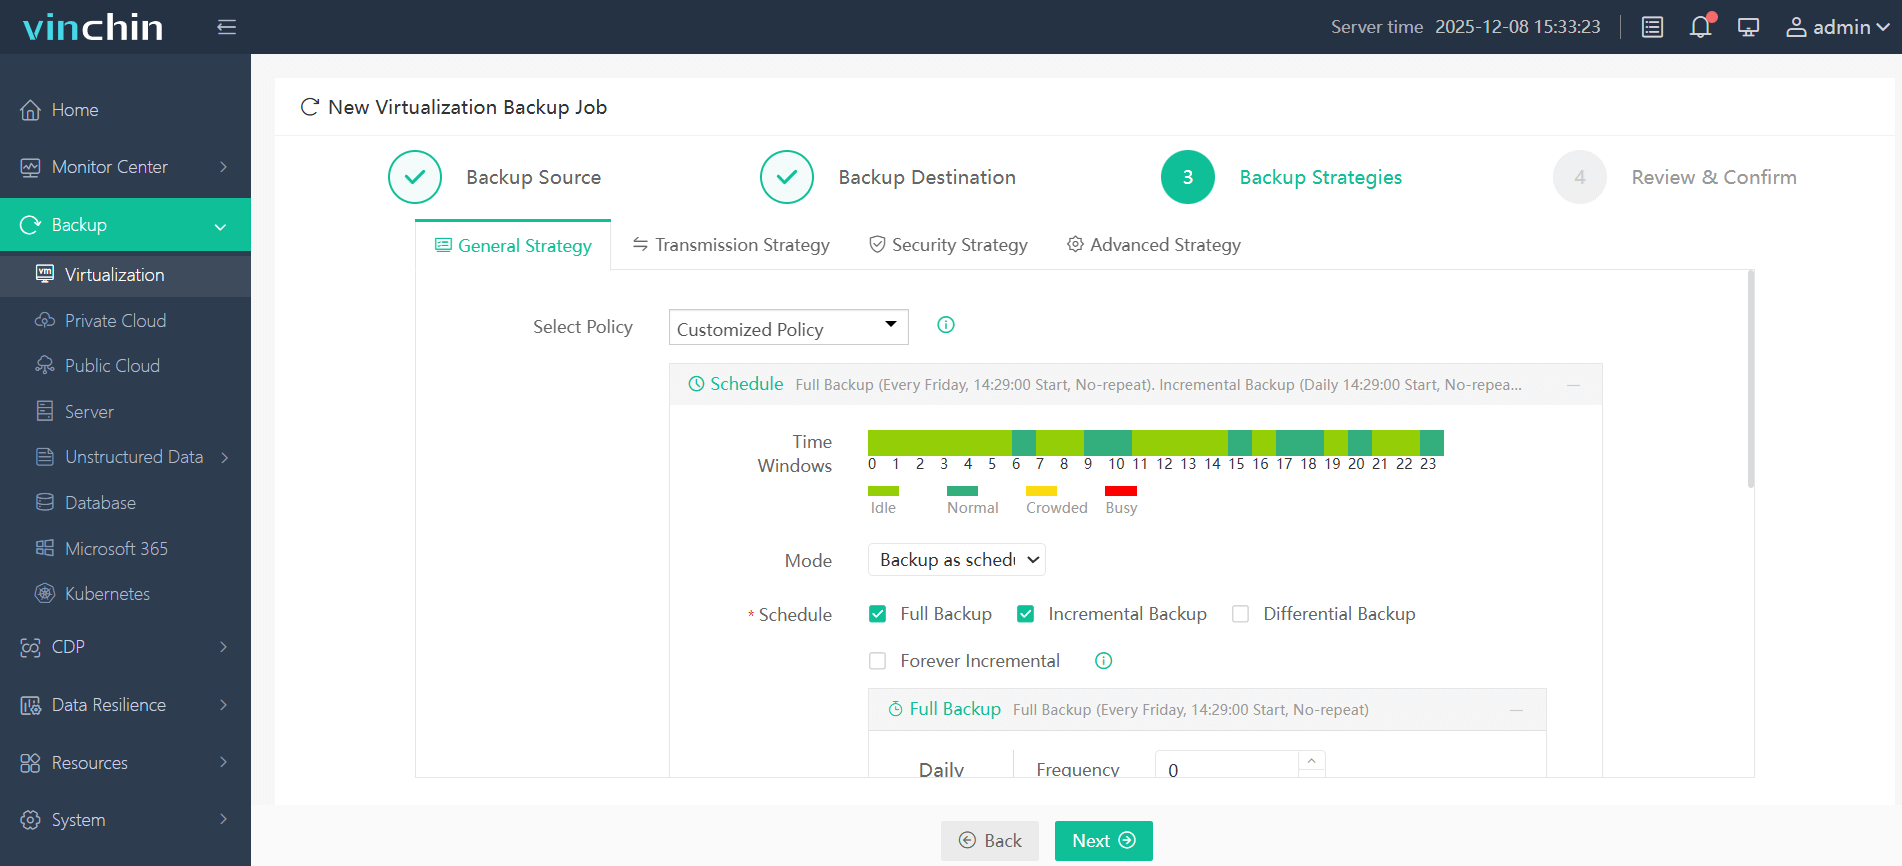
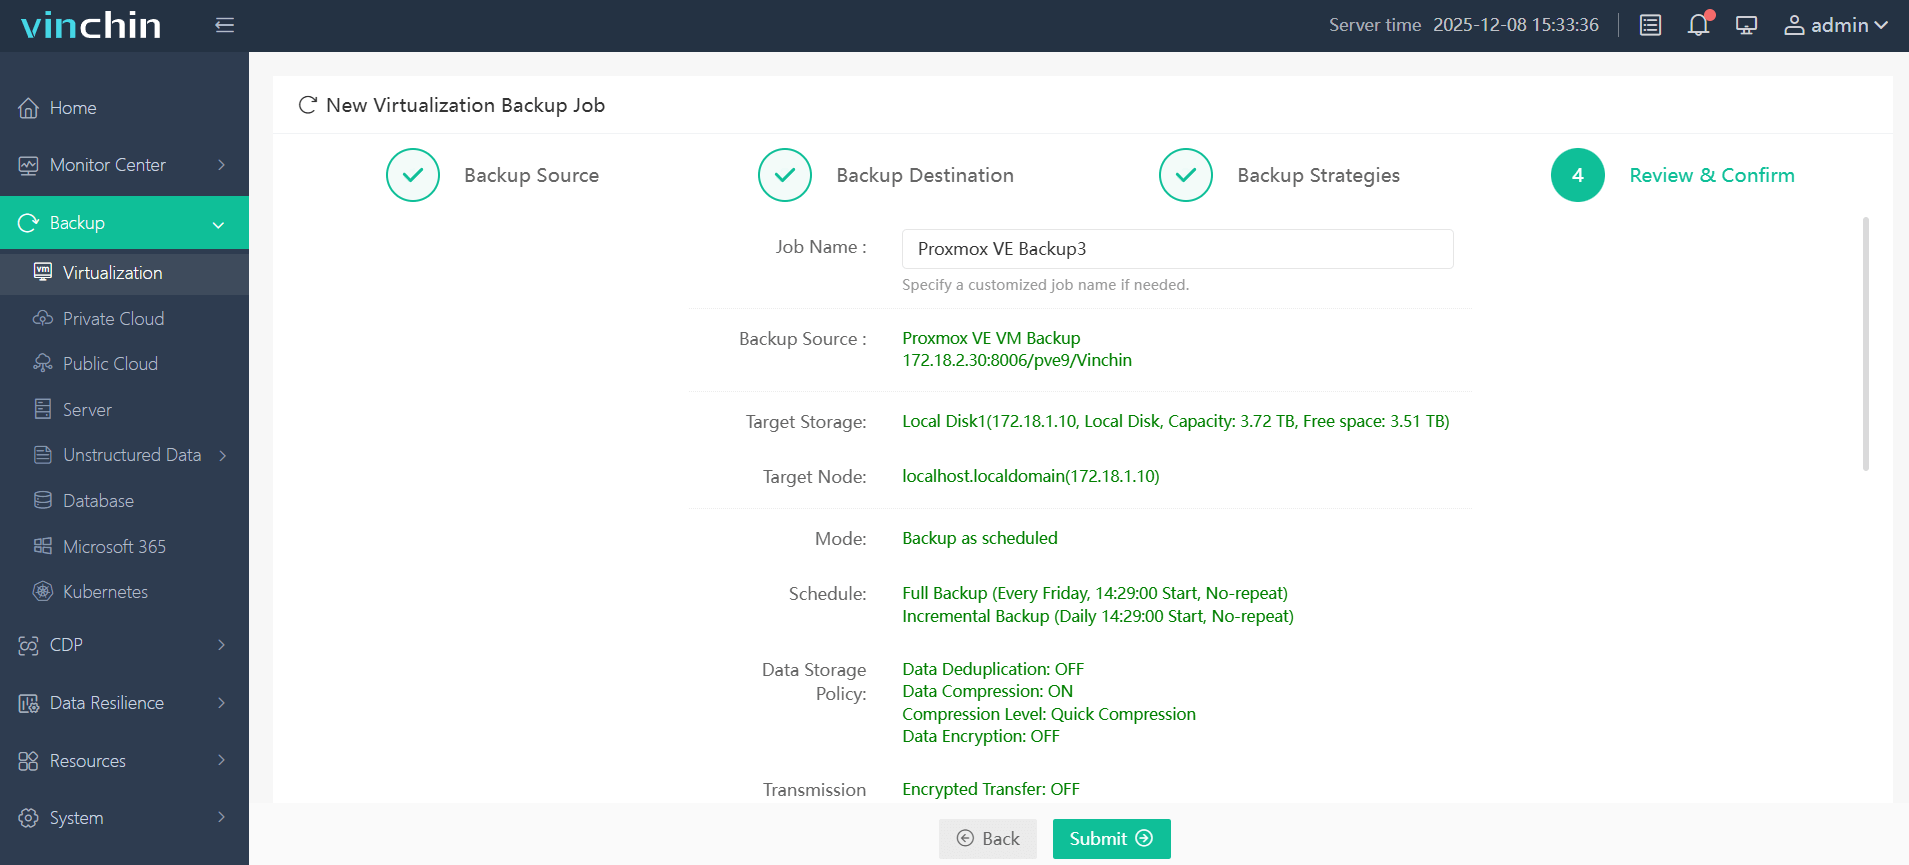
To back up your Proxmox VM, follow four steps tied to that VM:
1. Select the Proxmox VM to back up

2. Choose backup storage

3. Configure the backup strategy

4. Submit the job

Vinchin enjoys a global user base and high ratings. Get a 60-day full-featured free trial now.
Proxmox GPU Passthrough FAQs
Q1: How to check CPU IOMMU support?
A1: Run dmesg | grep -e DMAR -e AMD-Vi and look for interrupt remapping enabled.
Q2: How to isolate GPU in IOMMU group?
A2: Use ACS override only if needed: add pcie_acs_override=downstream to GRUB and reboot to separate devices.
Q3: How to access guest display when console is blank?
A3: Attach monitor to GPU or set up RDP/VNC inside the guest OS.
Q4: Why does passed-through GPU show "Error 43"?
A4: Hide Hyper-V/KVM, use latest drivers, spoof vendor/device IDs or dump GPU ROM if locked.
Conclusion
GPU passthrough on Proxmox unlocks high performance for VMs. Follow hardware checks, BIOS tweaks, and kernel edits. Load VFIO modules, isolate IOMMU groups, and bind GPU to VFIO. Configure VM with q35 and OVMF when possible. Tune CPU pinning and NUMA for best results. Troubleshoot Code 43, reset bugs, and logs. Always back up before key changes. Vinchin provides reliable backups to safeguard your VMs and data.
Share on:


