-
What is GPU Passthrough?
-
Advantages of GPU Passthrough
-
How to Connect a GPU to a Hyper-V Virtual Machine?
-
Professional Hyper-V Protection Solution
-
Add GPU to Hyper-V FAQs
-
Conclusion
The image of the virtual machine is rendered by the CPU. However, it is well known that CPU-rendered graphics are not just unattractive—they are practically unwatchable. Even with enhanced sessions based on RDP, the improvement is limited to a slight increase in clarity. Originally, DirectX was disabled, and after enabling enhanced sessions, further disabling of DirectDraw and AGP made things even worse. Therefore, a method must be found to enable the virtual machine to use a GPU.
What is GPU Passthrough?
GPU passthrough refers to bypassing the OS layer and assigning the physical device (in this case, the GPU) directly from the PCI slot to the VM. Normally, PCI devices are provided to VMs via the host OS, where the OS identifies the PCI device and then emulates it for the VM. Passthrough, however, assigns the physical device directly to the VM, so the VM perceives it as a physical card. Regular device emulation involves the Host OS driver, Qemu’s virtual driver, and then forwarding to the Guest OS driver. In this case, the VM sees only an emulated device.
Advantages of GPU Passthrough
1. Minimal Performance Loss: Whether it's for AI applications, deep learning, or scientific computing, GPU passthrough allows maximum GPU utilization. Since there's no emulation or conversion process, performance loss is negligible. GPU performance in a passthrough VM is within 5% of bare-metal performance. With thousands of compute units, GPUs excel at parallel computation.
2. Great Feature Compatibility: Unlike emulated or virtualized GPUs, passthrough allows direct installation of the manufacturer’s drivers within the VM. This enables full usage of GPU features like 3D graphics rendering, hardware video encoding/decoding, AI, machine learning, and even the latest multi-GPU interconnects.
3. No Vendor Lock-in: Migrating GPU servers to the cloud is simple. Thanks to GPU passthrough, the process can be completed in a matter of days.
How to Connect a GPU to a Hyper-V Virtual Machine?
1. Retrieve GPU Information
Run the following PowerShell command (PowerShell 2.0 and PowerShell ISE are both acceptable, but must be run as Administrator):
Get-VMHostPartitionableGpu
Note the Name of the GPU you want to connect. AMD’s code should be something like VEN\_1002.
2. Remove the Original GPU Partition Adapter from the VM (An error may occur, but it can be ignored):
$vm = "001"
Remove-VMGpuPartitionAdapter -VMName $vm
Here, the VM is named "001". Replace "001" with your actual VM name.
3. Add a GPU Partition Adapter to the VM (example with RTX 4060) and configure it.
$vm = "Enter your VM name here"
$gpu_path = "Enter the Name you just obtained"
Add-VMGpuPartitionAdapter -VMName $vm -InstancePath $gpu_path
Set-VMGpuPartitionAdapter -VMName $vm
-MinPartitionVRAM 80000000 -MaxPartitionVRAM 100000000 -OptimalPartitionVRAM 100000000
-MinPartitionEncode 80000000 -MaxPartitionEncode 100000000 -OptimalPartitionEncode 100000000
-MinPartitionDecode 80000000 -MaxPartitionDecode 100000000 -OptimalPartitionDecode 100000000
-MinPartitionCompute 80000000 -MaxPartitionCompute 100000000 -OptimalPartitionCompute 100000000

Set-VM -GuestControlledCacheTypes $true -VMName $vm
Set-VM -LowMemoryMappedIoSpace 1Gb -VMName $vm
Set-VM -HighMemoryMappedIoSpace [Enter the amount of memory you allocated to the VM in GB]GB -VMName $vm
Explanation:
-MinPartitionVRAM, -MaxPartitionVRAM, -OptimalPartitionVRAM: Set the minimum, maximum, and optimal VRAM allocation for the GPU partition.
-MinPartitionEncode, -MaxPartitionEncode, -OptimalPartitionEncode: Set encoding resource allocation.
-MinPartitionDecode, -MaxPartitionDecode, -OptimalPartitionDecode: Set decoding resource allocation.
-MinPartitionCompute, -MaxPartitionCompute, -OptimalPartitionCompute: Set computing resource allocation, in bytes.
Note: Values should not exceed those provided by the GPU. For simplicity, you can set all values equal.
Set-VM -GuestControlledCacheTypes $true: Allows the guest OS to control cache types.
Set-VM -LowMemoryMappedIoSpace 1Gb: Sets low memory-mapped I/O space to 1GB.
Set-VM -HighMemoryMappedIoSpace ...: Set high memory-mapped I/O space to match the VM's allocated memory.
4. After completing the steps above, start the VM and it should detect the GPU. However, it still lacks the necessary drivers.
Essentially, the GPU is functioning on the host, and the virtual machine receives a passthrough signal. Therefore, the VM must use the same drivers as the host, and the driver files should be placed in a portal-like folder.
5. Locate the Driver Folder
Press Win + R, enter dxdiag, and generate a report.
6. In the report, press Ctrl + F, search for "Card name", and locate your target GPU.
7. Copy the NVIDIA driver folder to the virtual machine’s directory:
C:\WINDOWS\System32\HostDriverStore\FileRepository
(Create the folder if it doesn’t exist. The VM should be in Enhanced Session mode).
However, in practice, the folder cannot be copied directly—probably due to permission issues. The host’s system folders are hidden from the VM. The workaround is:
Copy the folder to the host’s desktop → then to the VM’s desktop → finally move it to the target directory.
Enhanced Session is an RDP-based interaction technology, similar to streaming, that connects the trusted portions between the host and VM. In this mode, files can be copied between the host and VM.
8. Restart the VM. The GPU should now be successfully connected.
Professional Hyper-V Protection Solution
However, while GPU passthrough significantly improves the graphics performance and computational capabilities of virtual machines, it also introduces technical complexity. It requires hardware support (like VT-d/IOMMU), driver compatibility, intricate system configurations, and may limit portability between hosts. For organizations managing large-scale virtualization environments or hybrid deployments, flexibility and robust data protection become equally important alongside performance.
This is where Vinchin Backup & Recovery plays a crucial role. It is designed to provide comprehensive data protection and disaster recovery for virtualized environments, including those using Microsoft Hyper-V. It is developed to address the needs of businesses looking for reliable and efficient ways to backup and restore their virtual machines in the event of data loss, system failures, or other catastrophic events.
It also supports VMware vSphere, XenServer, XCP-ng, oVirt, RHV, OpenStack, Proxmox, etc. and database, NAS, file server, Linux & Windows Server, etc. Tailored for virtual environments, Vinchin offers automated backups, agentless backup, LAN/LAN-Free options, offsite copying, instant recovery, data deduplication, and cloud archiving. With data encryption and ransomware protection, it provides dual insurance for Hyper-V VM backups and supports easy migration between Hyper-V and other platforms.
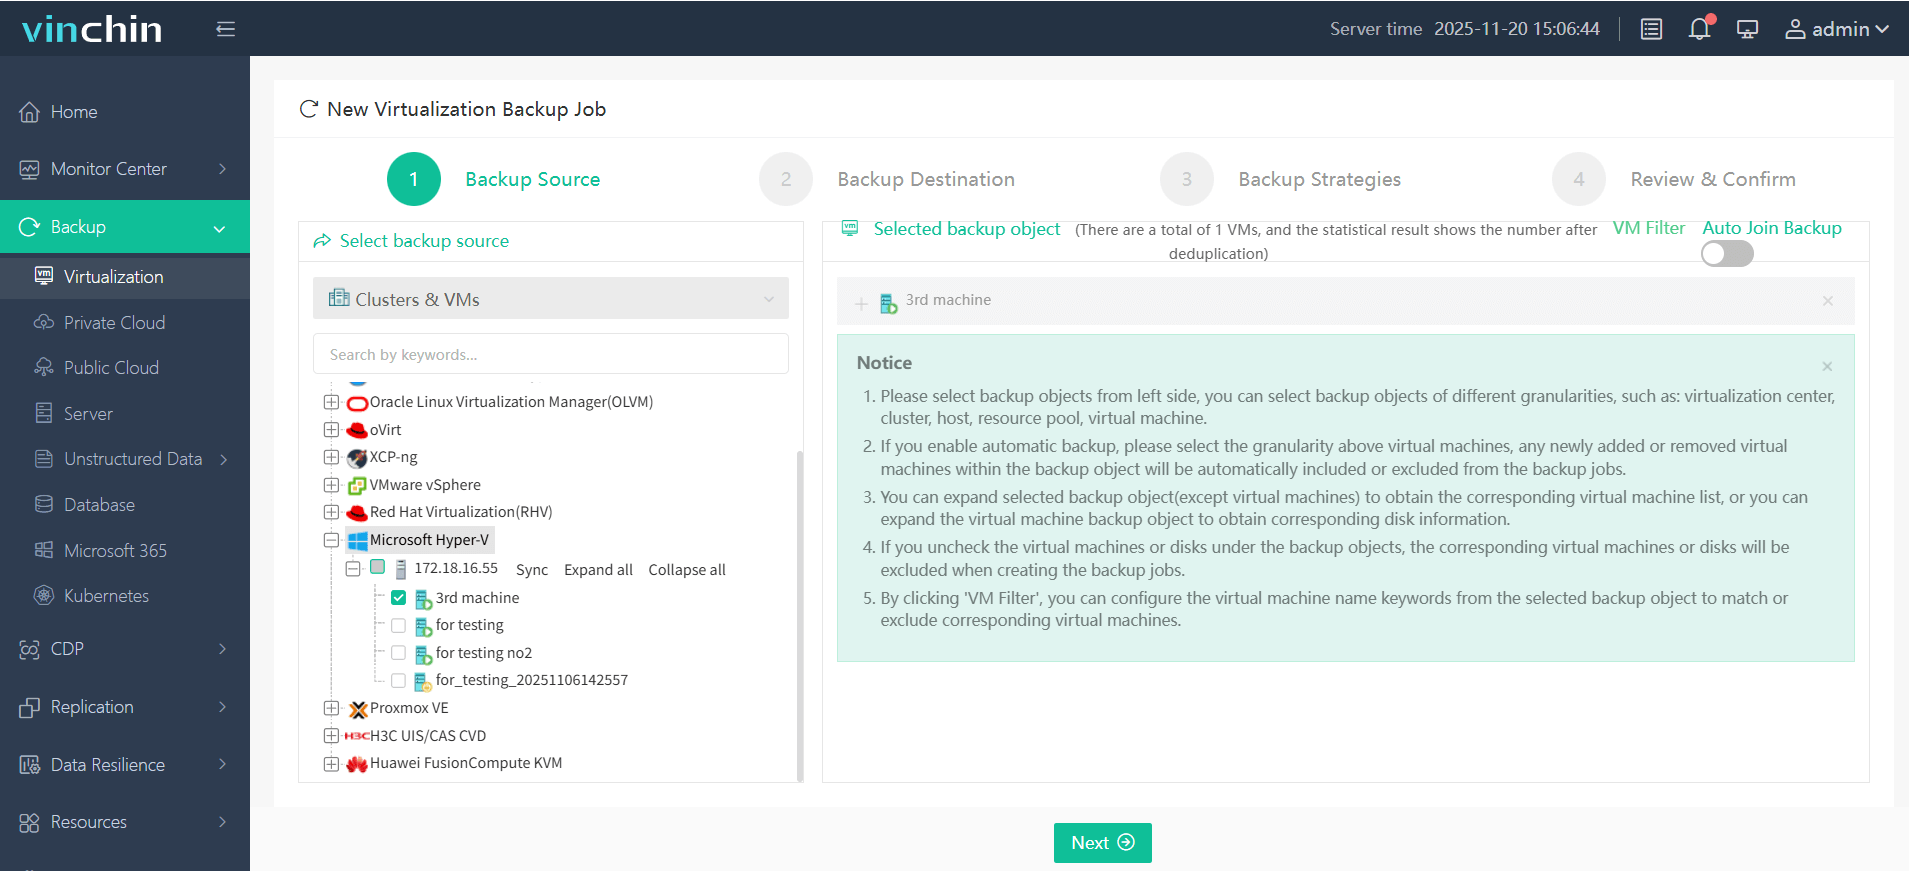
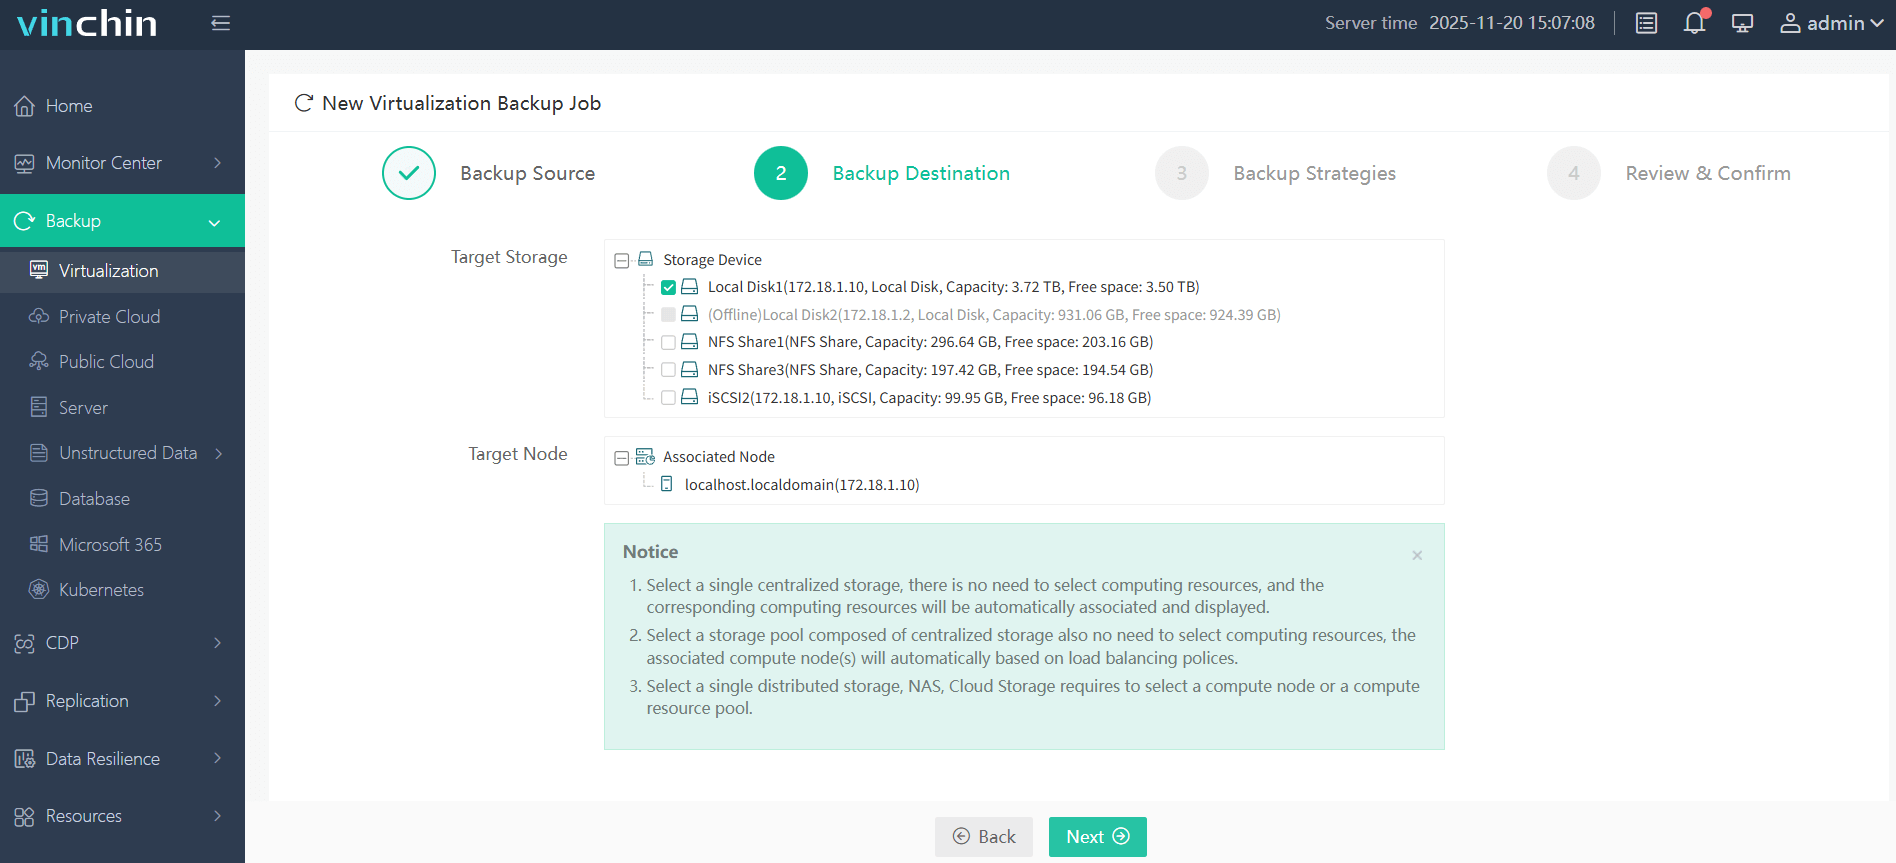
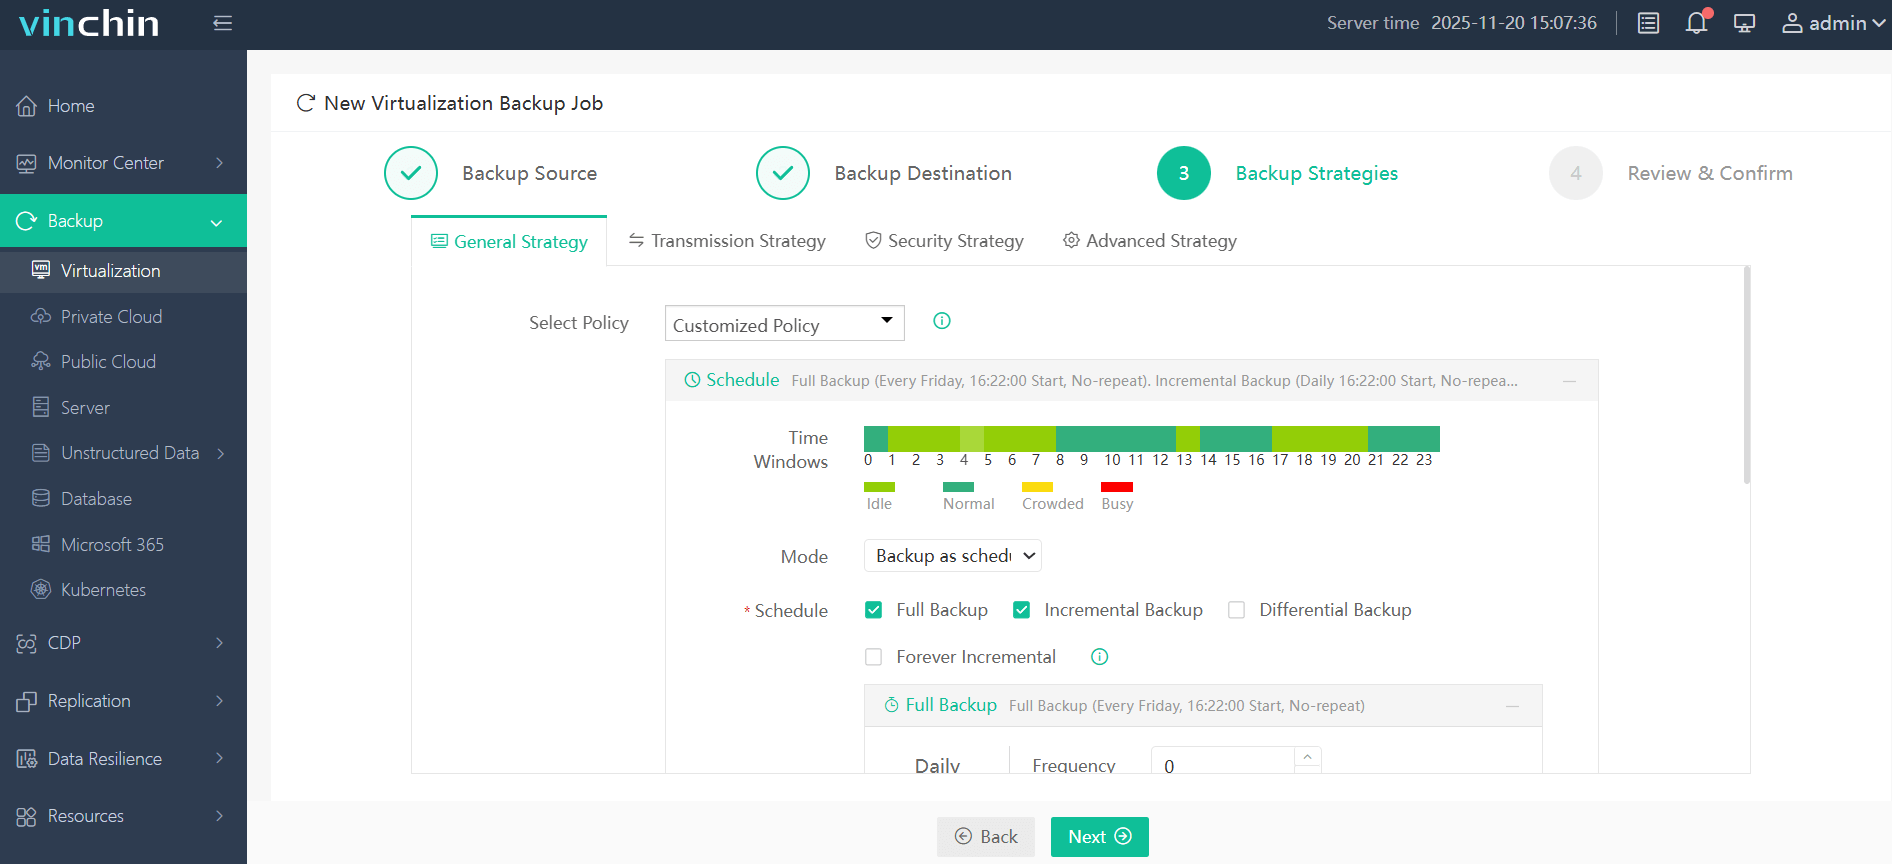
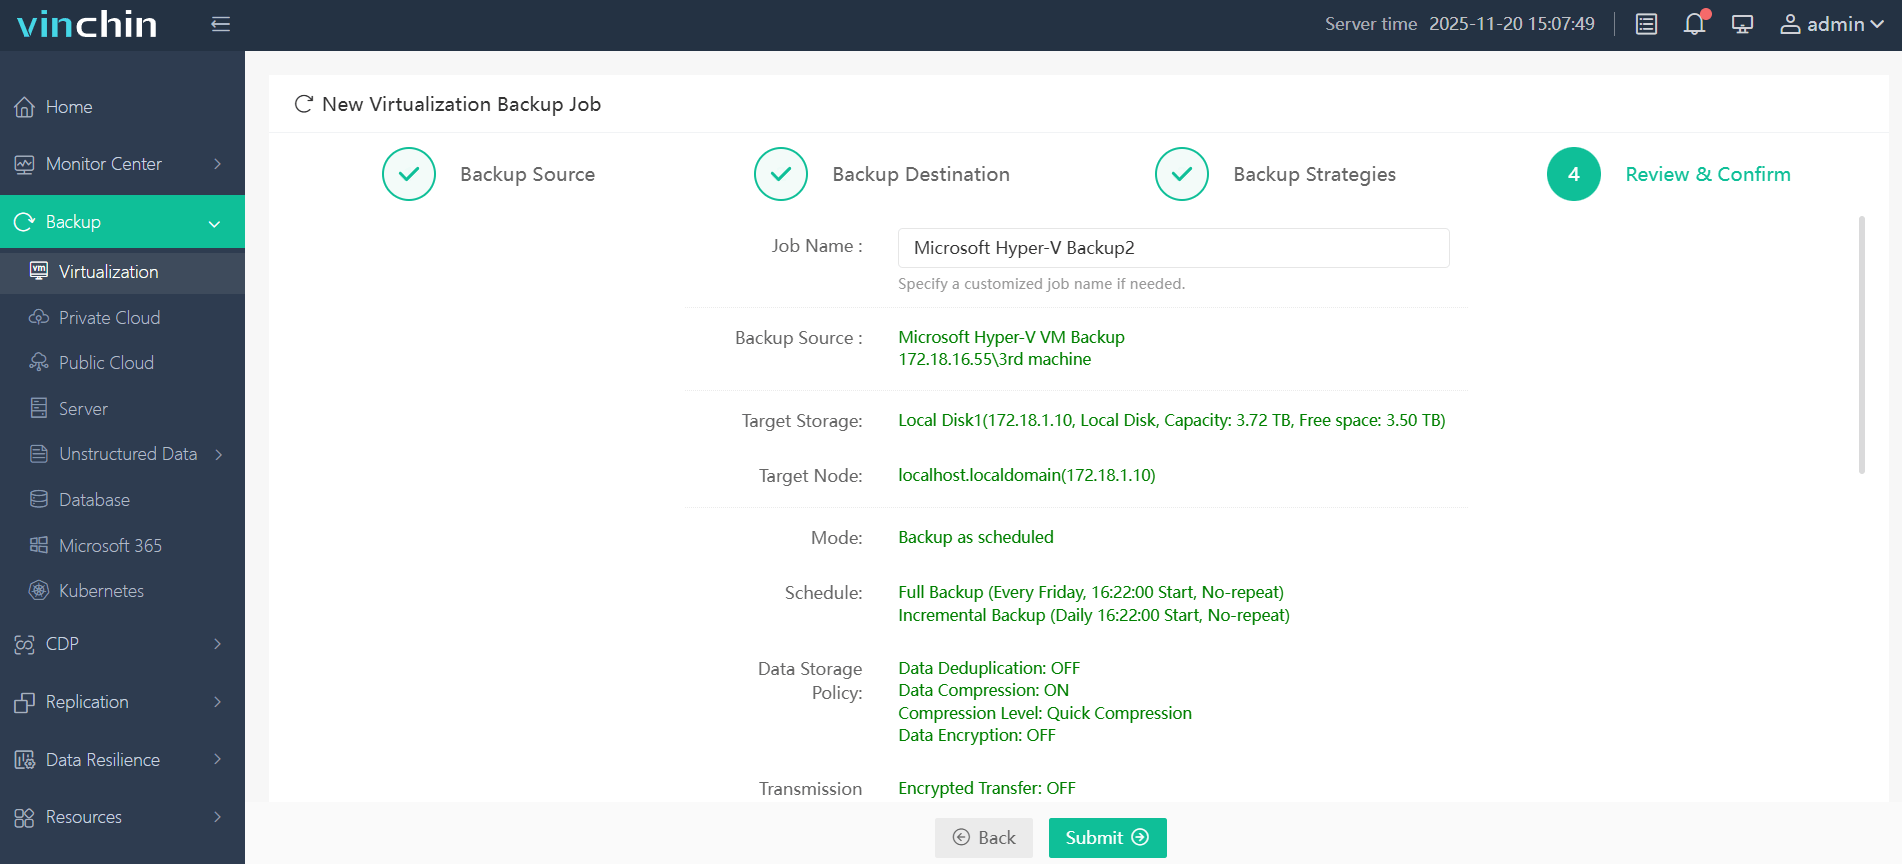
It only takes 4 steps to backup Hyper-V VMs with Vinchin Backup & Recovery:
1. Select the backup object.

2. Select backup destination.

3. Select backup strategies.

4. Review and submit the job.

Come on and experience the full capabilities of this robust system with a complimentary 60-day trial! Contact us with your requirements, and you will receive a tailored solution for your IT landscape.
Add GPU to Hyper-V FAQs
1. What is Discrete Device Assignment (DDA)?
DDA is a feature in Hyper-V that allows PCIe devices (like GPUs) to be passed through directly to VMs. It provides near-native performance and is ideal for workloads requiring GPU acceleration, like AI, CAD, or video processing.
2. Does GPU passthrough affect host performance?
Yes. Once assigned via DDA, the host loses access to that GPU, and it cannot be used for local display or compute tasks. The GPU is exclusively controlled by the VM.
Conclusion
While CPU-based rendering falls short in delivering usable graphics performance for virtual machines, GPU passthrough provides a transformative solution. By directly assigning physical GPU resources to the VM, passthrough eliminates the bottlenecks of emulation and unlocks near-native performance, full feature compatibility, and vendor flexibility. For Hyper-V environments, configuring GPU passthrough may require several precise steps, but the payoff is substantial: seamless GPU utilization, improved visual output, and support for demanding applications like 3D rendering and AI workloads. With the right setup, virtual machines can finally tap into the full power of modern GPUs—bringing performance, clarity, and capability back to virtualized environments.
Share on:


