Hyper-V is a robust virtualization platform that powers many enterprise data centers. But achieving top performance from your VMs requires more than just basic setup. Hyper-V performance tuning means continuously monitoring your environment, making smart adjustments, and optimizing resources so every VM runs smoothly—whether you manage a handful or hundreds of workloads.
What is Hyper-V Performance Tuning?
Hyper-V performance tuning is about maximizing speed, reliability, and resource efficiency across your virtual infrastructure. It's not just one setting or tool—it's an ongoing process that balances CPU power, memory allocation, storage throughput, and network bandwidth.
Every VM depends on four main components: CPU (processing), memory (RAM), storage (disk), and network connectivity. If any part lags behind or gets overloaded, your workloads will suffer slowdowns or even outages.
The architecture of Hyper-V includes a hypervisor layer that manages hardware access; a root partition where management OS runs; and child partitions where VMs live. Each layer can affect overall performance if not configured well.
Key technologies help optimize resource use:
You'll use tools like Hyper-V Manager, Performance Monitor, Resource Monitor, and PowerShell cmdlets to track metrics and make changes as needed. As environments grow larger or more complex—think clusters or high-density hosts—advanced features like NUMA configuration or virtual switch management become essential.
Performance tuning isn't a one-time job; it's a cycle of measuring results, analyzing trends, then tweaking settings again as needs change.
Why Should You Tune Hyper-V Performance?
Because small improvements quickly add up in virtualized environments.
A well-tuned host delivers faster response times—meaning fewer complaints about laggy apps or slow logins. Efficiently allocating resources like CPU, RAM, and disk IOPS lets you run more VMs on the same hardware, saving costs by delaying server upgrades.
Proactive tuning also prevents downtime by catching problems early. For example, spotting high disk latency allows you to migrate VMs away from busy storage before applications fail.
Ignoring performance leads to resource contention—too many VMs competing for limited CPU or storage—causing unpredictable slowdowns, like overloading a circuit breaker.
Finally, as your business grows and adds services, regular tuning ensures smooth scalability without unexpected issues.
How to Tune Hyper-V for Better Performance?
Let's break down practical steps from beginner basics through intermediate tweaks to advanced optimization methods—all designed for real-world operations teams.
1. Hardware and Host Configuration
Your physical server is the foundation of virtualization. If it's underpowered or misconfigured, even perfect VM settings won't prevent performance issues.
Use modern multi-core CPUs with virtualization support (Intel VT-x/AMD-V), enable hyperthreading, and keep NUMA on for efficient memory mapping.
Install enough RAM for the host and all VMs—never overcommit. Use multi-channel memory spread across NUMA nodes.
Prioritize SSDs or enterprise-grade HDDs. RAID 10 is preferred for performance and redundancy; avoid RAID 5/6 for heavy writes. Consider Storage Spaces Direct for cost-effective shared storage in hyper-converged setups.
Use at least dual 1GbE (preferably 10GbE) NICs. Set up external virtual switches for most traffic. Enable NIC teaming with dynamic load balancing for better throughput and failover.
Finally, check all hardware against the Windows Server Catalog before going live.
2. VM Configuration and Resource Allocation
How you configure each VM affects performance and coexistence on shared hosts.
Start with 1–2 vCPUs per VM. Only add more if sustained high CPU usage is observed—avoid overcommitting beyond physical cores to prevent scheduler delays.
To check physical vs logical cores:
Get-WmiObject –Class Win32_Processor | Select NumberOfCores, NumberOfLogicalProcessors
Use Dynamic Memory only for variable workloads—not latency-sensitive apps like SQL Server. For critical workloads, assign fixed RAM.
Choose VHDX format and fixed-size disks for better resilience and consistent I/O. Separate OS and data disks using SCSI controllers for better performance and hot-add support.
Always update Integration Services after major Windows updates to benefit from the latest drivers.
Use Generation 2 VMs when possible—they offer UEFI boot, faster startup, and better security. For large deployments, align VM resources with NUMA topology using the “Use Hardware Topology” setting to reduce cross-node latency.
3. Storage Optimization
Storage is often the top bottleneck in dense virtual environments—every VM shares disk I/O paths.
Keep production VM disks on fast, dedicated storage—not on the same volume as the host OS. Avoid placing multiple high-I/O VMs on a single LUN; instead, distribute across spindles or Storage Spaces Direct pools.
Use SCSI controllers for data drives (and all drives in Gen2 VMs) to benefit from hot-plug support and higher queue depths.
Skip full defrags—modern NTFS/ReFS handle this in the background. Use Storage Live Migration to refresh fragmented disks without downtime.
Enable ODX (Offloaded Data Transfer) on supported SANs for faster copy/merge operations without taxing host resources.
Monitor disk latency with Performance Monitor—values above 15ms often indicate performance issues. Migrate busy VMs or upgrade storage as needed.
4. Network Optimization
Network setup affects everything—from in-VM app performance to backup speed. Even small missteps can ripple through large clusters.
Create one external virtual switch per host, mapped to your fastest NIC. Avoid layering switches unless isolation is required, as it adds processing overhead.
Use NIC Teaming in Switch Independent mode with dynamic load balancing to ensure failover and even traffic distribution.
If supported, enable SR-IOV in BIOS and drivers for direct NIC access in VMs. Note: SR-IOV disables live migration and requires matching drivers throughout the path.
Enable Jumbo Frames (e.g., MTU 9014) only if all network components support it—test carefully before full rollout:
Get-NetAdapter | Where-Object {$_.InterfaceDescription -like "*Hyper-V*"} | Set-NetAdapterAdvancedProperty -RegistryKeyword "*JumboPacket" -RegistryValue "9014"Use VLAN tagging to segment dev/test/prod traffic securely without needing physical separation.
5. Monitoring and Maintenance
You can't optimize what you don't measure. Ongoing monitoring is key to avoiding surprises and planning capacity proactively.
Use Performance Monitor to track CPU usage, memory pressure, disk queue length, and network errors—focus on “Hyper-V” counters to filter out unrelated noise.
Enable Resource Metering for per-VM usage stats:
Enable-VMResourceMetering –VMName <VMName>
Check Event Viewer regularly for “Hyper-V-” log entries to catch hidden warnings or errors.
Automate checks with PowerShell:
$Counters = @("\Hyper-V Hypervisor Logical Processor(*)\% Total Run Time", "\Hyper-V Dynamic Memory VM(*)\Pressure")
Get-Counter -Counter $Counters -Continuous | Export-Csv "C:\PerfLogs.csv"
Larger environments should consider Log Analytics or SCOM for centralized, scalable monitoring.
6. Advanced Tuning Techniques
Once basics are mastered, intermediate admins often seek further gains—unlocking hidden efficiencies beneath untouched defaults.
Align vCPU/memory assignments with physical NUMA nodes (Task Manager > Performance > NUMA Nodes) to reduce cross-node latency, especially for multi-threaded DB engines or web farms.
Switch power plans from Balanced to High Performance to avoid C-state throttling delays that disrupt bursty workloads mid-session.
Use Server Core installations where possible to cut GUI overhead and background services, freeing up system resources.
Enable TCP Chimney and IPsec Offload in NIC settings to push repetitive tasks to hardware, reducing CPU load.
Script regular maintenance—patching, drift correction—via PowerShell DSC to maintain configuration consistency across hosts with minimal manual effort.
7. Tuning for Specific Workloads
Each workload has unique requirements—optimize accordingly to maximize performance and stability.
Database Servers
Use fixed memory (avoid Dynamic Memory) to prevent balloon-driver delays. Allocate dedicated vCPUs aligned with licensing to avoid noisy neighbor effects. Separate log, data, and tempdb files onto SSD-backed volumes to isolate I/O patterns and improve checkpoint performance.
Web/Application Servers
Prioritize horizontal scaling with more front-end nodes behind load balancers. Assign moderate vCPUs based on IIS/.NET thread concurrency limits. Use synthetic network adapters to boost HTTP throughput—avoid legacy emulated models.
File Servers / High-I/O Apps
Disable caching at the host controller level to ensure direct disk writes. Use fixed-size, thick-provisioned VHDX files to reduce long-term fragmentation—ideal for handling large volumes of small, randomly accessed files.
8. Troubleshooting Common Bottlenecks
Even optimized environments face issues—quick detection and resolution are critical.
CPU Contention
Check %GuestRunTime—sustained values >80% indicate CPU oversubscription.
Get-VMProcessor | Format-List *
Storage Latency
Monitor average disk read/write times; values >20ms suggest backend saturation.
Get-Counter '\PhysicalDisk(_Total)\Avg Disk sec/Read'
Network Packet Loss
Review adapter drop stats to catch link flaps or congestion during peak hours.
Get-VMNetworkAdapter -VMName <YourVM> | Format-List *Drop*
Resolve root causes quickly—rebalance loads or migrate affected VMs to maintain system health.
Protect Your Hyper‑V Environment with Vinchin
After optimizing your Hyper‑V infrastructure for peak performance, safeguarding those valuable workloads becomes essential. Vinchin provides an enterprise-level backup solution purpose-built for professional environments like yours—with broad support covering over fifteen mainstream virtualization platforms including VMware, Proxmox VE, oVirt/RHV/OLVM/XCP-ng/XenServer/OpenStack/ZStack—and notably Microsoft Hyper‑V itself right at the forefront.
With Vinchin Backup & Recovery, you get robust protection features such as incremental backup strategies that minimize storage consumption over time; powerful data deduplication and compression technology; seamless cross-platform V2V migration capabilities; granular restore options down to file level; cloud/tape archiving integration—and much more—all managed through an intuitive web console designed for ease-of-use even in complex enterprise scenarios.
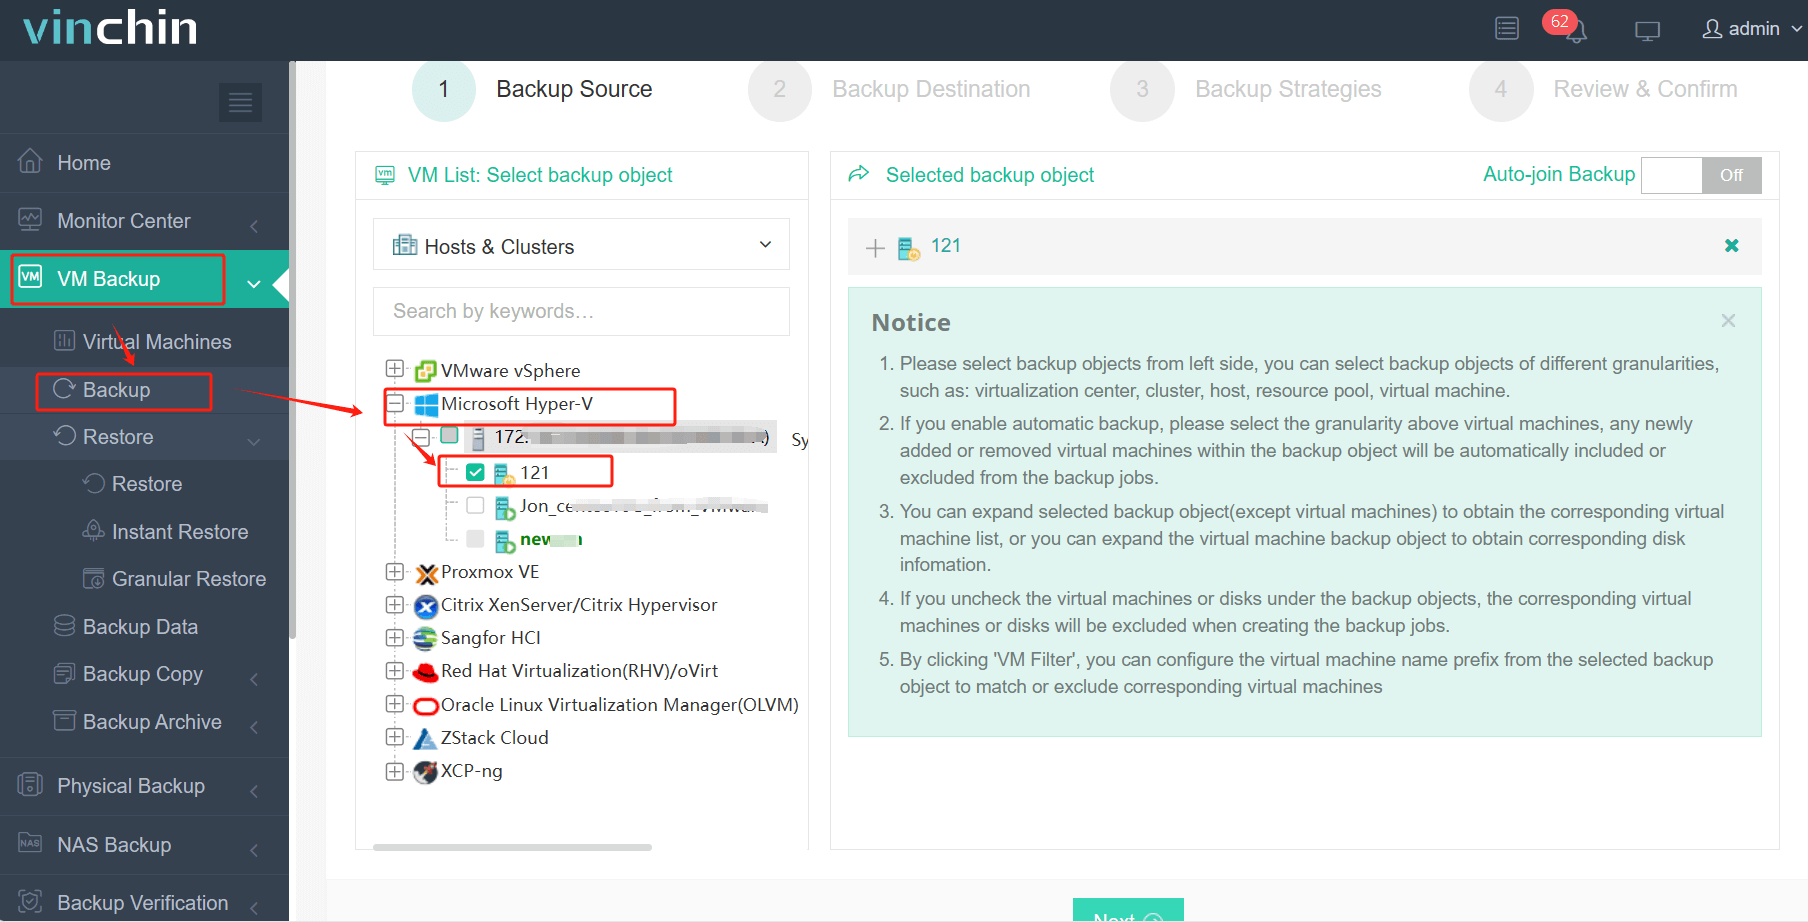
1.Just select Hyper‑V VMs on the host

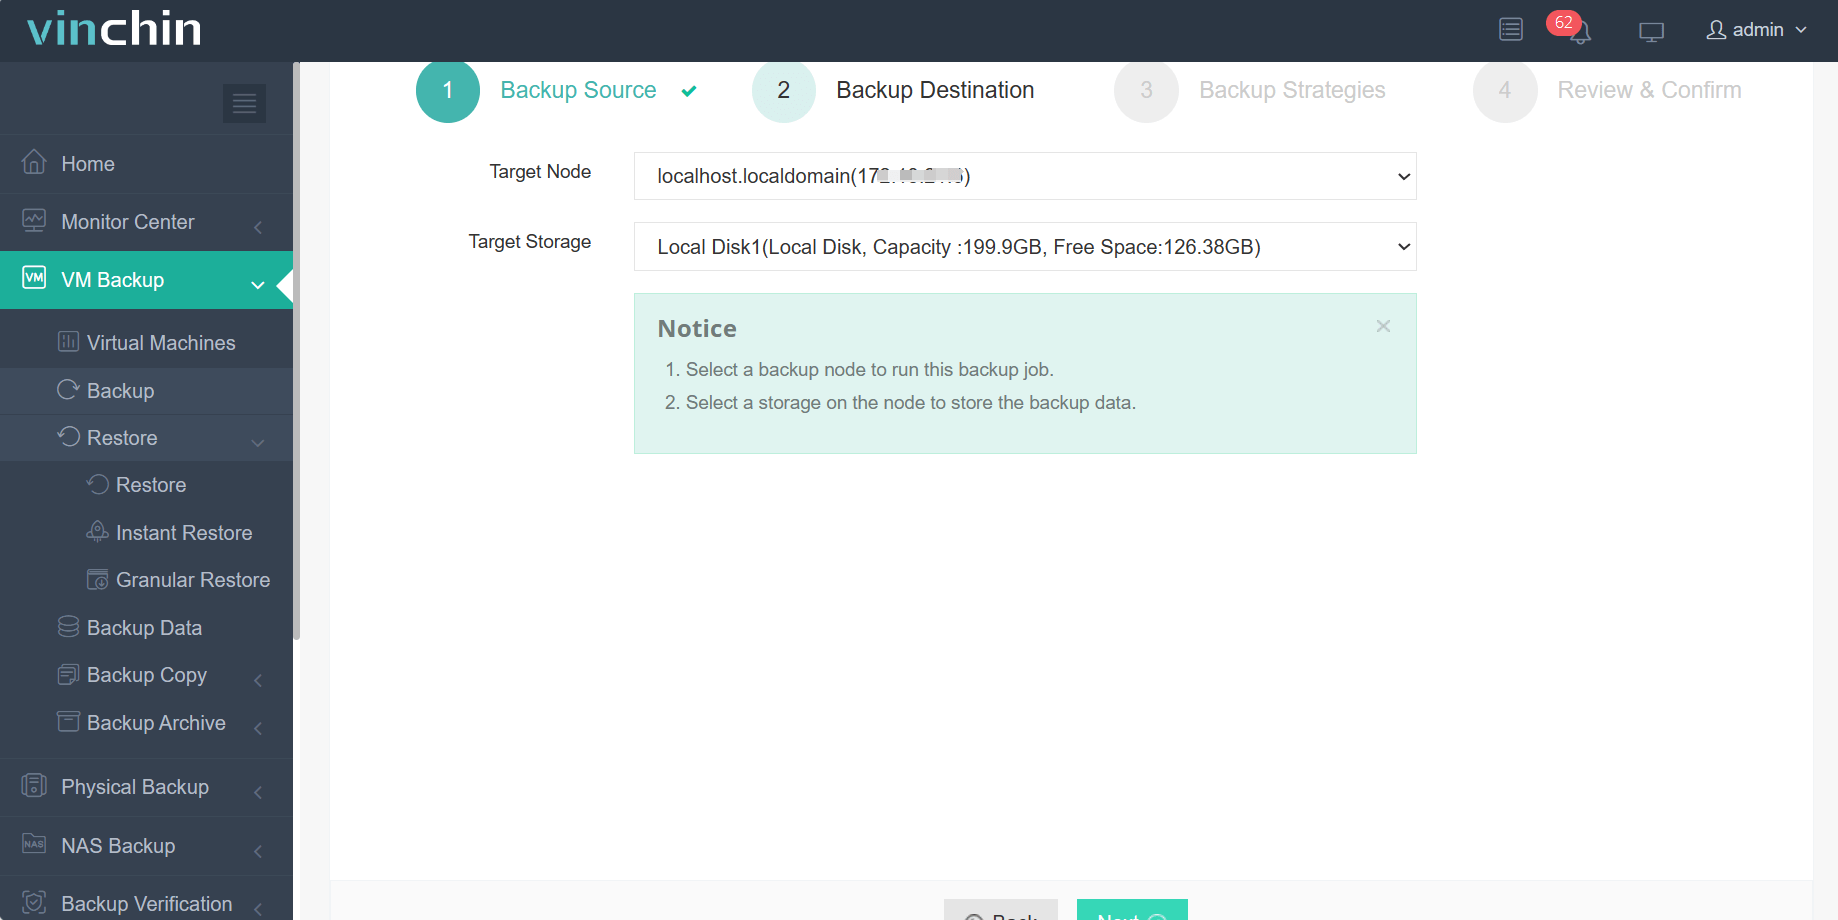
2.Then select backup destination

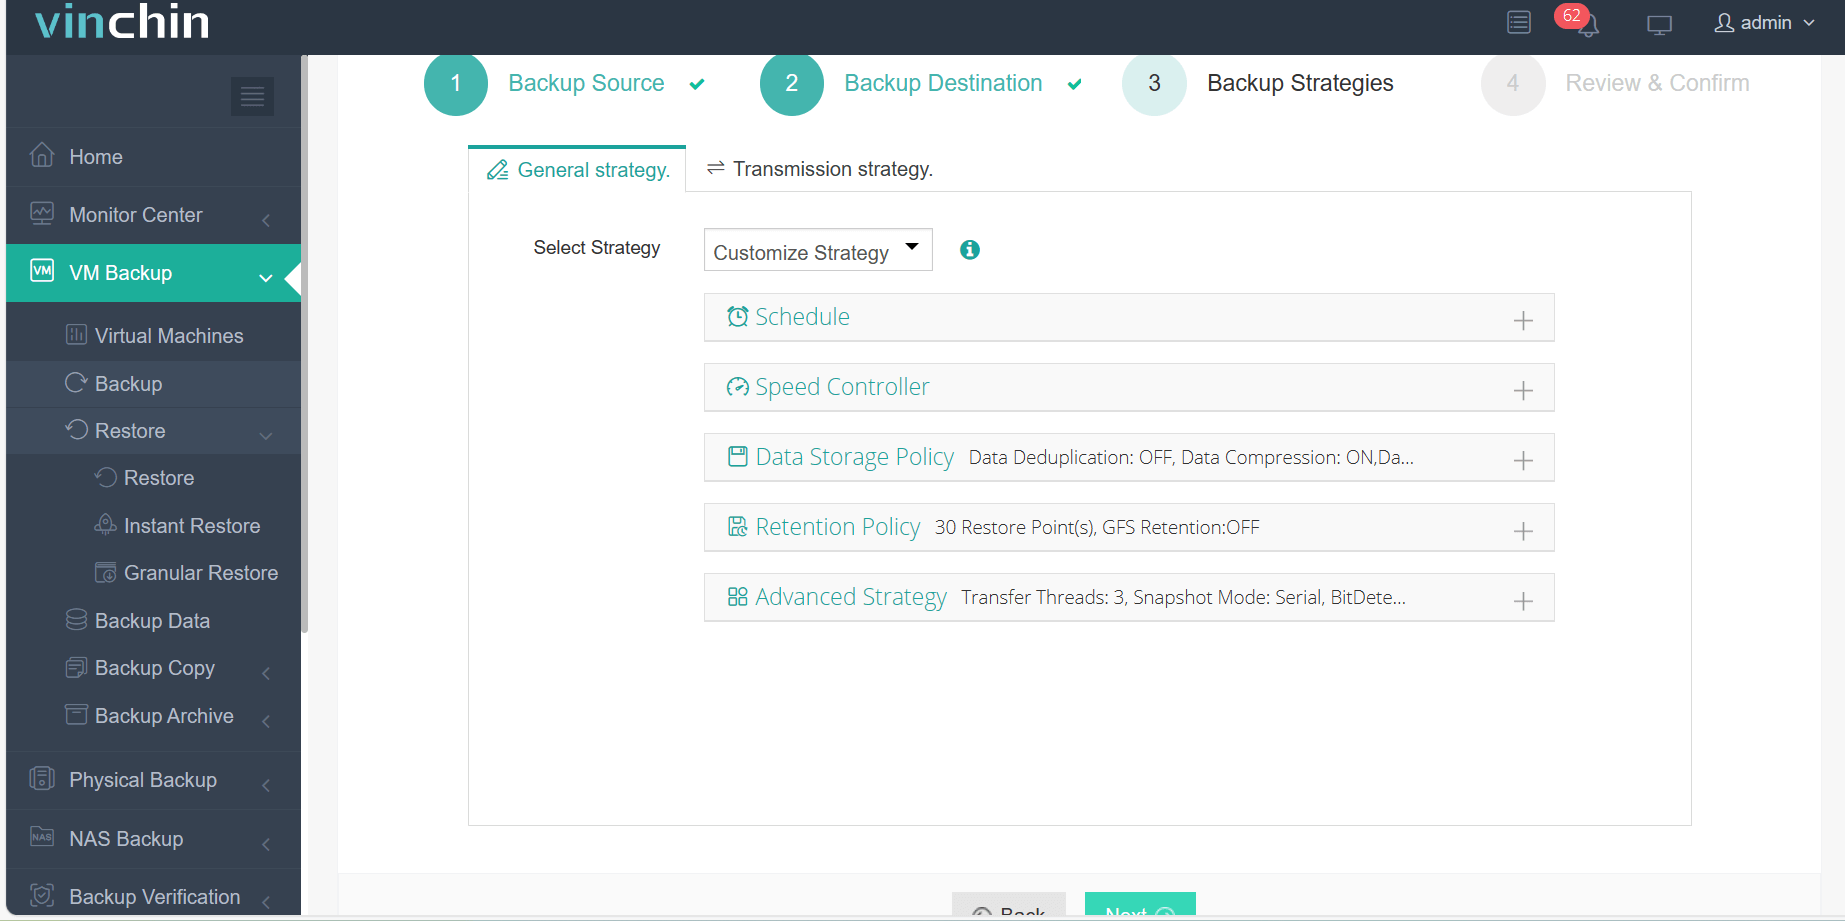
3.Select strategies

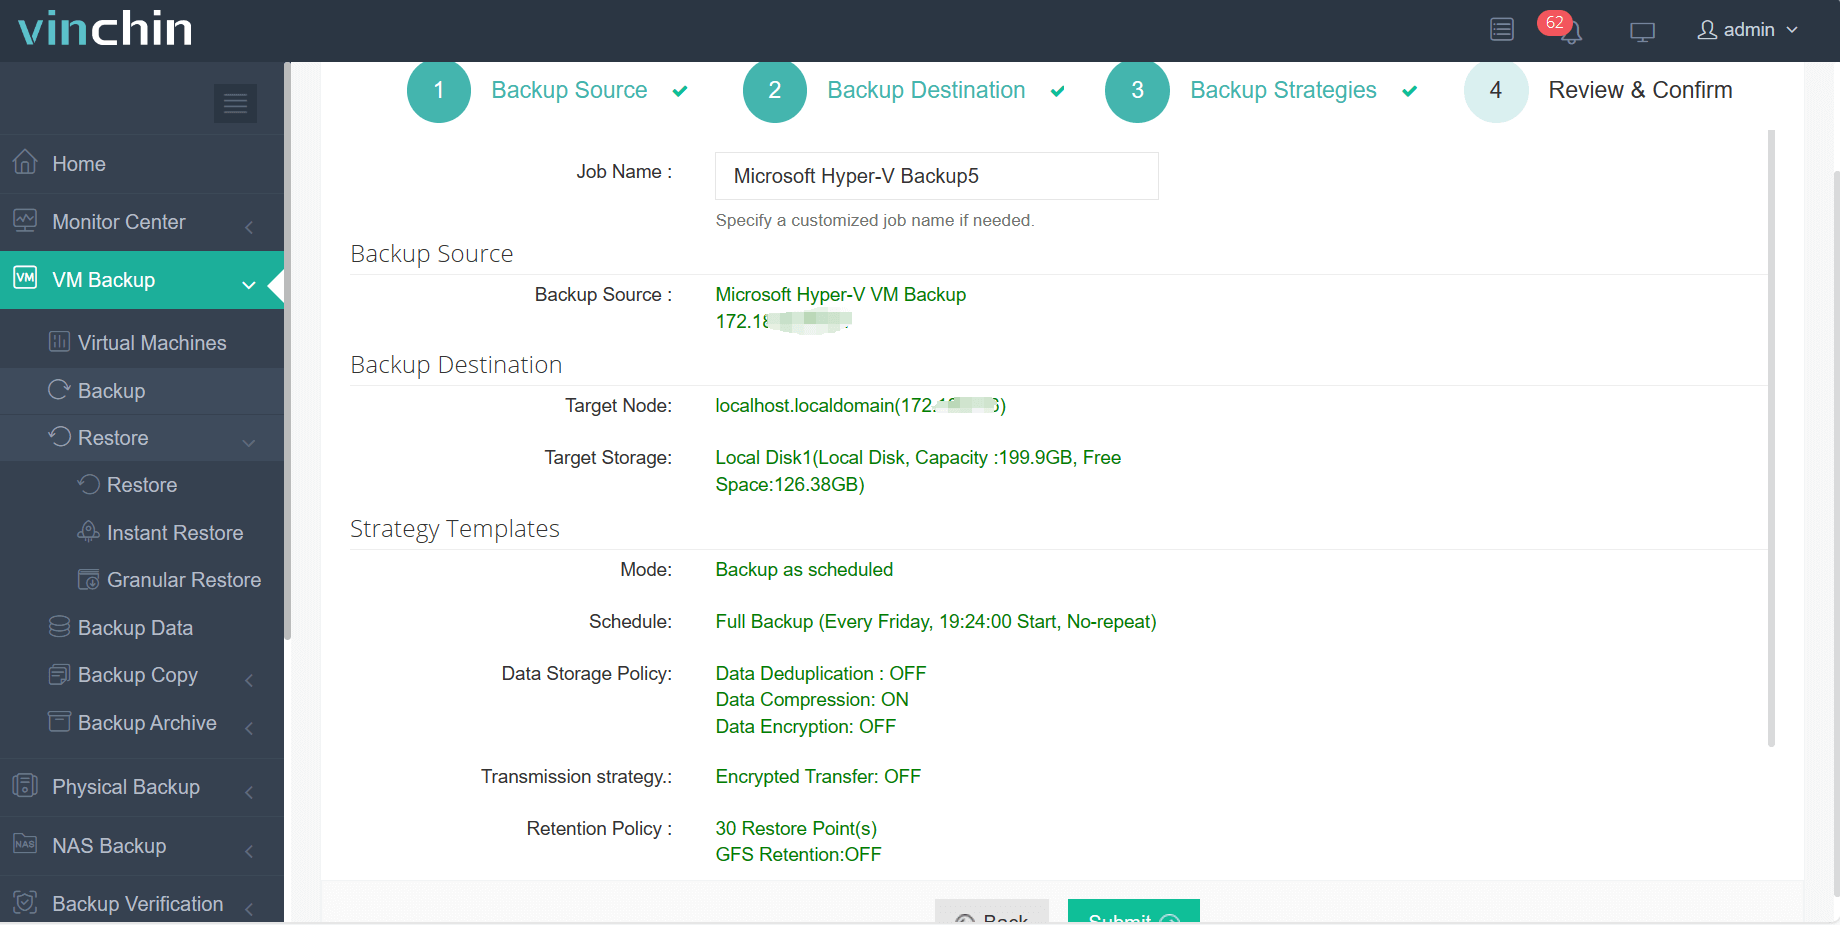
4.Finally submit the job

Trusted globally by thousands of organizations—with strong customer satisfaction ratings—Vinchin offers a fully-featured free trial valid for sixty days so you can experience its advantages firsthand risk-free.
Hyper-V Performance Tuning FAQs
Q1: How do I identify which component—CPU/memory/storage/network—is causing my current performance issue?
A1: Use Performance Monitor focusing separately on % Processor Time/Disk Latency/Mem Available Bytes/Packets Outbound Errors counters isolating culprit quickly based upon highest sustained utilization trend observed over time window sampled live onsite/offsite remotely alike.
Q2: Can I safely enable Dynamic Memory on all my production workloads?
A2: No—for critical applications like SQL/database servers always assign fixed RAM amounts avoiding unpredictable balloon-induced pauses impacting transaction consistency guarantees negatively downstream.
Conclusion
Tuning Hyper‑V means mastering how every component works together to ensure consistent performance today and seamless scalability tomorrow. With Vinchin safeguarding your finely tuned environment behind the scenes, you're protected no matter what the future holds.
Try Vinchin today for simple, powerful backup and true peace of mind!


