-
What is PVE USB Passthrough and Why You Need It?
-
Prerequisites for USB Passthrough in Proxmox VE
-
How Does PVE Handle USB Passthrough Internally?
-
Method 1: Passing a USB Device to a VM via the Web UI
-
Method 2: Passing Through Devices to LXC Containers
-
Method 3: Full Controller Passthrough Using PCIe Assignment
-
Best Practices for USB Passthrough in Proxmox VE
-
Troubleshooting Common Issues with PVE USB Passthrough
-
Protecting Proxmox VM with Vinchin
-
PVE USB Passthrough FAQs
-
Conclusion
USB passthrough is a key feature for many Proxmox VE users. It lets you connect physical USB devices—like license dongles or smart card readers—to VMs or containers as if they were plugged in directly. But what really happens under the hood? And how do you make this work reliably across different setups?
In this guide, we'll build your understanding step by step—from basic device mapping to advanced controller passthrough—while exploring practical solutions for common challenges. Whether you're running a home lab or managing enterprise infrastructure, mastering USB passthrough can unlock new possibilities in your virtual environment.
What is PVE USB Passthrough and Why You Need It?
At its core, USB passthrough allows a VM or LXC container to access a physical USB device attached to your Proxmox host. This means that software inside your guest system can use hardware keys, storage drives, Zigbee sticks, or other peripherals just like on bare metal.
How does this work? For VMs, Proxmox uses QEMU's built-in support to redirect USB traffic from the host to the guest OS. For containers (LXCs), it relies on Linux kernel features like cgroups and namespaces to expose device nodes securely.
Why is this important? Many business applications require direct hardware access—for example:
Using a hardware security key for two-factor authentication
Connecting external drives for data transfer
Attaching smart card readers for secure login
Integrating IoT devices via Zigbee or Z-Wave dongles
Without proper passthrough setup, these devices remain invisible inside your guests. Understanding how passthrough works—and its limitations—helps you avoid frustration down the road.
Prerequisites for USB Passthrough in Proxmox VE
Before setting up USB passthrough in Proxmox VE, check some basic requirements:
First, ensure your server's BIOS/UEFI has virtualization enabled (Intel VT-d or AMD-Vi). For PCIe controller passthrough (advanced use cases), enable IOMMU support by adding intel_iommu=on or amd_iommu=on to your kernel boot parameters.
Next, know which type of USB controller you have—EHCI (USB 2.0) or xHCI (USB 3.x)—as this affects compatibility and stability when passing through entire controllers.
Finally, keep in mind that newer versions of Proxmox may handle device permissions differently due to changes in udev rules or kernel updates. Always check compatibility notes before upgrading production systems.
How Does PVE Handle USB Passthrough Internally?
When you assign a physical USB device to a VM using Proxmox VE:
1. The host detects the device via its unique vendor ID (idVendor) and product ID (idProduct).
2. QEMU creates a virtual representation of that device inside the VM.
3. All communication between guest software and hardware flows through this channel—bypassing emulation for near-native speed.
For LXC containers:
1. The host exposes specific /dev nodes using bind mounts.
2. Cgroup permissions control which devices are visible inside each container.
3. Persistent symlinks under /dev/serial/by-id help maintain stable paths even if devices are unplugged/replugged.
This direct approach gives high performance but requires careful configuration—especially around permissions and isolation boundaries.
Method 1: Passing a USB Device to a VM via the Web UI
The simplest way to pass a USB device to a virtual machine is through Proxmox's web interface. This method is suitable for most users running Linux or Windows guests.
Plug the desired USB device into any available port on your host server.
In the web UI, select the target VM.
Click Hardware, then Add > USB Device.
Choose one of the following:
Use USB Vendor/Device ID: For a specific device that remains fixed.
Use USB Port: For flexible setups where any device plugged into a specific port is passed through.
Save changes and restart the VM. Inside your guest OS, run
lsusb(Linux) or check Device Manager (Windows) to confirm the device is passed through successfully.
Method 2: Passing Through Devices to LXC Containers
Passing physical devices to LXC containers is trickier due to stricter isolation, but it's still feasible.
Tip 1: Using Persistent Device Paths
Persistent paths under /dev/serial/by-id provide stable device links even after unplugging and replugging devices. To use this method:
On the host, run:
ls -l /dev/serial/by-id
Example output:lrwxrwxrwx 1 root root 13 Sep 9 10:54 usb-Silicon_Labs_CP210x-if00-port0 -> ../../ttyUSB0
In the web UI, select the target container and click Resources.
Click Add > Device Passthrough and enter the full device path (e.g.,
/dev/serial/by-id/...).Save changes and restart the container.
Tip 2: Manual LXC Config Edits
If persistent paths aren’t available, or you need finer control over permissions:
Edit the container's config file at
/etc/pve/lxc/<CTID>.confand add:lxc.cgroup2.devices.allow: c 188:* rwm lxc.mount.entry: /dev/ttyUSB0 dev/ttyUSB0 none bind,optional,create=file
Reboot the container to apply the changes.
Handling Permissions & Replug Events
Sometimes, unplugging and replugging devices causes permission resets or shifts in /dev node assignments. To handle this:
Create Persistent UDEV Rules:
Create a custom UDEV rule to automate permission fixes and symlink creation:SUBSYSTEM=="tty", ATTRS{idVendor}=="10c4", ATTRS{idProduct}=="ea60", SYMLINK+="mydevice", GROUP="lxcuser", MODE="0660"Reload UDEV rules with:
udevadm control --reload && udevadm trigger
Automate Container Restarts After Replug Events:
Combine UDEV triggers with scripts to automatically restart containers after device replug events:pct restart <CTID>
Method 3: Full Controller Passthrough Using PCIe Assignment
For maximum performance, you may want to pass through an entire USB controller rather than individual devices. This is especially useful for high-throughput devices like external SSDs.
Enable IOMMU in BIOS and the bootloader (
intel_iommu=onoramd_iommu=on).Find the controller address using:
lspci | grep -i usbBind the controller driver using VFIO tools if necessary:
echo "8086:a36d" > /sys/bus/pci/drivers/vfio-pci/new_id
In the web UI, select the target VM, click Hardware, then Add > PCI Device.
Select the appropriate controller address and confirm.
Important Warning: Avoid assigning the root hub/controller handling keyboard/mouse unless you have remote management tools available, as this could lock you out of the system.
Best Practices for USB Passthrough in Proxmox VE
When passing physical devices between hosts and guests, always adhere to the least privilege principle to reduce security risks.
Never grant broader access than necessary. Only pass required vendor/product IDs.
Monitor logs regularly for unusual activity, especially after upgrades or hardware swaps.
In multi-user environments, consider using group-based restrictions via custom UDEV rules/scripts to limit access to devices.
Troubleshooting Common Issues with PVE USB Passthrough
If devices aren't recognized or permissions fail:
Check USB Detection:
Runlsusbon both the host and the guest to verify detection.Permissions Errors:
Review group/user ownerships under/devand fix them withchownorchmod.Hot-Plug Failures:
Ensure the QEMU agent is enabled in VMs, and use scripts to automate container restarts for LXCs.
Protecting Proxmox VM with Vinchin
After configuring reliable PVE environments—including advanced features like USB passthrough—you'll want robust backup protection for peace of mind and business continuity planning.
Vinchin Backup & Recovery stands out as an enterprise-level virtual machine backup solution supporting over fifteen mainstream platforms—including dedicated support for Proxmox VE alongside VMware, Hyper-V, oVirt, OLVM, RHV, XCP-ng, XenServer, OpenStack, ZStack and more—all managed from one unified platform.
Key features include incremental backup technology that minimizes storage usage; built-in data deduplication and compression; seamless V2V migration between heterogeneous platforms; granular restore capabilities; plus scheduled automated backups with flexible retention policies—all designed for efficiency at scale without sacrificing reliability or speed.
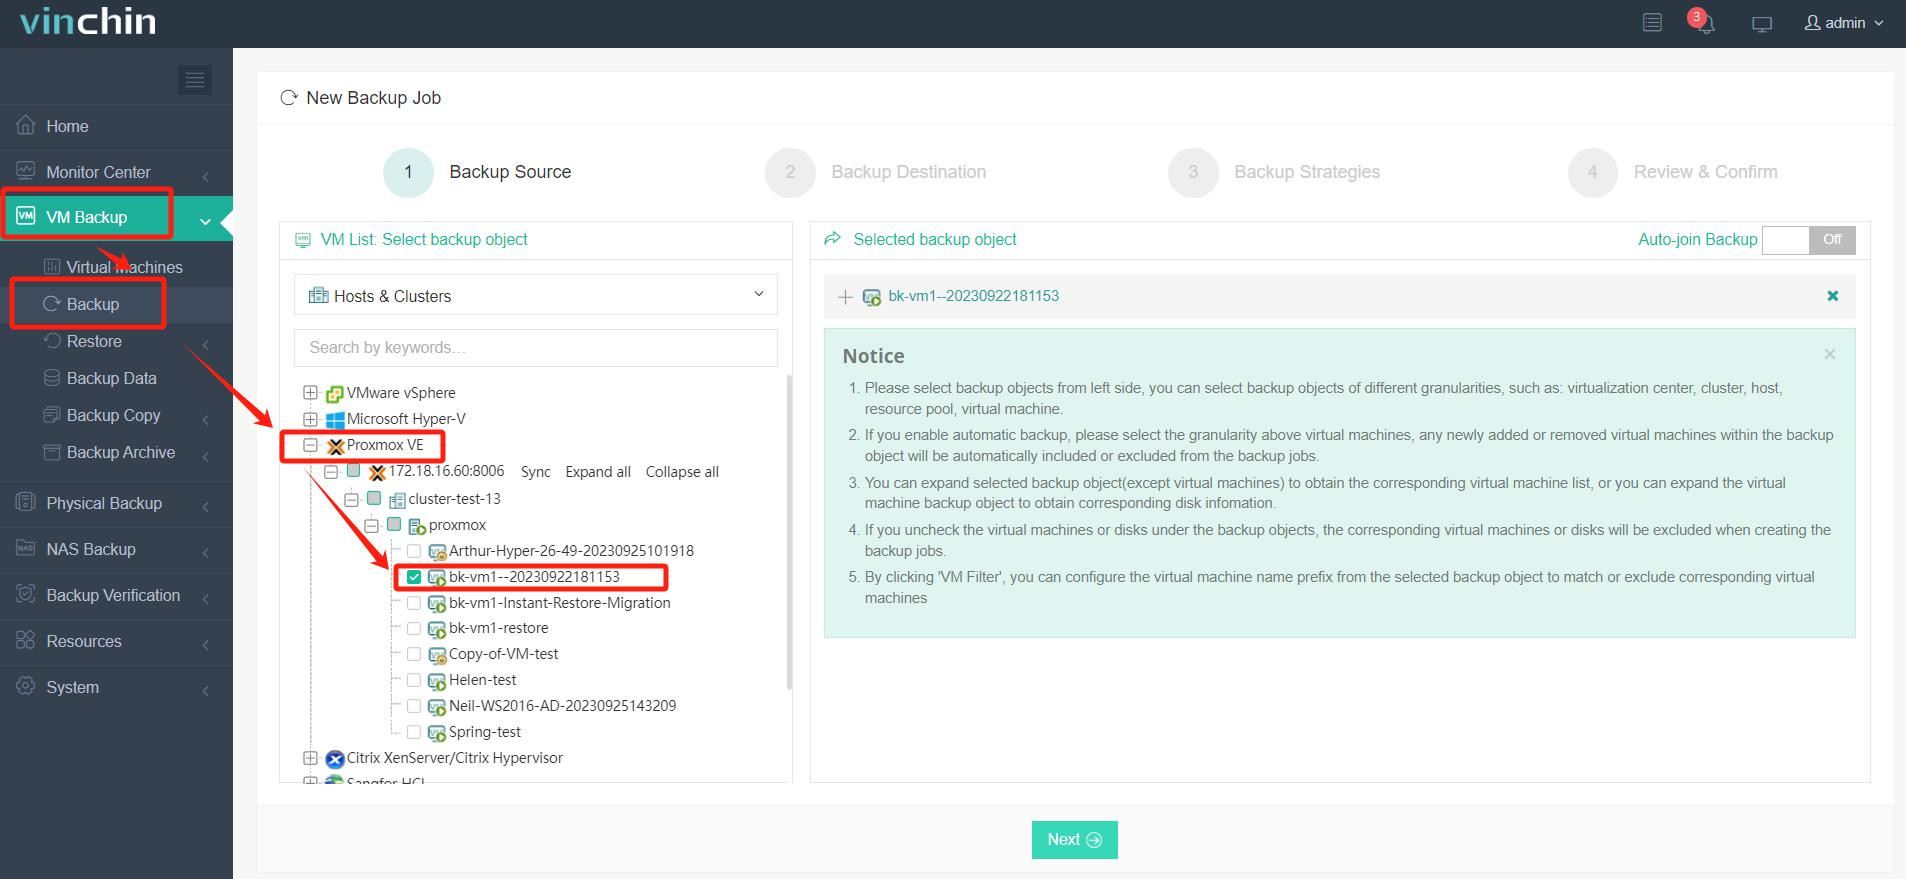
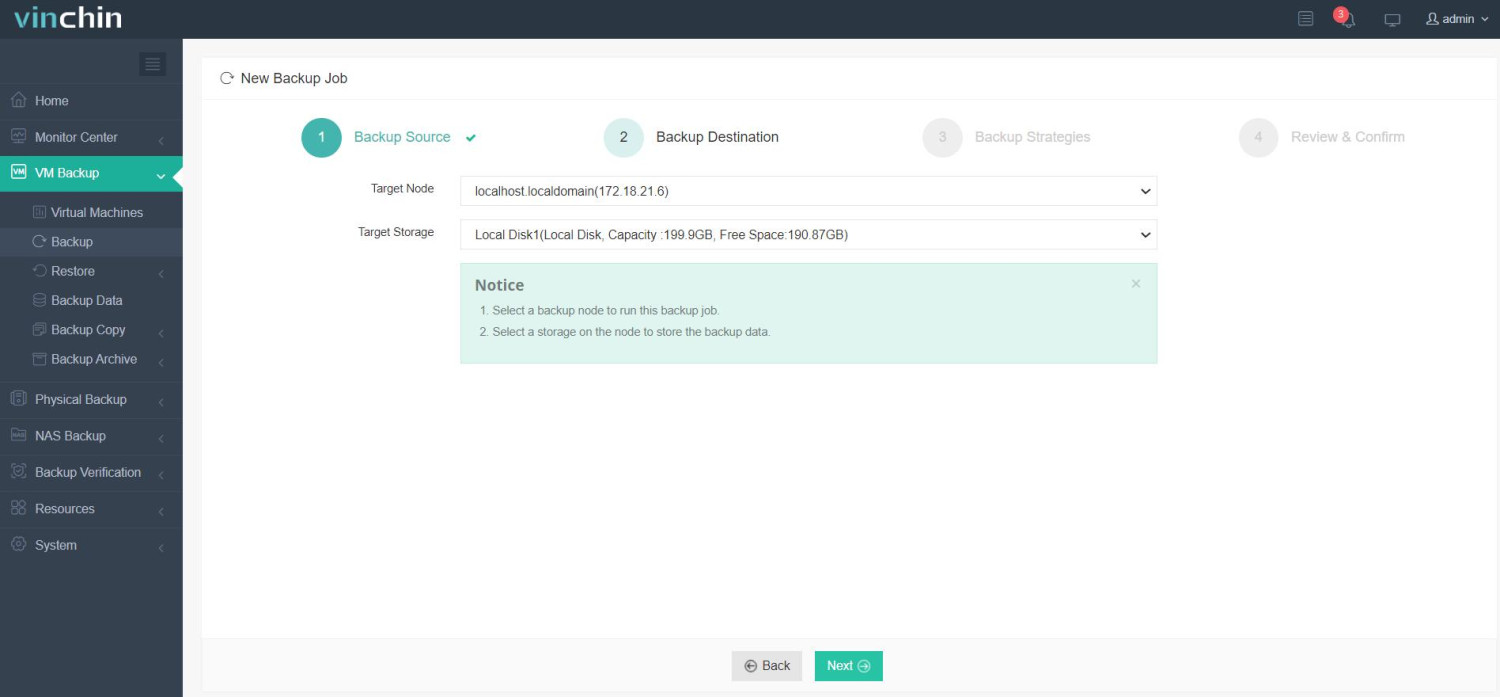
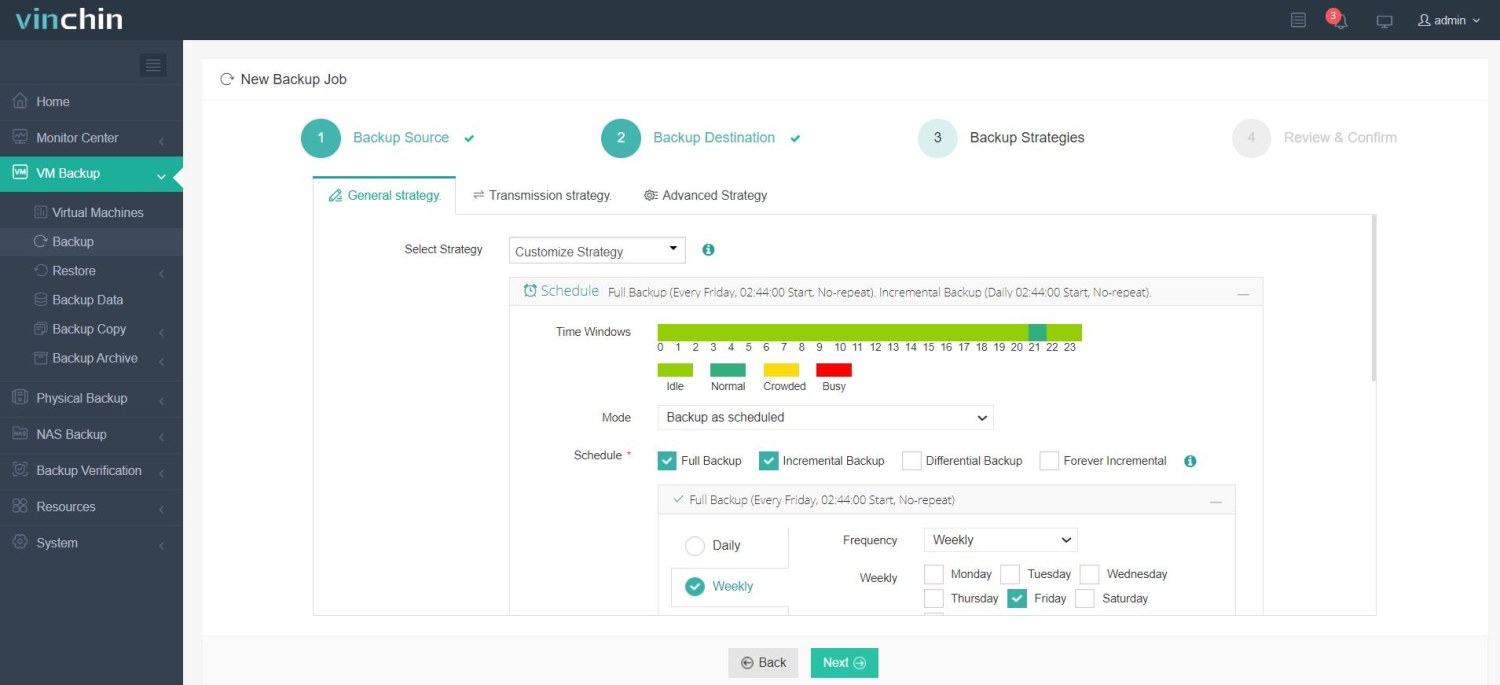
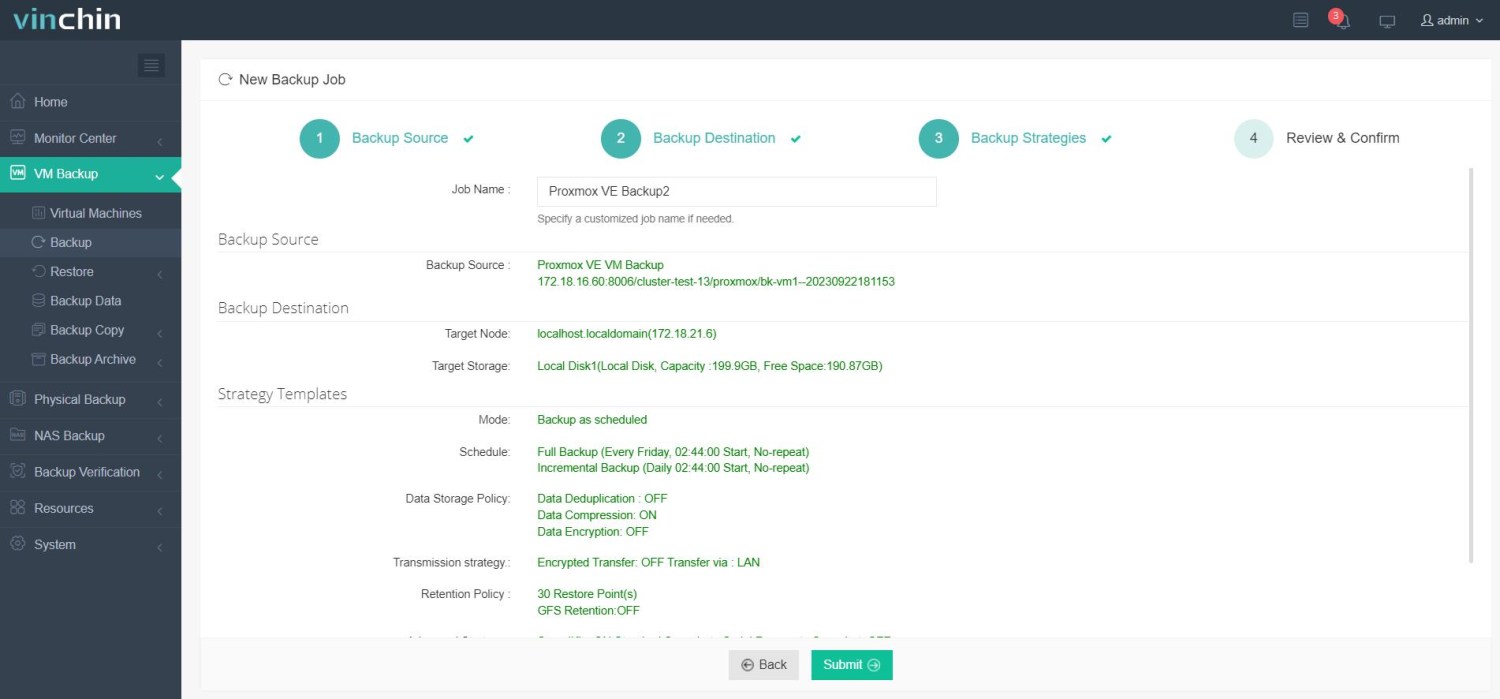
The intuitive Vinchin web console makes protecting any Proxmox VM straightforward:
1. Select the Proxmox VM to back up;

2. Choose backup storage;

3. Configure backup strategies;

4. Submit the job.

Thousands trust Vinchin worldwide—with high ratings across industries—and now you can experience every feature free with our comprehensive 60-day trial.
PVE USB Passthrough FAQs
Q1: Can I hot-plug a new USB stick so my Windows Server instantly recognizes it?
A1: Yes—as long as hotplug support is enabled in both QEMU settings and Guest Tools are installed,the stick appears immediately without rebooting .
Q2 : My LXC app can't write files even though I passed through my serial adapter — why ?
A2: Because /dev permissions aren’t right; fix the device’s group/permission via udev rules or chmod/chown.
Conclusion
PVE's flexible approach lets administrators connect almost any kind of physical peripheral—from single-use dongles right up through entire high-speed controllers—to their virtualized workloads safely and efficiently.With reliable backups powered by Vinchin,your critical data stays protected no matter how complex things get.Try Vinchin today—and keep peace of mind alongside peak performance !
Share on:


