-
What is qemu-img?
-
How to install qemu-img on Windows and Linux?
-
How to convert virtual disk with qemu-img?
-
How to manage virtual disk with qemu-img?
-
How to convert and manage VM with Vinchin Backup & Recovery?
-
Qemu-img converting virutal disk FAQs
-
Sum Up
Server virtualization technology can help optimize IT environment so that more and more companies select virtualization solutions for better IT environment performance.
For IT administrators, it is common to process virtual disks, which work like hard drives of physical machines and contain most of VM data, in daily work, including exporting virtual disks as VM backup, importing virtual disks for VM recovery, and converting virtual disks for VM migration.
Converting virtual disks before VM migration is because there are different requirements in different virtual environments. For example, ESXi host can accept vmdk virtual disks but KVM host often needs raw or qcow2 virtual disks so the format needs to be converted for the new host.
There are many virtual disk managers for VM management but it is qemu-img that is frequently used to converting virtual disk.
P.S. Except for migrating virtual disk, you can also migrate the whole virtual machine to reduce failures during migration and boot VM faster.
What is qemu-img?
Qemu-img is the qemu disk image utility and provides many options and parameters to help convert many kinds of virtual disks including raw, qcow2, qcow, vmdk, vhd, etc. It is also can be used to manage virtual disks like creating, checking, and resizing virtual disks.
How to install qemu-img on Windows and Linux?
Qemu-img allows you to install it on both Windows and Linux operating systems. After you get the installation package, you can follow the instruction to install it.
Install qemu-img on Windows operating system
Qemu-img can be directly installed on Windows operating system with the installation package. After installation, you have to set environment variables.
Right-click Windows icon on desktop > select System > select Advanced system settings on the right > select Environment Varibales > click Path to edit or create the environment variable
To test whether environment variable has been successfully set, you can press Windows key and R to open the Run command windows > type cmd to open the Command Prompt > run qemu-img --help to see whether there are any results
Install qemu-img on Linux operating system
Qemu-img should be installed on different Linux operating systems with different commands.
For Ubuntu/Debian, type: apt install qemu-img
For CentOS/Red Hat/Oracle, type: yum install qemu-img
For SUSE/OpenSUSE, type: zypper install qemu-img
Similarly, you can check the installation by qemu-img -v.
How to convert virtual disk with qemu-img?
Qemu-img can let you simply convert virtual disk via command line but you should never process a running virtual disk or the data might be lost.
Here are some examples:
To convert vmdk to qcow2:
qemu-img convert -f vmdk -O qcow2 centos.vmdk centos.qcow2
The option convert means converting virtual disk format, parameter -f presents the source image format, and paremeter -O presents the target image format.
To convert qcow2 to vmdk:
qemu-img convert -f qcow2 -O vmdk centos.qcow2 centos.vmdk
To convert vhd to qcow2:
qemu-img convert -p -f vpc -O qcow2 centos.vhd centos.qcow2
You need to pay attention to that if you would like to convert vhd virtual disk, the argument to qemu-img is vpc.
To convert vhdx to qcow2:
qemu-img convert -p -f vhdx -O qcow2 centos.vhdx centos.qcow2
To convert raw to vmdk:
qemu-img convert -f raw -O vmdk centos.raw centos.vmdk
To convert vmdk to raw:
qemu-img convert -f vmdk -O raw centos.vmdk centos.raw
How to manage virtual disk with qemu-img?
Except for converting virtual disk, qemu-img can also help manage virtual disk like creating qcow2 image or resizing virtual disk.
To create qcow2 image:
qemu-img create -f qcow2 disk_directory.img 10G
To resize virtual disk:
qemu-img resize disk_directory.img 20G
There are many other useful qemu-img options and parameters, you can get them in its guide.
How to convert and manage VM with Vinchin Backup & Recovery?
Sometimes recovering or migrating VM via processing virtual disk might lead to failures and this will be a disaster in the event of an emergency. You can upgrade your VM management plan.
Vinchin Backup & Recovery is a professional backup and disaster recovery solution for virtual environment which supports multiple virtualization platforms including VMware vSphere, Proxmox, oVirt, OLVM, Hyper-V, Red Hat Virtualization, XenServer, OpenStack, etc. (Native KVM is not supported for now)
Agentless backup will help you quickly add all the VMs to backup system and the user-friendly web console will help you easily finish all kinds of job configuration.
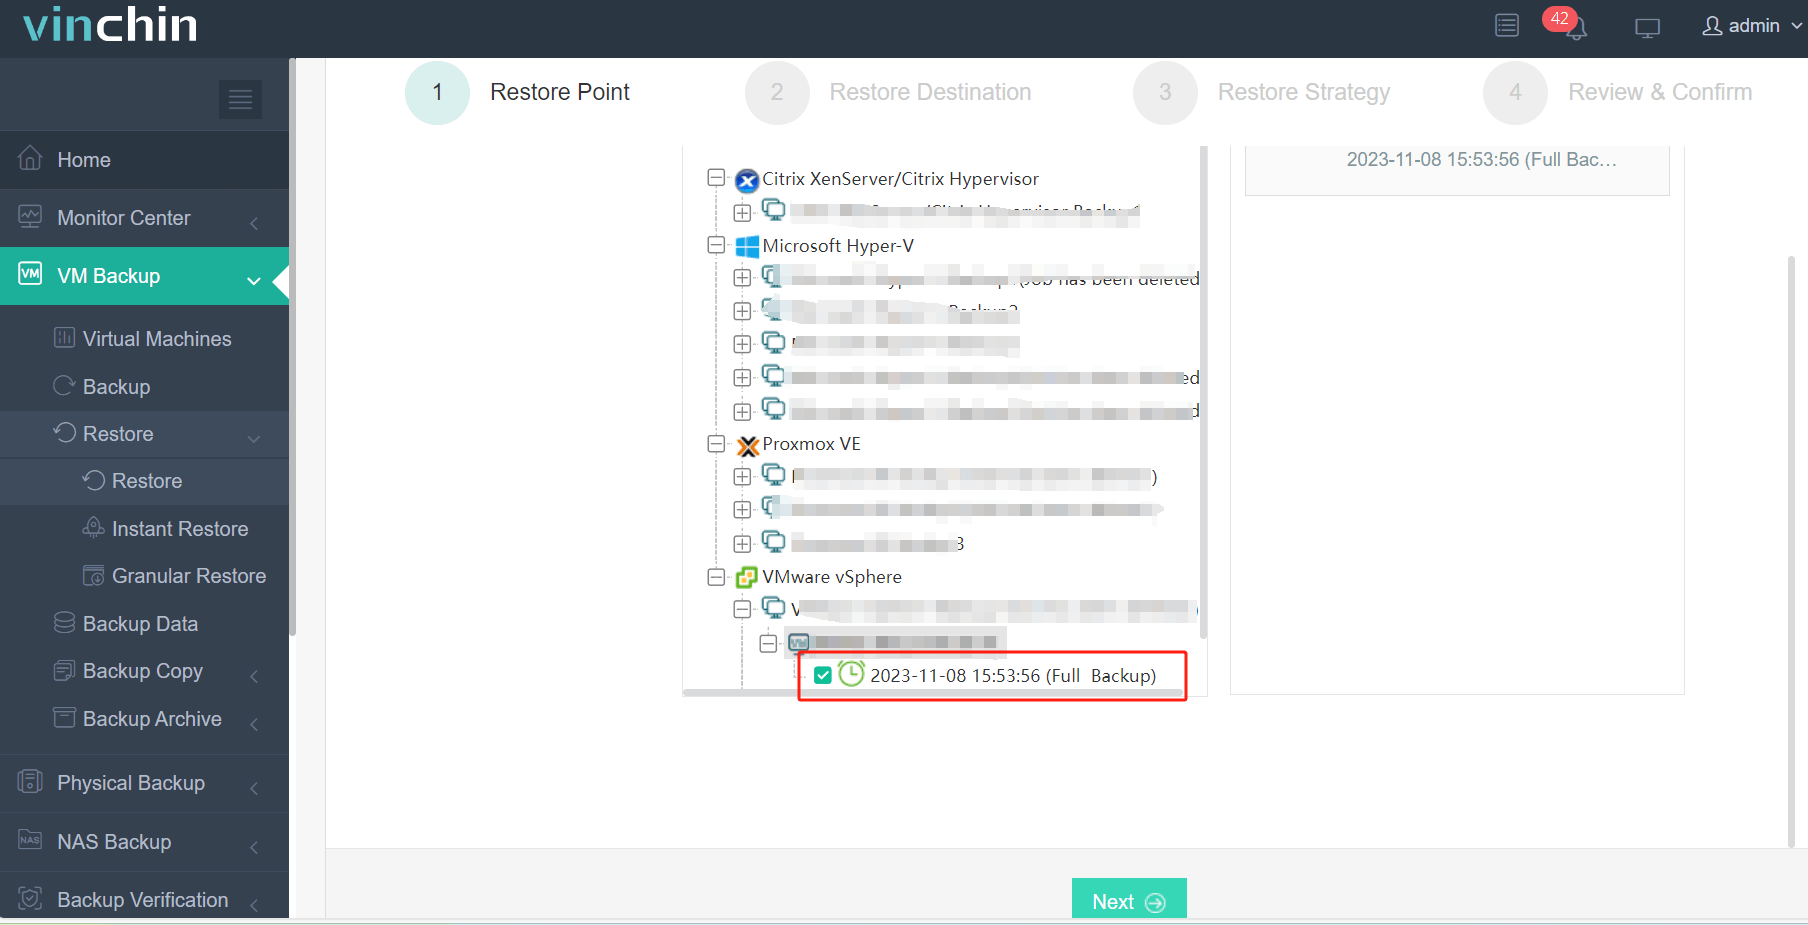
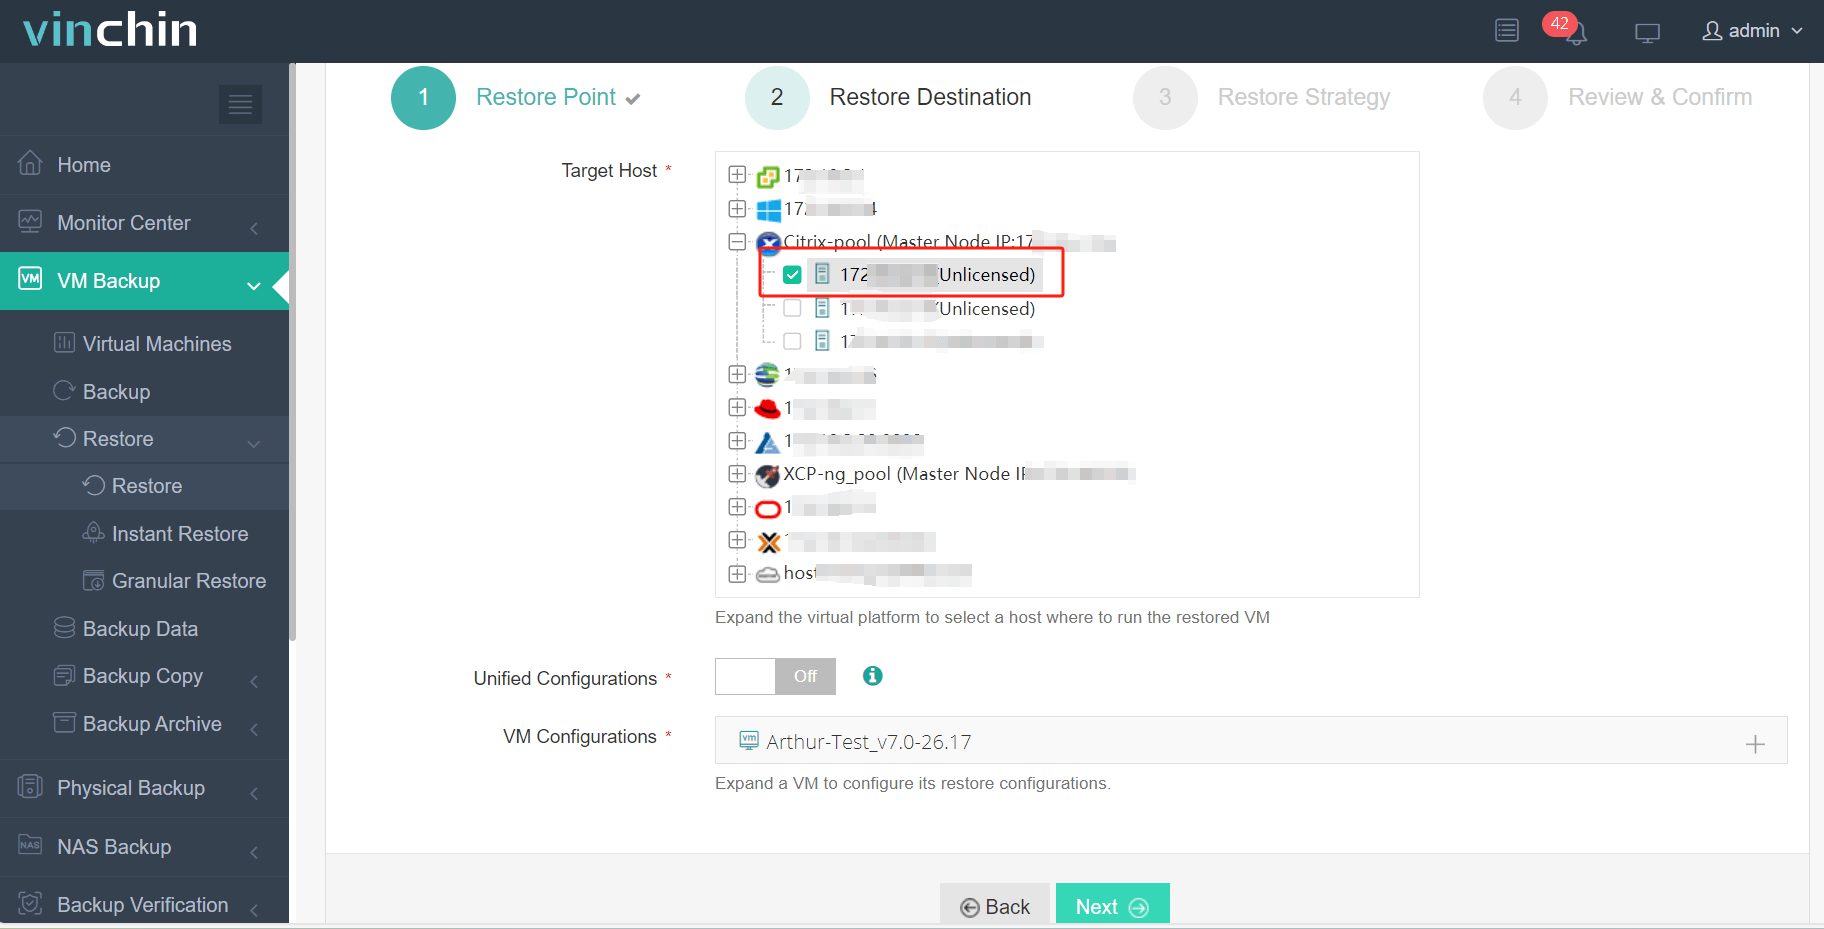
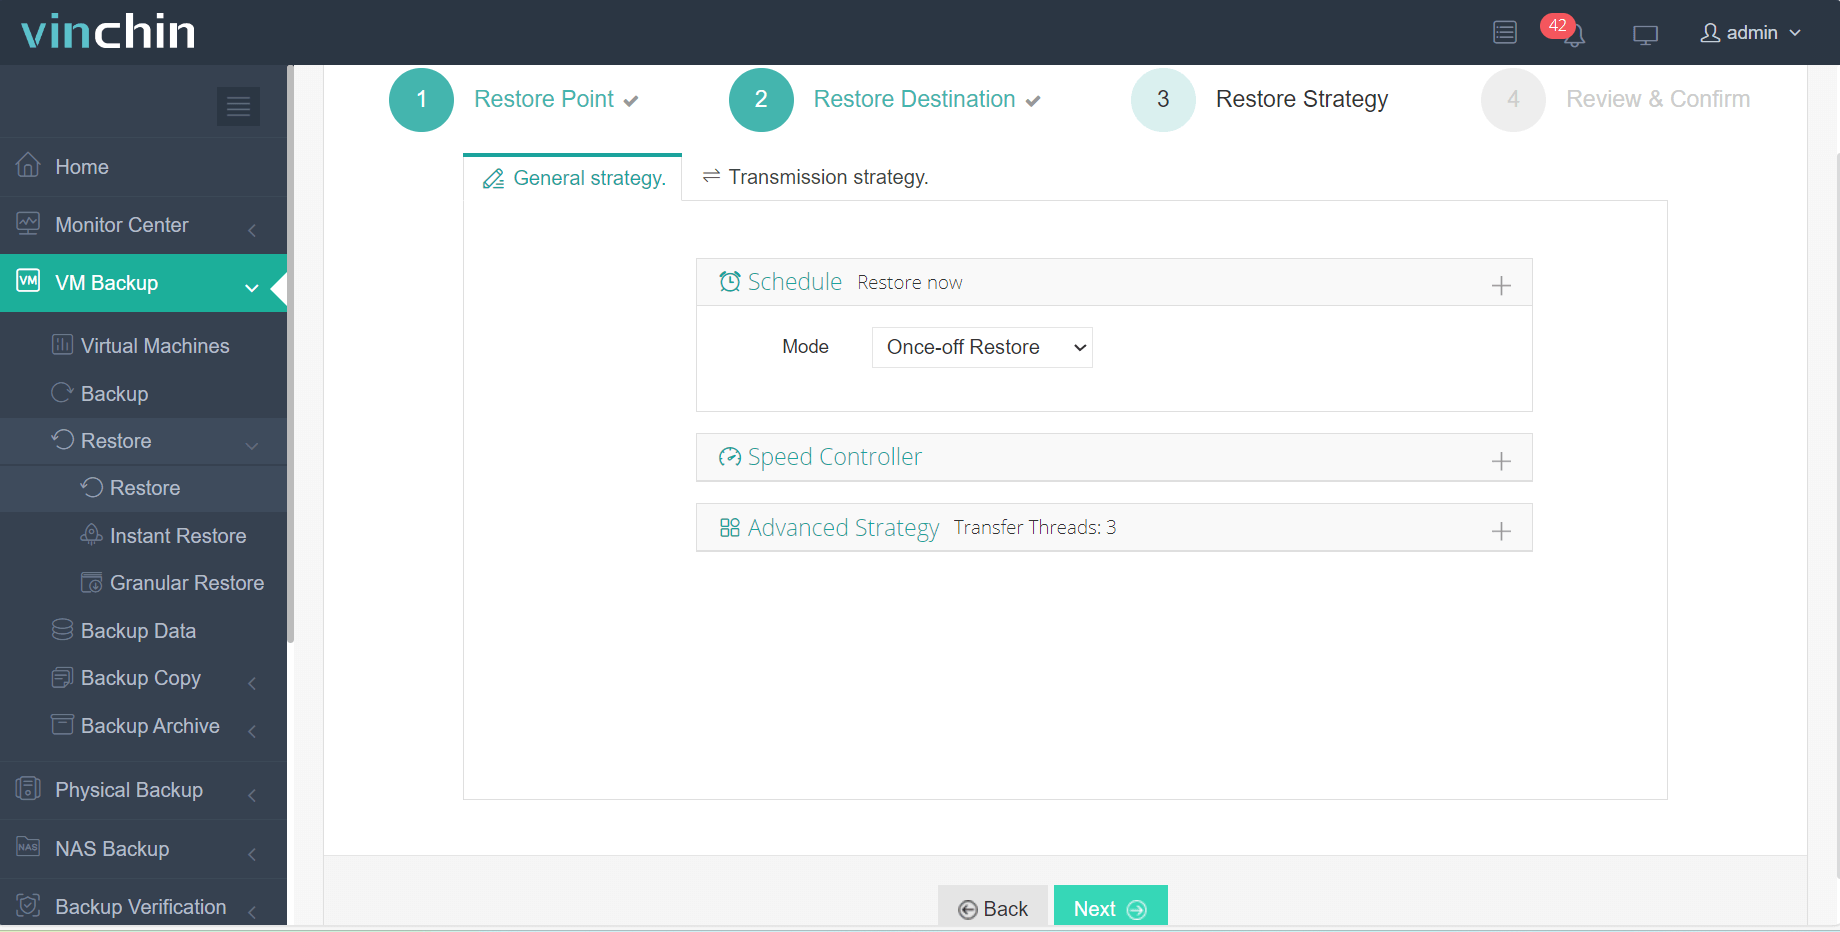
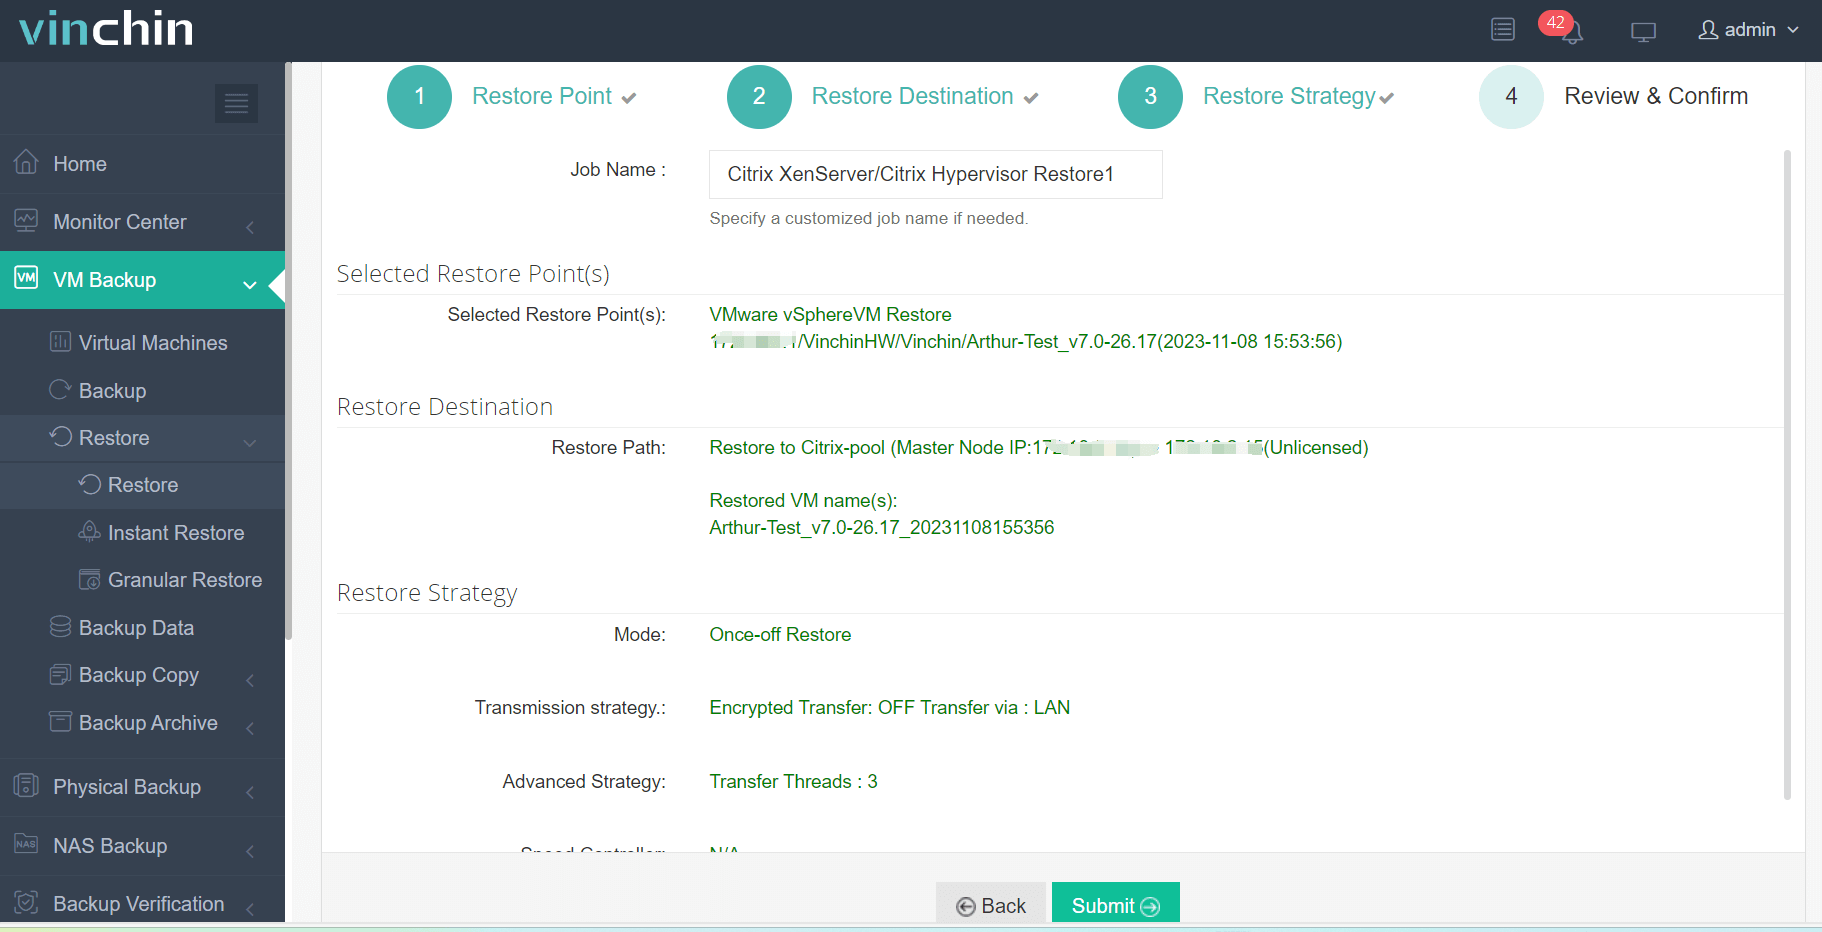
You can add hosts from different hypervisors and easily migrate VM with VM backup. For example, if you have a VMware VM backup, you just need 4 steps to migrate it to a XenServer host.
1. Select the VMware backup

2. Select the destination of XenServer host

3. Select the restore strategies

4. Submit the job

To help quickly recover VM from any disasters, Vinchin Instant Recovery technology lets you recover a failed VM from its backup in 15 seconds.
Vinchin Backup & Recovery has been selected by thousands of companies and you can also start to use this powerful system with a 60-day full-featured free trial. Just click the button to get the installation package.
Qemu-img converting virutal disk FAQs
Q1: Can I use qemu-img to repair a corrupted virtual disk?
A1: Qemu-img offers a check function that can detect and sometimes fix errors in supported disk formats, but it may not recover all data from severely damaged disks.
Q2: Is it possible to compress a virtual disk image with qemu-img?
A2: Yes, you can use the convert command with the -c option to create a compressed version of your virtual disk image.
Q3: How do I view detailed information about a virtual disk using qemu-img?
A3: Run qemu-img info [disk_image_file] in your terminal or command prompt to display details such as format, size, and backing file.
Sum Up
Qemu-img is the tool for virtual disk management and can be deployed on both Windows and Linux operating systems. IT administrators can use it to create, convert, and resize virtual disk to manage virtual disk and migrate VM between different hypervisors.
You can also choose a more powerful system, Vinchin Backup & Recovery, to protect and manage virtual environment via an easier way. Don't miss the free trial.
Share on:


