-
Why Need to Expand Proxmox VM Disks?
-
Method 1. Resize Disk Size via Proxmox GUI
-
Method 2: Resize Disk Size via Proxmox Shell
-
How to Detect the New Size in Guest?
-
Things to Note When Resizing Disks on Proxmox
-
Backup Proxmox VM with Vinchin
-
Proxmox Increase VM Disk Size FAQs
-
Conclusion
Expanding a VM disk in Proxmox requires careful steps to avoid data loss or downtime. It is a frequent operational task due to evolving workload demands. This article details the operational procedures for safely expanding Proxmox VM disks.
Why Need to Expand Proxmox VM Disks?
VMs may experience storage exhaustion as operations evolve. Applications can generate significant log volumes. Databases may grow rapidly. Deployment of new services increases storage requirements. For example, a PostgreSQL VM with growing tables needs timely disk expansion. Proactive capacity management prevents service degradation or failure. Common causes include application log growth, database expansion, and new feature deployments. Early resizing avoids patch failures or blocked installs. Monitoring trends helps plan expansions before hitting limits.
Running out of disk can halt OS updates or application installs. A Linux VM may lack space for package caches; a Windows VM may refuse patches. Without room, services can crash or behave unpredictably. Recognizing storage exhaustion signs—high usage alerts or slow I/O—lets admins act early. This saves troubleshooting time and reduces risk of emergency downtime.
Method 1. Resize Disk Size via Proxmox GUI
Before any resize, secure a verified backup. This step is non-optional. A fallback prevents data loss if steps fail. After backup, expand the virtual disk at the hypervisor level. Then update storage inside the guest OS. We cover GUI and CLI methods. We address Linux (Ext4, XFS, LVM) and Windows guests. We include advanced scenarios like snapshots, storage backends, and kernel detection. Follow each step precisely using active, clear language.
Always secure a recent backup before disk changes. A verified backup lets you restore if issues arise. Use Vinchin or another trusted tool. Verify backup integrity. Do not skip this step.
In the Proxmox web console, you can add space quickly:
Log in to Proxmox web interface.
Select the VM needing more space.
Go to Hardware.
Click the virtual disk entry (e.g., virtio0 or scsi0).
Click Disk Action then Resize.
Enter the amount to add (e.g., +10G).
Click Resize disk. This updates the virtual disk image.
Method 2: Resize Disk Size via Proxmox Shell
Open shell on the Proxmox host or via SSH. Run:
qm resize <VMID> <DISK> +<SIZE>
Replace <VMID> with the VM ID. Replace <DISK> with the disk identifier (e.g., scsi0, virtio0; as shown in VM’s hardware config). Replace <SIZE> with an increment and unit (e.g., 10G for 10 GiB). This command may work online if storage backend and guest OS support it; otherwise, shutdown the VM first. Confirm the success message. The virtual disk grows.
How to Detect the New Size in Guest?
After hypervisor-level resize, the guest OS sees unallocated space. You must extend partitions or volumes and grow filesystems. Steps vary by OS and filesystem.
Linux Guest: Ext4 on Partition
If the disk uses a partition table (GPT or MBR), adjust the partition end. First, confirm the new size: run lsblk. Use parted to resize:
Run
parted /dev/sda printto view layout.Run
parted /dev/sda resizepart <partition-number> 100%to extend the partition to the disk’s end. Use the correct partition number (e.g., 1).Inform the kernel: run
partprobe /dev/sdaor reboot if needed.Run
resize2fs /dev/sdaXto grow the ext4 filesystem. Confirm withdf -h.
For LVM-backed root:If partition hosts LVM PV, first resize partition as above.
Run
pvresize /dev/sdaXto enlarge the Physical Volume.Run
lvextend -r -L +10G /dev/mapper/vgname-lvnameto extend the Logical Volume and filesystem (for ext4).Confirm free space with
vgsand new size withdf -h.
These steps assume familiarity with Linux CLI.
Linux Guest: XFS Filesystem
XFS grows online but cannot shrink. After partition or PV resize:
Confirm new size via
lsblk.Ensure filesystem is mounted.
Run
xfs_growfs /mountpointto extend to full space.Confirm with
df -h.
If kernel does not detect new partition, runpartprobeor reboot. XFS requires mount point; online extend works without unmount.
Linux Guest: Using growpart
For cloud-like images or GPT layout, growpart simplifies partition expansion. Install cloud-utils if needed. Run growpart /dev/sda 1 to extend partition 1 to fill free space. Then run resize2fs or xfs_growfs. Use growpart --dry-run to verify.
Windows Guest
Windows can detect disk size changes online if VirtIO drivers or VMware Tools are updated. To extend: open Disk Management (run diskmgmt.msc). Use Action > Rescan Disks if new space does not appear. Right-click the volume showing unallocated space, choose Extend Volume, then follow the wizard to allocate space. Extending the system partition often works online; extending other partitions may require offline mode or reboot. Ensure disk type (Basic vs. Dynamic) and driver support.
Things to Note When Resizing Disks on Proxmox
Resizing with existing snapshots is risky. Warning: Resizing disks with existing snapshots is strongly discouraged and can lead to data corruption. Best practice: consolidate or remove all snapshots for that VM and disk. Perform a full backup. Resize the disk. Create new snapshots only if needed afterward.
Storage backend matters. online resize support depends on Proxmox storage type (LVM-thin, ZFS, Ceph, etc.) and guest drivers. Consult Proxmox storage docs for specifics. Some backends allow online expansion; others need VM shutdown.
Older guest kernels or storage drivers may not detect size changes. If OS does not see space, run partprobe or reboot. Keep guest tools and kernels updated to support online resize.
Thin provisioning may show free space differently. After extension, verify via monitoring tools. Adjust thresholds to reflect new capacity. Automated alerts should use new limits.
Confirm successful filesystem expansion. inside the guest, run df -h (Linux) or view disk properties (Windows). Verify applications detect new space. For Linux, consider a non-destructive read-only fsck -n /dev/sdaX or schedule a full fsck in maintenance window if concerns exist. For critical services, test in staging first. Validate application functionality dependent on expanded storage. Monitor logs and metrics for anomalies. Update backup configurations if size thresholds change.
Backup Proxmox VM with Vinchin
Now that disk size changed, regular backups matter. Vinchin offers enterprise-grade VM backup for Proxmox. It supports Proxmox first among platforms. Bridging from resize, you safeguard data before any change.
Vinchin Backup & Recovery is a professional, enterprise-grade VM backup solution supporting Proxmox and many platforms. It offers features such as forever incremental backup, data deduplication and compression, V2V migration, scheduled backup, throttling policies, and GFS retention—and more. Highlights include forever incremental backup that saves only changed blocks for efficiency, deduplication & compression to reduce storage needs, V2V migration for moving VMs between hosts, and instant recovery for quick rollbacks, though Vinchin provides far more advanced features. You can find full details in Vinchin Help Center.
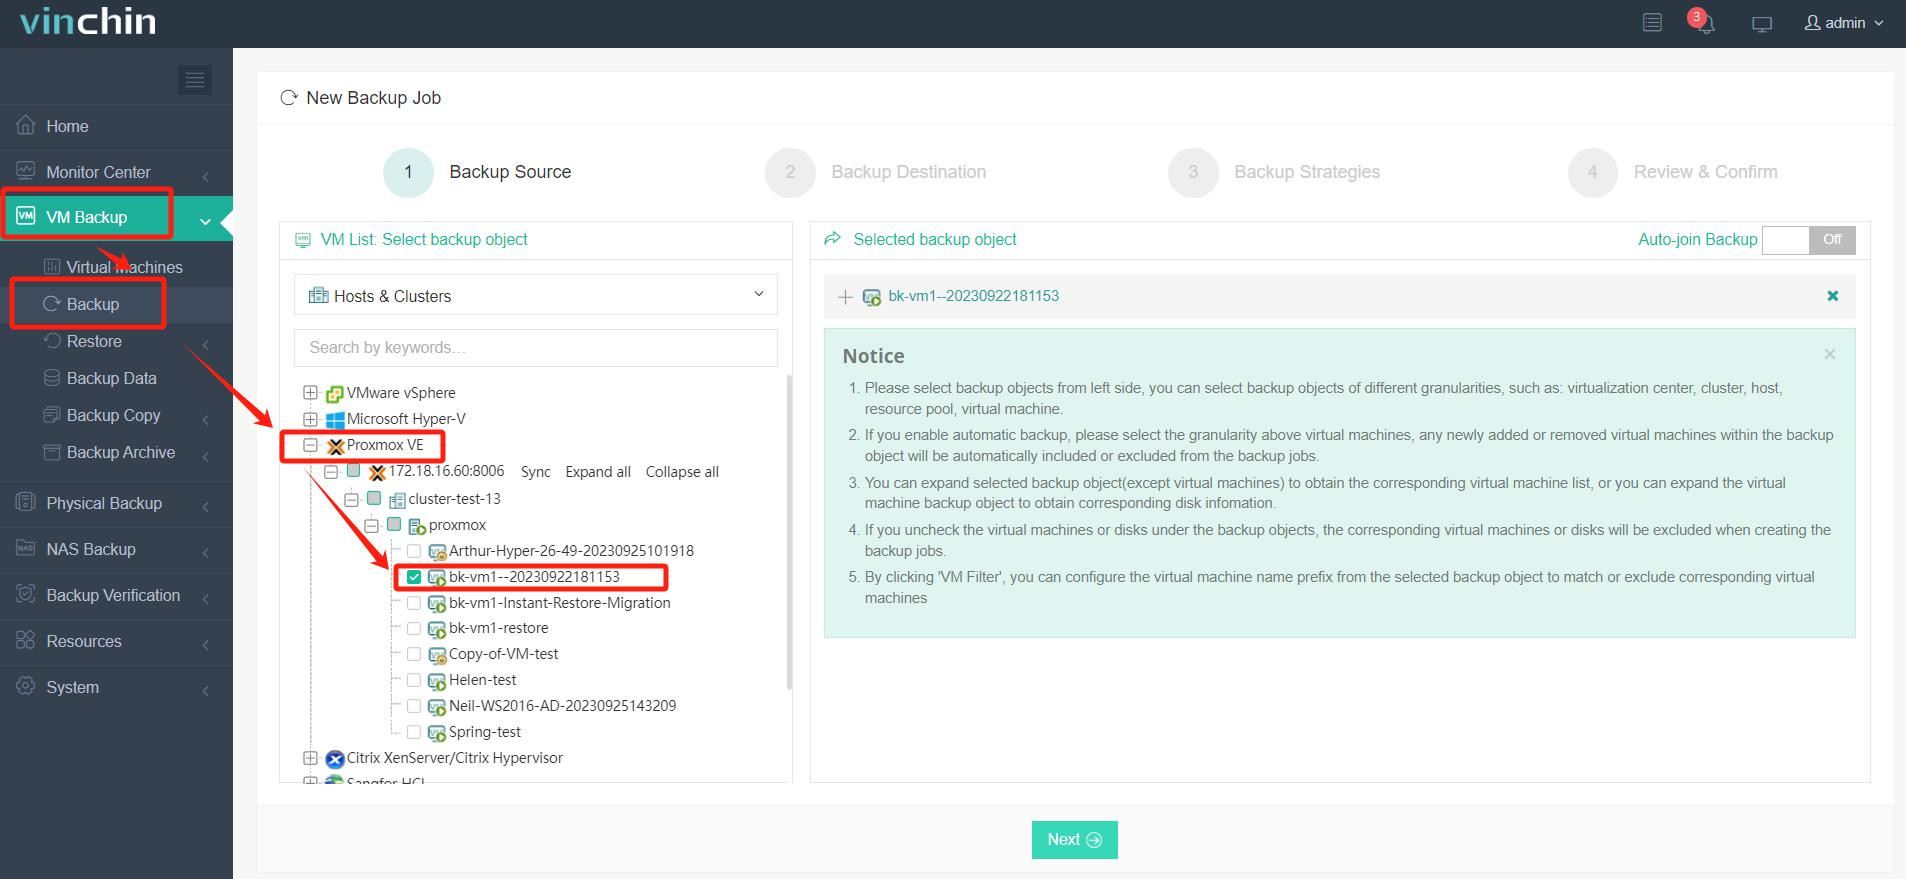
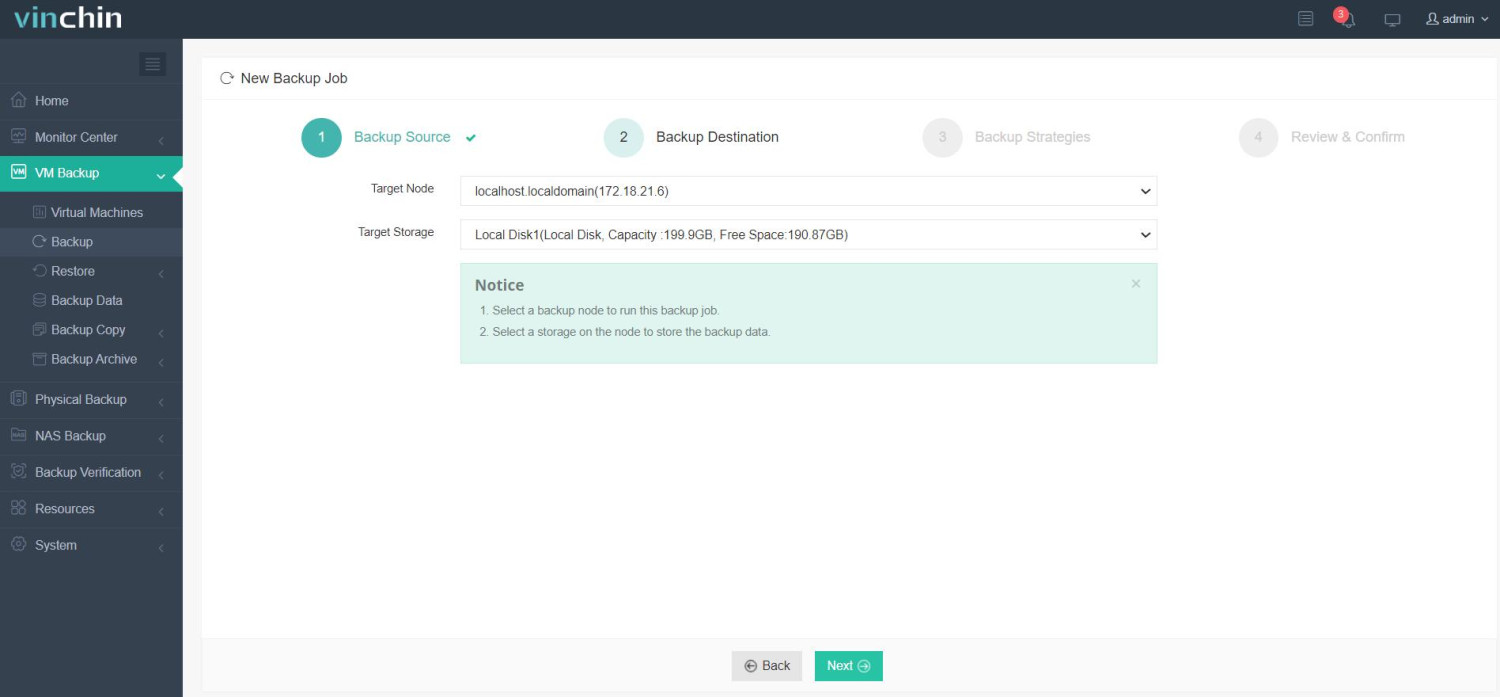
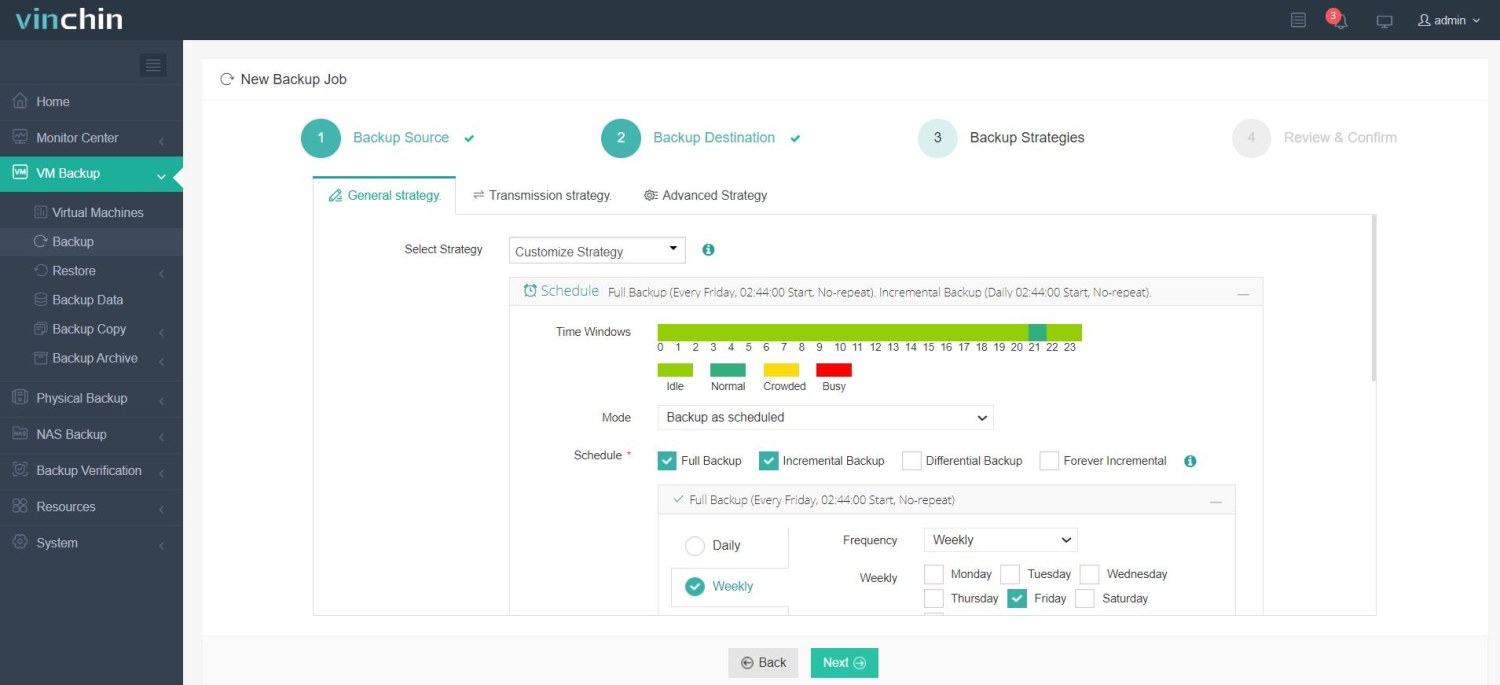
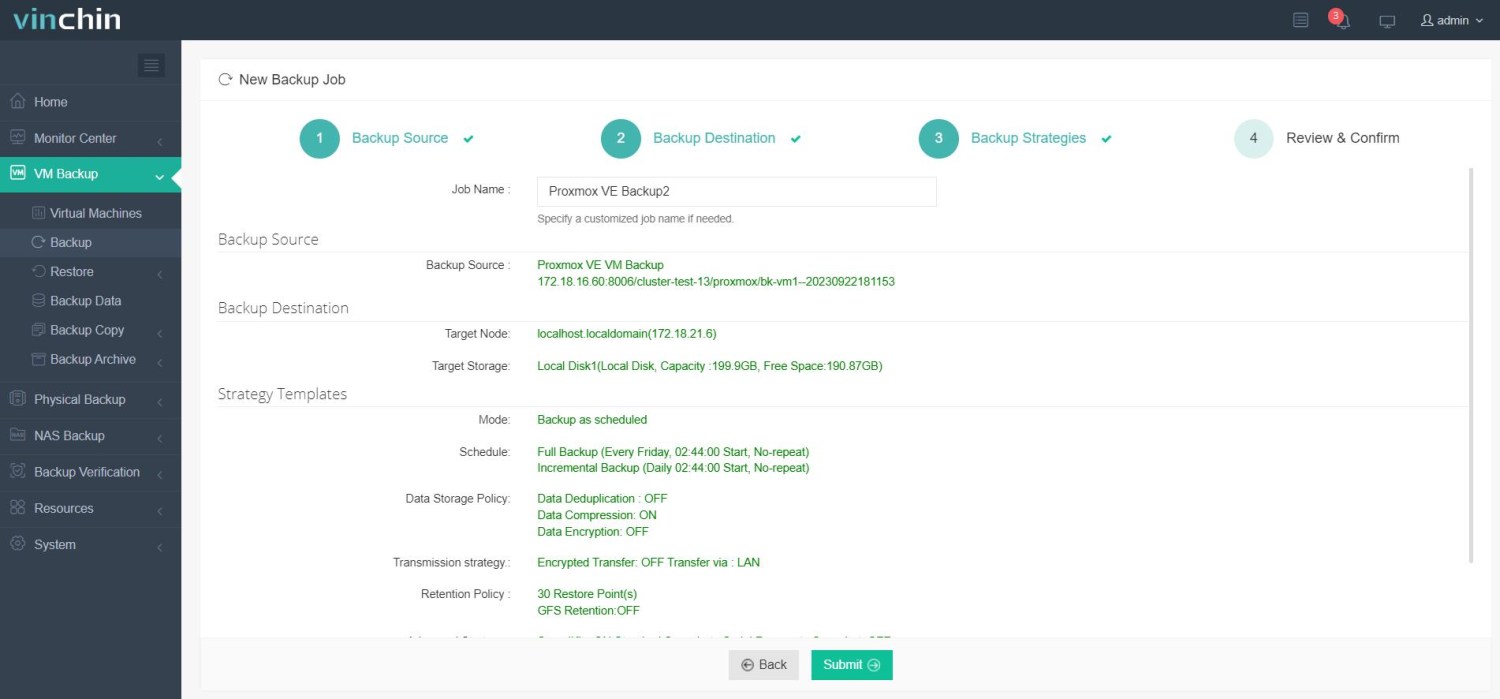
Using Vinchin's web console is straightforward. To back up a Proxmox VM:
1. Select the Proxmox VM to back up.

2. Choose backup storage.

3. Configure backup strategies.

4. Submit the job.

Each step ties to your chosen VM: you explicitly select that VM and view its properties during the process, making it clear which VM you're protecting.
Vinchin boasts a global customer base and strong product ratings. Try a full-featured 60-day free trial to experience accelerated backups, easy restores, and solid data protection. Download Installer for quick deployment today.
Proxmox Increase VM Disk Size FAQs
Q1: How to expand a Proxmox VM disk without downtime?
A1: Use qm resize <VMID> <disk> +<size> shell or Hardware > disk > Disk Action > Resize GUI if backend and guest OS support online expansion; otherwise, shut down VM first.
Q2: Linux guest shows extra size but partition stays old size, what next?
A2: Use growpart /dev/sda 1 or parted /dev/sda resizepart 1 100% to extend partition, then run resize2fs /dev/sda1 for Ext4 or xfs_growfs /mountpoint for XFS.
Q3: Can I shrink a VM disk in Proxmox?
A3: Proxmox does not natively support shrinking via GUI or qm resize. Shrinking is risky: you must ensure free space inside guest, shrink filesystem offline, calculate new device size, use low-level tools, and have full backups; migrating data to new smaller disk is safer.
Conclusion
Expanding a Proxmox VM disk necessitates a rigorous process: comprehensive backup, hypervisor-level disk expansion, guest OS partition/filesystem extension, and validation. Meticulous execution of OS-specific procedures is critical for operational success. Always verify backups and monitor after resize. With Vinchin handling backups, you mitigate risk when expanding storage to meet growing demands.
Share on:


