


To start installing the operating system in the VM, although XenServer already contains multiple templates, such as RedHat as 4 + 5, CentOS, SUSE, Oracle Enterprise Linux, etc., there is no need to download the original installation CD during installation; If it is not in the list, such as RedHat as 3, it must be installed on CD. Here is how to install the required operating system in the form of an ISO file when adding a VM.
First, log in to the console and execute the following instructions to create an ISO file type repository (SR – storage repositories).
mkdir /boot-iso
xe sr-create name-label=boot-iso type=iso device-config:location=/boot-iso device-config:legacy_mode=true content-type=iso
Upload those ISO files to / boot ISO of the host.
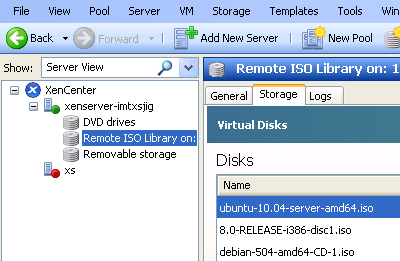
If the addition is successful, an item will appear in XenCenter.
Note:
1. If you accidentally create an error or repeatedly add a new one, and want to delete the repository, you can use the XenCenter UI and directly select detach.
2. After uploading the ISO file to the host, XenCenter cannot display synchronously. Xencenter can only catch it after the console executes the Xe tool stack restart command.
Note:
Citrix XenServer is an enterprise-class virtual platform for cloud computing. There are three versions: XenServer, essentials for XenServer, enterprise edition, and platinum edition. XenServer is free and is a competitive product at the same level as VMware ESXi. The installation process of XenServer is as easy as VMware ESXi. After installation, the interface is as follows. Similar to VMware ESXi, the main operation and configuration can be completed on another machine equipped with XenCenter client (the same as VMware vShpere client).
XenServer
Different from VMware ESXi, XenServer cannot directly import ISOs in the XenCenter client management interface and then install the operating system. These ISOs need to be pre-stored on another machine and then accessed by NFS. Therefore, we first set up an ISO directory on other machines and collect some ISO files, export the ISO directory with NFS, and then manually hang the directory on the XenServer server, so that we can see all ISO files in the management interface of XenServer and XenCenter, In other words, XenServer encourages you to store ISO files separately to another separate server for management. If you are not clear about the following NFS operations, you can refer to installing and configuring NFS 4.0 on CentOS:
# vi /etc/export
/home/vpsee/iso 172.16.240.164(rw,sync,no_root_squash)
172.16.240.164(rw,sync,no_root_squash)
# /etc/init.d/portmap restart
# /etc/init.d/nfs restart
Set permissions on NFS server to allow XenServer server to access NFS:
# vi /etc/hosts.deny
portmap:ALL
# vi /etc/hosts.allow
portmap:172.16.240.0/255.255.254.0
Directory hung on NFS server after logging in to XenServer with SSH:
$ ssh root@172.16.240.164
root@172.16.240.164's password:
# xe-mount-iso-sr 172.16.240.10:/home/vpsee/iso
After successful mounting, you can see all ISOs on the XenCenter console (currently only Windows version of XenCenter):
The rest is easy. With ISO, you can directly install the operating system. Note that if the machine CPU does not support full Virtualization (Intel VT or AMD SVM), the installation will fail and an error will be reported:
XenServer-imtxsji: HVM is required for this operation
INVALID_SOURCE - Unable to access a required file in the specified repository:
file:///timp/cdrom-repo-RZ1Yem/install.386/xen/vmlinuz.
If so, the semi-virtual system can only be installed through the network (install from URL).
Share on:


