Introduction
Yes. You can recover a VM without waiting for a full restore by using Instant VM Recovery. It runs the VM directly from the backup repository while the remaining data is restored to production storage in the background, reducing downtime after incidents such as host failure, VM corruption, failed updates, or ransomware attacks.
This article explains how Instant VM Recovery works, when to use it, how it differs from a full restore, and how to perform it, along with key prerequisites and common mistakes.
Terminology Note
Instant VM Recovery, also called instant VM restore in some backup products, is a recovery method that starts a VM directly from backup storage before the full data migration finishes. This article uses Instant VM Recovery throughout and treats Instant VM Restore as the same capability.
How Does Instant VM Recovery Work?
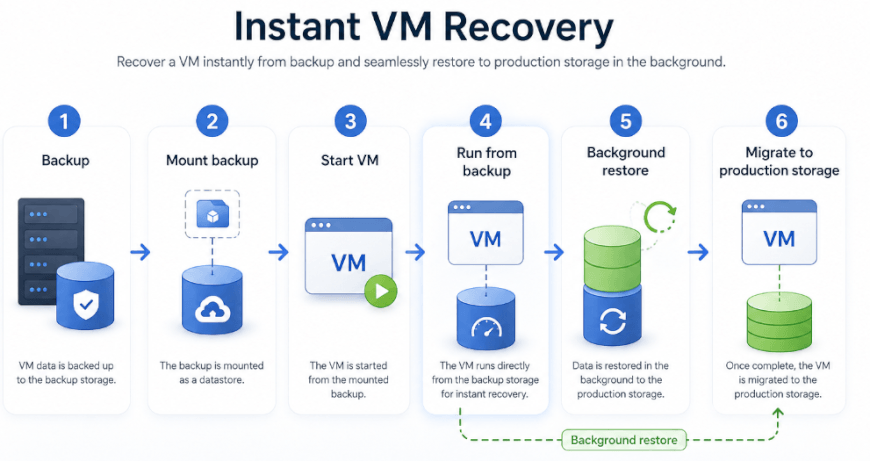
Instant VM Recovery follows a fixed pipeline:
Backup → Mount backup → Start VM → Run from backup → Background restore → Migrate to production storage
Each step has a specific purpose.
1. Select a healthy recovery point
Pick the most recent backup that is known to be clean. Restoring from a corrupted or infected backup is one of the most common causes of re-incidents.
2. Mount the VM from the backup
Instead of restoring every block, the backup is presented to the hypervisor as a usable datastore. No full copy happens up front, which is why the VM can start quickly.
3. Start the VM
The VM boots and reads blocks on demand directly from the backup repository. From the user's point of view, the service is already back.
4. Restore data in the background
While the VM is already serving users, the remaining blocks are copied back to production storage. The two events run in parallel.
5. Move the VM back to production storage
Once the background restore is complete, the VM is migrated to run on local storage again. Only at this point is the recovery truly permanent.
Pro tip
Instant VM Recovery turns a recovery from a single long event into two parallel events — a fast start and a slower background migration.
How Do You Perform Instant VM Recovery?
The exact steps depend on your backup product, but the procedure is essentially the same across hypervisors. Follow these seven steps in order.
Step 1: Identify the failed VM
Confirm which VM is unavailable, what error is showing, and whether the failure is at the VM level, host level, or storage level. This determines whether Instant VM Recovery is the right first response.
Step 2: Choose a clean recovery point
Open the backup history for that VM. Pick the most recent verified backup that predates the incident. Avoid restore points taken after the failure or after a suspected infection.
Step 3: Select Instant VM Recovery
Choose the instant-recovery option rather than "Full Restore." The product will prepare the backup as a mountable datastore, ready to be started by the hypervisor.
Step 4: Choose the target host and network
Select a host that has enough spare CPU and memory to run the recovered VM. Confirm the network mapping so the VM appears on the correct VLAN or segment from the moment it boots.
Step 5: Start the recovered VM
Power on the VM. The VM will boot from the backup repository and begin serving workloads immediately — typically within minutes.
Step 6: Verify applications and services
Check that the operating system boots, applications start, and dependent services (DNS, authentication, database connections) are reachable. Do not declare recovery complete on a green backup log alone.
Step 7: Complete the background restore
Allow the background migration to finish. When it completes, the VM runs entirely from production storage and the recovery is permanent.
A Worked Example: The Workflow in Vinchin Backup & Recovery
The seven steps above describe the universal Instant VM Recovery procedure. To make the workflow concrete, here is what each step looks like when run inside one specific product — Vinchin Backup & Recovery, a backup platform for VMware, Hyper-V, Proxmox VE, and other mainstream hypervisors that ships Instant VM Recovery as a built-in option.
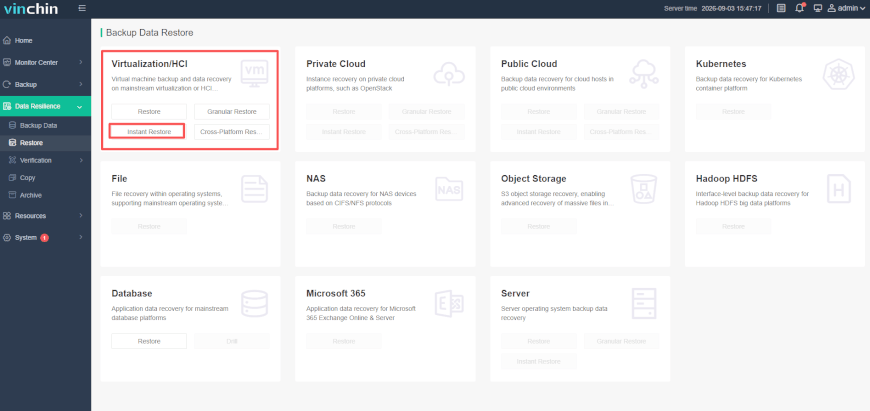
Step 1 — Find Instant VM Recovery. Open Vinchin Backup & Recovery, go to Data Resilience > Restore and select Virtualization/HCI > Instant Restore as the recovery method.
Step 2 — Identify the failed VM. Locate the VM that needs to be recovered.
Step 3 — Select a recovery point. Choose an available backup of the VM from before the incident and use it as the recovery point.
Step 4 — Select the target environment. Choose the target host and configure the appropriate network settings for the recovered VM.
Step 5 — Start the recovered VM. Start the recovery task. Vinchin makes the VM available directly from the backup data, allowing it to resume operation without waiting for the entire VM to be restored first.
Step 6 — Verify the workload. Confirm that the VM boots correctly and that its applications and required services are working as expected.
Step 7 — Complete the recovery. Once the VM is stable, migrate it to the target production storage to complete the recovery and return it to normal operation.
The exact menu names differ in other products — Veeam, NAKIVO, Acronis, and most enterprise backup platforms expose the same Instant VM Recovery workflow under different labels. The seven steps themselves are the same across products; Vinchin is shown here as one concrete example.
When Should You Use Instant VM Recovery?
Instant VM Recovery is the right first response when downtime matters more than permanence.
VM hardware failure
Storage failure
Accidental VM deletion
Ransomware incident (where the backup itself is clean)
Corrupted VM
Failed update or configuration change
Production VM unavailable for an unknown reason
Rule of thumb
If restoring the entire VM would take longer than your acceptable downtime, Instant VM Recovery is usually the better first response.
Instant VM Recovery is not the right tool when the backup itself is suspect, when the production storage is needed immediately by another workload, or when the recovered VM must run for a long time without performance degradation from the backup repository.
Instant VM Recovery vs. Full VM Restore
Administrators often ask why they should not just run a full restore. The answer is that the two approaches answer different questions.
| Instant VM Recovery | Full VM Restore |
VM startup | Fast (minutes) | Slower (depends on VM size and storage) |
Initial data movement | Minimal (blocks on demand) | Full VM (every block) |
Production recovery | Immediate / fast | After restore completes |
Background restore | Yes | No |
Best for | Urgent recovery | Permanent recovery |
Dependency on backup repo | Temporary (until migration finishes) | None after completion |
Instant recovery is primarily about reducing time to service availability. Full restore is about completing the VM restoration before the VM runs. In most incident responses, the right play is to start with Instant VM Recovery, then complete a full restore in the background.
What Do You Need for Instant VM Recovery?
Instant VM Recovery is not magic. It requires six conditions to be true.
A usable VM backup
A backup repository that can provide sufficient read performance
A compatible virtualization host
Enough CPU and memory on the target host
Network connectivity between the backup repository and the target host
A recovery point that is known to be clean
Heads up: A fast recovery method cannot compensate for a bad or inaccessible backup. If the backup is corrupted, infected, or unreachable, instant recovery will fail quickly.
The most common failure mode is a backup repository that is too slow. Instant recovery inherits the I/O characteristics of the storage it runs from, so a slow repository means a slow VM.
What Happens After the VM Starts?
Starting the VM is not the same as finishing the recovery. Many administrators misunderstand this and stop monitoring the process too early.
After instant recovery, four things are true at the same time:
The VM temporarily runs from the backup repository
Production storage is restored in the background
Application availability is verified during the migration window
The VM is migrated or finalized to production storage when the background restore completes
Until the migration is complete, the VM is technically running from the backup. Performance depends on the backup storage, and the recovery is not yet permanent. A short, scheduled migration window is normal; a long, drawn-out migration is a sign that the backup repository is too slow for production use.
How Can You Make Instant VM Recovery Faster?
Seven practices consistently improve recovery time across environments.
Keep backup storage close to recovery hosts (low-latency network)
Use sufficiently fast storage (NVMe or SSD on the backup repository)
Avoid network bottlenecks between the repository and the recovery host
Keep critical VMs on frequent backup schedules (short RPO)
Test instant recovery regularly, not just backup verification
Verify application dependencies before declaring recovery complete
Reserve enough compute resources for the recovery host
The first two items — storage speed and network proximity — account for most of the time difference between a fast instant recovery and a slow one. The remaining items are hygiene.
Illustrative Instant VM Recovery Timings
The table below gives planning-level estimates for the two phases of instant recovery — bringing the VM online, and finishing the background migration to production storage — for typical VM sizes on a 1 GbE network with an SSD-based backup repository. These are reference ranges for plan sizing, not vendor benchmarks: actual times depend on repository IOPS, network bandwidth, and how much of the VM's data has to be migrated back.
VM size (provisioned) | Typical time to VM online (instant start) | Typical background migration time | Notes |
50 GB (small server) | 15–60 seconds | 10–30 minutes | Mostly OS disk; low read load |
200 GB (line-of-business app) | 30 seconds–2 minutes | 30–90 minutes | Startup dominated by random-read IOPS |
500 GB (mid-size application server) | 1–3 minutes | 1.5–4 hours | Migration bandwidth becomes the limiting factor |
1 TB (database server) | 2–5 minutes | 3–8 hours | Depends heavily on database cache warm-up after start |
Platform Differences: VMware, Hyper-V, and Proxmox VE
The seven-step workflow is the same on every hypervisor; what differs is how the backup is presented to the host. The table below summarizes the mount mechanism per platform.
Platform | How the recovered VM accesses backup data |
VMware vSphere / ESXi | Backup storage is mounted to the ESXi host as an NFS datastore; the instant-restored VM runs from that datastore until the migration to production storage completes. |
Proxmox VE | Instant Restore runs the VM directly from the backup; the restored VM reads blocks on demand rather than waiting for a full copy. |
Hyper-V | The VM's virtual disks are mounted from the backup repository to the target host, so the VM boots before the full data copy finishes. |
In all three cases the recovered VM reads blocks on demand and the background migration moves the data to production storage afterward, so the operational steps — verify applications, watch the migration window, finalize on production storage — are identical across platforms.
Common Mistakes to Avoid During Instant VM Recovery
1. Choosing an unverified backup
Restoring from a backup that is itself corrupted or infected just re-creates the incident. Always verify the recovery point first.
2. Ignoring network configuration
A VM that starts on the wrong VLAN or with the wrong IP is not really recovered. The service is online but unreachable.
3. Starting the VM without checking dependencies
A database needs its authentication service up first; an application needs its database. Order matters.
4. Treating instant recovery as the final restore
The migration to production storage still has to happen. Until it does, the VM depends on the backup repository.
5. Never testing the recovery process
A recovery that has never been performed is a guess, not a plan. Test it on a schedule, not during an incident.
Frequently Asked Questions
Q1: Is instant VM recovery faster than a full restore?
Yes, especially when the goal is to get a VM back online quickly. Instead of waiting for the entire VM to be copied back to production storage, Instant VM Recovery starts the VM from the backup while the remaining data is restored in the background.
Q2: Does instant VM recovery restore all VM data?
Yes. The VM can start running before the full restore is complete, while its data is migrated back to production storage in the background. Once the migration finishes, the VM no longer depends on the backup repository.
Q3: Can I use instant recovery after ransomware?
Yes, as long as you have a clean recovery point that was not affected by the attack. The backup itself must also remain accessible, which is why isolated, immutable, or offsite backup copies are important for ransomware recovery.
Q4: What happens if the backup repository is unavailable?
If the VM is still running from the backup repository, losing access to that repository can affect the VM and its applications. For this reason, Instant VM Recovery should be followed by completing the background migration to production storage as soon as practical.
Conclusion
Instant VM recovery is the fastest practical way to bring a failed VM back online without waiting for a full restore. The correct workflow is to select a clean recovery point, mount the VM backup, start the VM on a suitable host, verify applications, and complete the migration back to production storage. In Vinchin Backup & Recovery, this workflow is available as a built-in Instant Restore option for VMware, Hyper-V, Proxmox VE, and other mainstream virtualized environments.