-
Migrate MySQL to PostgreSQL with Pgloader
-
Migrate MySQL to PostgreSQL with Py-mysql2pgsql
-
Backup MySQL and PostgreSQL Before and After Database Migration
-
Sum up

Relational database management systems (RDBMS) are widely deployed across industries from e-commerce, and website, to financial services and geographical designs. MySQL vs PostgreSQL are two popular open-source choices among them and rank the top 5 databases in the rankings that capture global attention.
Based on different use cases, a business that involves complex longer-running queries, advanced query needs like joins, analytics, window, etc., or ACID-consistent data requirements, may find that PostgreSQL is a preferred option compared to MySQL.
Typically, MySQL is often used as a small web database for organizations that have carefully tuned, reviewed, and relatively simple application-generated queries (especially those that can use PRIMARY KEYs). MySQL is faster in such cases.
Whereas PostgreSQL shines in analytics, data mining environments, and data warehouses since the database has better querying, query optimizing, and query answering abilities, as opposed to the vulnerabilities of MySQL in these environments.
If you are after MySQL migration to PostgreSQL (see convert PostgreSQL to MySQL), this blog will introduce two conversion methods.
Migrate MySQL to PostgreSQL with Pgloader
Pgloader is a free database migration tool that allows users to implement continuous migration from MySQL, SQLite, and MS SQL Server to PostgreSQL.
Prerequisites:
Access to servers that set up a firewall and a non-root user with sudo rights.
Root MySQL user authenticates with a password and accepts encrypted connections.
Use PostgreSQL server as the client machine of MySQL.
1. Install Pgloader.
You can install Pgloader from the Ubuntu APT repositories using the apt command, but to use the useSSL option in v3.5.1 and later, you’ll have to install from the GitHub repository using the source code.
a. Update the package index of the Postgres server.
postgres-server$
sudo apt update
b. Input the following commands and press Enter to install dependencies of Pgloader.
postgres-server$ sudo apt install sbcl unzip libsqlite3-dev gawk curl make freetds-dev libzip-dev
c. Navigate to the release page of GitHUb project, find the latest version> Assets> copy the Source code (tar.gz) link, paste into the curl command, and replace the https URL.
postgres-server$ curl -fsSLO https://github.com/dimitri/pgloader/releases/download/v3.6.9/pgloader-bundle-3.6.9.tgz
d. Extract the tarball.
postgres-server$ tar xvf v3.6.9.tar.gz
e. Go to the new Pgloader parent directory.
postgres-server$ cd pgloader-3.6.9/
f. Compile the Pgloader binary.
postgres-server$ make pgloader
g. Move the binary file into the /usr/local/bin directory.
postgres-server$ sudo mv ./build/bin/pgloader /usr/local/bin/
h. Test the Pgloader version to confirm it is installed.
postgres-server$ pgloader –version
2. Create a PostgreSQL role and database.
PostgreSQL database users can be authenticated through identification protocal/ident (by default) and password, while the default option offers greater security, it brings problems for external connection.
When a role authenticates using the ident method and has the same name as the Linux user profile issuing the pgloader command, Pgloader can load data into a Postgres database using that role. This tutorial will present you have to set up a PostgreSQL role with password authentication.
a. Create a new role. -P flag requests a password for the new role.
postgres-server$ sudo -u postgres createuser --interactive -P
b. Then the script will prompt for a new role name.
Enter name of role to add:
c. Enter and confirm the password for the role.
Enter password for new role:
Enter it again:
d. Classify the new role as a superuser for the broad privileges. Type y and press ENTER.
Output
. . .
Shall the new role be a superuser? (y/n) y
e. Create a target database to load the source data.
postgres-server$ sudo -u postgres createdb xxx
3. Create a MySQL dedicated user and manage certificates.
a. Open up MySQL prompt.
mysql -u root -p
b. Create a new MySQL user. Replace the your_postgres_server_ip with the public PostgreSQL IP address and password with a safe one or passphrase.
mysql> CREATE USER 'new_mysql_name'@'your_postgres_server_ip' IDENTIFIED BY 'password' REQUIRE SSL;
c. Grant newly created MySQL user access to the target.
GRANT ALL ON source_db.* TO ' new_mysql_name'@'your_postgresql_server_ip';
d. Reload the grant tables to enable privilege changes.
mysql> FLUSH PRIVILEGES;
e. Close the prompt.
mysql> exit
f. Add the ca.pem and client-cert.pem files to Ubuntu’s trusted certificate store to enable the SSL for Pgloader. Do not forget to change the names of these files to include the.crt file extension.
postgres-server$ sudo cp ~/client-ssl/ca.pem /usr/local/share/ca-certificates/ca.pem.crt
postgres-server$ sudo cp ~/client-ssl/client-cert.pem /usr/local/share/ca-certificates/client-cert.pem.crt
h. Look for certificates.
postgres-server$ sudo update-ca-certificates
4. Migrate data from MySQL to PostgreSQL.
$ pgloader mysql://mysql_username:password@mysql_server_ip_/source_database_name? useSSL=true postgresql:// postgresql://postgresql_role_name:password@postgresql_server_ip/target_database_name?option_1=value&option_n=value
5. Check the migration.
a. Start the PostgreSQL prompt.
postgres-server$ sudo -i -u postgres psql
b. Connect to the target database that loads the data.
postgres-server$ c xxx
c. Check to see if your PostgreSQL database contains the moved data:
xxx=# SELECT * FROM source_db.sample_table;
6. Migrate MySQL to PostgreSQL on the same machine. Run the command from a Linux user that can access root MySQL user.
$ pgloader mysql://root@localhost/source_dbpgsql://sammy:postgresql_password@localhost/target_db
7. Migrate from the CSV file.
$ pgloader load.csv pgsql://sammy:password@localhost/target_db
Migrate MySQL to PostgreSQL with Py-mysql2pgsql
Py-mysql2pgsql is a tool to convert/migrate/export data from MySQL (only tested on 5.x), write a PostgreSQL compliant (8.2 or higher) dump file or pipe it into your operating PostgreSQL server (8.2 or higher). It cannot import spatial data from MySQL right now.
Prerequisites:
Python 2.7
MySQL-python
psycopg2
PyYAML
termcolor (except when installing on Windows)
pytz
1. Install py-mysql2pgsql.
Windows: install the driver dependencies, then the tool.
psycopg2 for Windows: pip install psycopg2
MySQL-python for Windows
PyPI: automatically install all dependencies.
> pip install py-mysql2pgsql
Source:
> git clone git://github.com/philipsoutham/py-mysql2pgsql.git
> cd py-mysql2pgsql
> python setup.py install
2. Verify the installation.
[root@xxx /data/aken/tools/py-mysql2pgsql-0.1.5]# py-mysql2pgsql -h
usage: py-mysql2pgsql [-h] [-v] [-f FILE] [-V]
Tool for migrating/converting data from mysql to postgresql.
optional arguments:
-h, --help show this help message and exit
-v, --verbose Show progress of data migration.
-f FILE, --file FILE Location of configuration file (default:mysql2pgsql.yml). If there isn't one there already, one will be made for you.
-V, --version Add version and exit.
3. Edit the migration configuration file mysql2pgsql.yml.
# specify socket to choose a socket connection
# localhost is a special MySQL hostname overriding the port option
# choose tcp to c
Mysql:
hostname:
port:
socket:
username:
password:
database:
compress: false
destination:
# output goes to file if file is provided, otherwise postgres
file:
postgres:
hostname:
port:
username:
password:
database:
# Only the tables listed will be transformed. To convert all tables, leave empty.
#only_tables:
#- tablex
#- tablex
# if exclude_tables is given, the tables listed below will not be converted.
#exclude_tables:
#- tablex
#- tablex
#Only the schema definition will be exported or migrated if supress_data is true.
supress_data: false
#Only the schema definition will be exported or migrated if supress_ddl is true.
supress_ddl: false
# if force_truncate is true, a table is forced to be truncated before table loading
force_truncate: false
# if timezone is true, makes the tzinfo mysql data appendable or convertible to UTC
timezone: false
# If index prefix_is specified, indexes with that name prefix will be generated.
index_prefix:
4. Migrate data from MySQL to PostgreSQL.
[root@xxx]# py-mysql2pgsql -v -f mysql2pgsql.yml
>>>>>>>>>> STARTING <<<<<<<<<<
START CREATING TABLES
START - CREATING TABLE tab_xxx
FINISH - CREATING TABLE tab_xxx
DONE CREATING TABLES
START WRITING TABLE DATA
START - WRITING DATA TO tab_xxx
FINISH - WRITING DATA TO tab_xxx
DONE WRITING TABLE DATA
START CREATING INDEXES AND CONSTRAINTS
START - ADDING INDEXES TO tab_xxx
FINISH - ADDING INDEXES TO tab_xxx
START - ADDING CONSTRAINTS ON tab_xxx
FINISH - ADDING CONSTRAINTS ON tab_xxx
DONE CREATING INDEXES AND CONSTRAINTS
>>>>>>>>>> FINISHED <<<<<<<<<<
Backup MySQL and PostgreSQL Before and After Database Migration
It’s essential to back up your databases before any operation that might impact your data integrity. And after the database migration, backup is also necessary to prepare for possible data loss disasters.
There are many reliable database backup solutions on the market and Vinchin Backup & Recovery is one of them, which automates database backup and provides simple data recovery for multiple databases including MySQL, PostgreSQL, Postgres Pro, SQL Server, Oracle DB, and MariaDB.
With Vinchin Backup & Recovery, you can set a repeated database backup from full, differential, incremental, archive log, and transaction log backup options that vary with databases and reduce 50% of data after deduplication and compression.
You can encrypt the path for safe transmission and manage the backups automatically with the retention policy.
You can also choose to restore the database to the original or a new one.
Want to take Vinchin Backup & Recovery for a spin? Here’s a 60-day full trial of the Enterprise version available for testing.
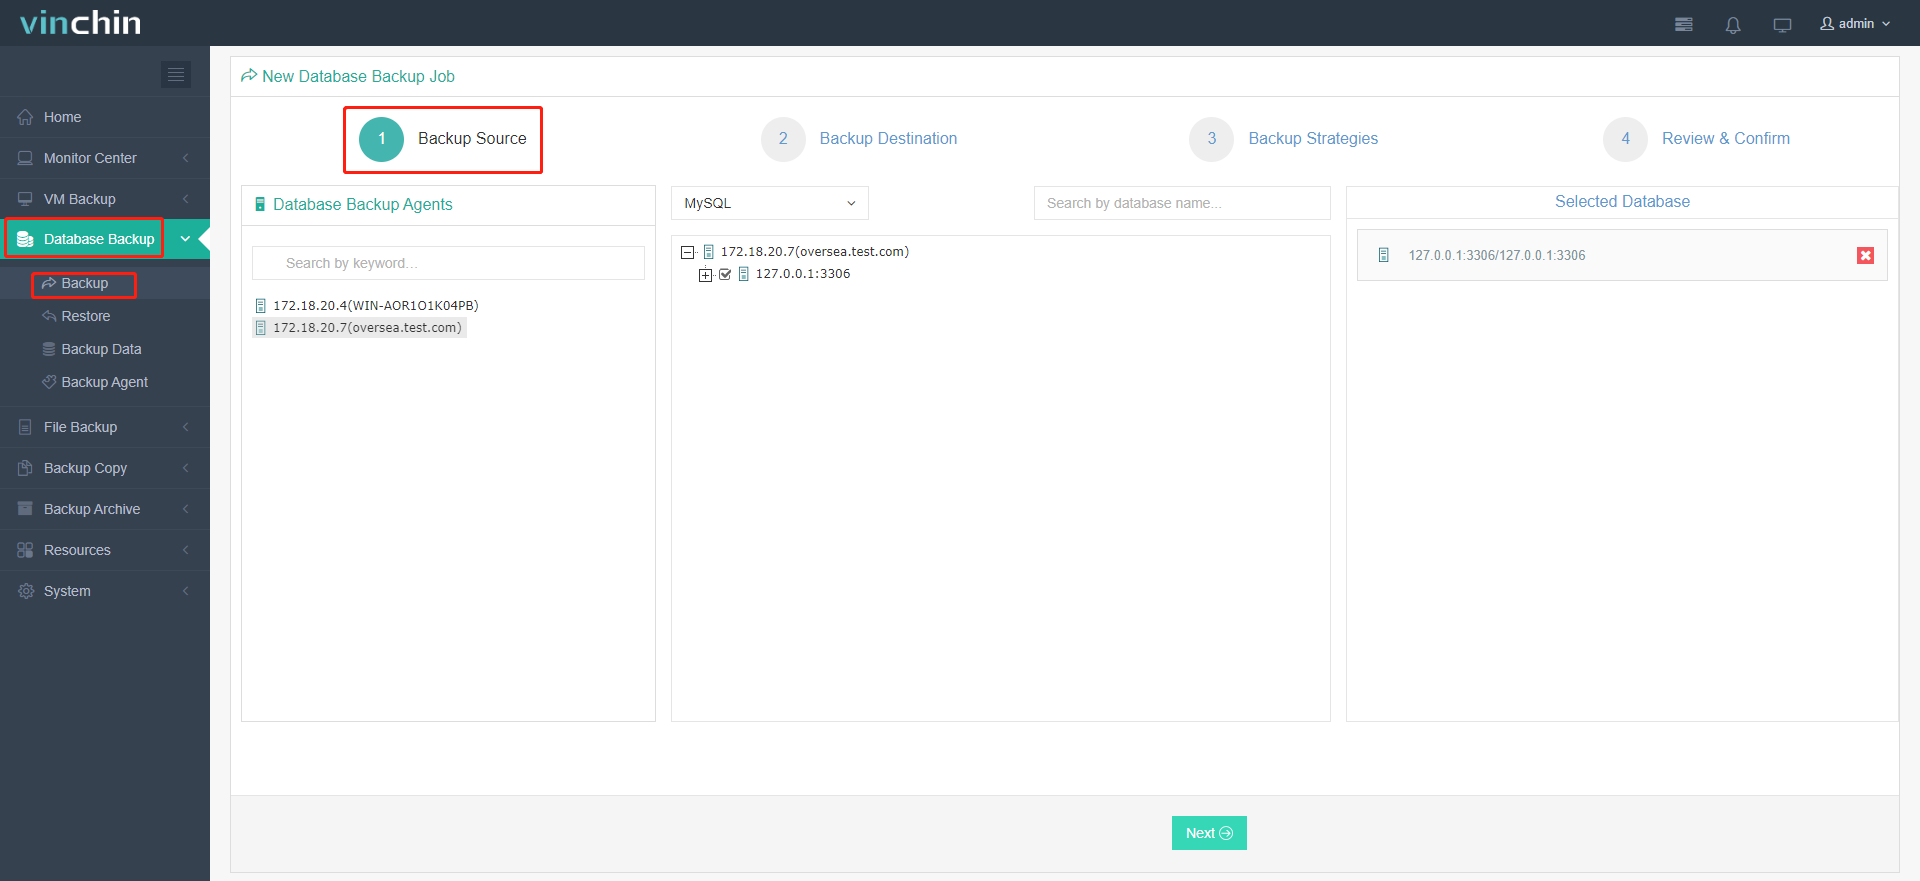
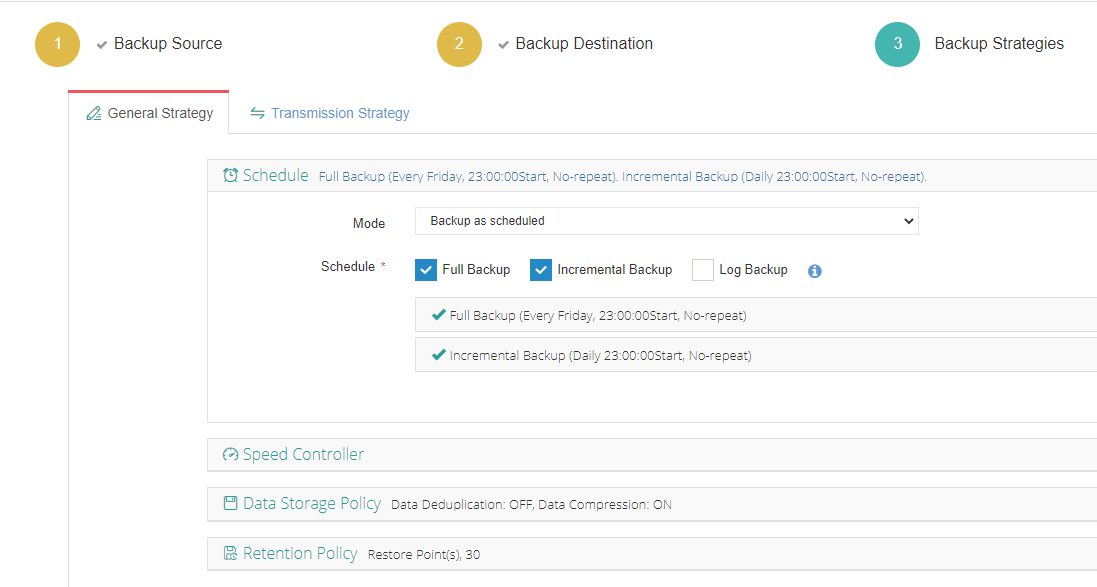
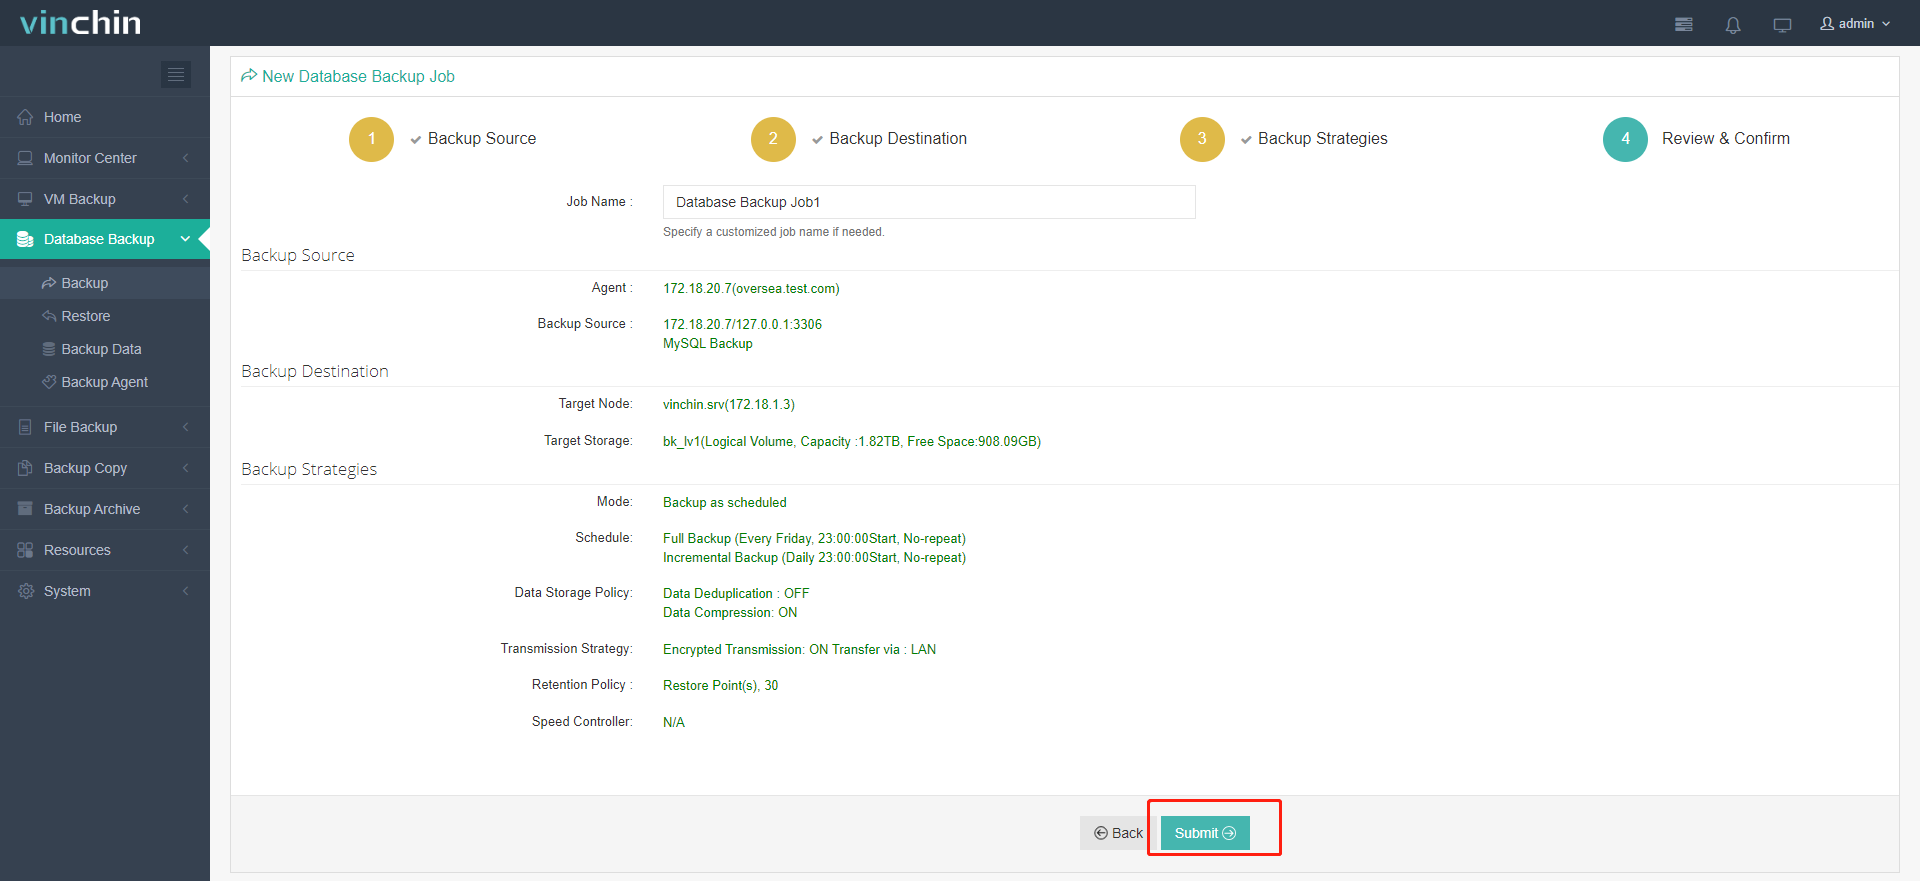
Here is the overview of the MySQL backup process with Vinchin Backup & Recovery:
1. Select the backup source from the licensed database list.

2. Specify a desired backup node and storage for your backup.

3. Configure customizable backup strategies.


4. Review and click Submit.

Sum up
Some MySQL database users may find PostgreSQL a better option for its enhanced performance with complicated querying, here in this article, I introduce two methods to migrate MySQL to PostgreSQL using two GitHub data migration tools Pgloader and Py-mysql2pgsql.
Note that database backup before and after the conversion process is indispensable for data security. Use Vinchin Backup & Recovery for simplified database backup and manage multiple databases via a centralized console.
Share on:


