-
What Is Terraform and XenServer
-
Why Use Terraform With XenServer?
-
Method 1: Using terraform-provider-xenserver
-
How To Backup XenServer Virtual Machine With Vinchin Backup & Recovery
-
terraform xenserver FAQs
-
Conclusion
Managing virtual machines at scale can be overwhelming if you rely on manual steps. Mistakes happen easily when you click through menus or run scripts by hand. What if you could automate your entire XenServer environment? With Terraform, you can turn infrastructure management into code—making your work faster, safer, and more reliable than ever before.
In this guide, we focus on using Terraform with XenServer through the provider now maintained by the XenServer project itself. Whether you’re just starting out or looking for advanced automation tips, read on to learn how to bring Infrastructure as Code (IaC) to your virtualization stack.
What Is Terraform and XenServer
Terraform is an open-source tool from HashiCorp that lets you define infrastructure as code using simple configuration files. You describe what resources you want—like VMs or networks—and Terraform builds them for you automatically.
XenServer is a powerful virtualization platform used worldwide in data centers large and small. It allows IT teams to create, manage, and monitor virtual machines efficiently across clusters or single hosts.
By combining these tools, operations administrators gain full control over their environments while reducing manual errors and saving time every day.
Why Use Terraform With XenServer?
Automating XenServer with Terraform offers many benefits at every experience level:
Beginners get consistency—every VM is built exactly as described.
Intermediate users can track changes over time using version control.
Advanced admins can rebuild whole environments quickly after failures or migrations.
With Infrastructure as Code:
You create VMs, networks, storage repositories (SRs), and more from one place.
Changes are easy to review before applying.
Teams share configurations safely without confusion.
Environments become repeatable—no more guessing about settings or dependencies!
This approach saves hours of manual work while boosting reliability across your organization’s infrastructure.
Method 1: Using terraform-provider-xenserver
The main way to connect Terraform with XenServer is through terraform-provider-xenserver. This plugin is now officially maintained by the XenServer project itself—a big step forward from its community-only roots! It lets you manage nearly all core resources directly from your configuration files without leaving the comfort of your editor or CI/CD pipeline.
Before getting started:
Make sure your XenServer environment runs version 7.2 or newer
Install Terraform version 0.12.x or later
Gather API credentials for an account with admin rights
Understand basic concepts like providers, resources, state files
Step 1: Install the Provider
Modern versions of Terraform let you declare required providers right inside your config file—no need for a separate .terraformrc unless customizing paths:
terraform {
  required_providers {
    xenserver = {
      source = "xenserver/xenserver"
      version = "~> 0.4" # Check registry for latest stable release
    }
  }
}
Step 2: Configure Provider Credentials Securely
Never hard-code passwords in plain text! Instead:
1. Define sensitive variables in variables.tf:
    variable "xenserver_url" { type = string; description = "XenServer API URL"; sensitive = true }
    variable "xenserver_username" { type = string; sensitive = true }
    variable "xenserver_password" { type = string; sensitive = true }
2. Reference those variables securely in main.tf:
    provider "xenserver" {
      url      = var.xenserver_url     # API endpoint (e.g., https://your-xensrv)
      username = var.xenserver_username # Admin user name
      password = var.xenserver_password # Password stored outside source code!
    }
3. Pass values via environment variables (TF_VAR_xenserver_url, etc.) or use a secrets manager integration if possible.
Step 3: Define Resources Like Virtual Machines
Here’s an example resource block that creates a VM from an existing template:
resource "xenserver_vm" "test" {
  base_template_name = "CentOS 7 Template" # Name shown in XenCenter/XCP-ng Center
  name_label        = "test-vm"
  static_mem_min    = 8589934592           # Minimum RAM (bytes)
  static_mem_max    = 8589934592           # Maximum RAM (bytes)
  dynamic_mem_min   = 8589934592           # Dynamic memory lower bound (bytes)
  dynamic_mem_max   = 8589934592           # Dynamic memory upper bound (bytes)
  vcpus             = 1                    # Number of virtual CPUs assigned
  boot_order        = "c"                  # Boot device order ('c' means disk first)

  hard_drive {
    is_from_template = true                # Clone disk from template image
    user_device      = "0"
  }

  cdrom {
    is_from_template = true                # Attach CD-ROM drive if needed
    user_device      = "3"
  }

  network_interface {
    network_uuid     = "<network uuid>"     # Replace with actual UUID—or see next section!
    device           = 0                    # NIC index number
    mtu              = 1500                 # Standard Ethernet MTU size
    mac              = ""                   # Leave blank for auto-generated MAC address

    other_config     = {                     # Optional advanced NIC settings
      ethtool-gso="off", ethtool-ufo="off", ethtool-tso="off",
      ethtool-sg="off", ethtool-tx="off", ethtool-rx="off"
    }
}
You can find network UUIDs using either the web console (Networking) or CLI commands like xe network-list.
Step 4: Initialize & Apply Your Configuration
To deploy resources:
1. Run terraform init — downloads plugins & sets up working directory
2. Run terraform plan — previews actions before making changes
3. Run terraform apply — creates/updates VMs per config
Terraform connects securely over HTTPS using supplied credentials.
Step 5: Manage Updates & Deletions Safely
Change any setting in your .tf files then rerun terraform apply. Want to remove something? Delete its block from code first—then apply again so real-world resources match what’s described.
How To Backup XenServer Virtual Machine With Vinchin Backup & Recovery
For organizations seeking robust protection of their virtualized workloads, Vinchin Backup & Recovery delivers professional enterprise-level backup capabilities tailored specifically for platforms such as Citrix/XCP-ng/XenServer—as well as VMware, Hyper-V, Proxmox, oVirt, OLVM, RHV, XCP-ng, OpenStack, ZStack and more (15+ mainstream environments). Vinchin Backup & Recovery supports essential features including LAN-free backup for high-speed transfers within supported infrastructures; CBT technology enabling efficient incremental backups; forever-incremental backup strategies; granular restore options; and comprehensive data deduplication and compression—all designed to maximize efficiency while minimizing storage costs and downtime risk.
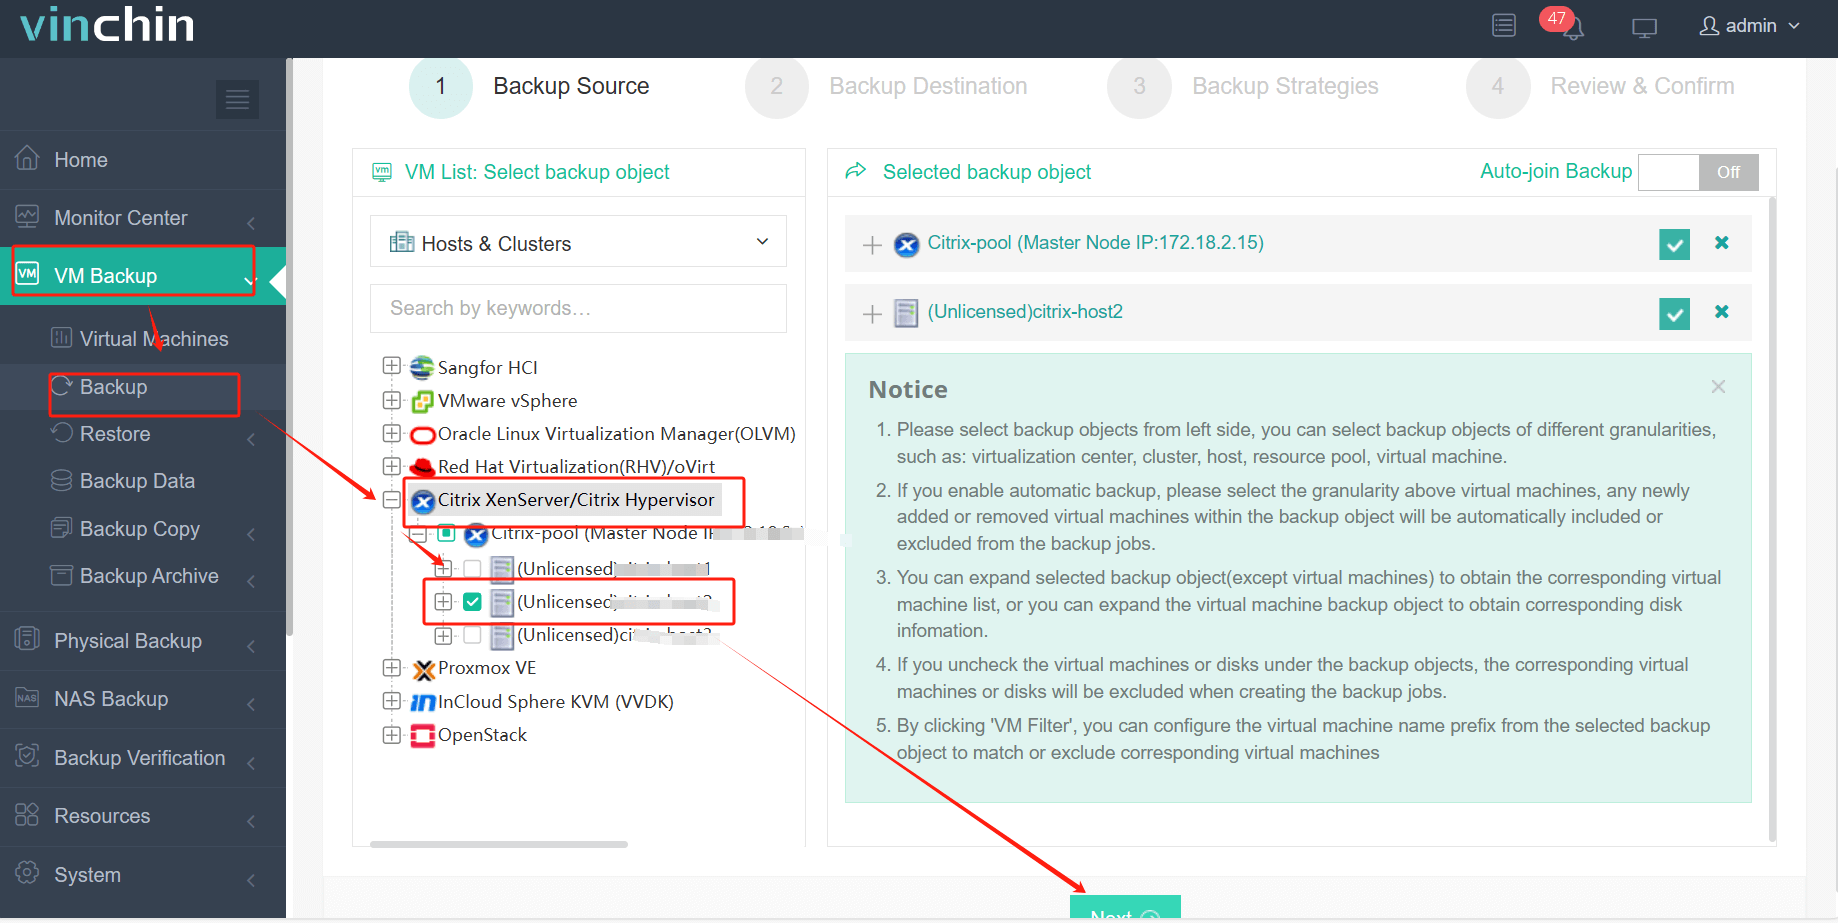
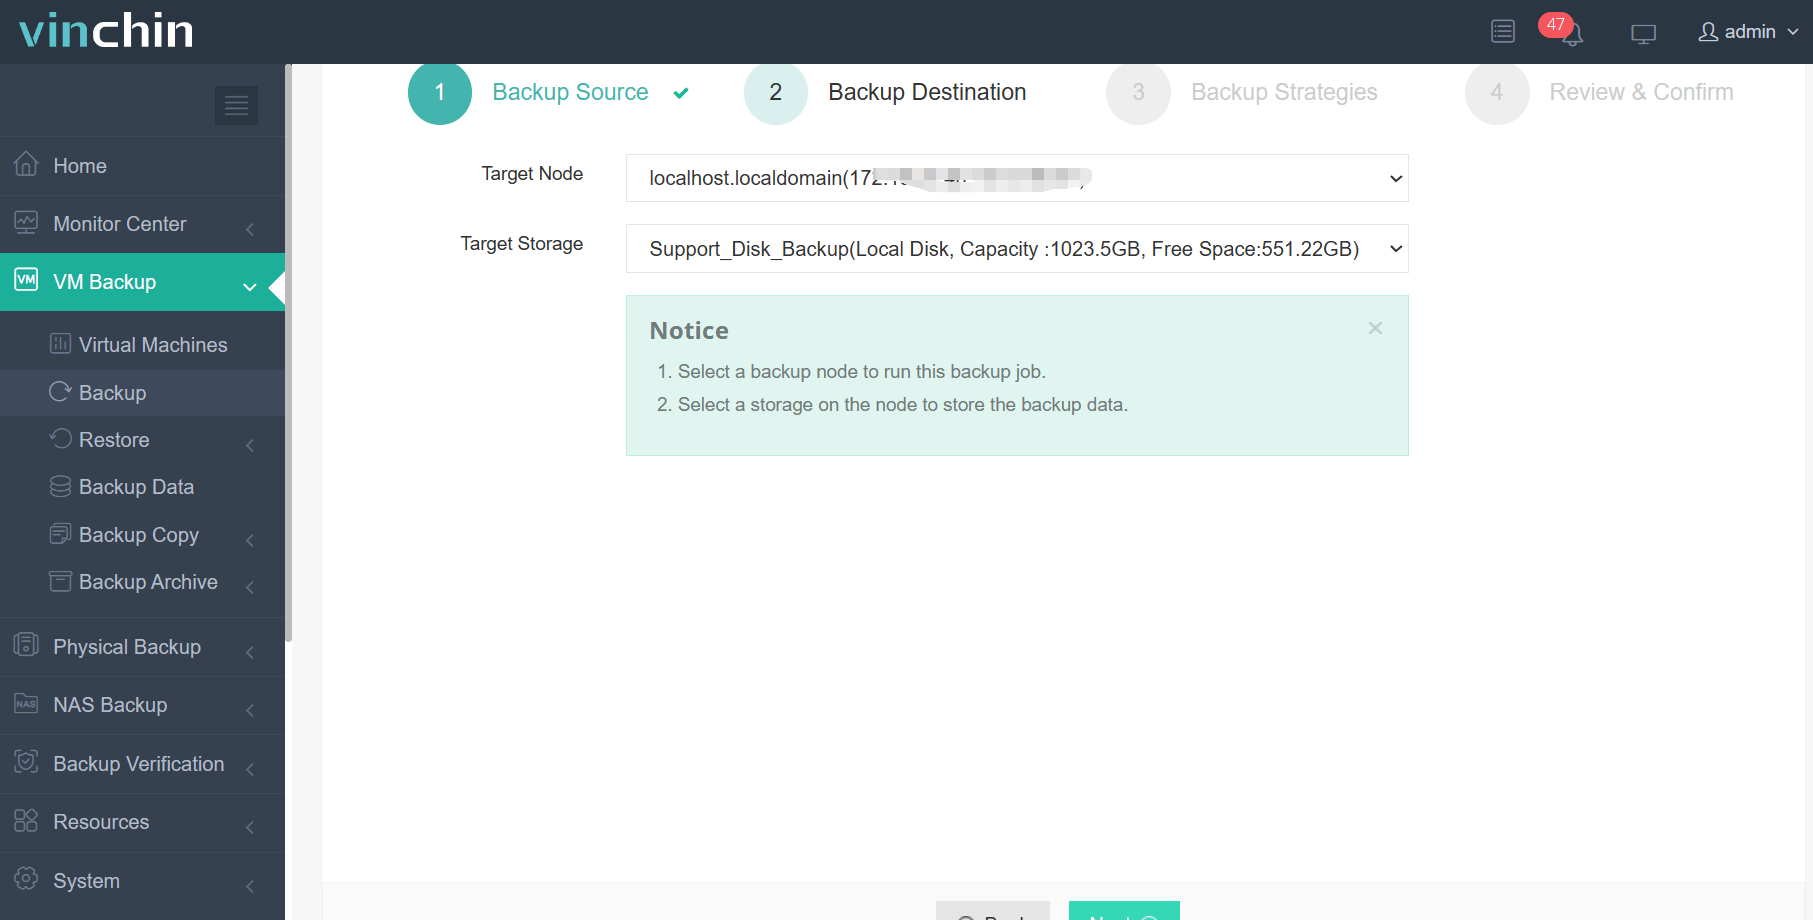
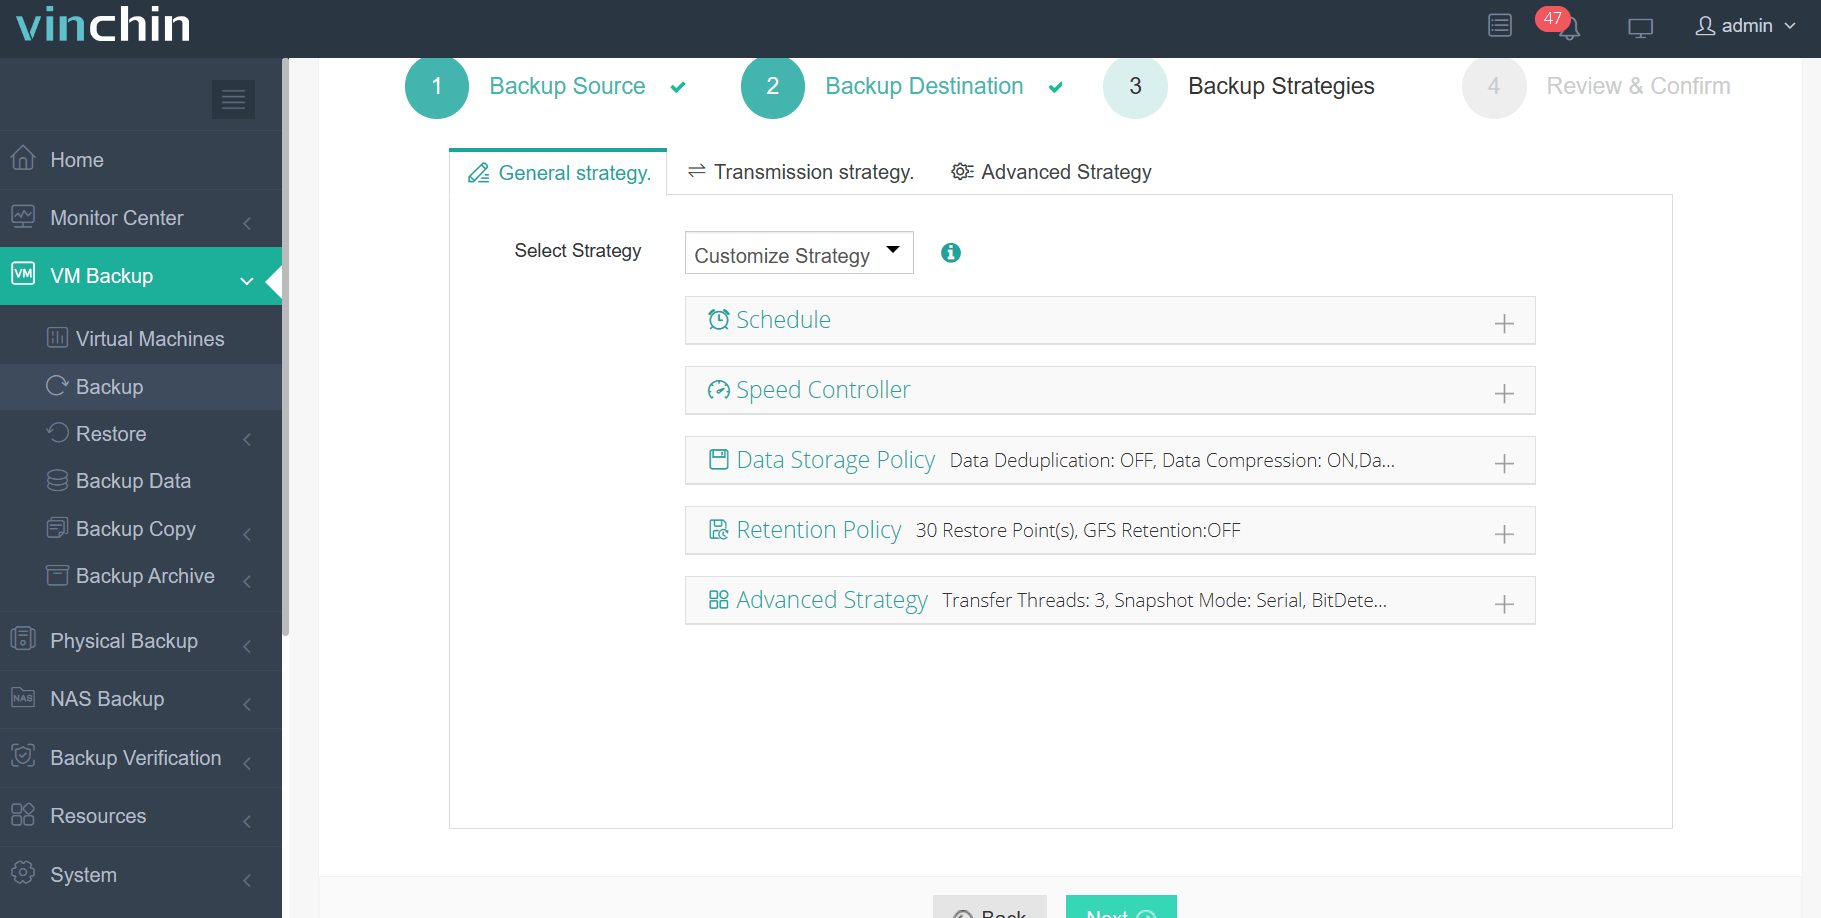
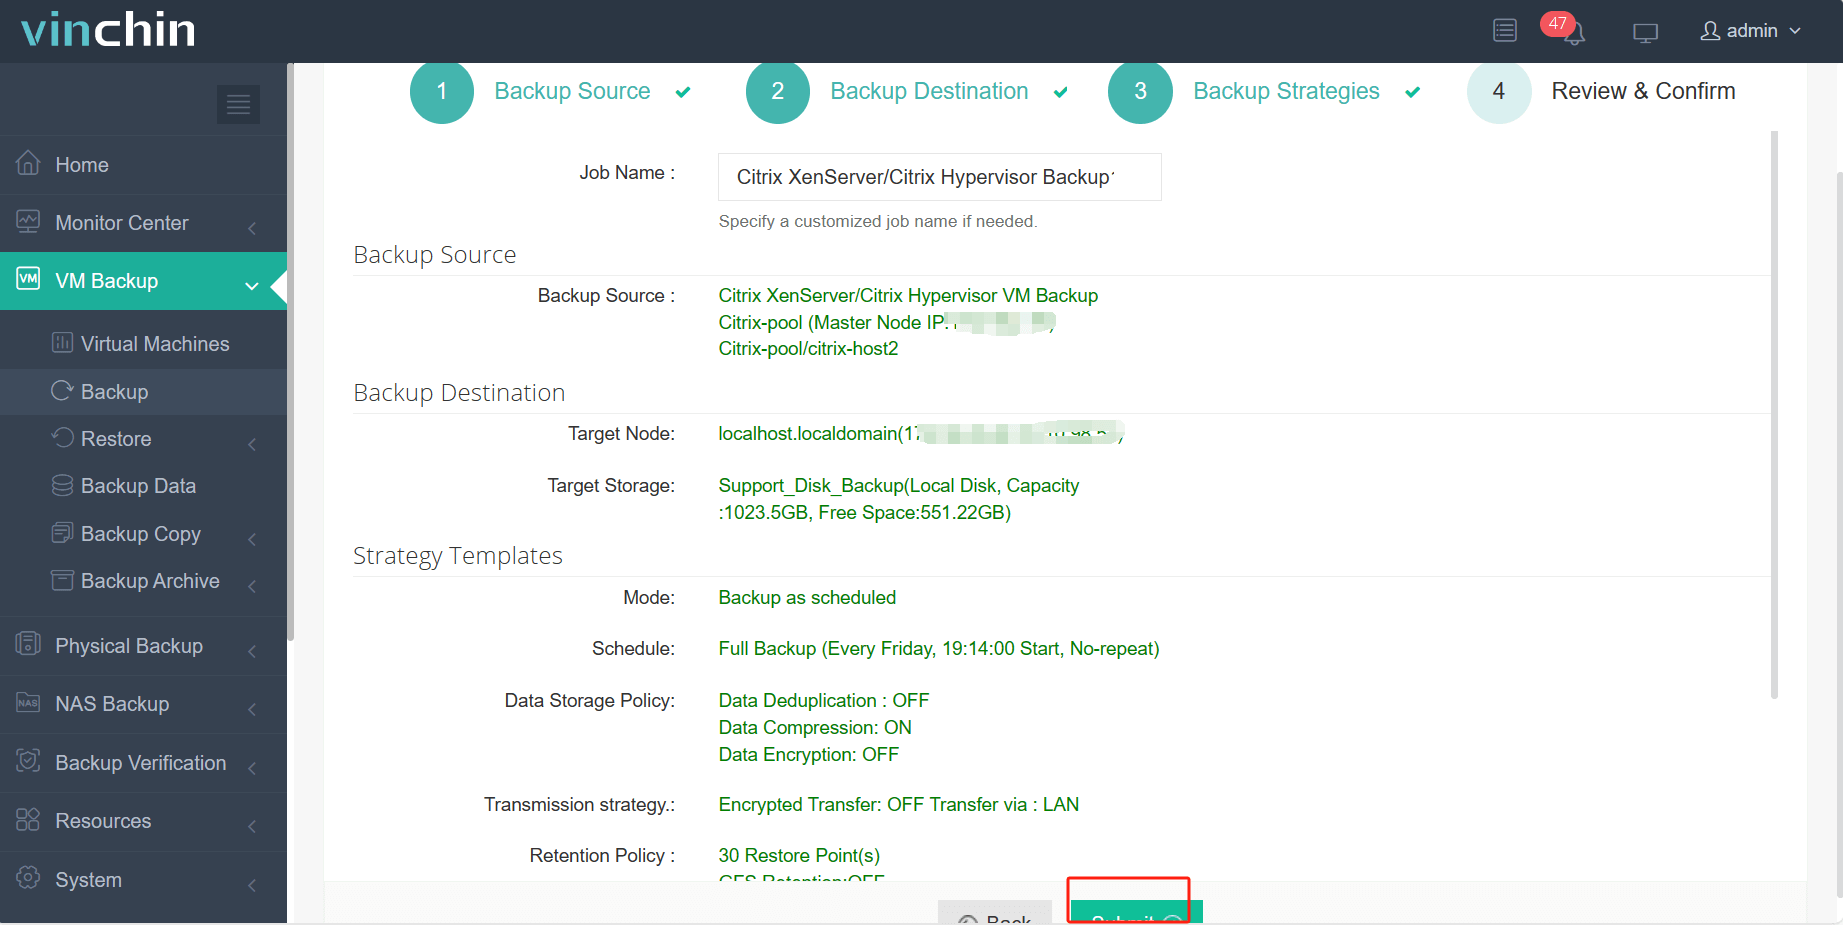
With Vinchin Backup & Recovery's intuitive web console interface backing up a XenServer VM takes just four steps:
Step 1: Select the Citrix Hypervisor/XenServer VM(s) you want to protect;

Step 2: Choose your preferred backup storage location;

Step 3: Configure a suitable backup strategy based on organizational needs;

Step 4: Submit the job with a single click.

Recognized globally among enterprise data-protection solutions—with thousands of satisfied customers—Vinchin Backup & Recovery offers a fully featured free trial valid for sixty days; click below to start protecting your critical workloads today!
terraform xenserver FAQs
Q1: Can I import existing VMs into my terraform xenserver configuration?
Yes—you can use the command line tool (terraform import) along with resource addresses matching those defined in your .tf files; see official docs for syntax examples.
Q2: How do teams avoid conflicts when managing shared infrastructure?
Store state remotely using services like AWS S3/Azure Blob Storage plus locking mechanisms so only one person applies changes at once—never edit .tfstate manually!
Q3: Is there any way to rotate passwords without downtime?
Yes—update secret values via environment variables/secrets manager then re-run terraform apply; active sessions refresh automatically if configured correctly.
Conclusion
Automating virtual machine management with terraform xenserver brings speed and consistency whether you're building test labs or running mission-critical workloads at scale—all while reducing risk of human error along the way! For reliable backups tailored specifically for modern virtualization stacks including Citrix/XCP-ng/Xen environments try Vinchin today—it only takes minutes to get started!
Share on:


