-
Why use a Static IP address?
-
How to set a Static IP for a VM in Hyper-V?
-
Data protection solution for Hyper-V environment
-
Hyper-V Networking FAQs
-
Conclusion
Although the default virtual switch in Hyper-V uses NAT by default, its network number changes after every reboot, which is extremely inconvenient when using SSH for remote login. Therefore, creating a new virtual switch allows for a fixed network address and static IP, making it easier to use SSH for remote connections.
Why use a Static IP address?
Setting a static IP address for a virtual machine in Hyper-V ensures that the VM's IP address remains unchanged within the network.
Here are the main reasons and benefits of using a fixed IP address:
1. Service stability and accessibility: This is the core reason. Many network services require clients or other servers to reliably find and connect to them via their IP address.
If the IP addresses of these critical services change frequently, the clients, services, or scripts that rely on them will fail to connect, leading to service disruption, connection failures, and script errors. A fixed IP eliminates this uncertainty, ensuring the service is always reachable at the same "house number."
2. Port forwarding and firewall rules: If you need to access services inside the VM from an external network (such as RDP, SSH, or a web interface), you usually need to set up port forwarding rules on the Hyper-V virtual switch (especially for NAT-type switches) or on a physical router/firewall. These rules must specify the target IP address.
With a static IP, you only need to set the port forwarding rule once. If the VM uses a dynamic IP, the rule becomes invalid every time the IP changes, requiring manual updates—very troublesome and error-prone.
3. Network device configuration and access control: Network administrators may need to configure special access control lists and policies on physical routers, firewalls, or switches for specific VMs. These configurations are often based on IP addresses.
A fixed IP ensures these IP-based policy configurations can be applied reliably and stably to the target VM without frequent adjustments due to IP changes.
4. Simplified management and troubleshooting: When you have multiple VMs, remembering or looking up each VM's dynamic IP address can be troublesome. Static IPs can be assigned according to your plan (e.g., one subnet for databases, another for web frontends).
Simpler troubleshooting: When network issues arise, it's much easier to troubleshoot a server with a static IP than one with a changing IP. Ping or tracert commands to the target address always work.
How to set a Static IP for a VM in Hyper-V?
After installing a Linux VM on a Windows 10 system using Hyper-V, there are two main network access requirements:
(1) No matter how the physical machine's network environment changes, the VM's IP address should remain unchanged, ensuring that tools like Xshell can always access the VM using the same IP address, even after installing other software.
(2) The physical machine must be able to access the VM; whether the VM can access the Internet is secondary. The key is to ensure that the physical machine can access the VM and that VMs can access each other.
1. To meet the first requirement, assign the VM a fixed subnet and static IP. Here we use the 192.168.137.X subnet. Using CentOS 7 as an example, set the static IP as follows:
cd /etc/sysconfig/network-scripts
vi ifcfg-eth0
Modify the following information. Here we set the static IP address as 192.168.137.200:
BOOTPROTO=static
DEVICE=eth0
ONBOOT=yes
IPADDR=192.168.137.200
GATEWAY=192.168.137.1
DNS1=192.168.137.1
NETMASK=255.255.255.0
Restart the network service to apply the settings:
systemctl restart network
2. Configure the virtual network in Hyper-V:
Open Hyper-V's Virtual Switch Manager.
Create a new virtual switch, enter a name, select "Internal Network," and click OK.
Right-click the VM you want to configure, go to Settings, and in the popup, select the newly created CentOS-7 virtual switch. Click OK, then reboot the VM to apply the change.
3. Configure the network on the physical machine (Windows 10 in this example):
Open Control Panel > Network and Sharing Center > Change Adapter Settings.
Find the newly added virtual network switch, right-click and select Properties.
Select the IPv4 protocol.
Set the IP address and subnet mask as follows (others can be left blank). The IP must be 192.168.X.1, where X = 137, matching the subnet set on the CentOS VM. Consistency is key.
4. After completing the above settings, the physical machine can access the VM. Try pinging 192.168.137.200 — it should respond. Now you can connect using Xshell or similar terminals.
5. If the VM needs Internet access, go to Control Panel > Network and Sharing Center > Change Adapter Settings.
Right-click the physical machine's active network card, go to Properties, then Sharing.
Check the Internet Connection Sharing option and select the Hyper-V virtual switch you created earlier. Click OK.
After this operation, the VM should be able to access the external network.
Note: Sometimes after enabling Internet Connection Sharing, the IP address of the virtual switch may change. If it does, you need to manually reset it as in step 3 to match the subnet configured on the CentOS VM.
Data protection solution for Hyper-V environment
After completing the configuration of the network environment, the next important link that cannot be ignored is the data protection of virtual machines.
Whether it is a Linux virtual machine used for development and testing, or an application server that carries production business, data security is of paramount importance. Therefore, an efficient, flexible and easy-to-use backup solution is crucial for Hyper-V administrators.
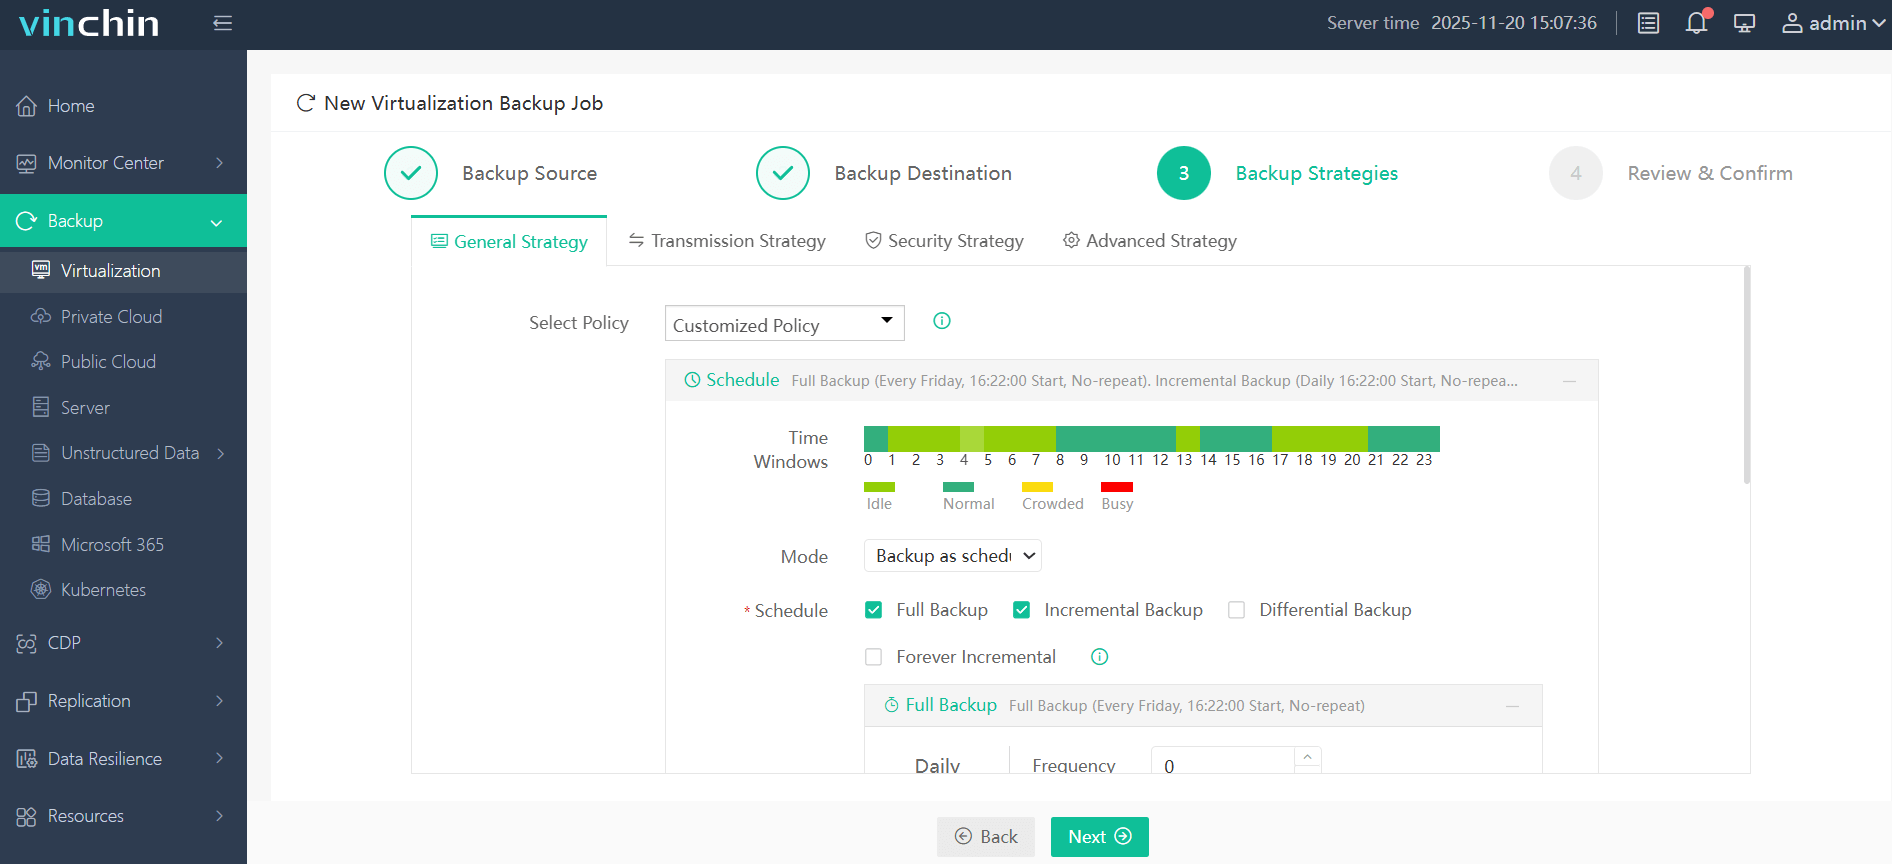
To this end, Vinchin Backup & Recovery provides professional backup and recovery functions for Hyper-V environments. Vinchin can complete backup tasks without installing any agent programs on the Hyper-V host, greatly reducing system resource overhead and simplifying the deployment process. It supports full backup, incremental backup, etc., and combined with the scheduled task function, it can flexibly configure daily/weekly backup plans to avoid the risk of human forgetfulness.
Using Vinchin, you can not only quickly restore Hyper-V virtual machines to any time point, but also restore backup data to other platforms such as VMware, XCP-ng, oVirt, Proxmox, etc., to achieve cross-platform migration and disaster recovery.
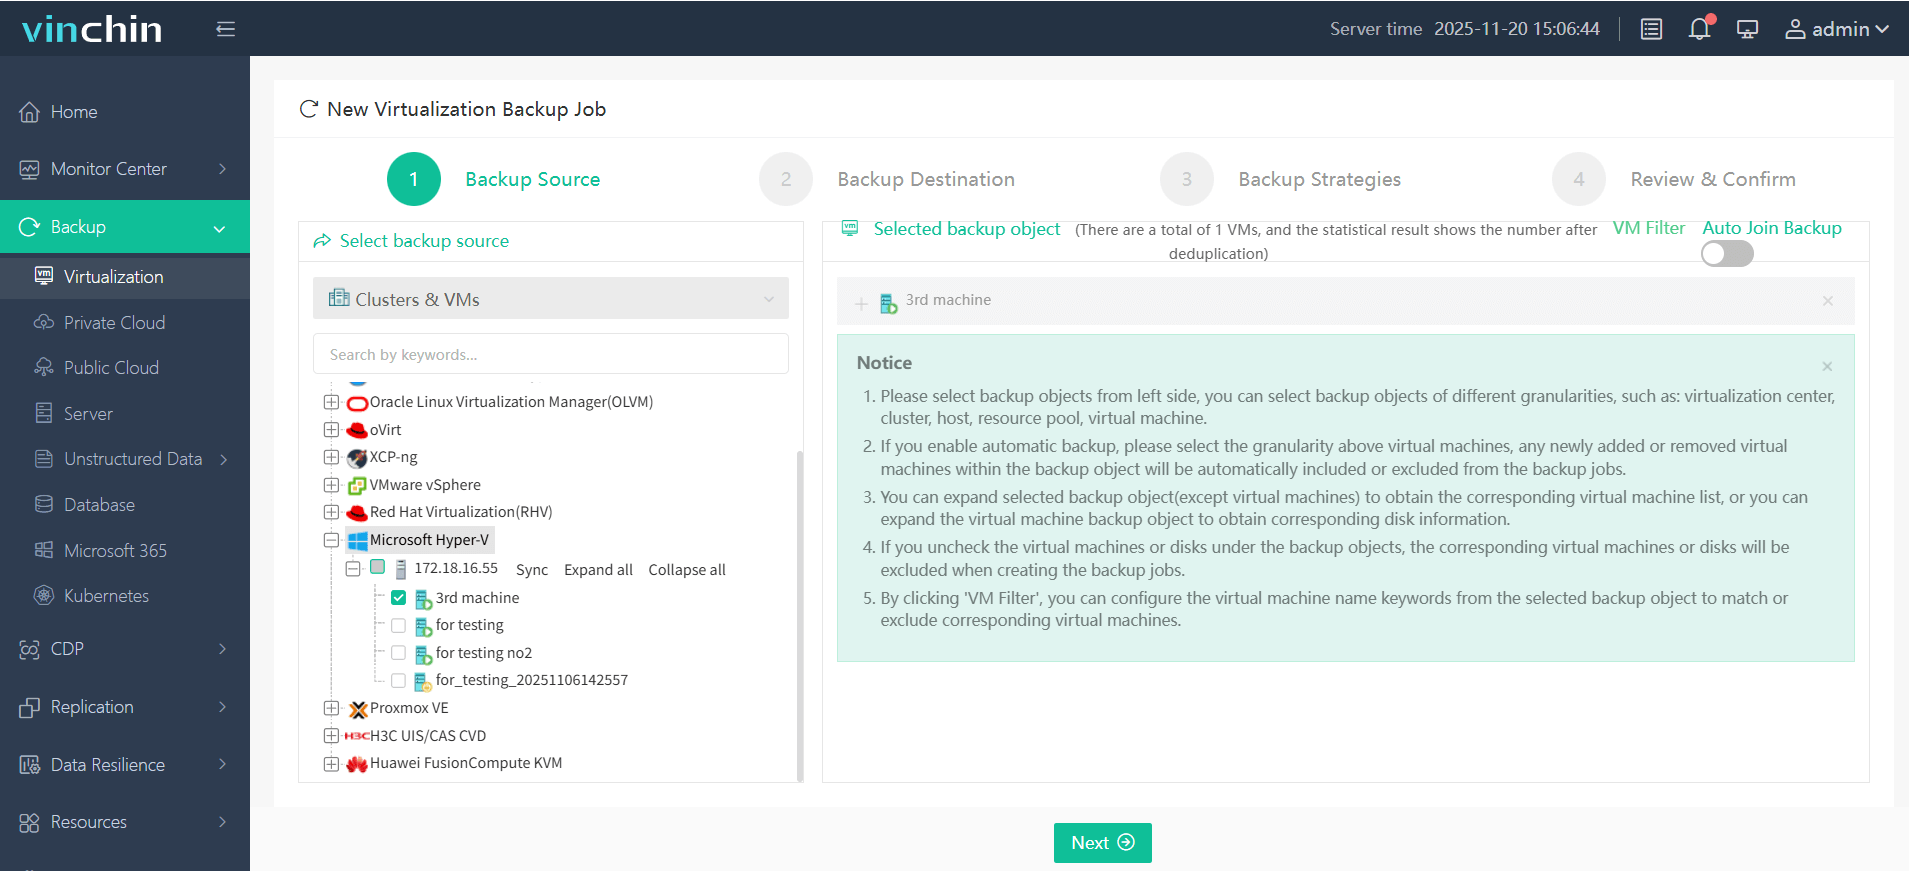
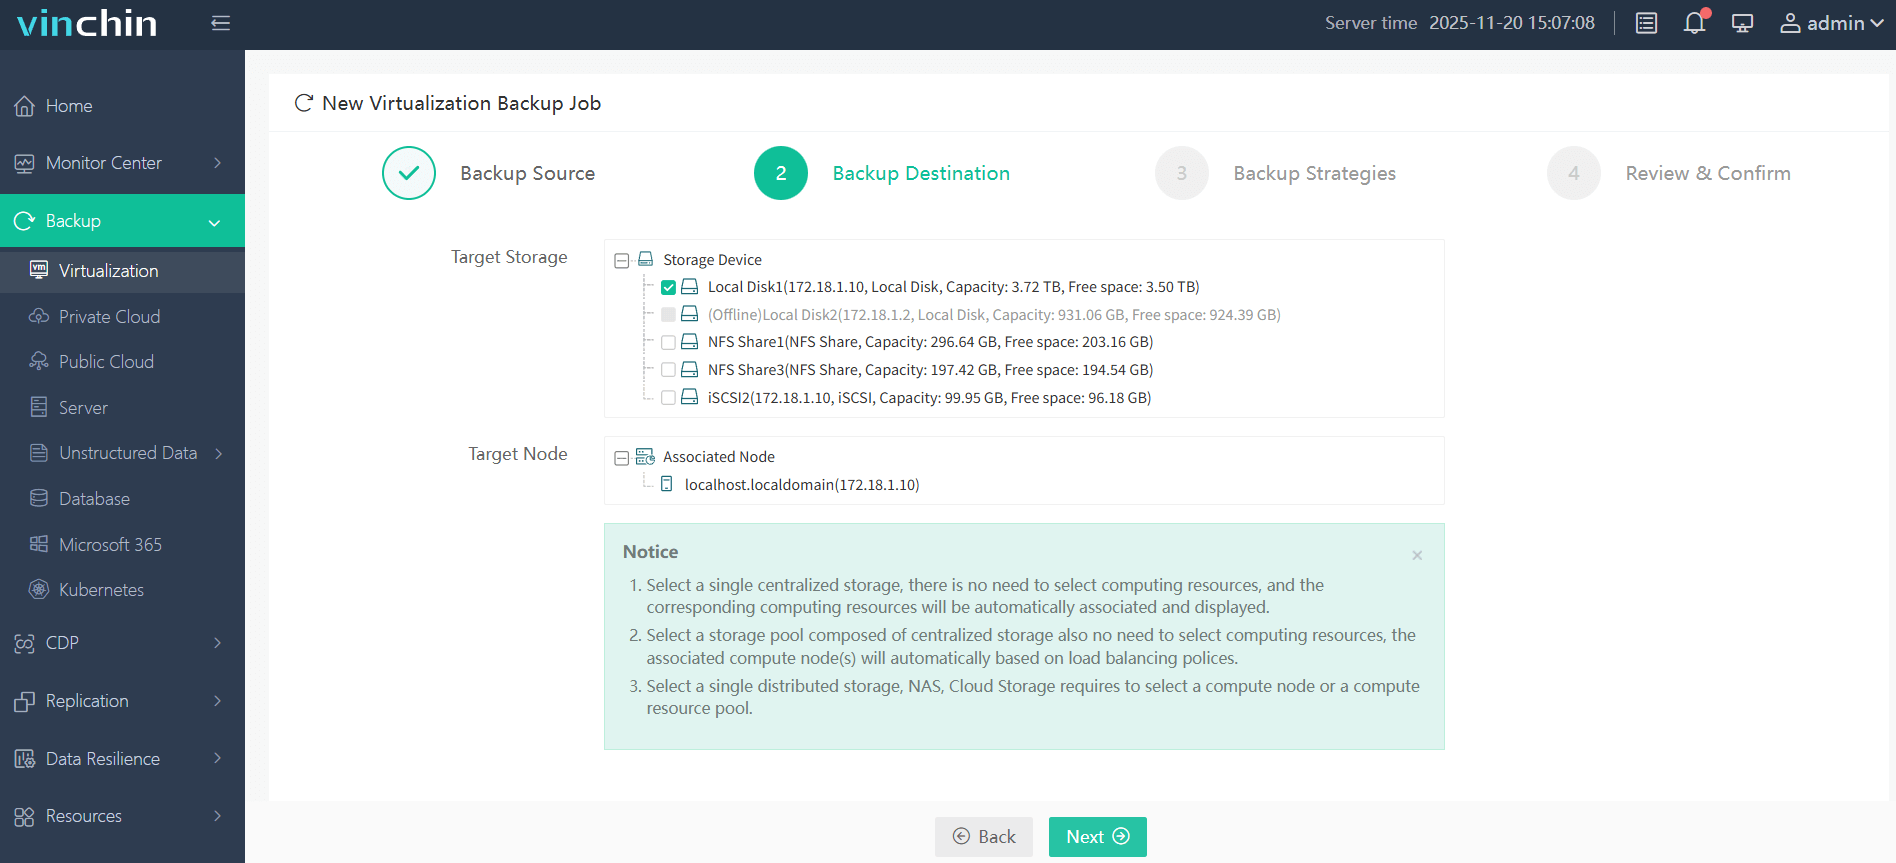
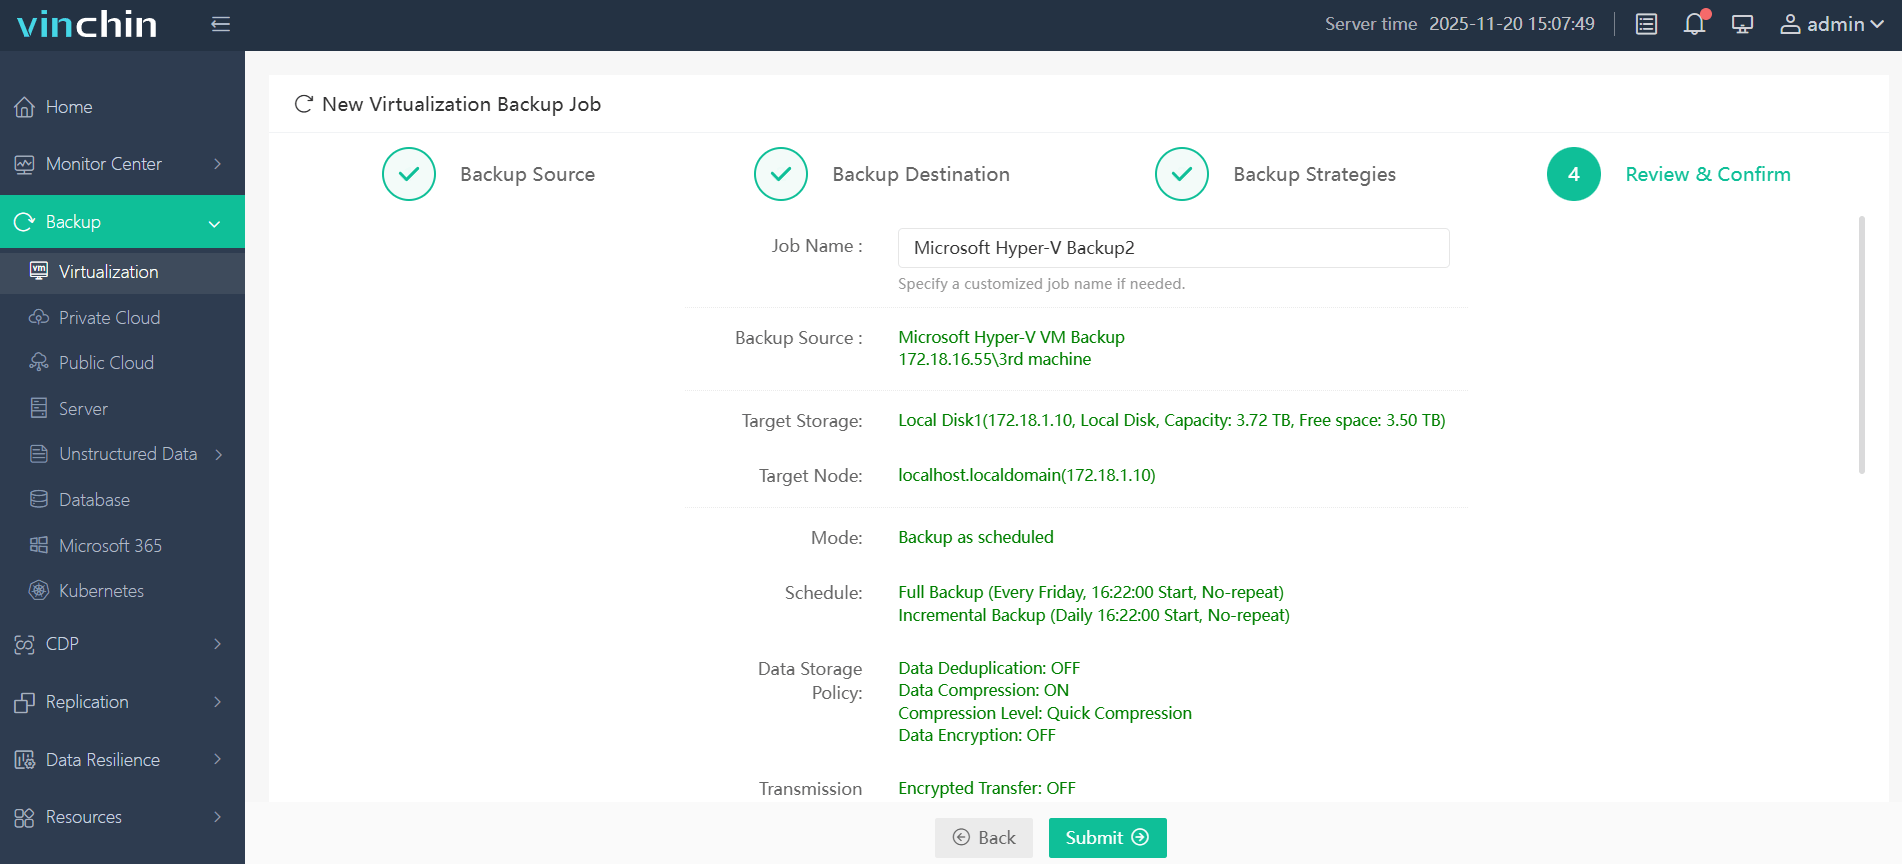
It only takes 4 steps to backup Hyper-V VMs with Vinchin Backup & Recovery:
1. Select the backup object.

2. Select backup destination.

3. Configure backup strategies.

4. Review and submit the job.

If you are using Hyper-V and want to build a highly available and easy-to-manage virtualization environment, you might want to try Vinchin's backup solution to add a layer of security to your system. A 60-day free trial is waiting for you to start.
Hyper-V Networking FAQs
1. How do I enable MAC address spoofing for a VM?
In Hyper-V Manager, go to the VM's Network Adapter > Advanced Features, and check "Enable MAC address spoofing".
2. Can I use a virtual switch for multiple VLANs?
A: Yes, using trunk mode on the physical NIC and configuring VLAN IDs per VM, Hyper-V can support multiple VLANs through one virtual switch.
Conclusion
Using a static IP address in Hyper-V virtual machines not only ensures stable connectivity for remote management tools like SSH but also simplifies network configuration, port forwarding, and troubleshooting. By creating a custom virtual switch and configuring both the VM and host network settings carefully, you can achieve a consistent and reliable network environment for your Linux VM. Whether for development, testing, or production use, this approach offers greater control and minimizes unexpected network disruptions caused by changing IP addresses.
Share on:


