-
About Hyper-V Networking
-
What is a Hyper-V Network Adapter?
-
How to Set up Hyper-V Network Adapters?
-
Best Practices and Performance Tuning of Hyper-V Networking
-
Enterprise Hyper-V VM Backup with Vinchin Solution
-
Hyper-V Networking FAQs
-
Conclusion
Hyper-V networking links virtual machines to networks. It shapes traffic flow and isolation. Admins rely on it for performance and security. How do you plan and set up networks in Hyper-V? This article goes from basics to advanced. You learn concepts, steps, and best practices.
About Hyper-V Networking
Hyper-V uses virtual switches to connect VMs, the host OS, and external networks. A virtual switch acts like a physical switch but runs in software. You plan uplinks, VLANs, and ACLs to match your topology and security needs. Good design avoids oversubscription and isolates traffic. Design vSwitch uplinks using NIC teaming with dynamic load balancing to prevent bottlenecks .
Virtual switches support External, Internal, and Private modes. External links to a physical NIC. Internal links VMs and host OS. Private links only VMs. Use mode per use case. Under External, configure trunk ports on physical switches for VLAN tagging. You can use Access mode or Trunk mode: set port type in the physical switch and tag in Hyper-V .
Hyper-V supports extended Port ACLs on vSwitch ports. You can allow or block traffic by IP, port, or protocol. Apply rules via PowerShell or System Center VMM. Use ACLs to isolate east-west traffic among VMs. PVLAN isolation can work but has limits: only one isolated PVLAN per primary VLAN. Configure PVLANs consistently across hosts .
Document each switch and its uplinks. Name switches clearly, such as “vSwitch-External-Uplink01”. Track which VLANs traverse which uplinks. Avoid mixing management, migration, storage, and tenant traffic on one VLAN. Segment these via dedicated VLANs and virtual switches. Use clear names to ease troubleshooting.
What is a Hyper-V Network Adapter?
A Hyper-V Network Adapter is a virtual NIC inside a VM. It appears like a physical NIC in the guest OS. Synthetic adapters use Hyper-V Integration Services for efficient I/O. Legacy adapters emulate an Intel 21140-based NIC for OS install or PXE boot. Use legacy only during setup, then switch to synthetic for speed .
You can configure VLAN IDs on adapters. Use Set-VMNetworkAdapter -VMName <Name> -VlanId <ID> to tag traffic. You can set bandwidth weight or max bandwidth to control noisy neighbors. Port mirroring works: use Set-VMNetworkAdapter -VMName <Name> -PortMirroring Source/Destination to mirror traffic for analysis .
Advanced adapter features include SR-IOV, VMQ, RSS, and offloads like TCP checksum. SR-IOV gives direct hardware access when hardware and firmware allow it. Check IOMMU in BIOS and NIC support first. Guest OS must support SR-IOV drivers. Offloads reduce CPU load on high-throughput workloads. Test before enabling in production .
Hyper-V Integration Services must be up to date in guest OS for full synthetic adapter support. In older Windows versions, install or update them. Linux guests need Linux Integration Services or modern kernels. For PXE boot or rescue, use legacy adapter until network drivers load, then add synthetic.
How to Set up Hyper-V Network Adapters?
Start with clear planning. Know which VLANs and uplinks you need. Identify management, migration, storage, and tenant networks. Use dedicated VLANs or separate virtual switches. This avoids conflicts and eases troubleshooting.
1. Create a Virtual Switch
Open Hyper-V Manager. In Actions, choose Virtual Switch Manager. Click New virtual network switch. Pick External, Internal, or Private. For External, select the physical NIC. Check Allow management operating system to share this network adapter only if host must use that NIC. Name the switch clearly, e.g., External-Uplink-10GbE.
On physical switch, set the port to Trunk mode if passing multiple VLANs. Ensure native VLAN matches host management VLAN if used. Test connectivity: ping gateway from host after creation. Document switch name, uplink NIC, and VLANs.
2. Add Network Adapter to a VM
Open VM settings. Click Add Hardware, choose Network Adapter, then Add. Under Virtual switch, pick the right switch. Use synthetic adapter for OS with Integration Services. Use legacy adapter only during OS install if driver unavailable. After boot, install Integration Services and add synthetic, then remove legacy .
Inside guest, configure IP. For DHCP, check lease. For static IP, set address, mask, gateway, and DNS to match VLAN. Test by pinging gateway or another VM. Use Get-VMNetworkAdapter -VMName <Name> | Select Name, Status, MacAddress to verify adapter status.
3. Configure VLANs on Adapter
In VM settings, select adapter. Enable VLAN identification and set VLAN ID. This tags outgoing traffic. For trunk on physical side, allow this VLAN. For access port, tag untagged frames as VLAN. Use consistent VLAN IDs across hosts. To automate:
Set-VMNetworkAdapter -VMName Web01 -VlanId 100 -ErrorAction Stop
Use -ErrorAction Stop to handle failures. Check with Get-VMNetworkAdapterVlan -VMName Web01.
4. NIC Teaming and Switch Embedded Teaming
On host, use Windows Server NIC Teaming (LBFO) or Switch Embedded Teaming (SET). SET integrates teaming into the virtual switch from Windows Server 2016 onward. Team physical NICs for bandwidth and failover. Link the virtual switch to the teamed interface. This yields higher throughput and redundancy .
Warn: mixing LBFO and SET in same host can cause confusion. Test failover by unplugging one NIC. Within guest, you can team synthetic adapters if OS supports it, but consider complexity. Document teaming mode and members.
5. PowerShell Automation
Scripts ensure repeatable setups. Use idempotent patterns: check if switch or adapter exists before creating. For example:
if (-not (Get-VMSwitch -Name "External-Switch" -ErrorAction SilentlyContinue)) {
  New-VMSwitch -Name "External-Switch" -NetAdapterName "Ethernet0" -AllowManagementOS $true -ErrorAction Stop
}
Add-VMNetworkAdapter -VMName WebServer01 -SwitchName "External-Switch" -ErrorAction Stop
Set-VMNetworkAdapter -VMName WebServer01 -VlanId 100 -ErrorAction Stop
Check SR-IOV compatibility:
Get-NetAdapterSriov -Name "Ethernet0" | Where-Object { $_.SriovEnabled -eq $true }Capture errors early. Log output for review. Use loops to handle many VMs.
6. Port Mirroring and Monitoring
Enable port mirroring to inspect traffic. Use PowerShell:
Set-VMNetworkAdapter -VMName App01 -PortMirroring Source -ErrorAction Stop
Set-VMNetworkAdapter -VMName Monitor01 -PortMirroring Destination -ErrorAction Stop
Run packet capture in Monitor01. Note: capturing >1Gbps may drop packets; for high-throughput, use ETW tracing or host-based capture. Mirror carefully to avoid overload.
Best Practices and Performance Tuning of Hyper-V Networking
Keep vSwitch simple: Use clear names. Document uplinks and VLANs. Limit virtual ports per physical NIC to avoid oversubscription—e.g., avoid running eight 1Gbps VMs on a 10Gbps link without teaming and QoS. Use NIC teaming or SET for redundancy and bandwidth .
Enable VMQ and RSS for multi-queue support: Use SR-IOV when low CPU use or low latency matters. For jumbo frames, set MTU end-to-end. For RDMA workloads, implement DCB and SET with RoCEv2 NICs. Monitor regularly: track throughput, CPU load, and packet drops via Performance Monitor.
Automate deployments with PowerShell: Use idempotent scripts for switches, adapters, VLANs. Validate preconditions in scripts. Use logging of results. For updates, schedule maintenance windows and test in staging.
Plan capacity: map VM network demands to physical NIC speeds. Avoid oversubscription without QoS. Segment traffic: management OS, live migration, storage, tenant data on separate VLANs or switches. Use port ACLs to block east-west traffic between tiered VMs. Harden host OS: apply patches, disable unused features.
Enterprise Hyper-V VM Backup with Vinchin Solution
Backup matters for networked VMs too. Let's see how Vinchin fits here. Vinchin Backup & Recovery is a professional, enterprise-level VM backup solution supporting Hyper-V, VMware, Proxmox, oVirt, OLVM, RHV, XCP-ng, XenServer, OpenStack, ZStack, and 15+ environments.
It offers forever incremental backup to cut backup windows, data deduplication and compression to save storage, V2V migration to move workloads across platforms, throttling policies to limit network impact. It also supports SpeedKit, the CBT alternative technology developed by Vinchin, for efficient incremental backup. And it delivers many more features beyond these.
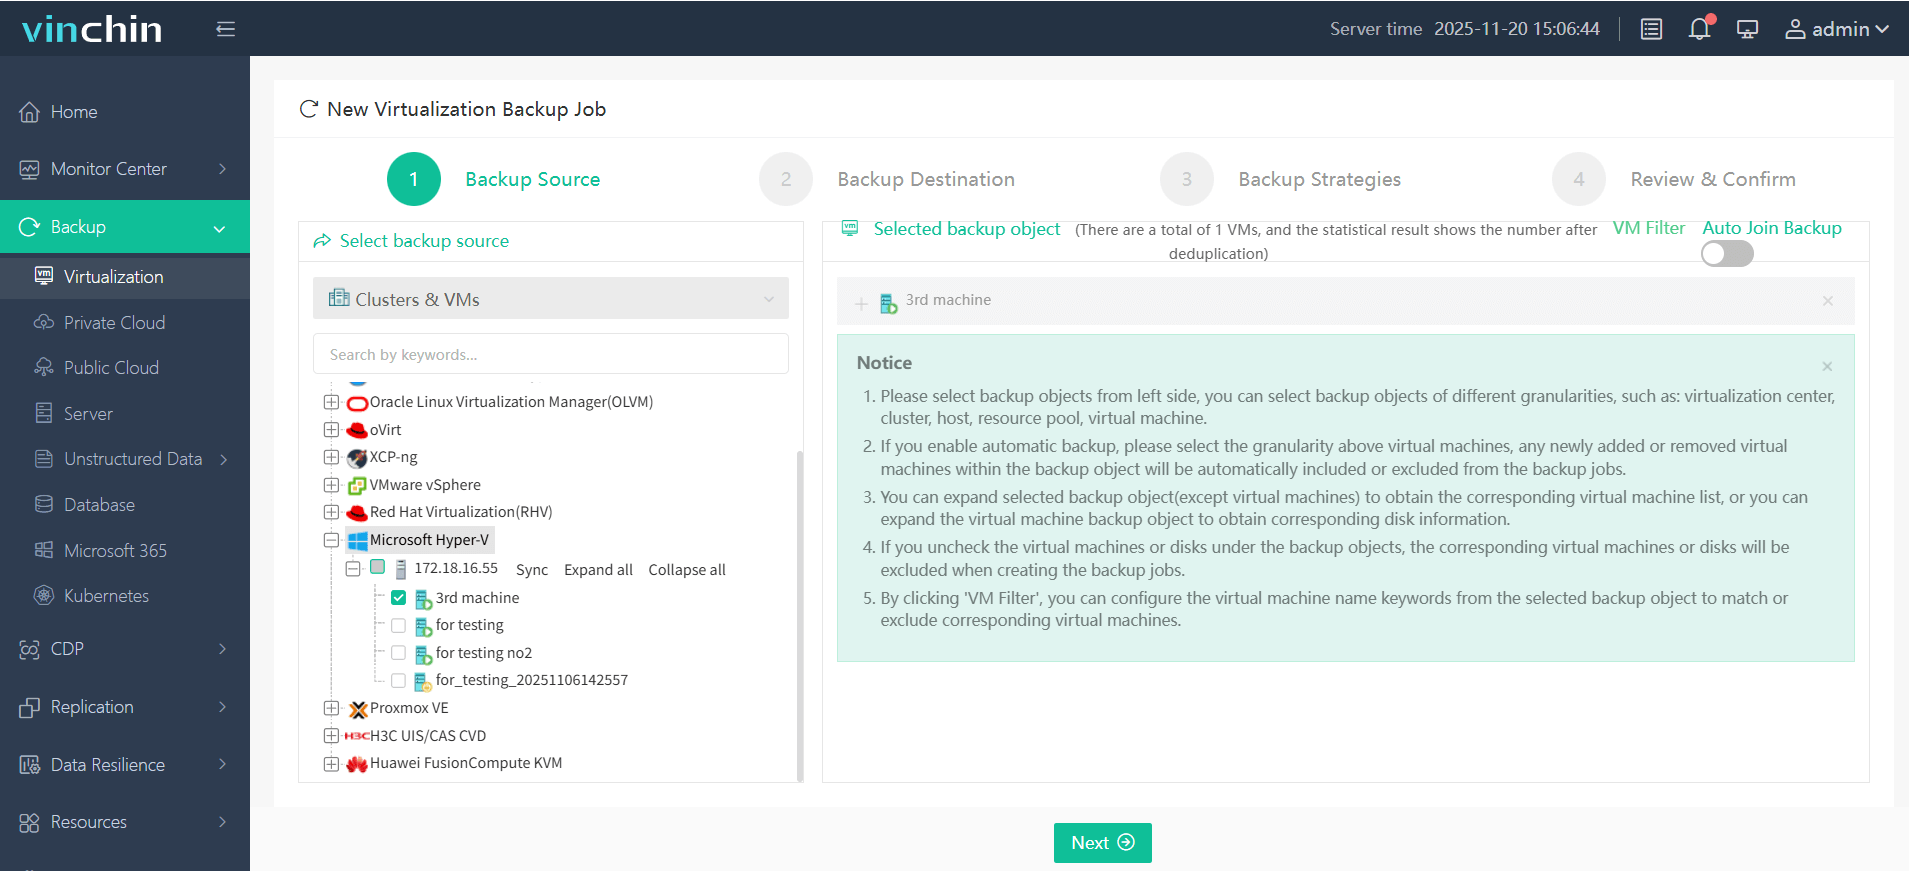
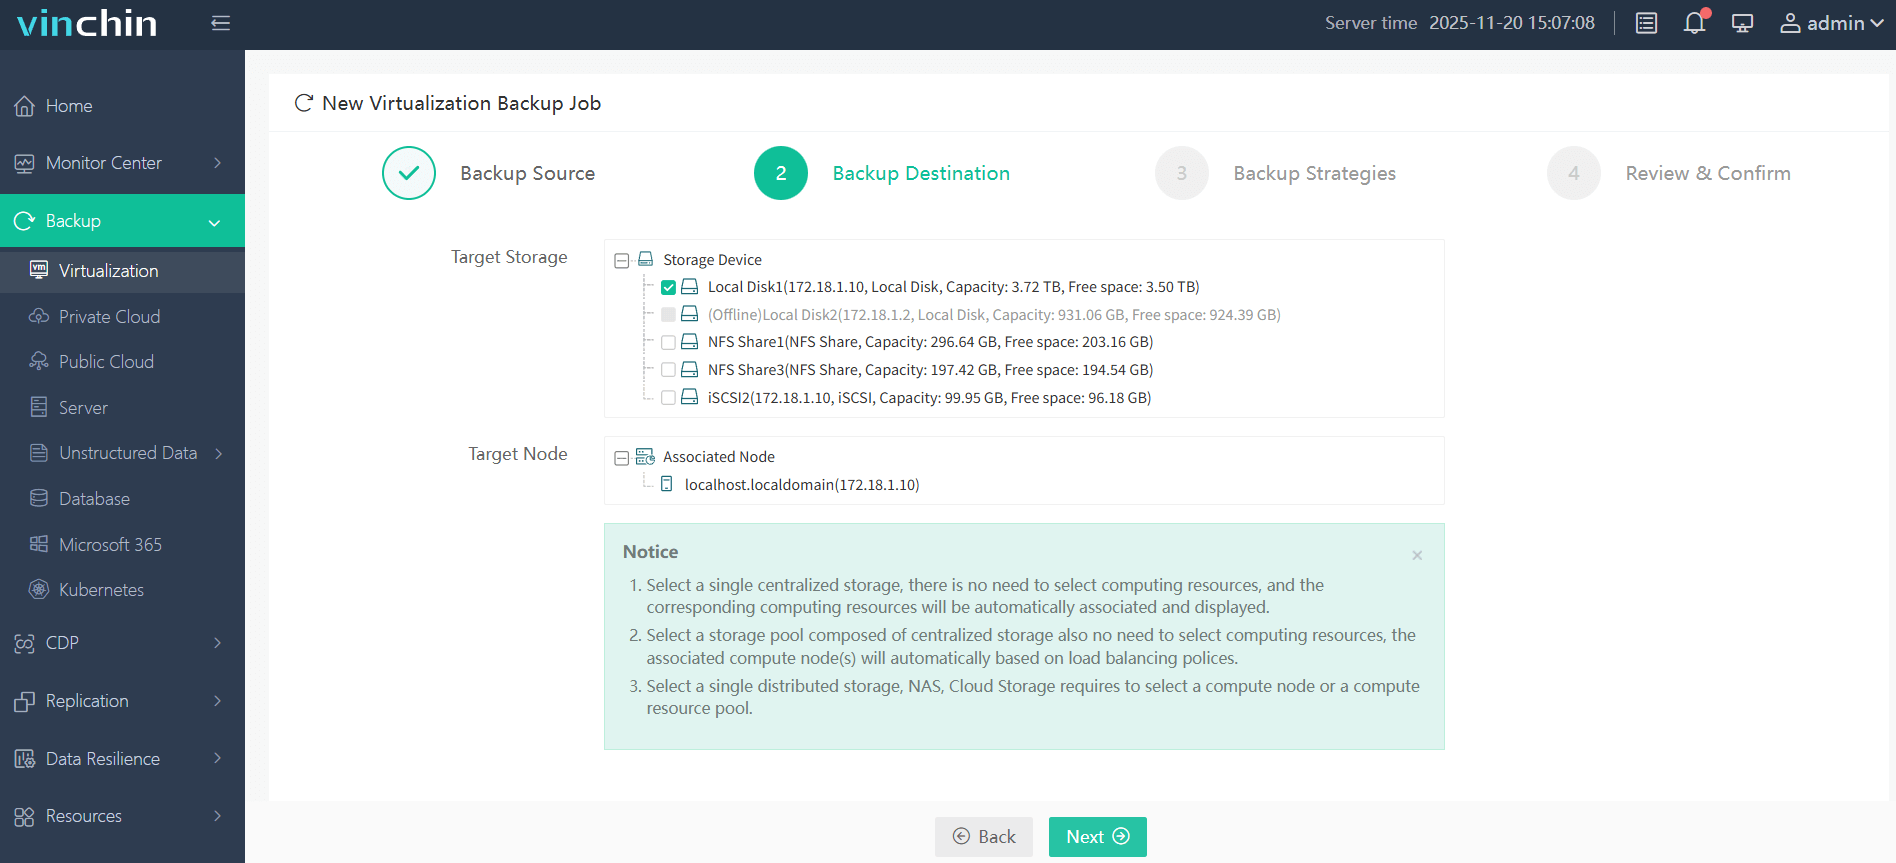
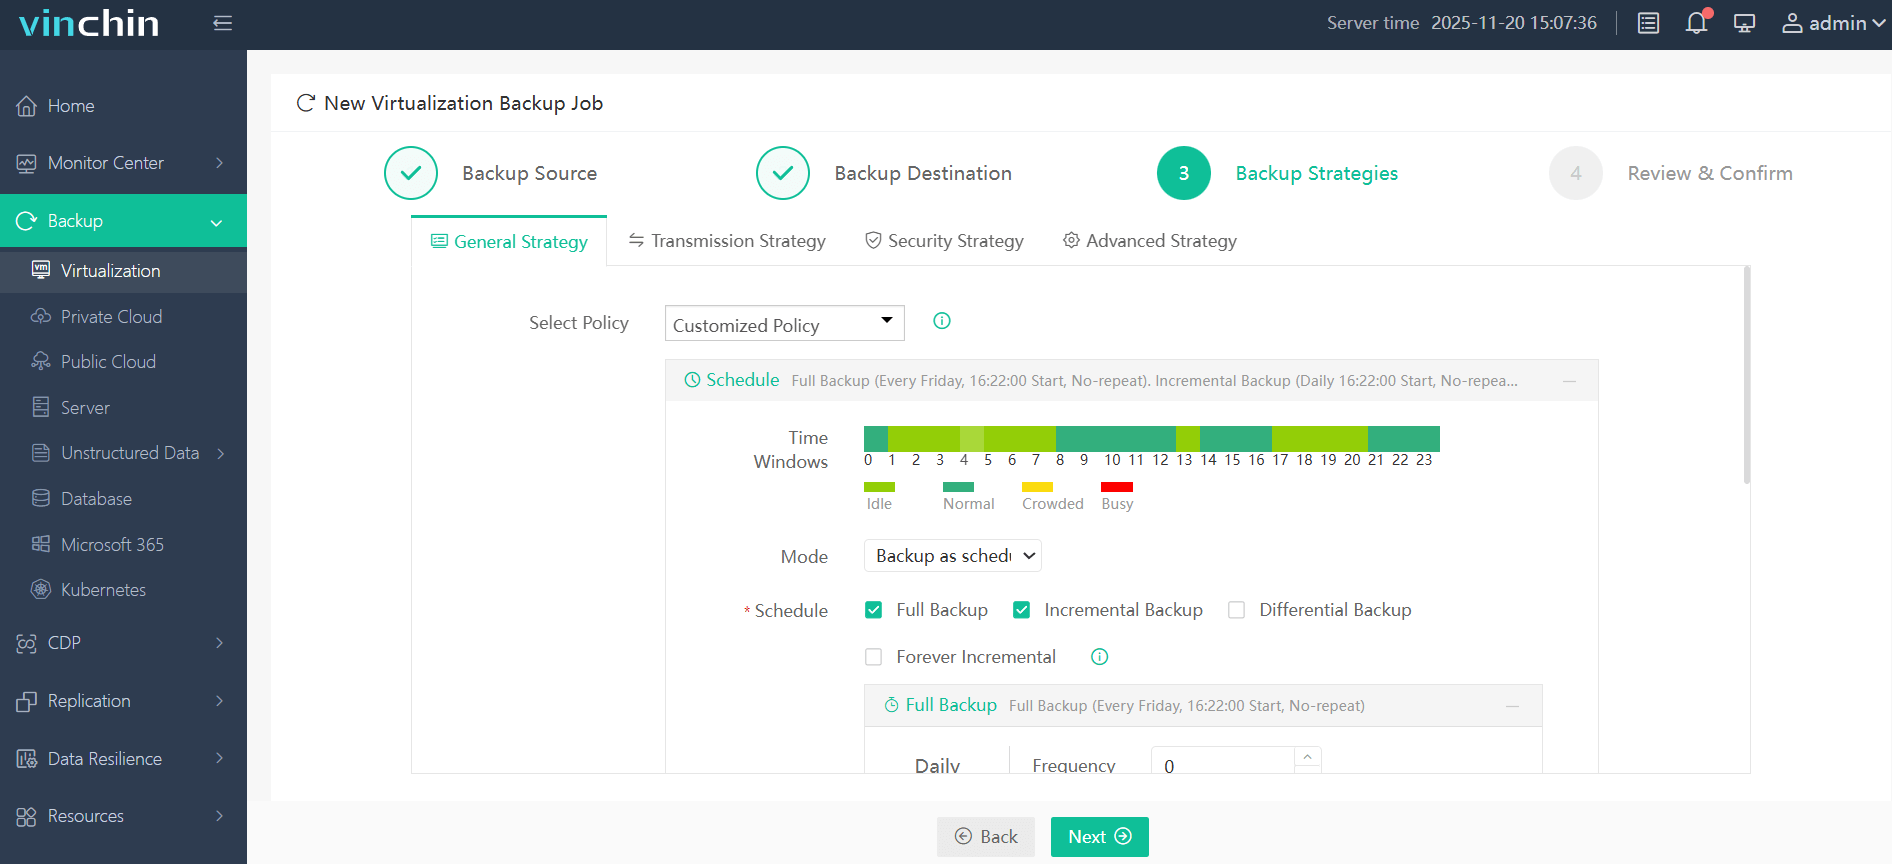
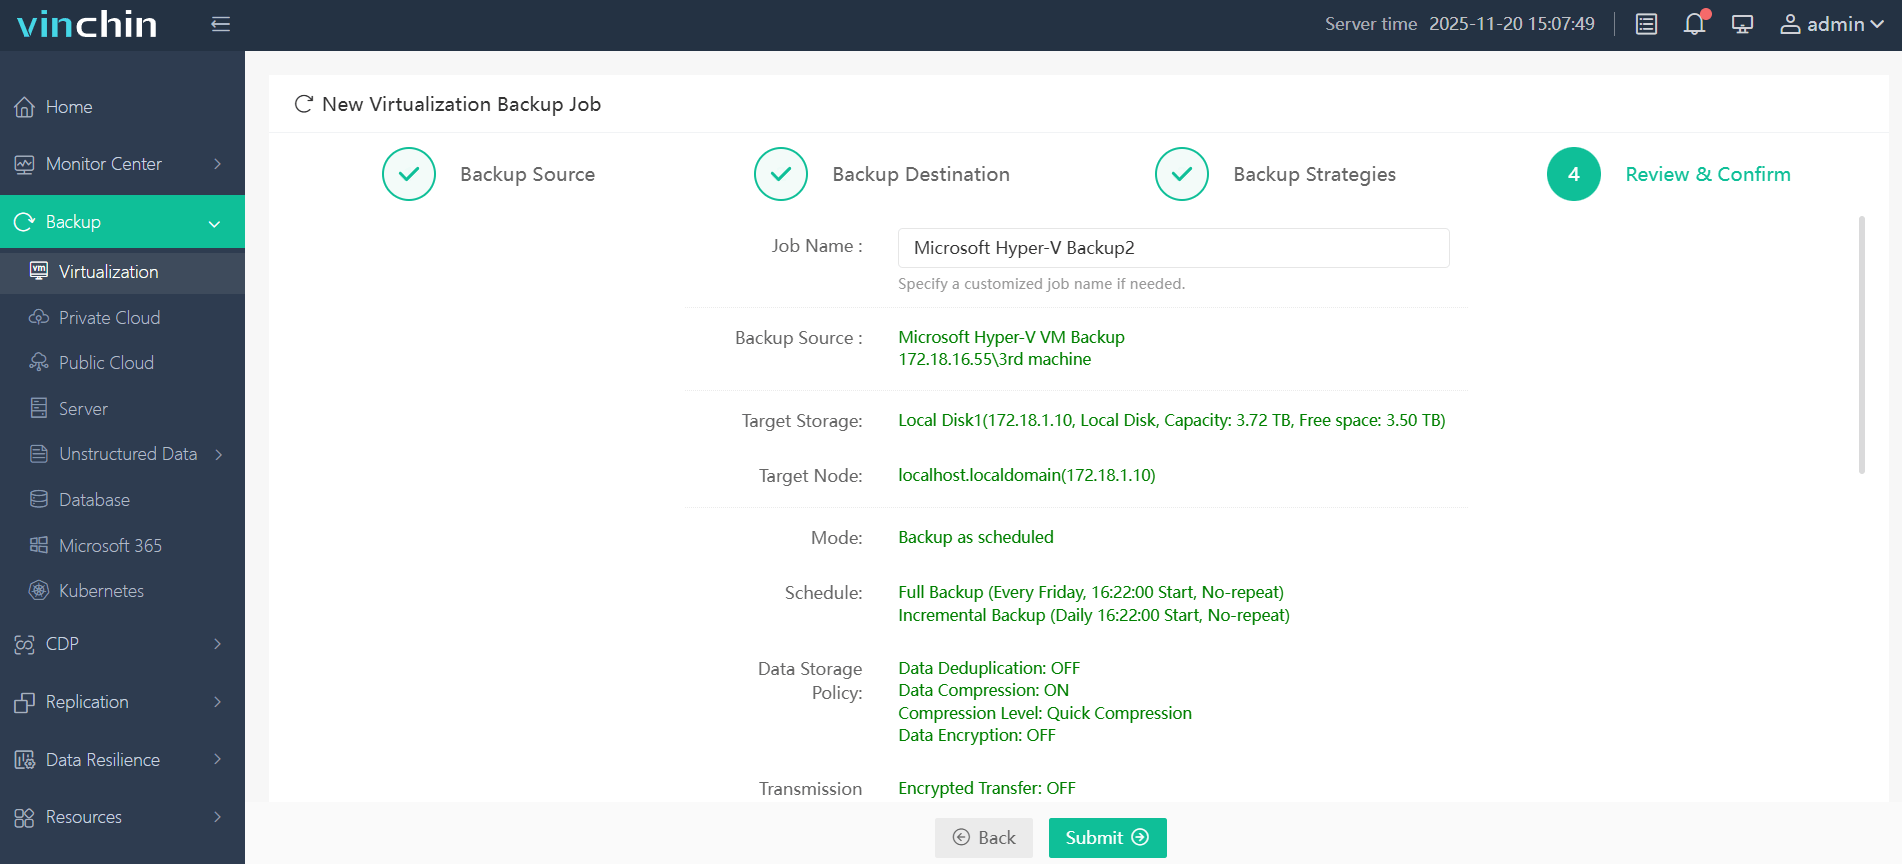
Vinchin's web console is simple. To back up a Hyper-V VM:
1.Select the Hyper-V VM.

2.Select backup destination.

3.Configure backup strategies.

4.Review and submit the job.

Vinchin serves clients worldwide with high ratings. Try a 60-day full-featured free trial. Click the Download Trial button to get the installer and deploy in minutes.
Hyper-V Networking FAQs
Q1: How fix missing network adapter in VM?
Often caused by missing Integration Services or using a Gen1 VM with synthetic NIC; add a legacy adapter for install, then install Integration Services and add a synthetic adapter.
Q2: How script VLAN changes across many VMs?
Use PowerShell with idempotent checks: loop through VMs and run Set-VMNetworkAdapter -VMName <Name> -VlanId <ID> -ErrorAction Stop in a script.
Q3: How diagnose SR-IOV performance issues?
Check Get-NetAdapterVPort -Name SriovVF for VF state, confirm IOMMU and Get-VMNetworkAdapter -VMName <Name> | fl SriovEnabled, and test VMQ/RSS settings and latency with iPerf.
Conclusion
Hyper-V networking also enables scalable, secure virtualization with features like SR-IOV for near-bare-metal performance and HNV for cloud-scale abstraction. Operational excellence requires rigorous VLAN segmentation, automated deployment via PowerShell, and continuous monitoring of physical and virtual throughput. Test changes in staging before production rollout. Vinchin provides robust backup features for Hyper-V and beyond.
Share on:


