-
What is Proxmox on AWS?
-
Why run Proxmox on AWS?
-
How to Deploy Proxmox VE Using a Debian EC2 Instance on AWS?
-
How to Deploy Proxmox VE Using Nested Virtualization on AWS Metal Instances?
-
Seamless Virtual Machine Migration with Vinchin Backup & Recovery
-
Proxmox On AWS FAQs
-
Conclusion
Running Proxmox on AWS is an exciting topic for IT administrators who want to blend open-source virtualization with cloud scalability. But can you really deploy Proxmox Virtual Environment (VE) on Amazon Web Services? Yes—you can, though there are some important caveats. In this article, we'll explain what “Proxmox on AWS” means, why you might choose this setup, and how to get started step by step—from basic deployment to advanced networking and troubleshooting. We'll also show how Vinchin makes virtual machine migration seamless.
What is Proxmox on AWS?
Proxmox on AWS means running the Proxmox Virtual Environment—an open-source hypervisor—on Amazon Elastic Compute Cloud (EC2). Instead of using your own hardware in a data center or server room, you install Proxmox onto a cloud-based server in AWS. This lets you manage virtual machines (VMs) and containers through the familiar Proxmox web interface while taking advantage of AWS's flexible infrastructure.
However, AWS was not designed for custom hypervisors like Proxmox; it's optimized for its own virtualization stack. Running Proxmox here requires careful planning around instance types and network configuration. You may encounter limitations compared to running it on physical servers.
Why run Proxmox on AWS?
Why would anyone want to run Proxmox on AWS? The main reason is flexibility combined with scale. With Proxmox VE in the cloud:
You can quickly spin up or down VMs without buying hardware.
You pay only for what you use.
There's no need to maintain physical servers.
It's ideal for testing labs or development environments that need global reach.
You get access to clustering features and container management.
But remember: AWS is built around its own virtualization tools and services. Running Proxmox here works best for specific use cases—like hybrid lab setups or migrations—not as a full replacement for native EC2 workflows.
How to Deploy Proxmox VE Using a Debian EC2 Instance on AWS?
Deploying Proxmox VE directly onto an EC2 instance is possible if you follow certain steps carefully. Let's walk through them so you can get started smoothly—even if this is your first time working with both platforms together.
Deployment Steps
Here's how you can deploy:
1. Launch a Debian 11 EC2 instance: Use an official Debian 11 AMD64 AMI; find the latest AMI ID at Debian Wiki.
2. Select your instance type: For containers only, choose t3.small or larger; for nested VMs inside Proxmox itself, select a “metal” instance.
3. Configure network and storage: Set up a security group allowing access only from your IP address—not all IPs—for ports 8006 (Proxmox UI), 22 (SSH), plus ICMP if needed.
4. Paste the cloud-init script: In Advanced details, scroll down to User Data and paste in this script. Edit hostname and fqdn fields as needed.
5. Launch your instance: Start it up; installation begins automatically via cloud-init.
6. Monitor installation progress: Use Actions > Monitor and Troubleshoot > EC2 Serial Console or SSH in (tail -f /var/log/syslog) to watch logs live.
7. Set root password: SSH into your new server as root, then run passwd so you can log into the web console later.
8. Access the web interface: Open https://<your-instance-public-IP>:8006/ in your browser; log in as root.
9. Reboot once after install completes: This switches over fully to the new kernel required by Proxmox VE.
How to Deploy Proxmox VE Using Nested Virtualization on AWS Metal Instances?
Nested virtualization means running one hypervisor inside another—in this case installing Proxmox VE inside an already virtualized environment provided by Amazon EC2 metal instances.
This approach allows even more complex test labs or hybrid setups but comes with trade-offs: performance overhead increases (~10% higher CPU steal time; ~15–20% lower disk throughput based on community benchmarks). Still curious? Here’s how it works:
Deployment Steps
1. Launch a “metal” EC2 instance such as c5n.metal or m5zn.metal
2. Install Debian 11 using its official AMI image
3 .SSH into your host once ready; follow the official guide step-by-step
4 .No extra configuration needed—nested virtualization comes enabled by default
5 .Create VMs or containers via web interface just like normal
Performance will never match bare-metal deployments due to double-layer abstraction—but many workloads still perform acceptably well here if tuned properly!
Seamless Virtual Machine Migration with Vinchin Backup & Recovery
To ensure smooth transitions between different virtual environments without disrupting business operations, organizations require robust migration solutions alongside reliable backup strategies. Vinchin Backup & Recovery stands out as an enterprise-grade backup solution offering agentless virtual machine migration capabilities that help businesses move their workloads seamlessly V2V migration while minimizing impact on production systems.
Vinchin Backup & Recovery supports a wide array of mainstream virtualization platforms—including VMware vSphere/ESXi clusters, Microsoft Hyper-V, oVirt, OLVM, Red Hat Virtualization, XCP-ng, XenServer/Citrix Hypervisor, OpenStack—and notably includes comprehensive support for migrating both from and into Proxmox environments among others not listed here explicitly.
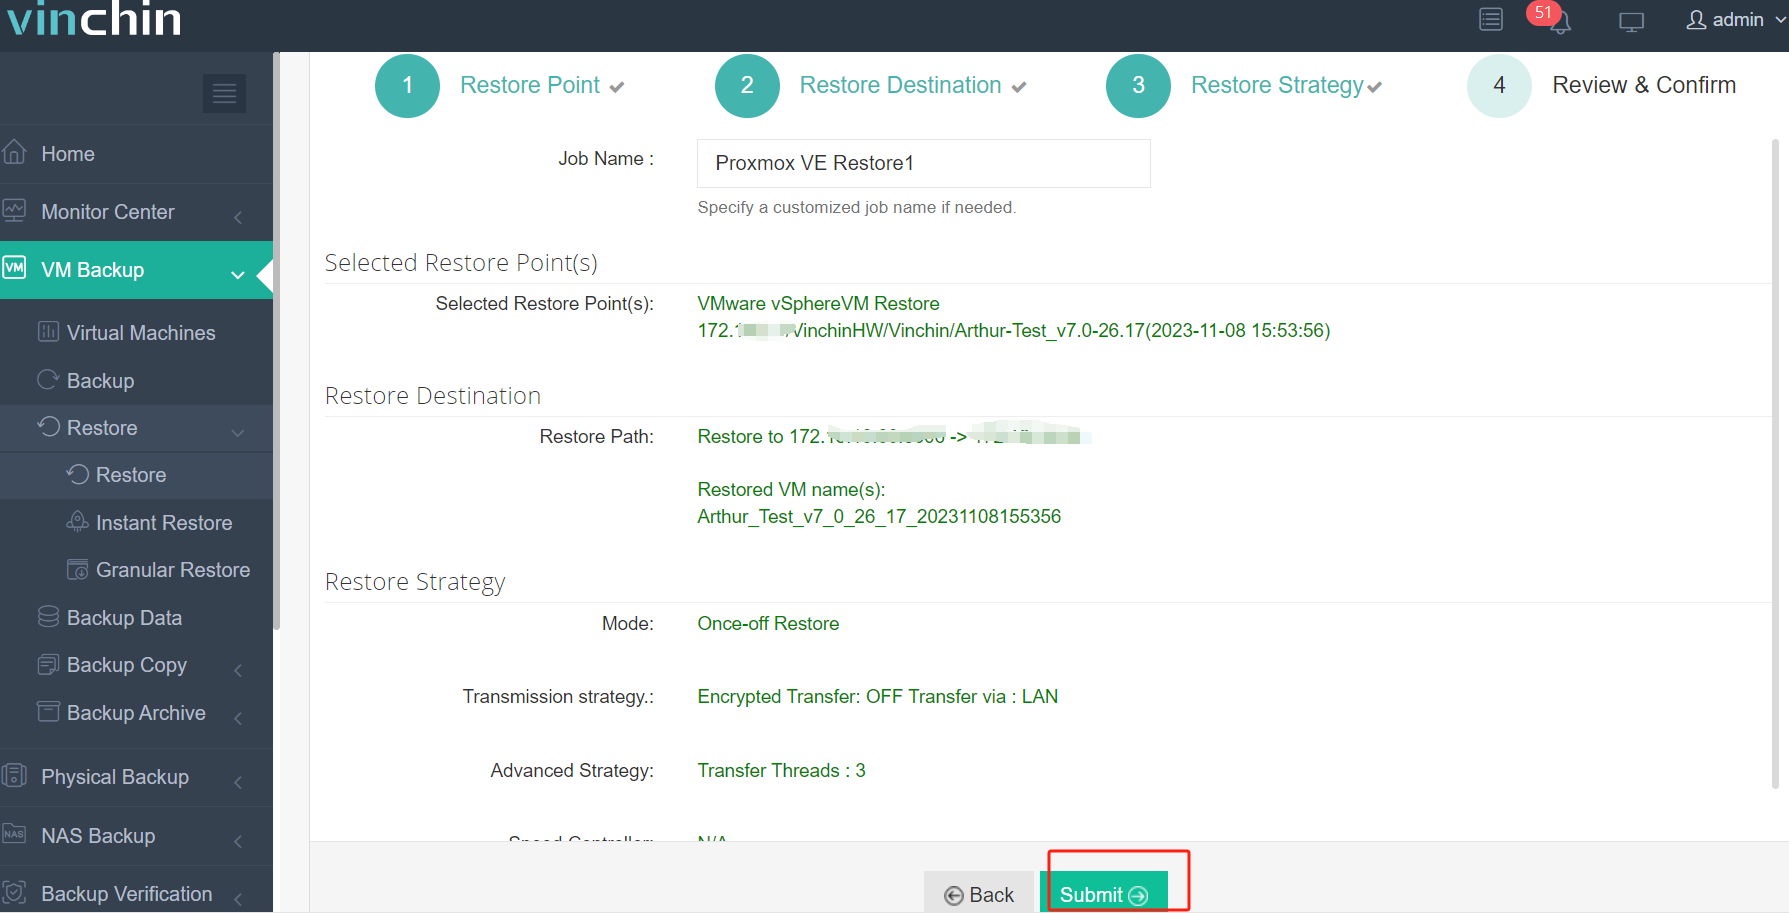
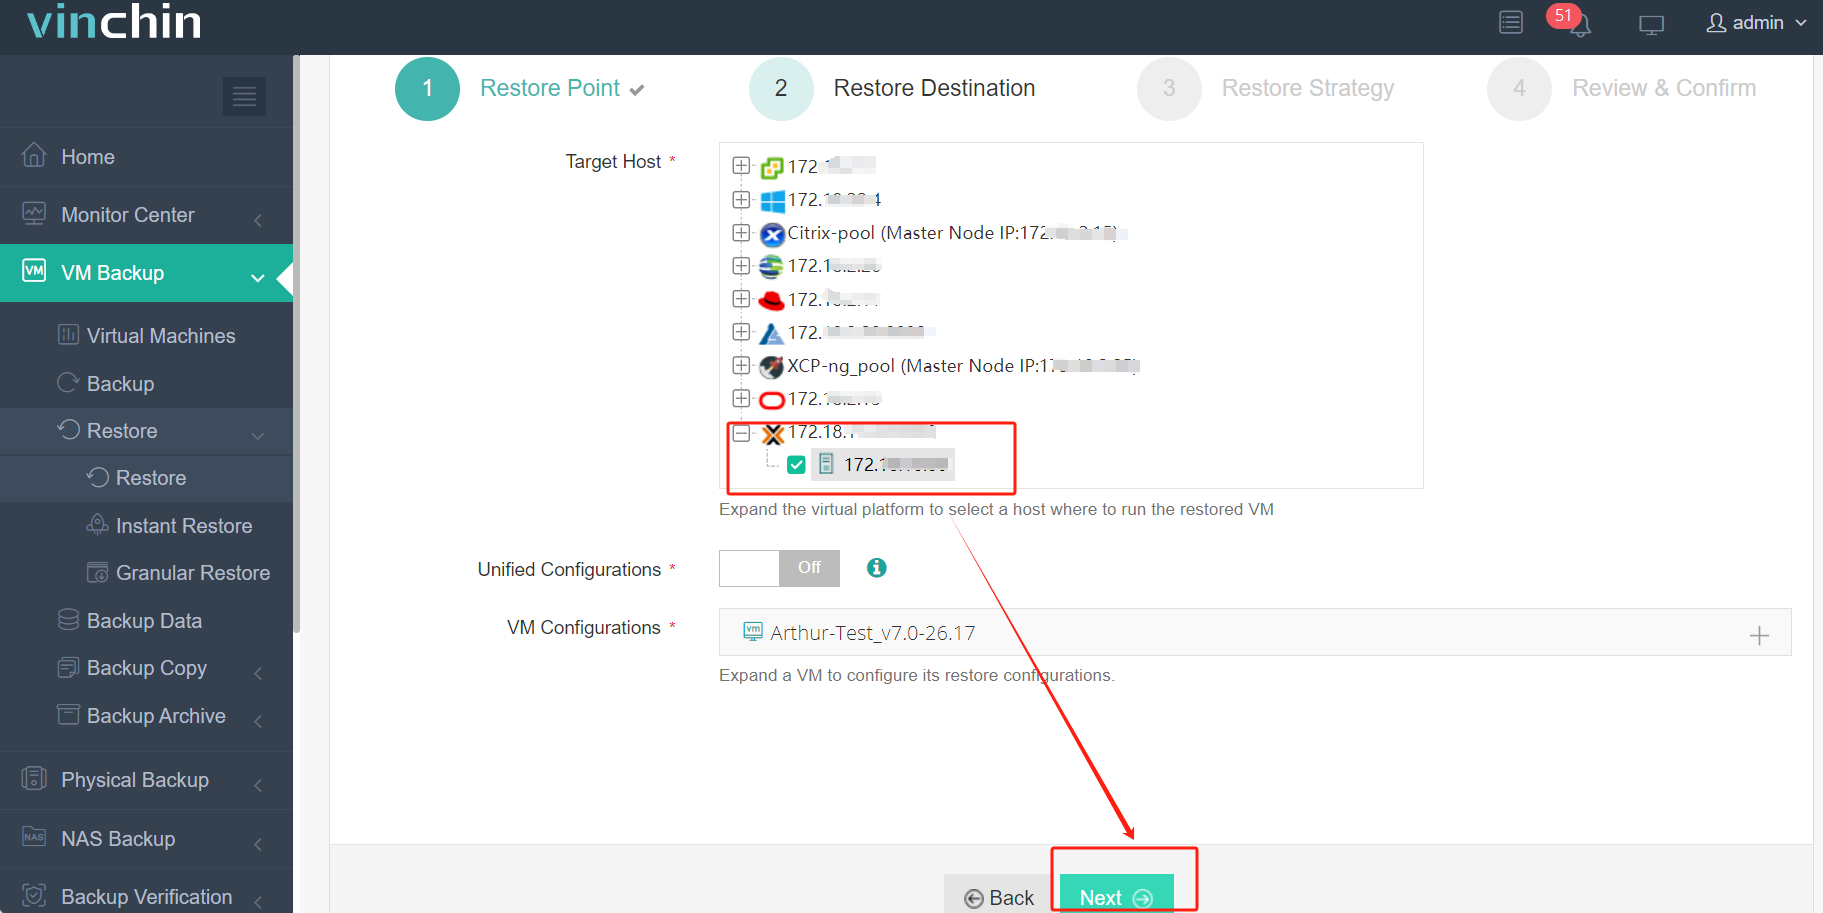
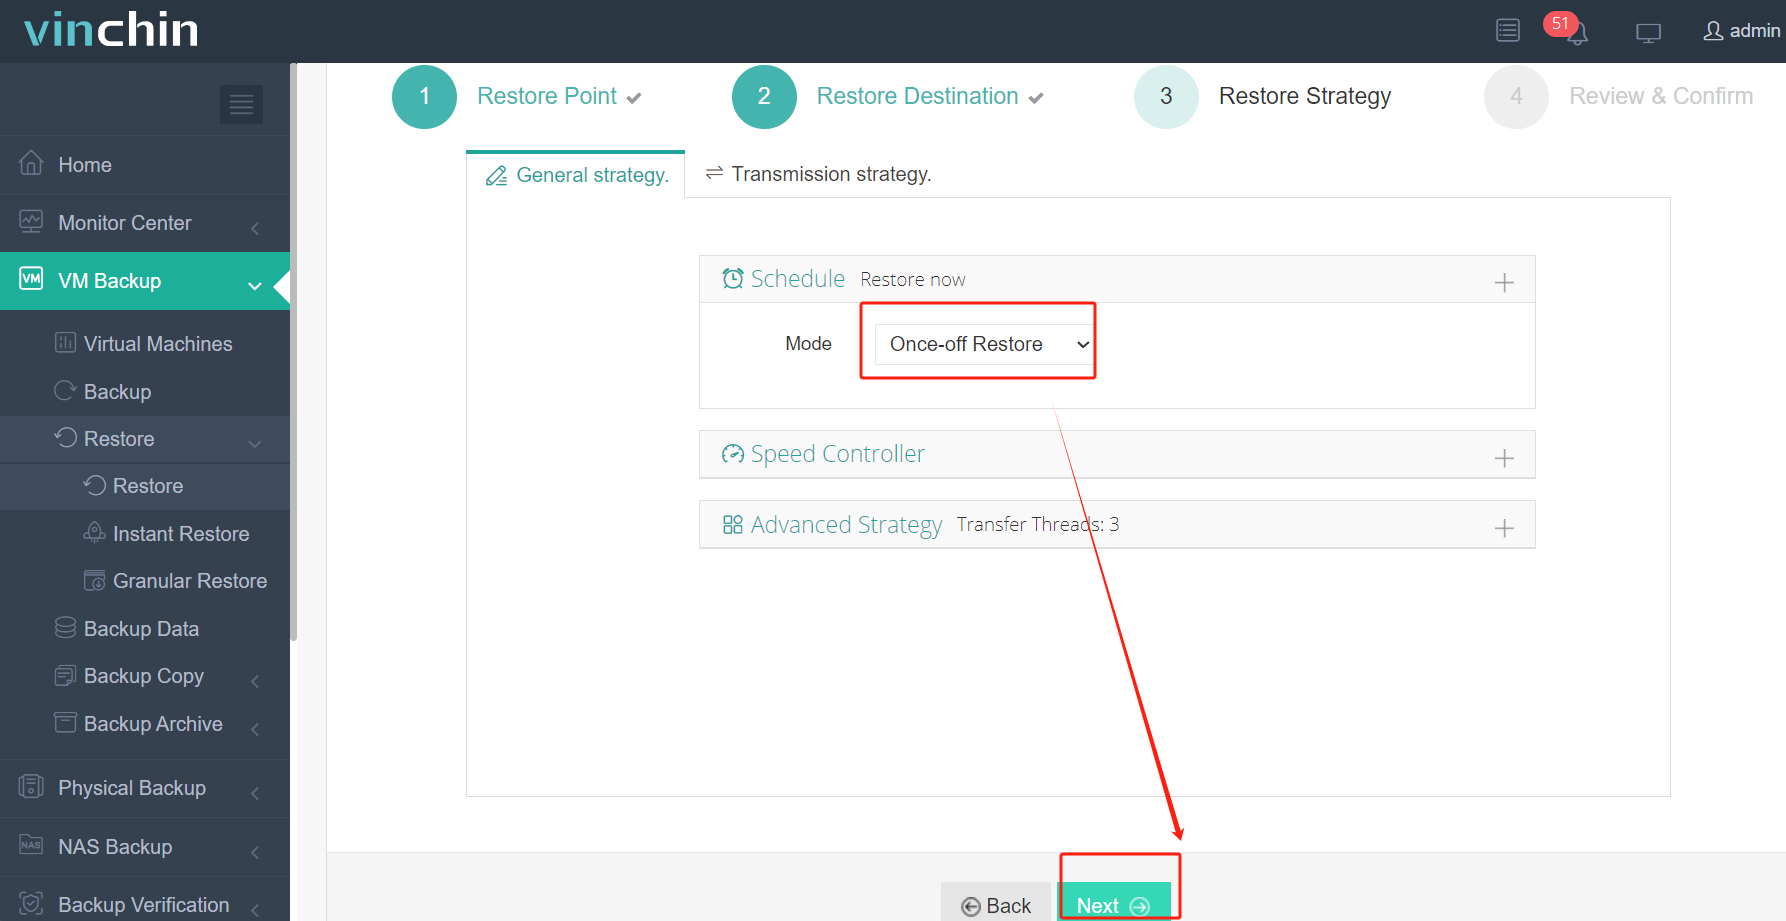
The migration process with Vinchin Backup & Recovery is extremely straightforward:
Step 1. Select Restore Point

Step 2. Select Restore Destination

Step 3. Select Restore Strategies

Step 4. Review and submit the job

Thousands of organizations worldwide trust Vinchin thanks to its reliability and user satisfaction ratings across diverse industries globally! Experience all features free with a comprehensive 60-day trial—download now and deploy effortlessly within minutes using our installer package.
Proxmox On AWS FAQs
Q1: Can I snapshot my entire cloud-hosted cluster easily?
A1: Yes—with proper storage attached—you can create consistent snapshots using built-in LVM/ZFS tools available within most modern Linux distributions running under Proxmox VE.
Q2: What happens if my public IP changes after reboot?
A2: Update DNS records promptly—or assign Elastic IP addresses via AWS Console—to maintain uninterrupted remote access post-restart events.
Q3: How do I automate nightly backups from my guest VMs?
A3: Schedule jobs using cron plus native backup utilities bundled within each guest OS—or leverage external solutions compatible with SFTP/NFS/S3 endpoints configured securely outside core cluster perimeter.
Conclusion
Running “Proxmox on AWS” gives IT teams powerful flexibility—but demands careful planning around costs, networking setup, compliance risks and ongoing security hardening efforts throughout lifecycle management phases! For seamless cross-platform migration needs—including agentless options spanning multiple vendors—Vinchin offers robust solutions trusted worldwide by thousands of organizations today.
Share on:


