-
What Is oVirt Live Migration?
-
Why Use oVirt Live Migration?
-
Prerequisites and Host Configuration
-
How to Perform Native oVirt Live Migration?
-
How to Automate oVirt Live Migration with Ansible?
-
How to Migrate Virtual Machines with Vinchin?
-
ovirt live migration FAQs
-
Conclusion
oVirt live migration lets you move running virtual machines between hosts without downtime. This feature is essential for maintenance, load balancing, and high availability in any modern data center. Imagine needing to update firmware on a physical server hosting dozens of critical VMs—live migration allows you to shift those workloads elsewhere without users noticing even a blip. In this guide, we'll explore what oVirt live migration is, why it matters, how to perform it manually or automate it using tools like Ansible, how to troubleshoot common issues, monitor migrations effectively, and how Vinchin can help you migrate VMs across platforms with ease.
What Is oVirt Live Migration?
oVirt live migration is the process of moving an active VM from one physical host to another within the same cluster—without shutting down the VM or interrupting its services. During this process, oVirt transfers the VM's memory state, CPU context, and device connections over the network to the target host. Storage remains shared between hosts; network connections stay intact throughout. Users experience no disruption during or after migration.
This seamless movement relies on both hosts having access to identical storage resources (like NFS or iSCSI) and matching network configurations. The entire operation happens behind the scenes while your applications keep running.
Why Use oVirt Live Migration?
Live migration in oVirt gives administrators powerful flexibility:
You can perform hardware maintenance without downtime by moving VMs off a host that needs repair or upgrades.
Workloads can be balanced across hosts automatically or manually so that no single server becomes overloaded.
High availability policies ensure that if a host fails—or enters maintenance mode—VMs are relocated instantly to healthy nodes.
With live migration enabled in your environment, you minimize service interruptions due to hardware issues or planned updates. It also helps you meet strict uptime requirements demanded by business-critical applications.
Prerequisites and Host Configuration
Before starting any live migrations in oVirt—even simple ones—it's important to check several key requirements:
First, make sure both source and destination hosts belong to the same cluster within your data center setup. They must share compatible CPU families; otherwise migrations may fail due to instruction set mismatches (you can verify this under Compute > Hosts > Host Details > CPU). Both hosts need access to shared storage—such as NFS exports or iSCSI LUNs—which you can confirm by logging into each host via SSH and listing mount points (ls /rhev/data-center/mounts). Network bridges used for VM traffic should have identical names (including VLAN tags) on both sides; mismatched bridge names will block migrations.
Finally, always check available resources: ensure at least 20% free RAM on your target host before migrating memory-intensive VMs—a lack of headroom here is one of the most common causes of failed migrations.
How to Perform Native oVirt Live Migration?
Native oVirt live migration is straightforward using its web-based Administration Portal once prerequisites are met.
To manually migrate a VM in oVirt:
1. In Administration Portal, click Compute then Virtual Machines
2. Select your running VM
3. Click Migrate
4. In Migrate VM(s) dialog: choose Select Host Automatically for automatic placement or Select Destination Host from drop-down list
5. Click OK
You'll see progress under the Migration bar; when finished, check that the Host column reflects your new location.
How to Automate oVirt Live Migration with Ansible?
Automation saves time—and reduces human error—in larger environments where many VMs may need relocation at once. Ansible provides modules tailored for managing oVirt clusters efficiently.
A typical playbook uses ovirt_vm module like this:
- name: Migrate VM to another host
  hosts: localhost
  connection: local
  gather_facts: no
  tasks:
    - name: Validate target host resources
      ovirt_host_info:
        name: "target-host.example.com"
      register: host_stats

    - name: Abort if insufficient memory
      fail:
        msg: "Insufficient RAM on {{ target_host }} ({{ host_stats.ovirt_hosts[0].memory_free }} MB free)"
      when: host_stats.ovirt_hosts[0].memory_free < vm_memory * 0.2

    - name: Migrate VM
      ovirt_vm:
        auth:
          url: https://ovirt-engine.example.com/ovirt-engine/api
          username: admin@internal
          password: yourpassword
          insecure: true
        name: my_vm
        state: running
        migrate: true
        host: target-host.example.com
Here's what happens step-by-step:
First task checks available RAM on your chosen destination; second aborts early if there isn't enough headroom; third performs actual migration via API call—all hands-off! You run this playbook using ansible-playbook migrate_vm.yml.
Advanced users might loop over multiple VMs at once—or integrate triggers based on monitoring alerts—to automate even complex scenarios end-to-end. Always test automation scripts outside production first!
How to Migrate Virtual Machines with Vinchin?
While native tools handle intra-cluster moves well within oVirt environments, some organizations require seamless V2V migration mobility without disrupting operations further afield than standard methods allow. Vinchin Backup & Recovery delivers professional-grade backup capabilities along with agentless virtual machine migration designed specifically for enterprises seeking efficiency and reliability.
Supporting VMware vSphere/ESXi , Microsoft Hyper-V , Proxmox VE , Red Hat Virtualization , Oracle Linux Virtualization Manager , XCP-ng , Citrix XenServer , OpenStack , as well as additional compatible virtualization platforms beyond those listed here —Vinchin Backup & Recovery enables businesses to transition workloads easily across diverse infrastructures while minimizing production impact.
The process could not be simpler.
Step 1. Select Restore Point

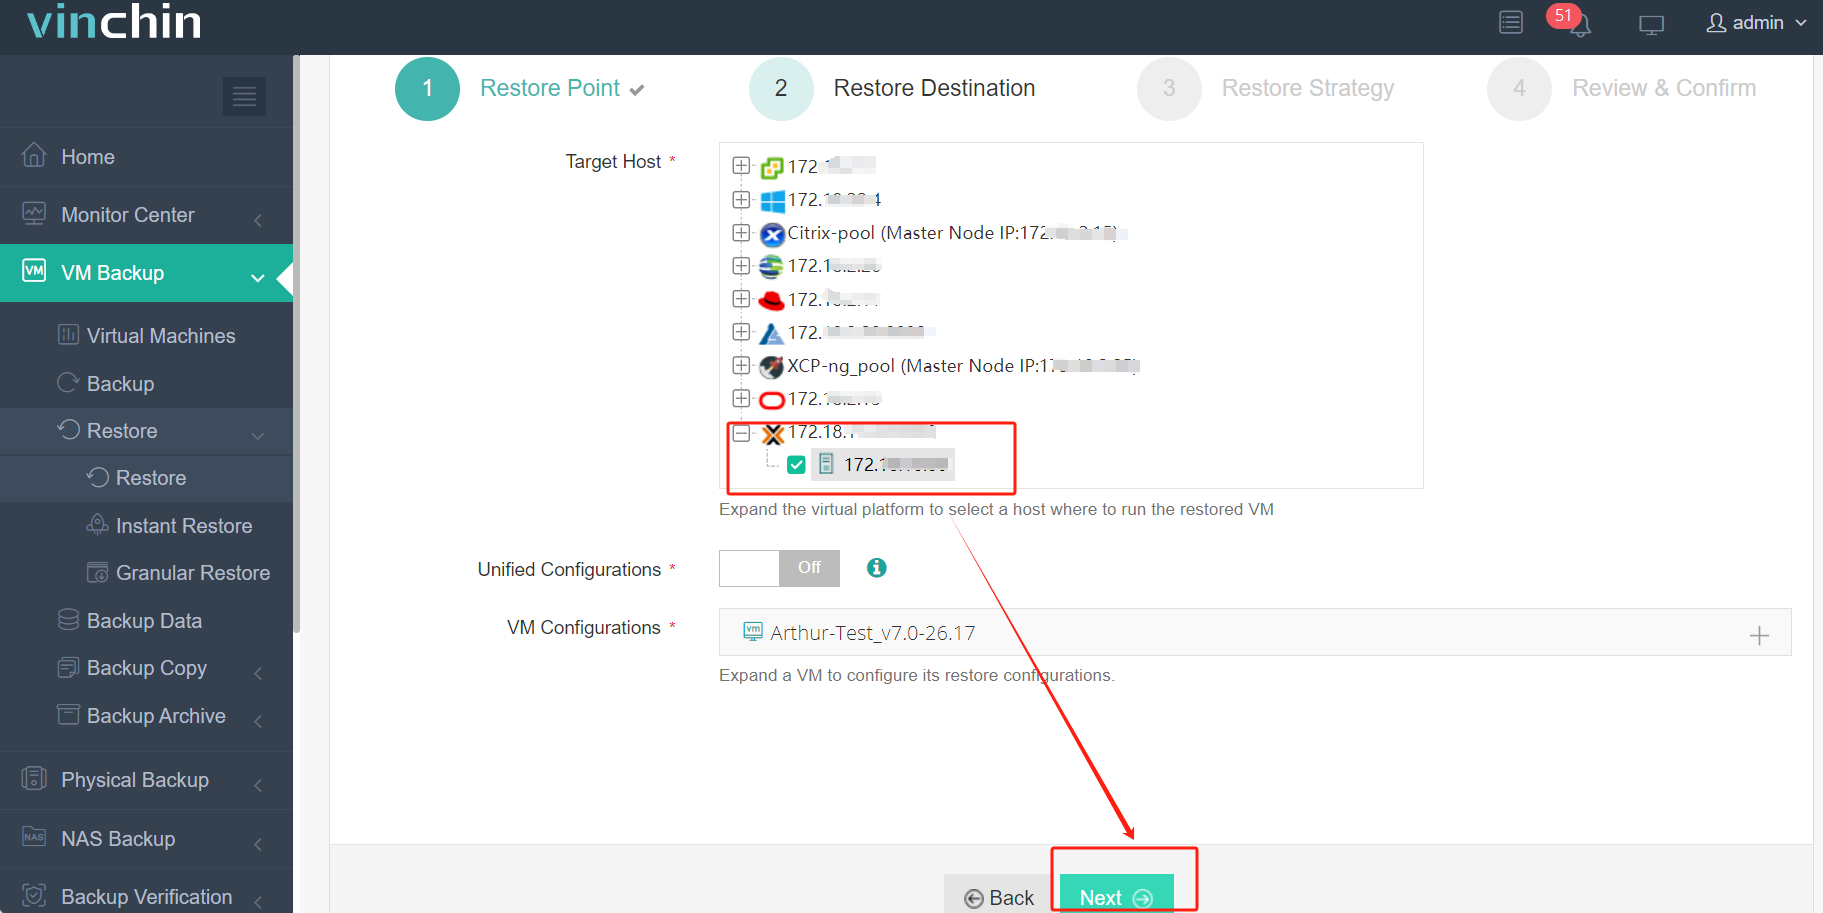
Step 2. Select Restore Destination

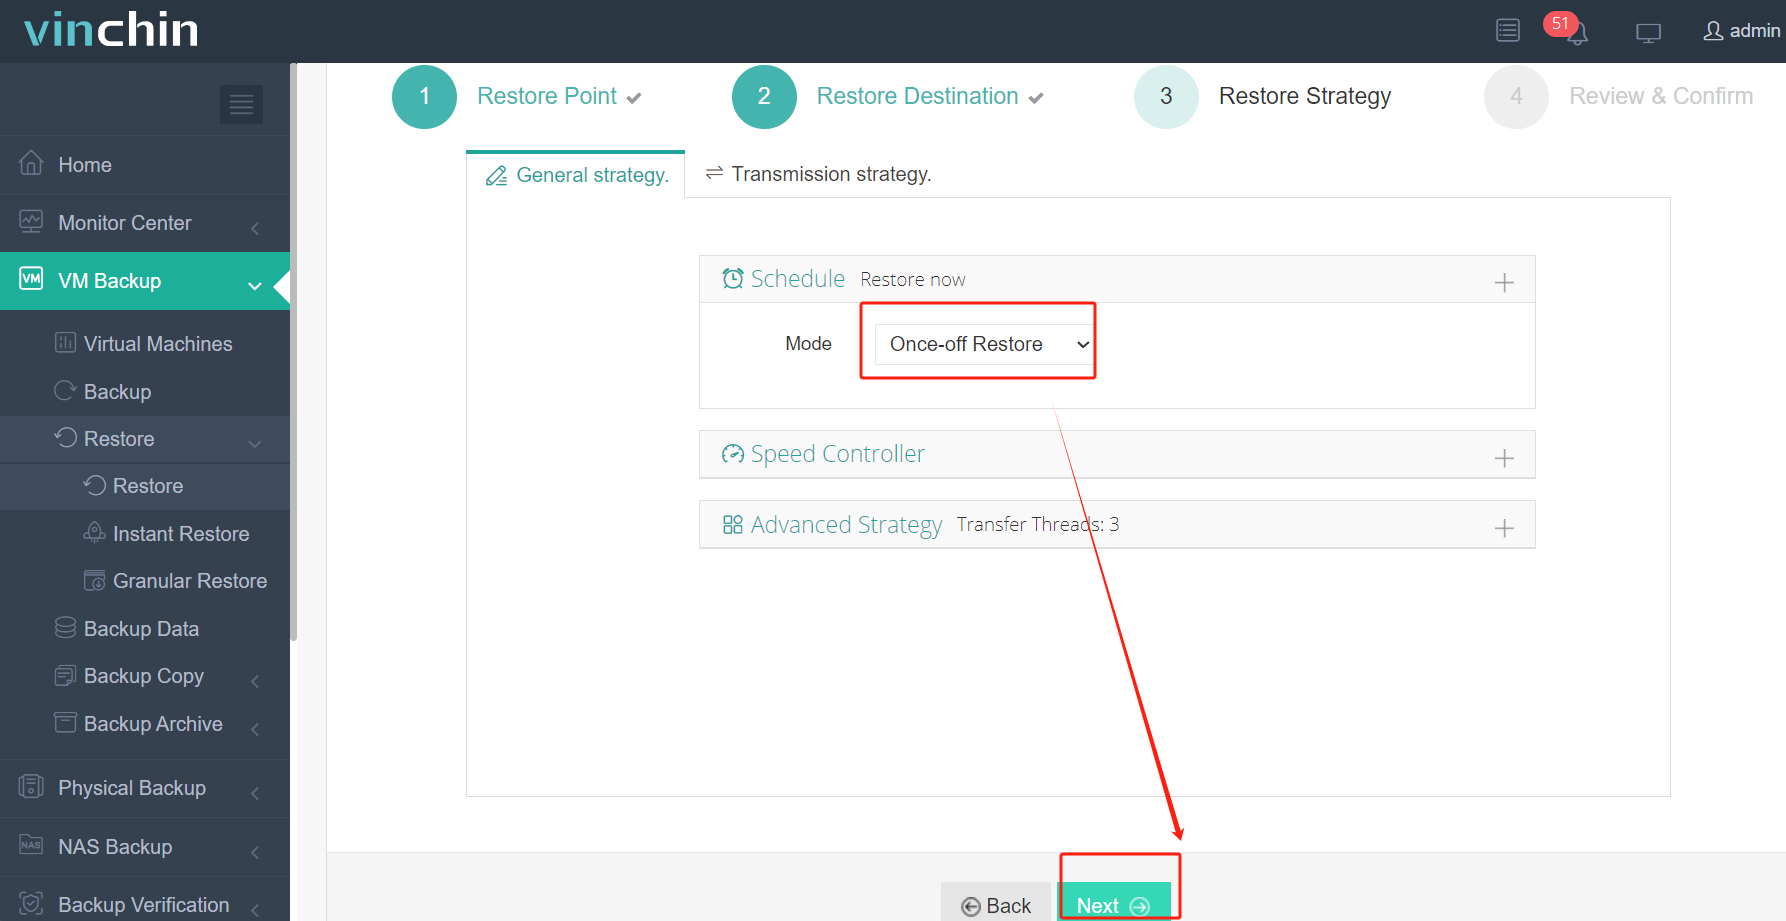
Step 3. Select Restore Strategies

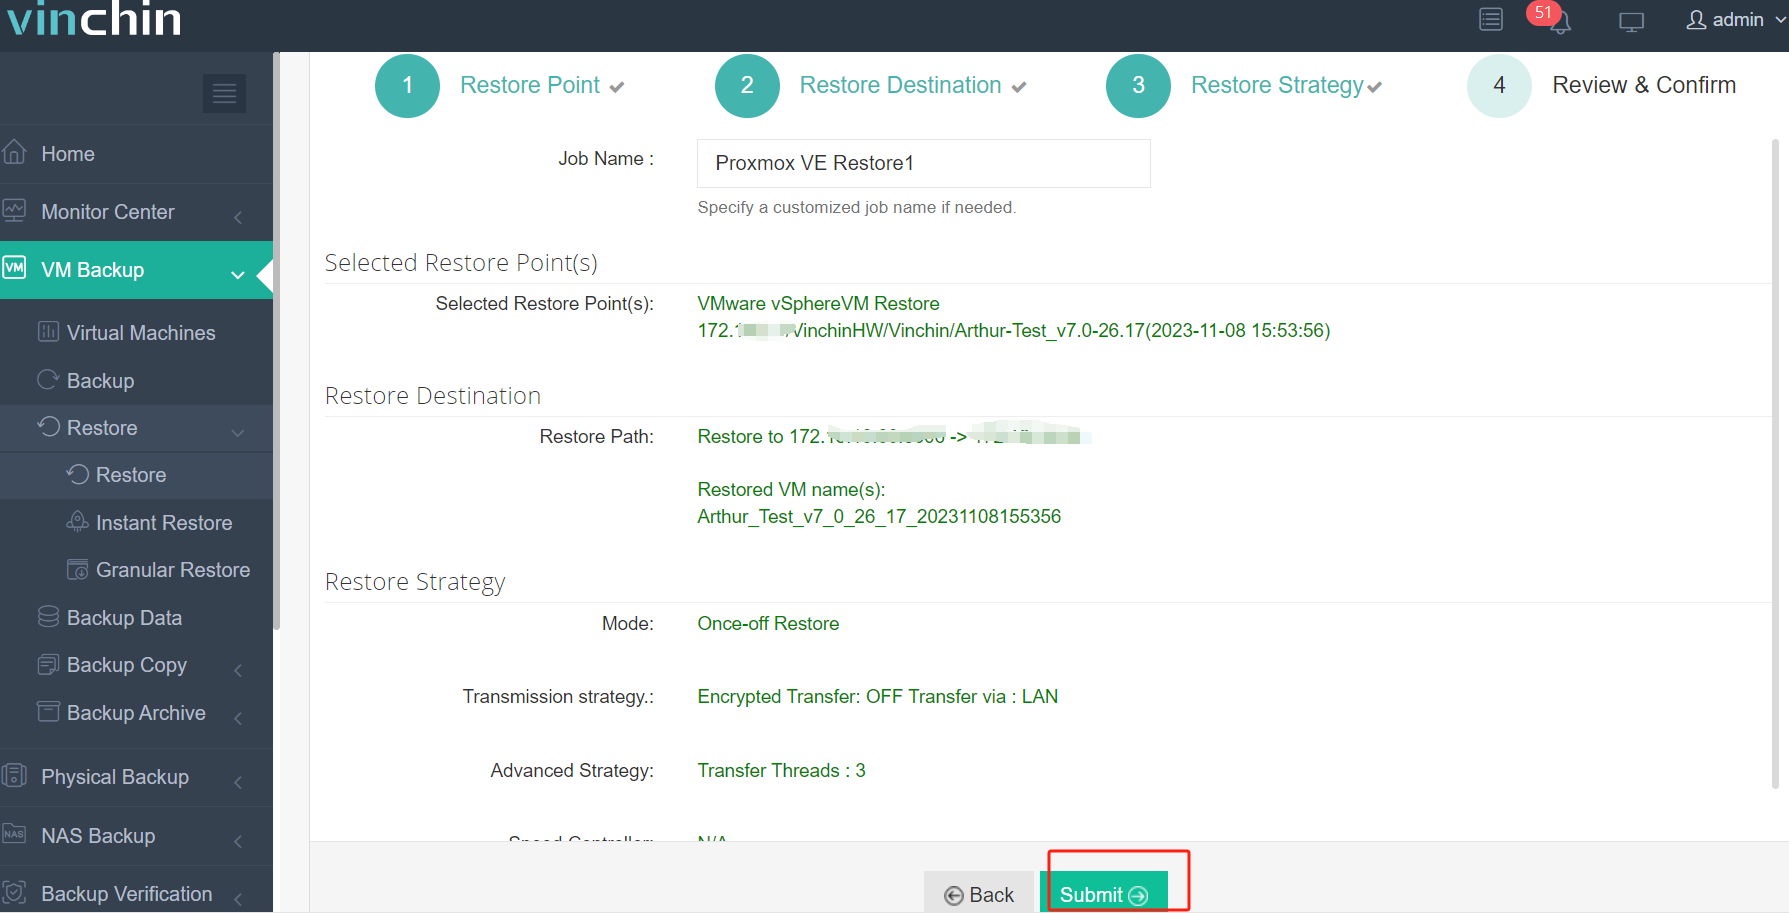
Step 4. Review and submit the job

Join thousands of satisfied customers worldwide who trust Vinchin Backup & Recovery's highly rated solutions every day. Download now for instant deployment—including a full-featured free trial valid for sixty days—to experience effortless enterprise-class backup and cross-platform virtual machine mobility firsthand!
ovirt live migration FAQs
Q1: Can I live migrate a VM between different clusters in oVirt?
A1 No; live migration works only within same cluster because CPU/network compatibility must match exactly across nodes involved.
Q2; What steps help diagnose repeated failed migrations?
A2 Check logs (vdsm.log, engine.log) look for “migration failed” entries then verify shared storage/network bridges/firewall rules match everywhere involved hosts touch data paths.
Q3: Can I schedule automatic live migrations based load balancing needs?
A3: Yes; enable automatic policies under cluster scheduling then set eligible VMs' options allow auto-migration whenever thresholds exceeded during normal operations!
Conclusion
oVirt live migration keeps virtual environments flexible—even when hardware changes strike unexpectedly! Try Vinchin free now & join thousands who trust them every day worldwide!
Share on:


