-
What is Windows Instant Recovery and Why You Need It?
-
Core Technologies Behind Instant Recovery
-
How Does Windows Instant Recovery Work?
-
Comprehensive Protection for Virtual Platforms with Vinchin
-
Windows Instant Recovery FAQs
-
Conclusion
Windows Instant Recovery is changing how IT teams respond to disasters. Instead of waiting hours for full restores after hardware failures or ransomware attacks, you can now bring critical Windows systems or virtual machines back online in minutes. This guide will walk you through everything you need to know—so you can keep your business running smoothly when trouble strikes.
What is Windows Instant Recovery and Why You Need It?
Windows Instant Recovery lets you restore a Windows system or VM almost instantly by booting directly from backup files. There's no need to wait for data to copy onto production storage first. This means that after an outage—whether caused by hardware failure, cyberattack, or accidental deletion—you can get essential services up fast.
Why does this matter? Downtime is costly. According to Gartner research, IT downtime costs average $5,600 per minute. With instant recovery in place, you slash downtime dramatically. You also gain flexibility: test backups without risk; patch systems safely; even migrate workloads on demand. In today's world where every second counts, instant recovery isn't just nice—it's essential.
Core Technologies Behind Instant Recovery
Before diving into procedures, let's look at what makes instant recovery possible under the hood.
Most modern backup solutions use Volume Shadow Copy Service (VSS) in Windows to create application-consistent snapshots. VSS ensures that databases and running applications are captured in a usable state—not just raw files—so they start cleanly after restore.
For mounting backups as live VMs on hypervisors like VMware or Hyper-V:
NFS (Network File System) or iSCSI protocols often present backup storage directly to hosts so they see it as local disks.
Change Block Tracking (CBT) tracks only changed data blocks between backups instead of copying everything each time. This speeds up both incremental backups and instant recoveries because only recent changes need processing.
Hypervisors use APIs such as VMware VADP or Microsoft VSS hooks for seamless integration with backup tools.
Understanding these building blocks helps troubleshoot issues later—and explains why some features work differently across platforms.
How Does Windows Instant Recovery Work?
At its core, instant recovery mounts a backup image as a temporary VM on your hypervisor platform—without moving all data back first. The VM boots from this mounted image while users access their apps and files as usual.
This approach buys time: your team can investigate root causes or repair production storage while users stay productive on the recovered system.
How to Prepare for Instant Recovery?
Preparation is key for smooth recoveries later on. Here's what you should know before starting:
First, always maintain recent backups of your Windows systems or VMs using full images plus regular incremental or differential updates. Incremental backups save space by storing only changed data since the last run—a feature made possible by CBT technology described earlier.
Next, check that your backup appliance has enough free space not just for storing images but also for hosting temporary live VMs during recovery sessions. As a rule of thumb:
Reserve at least 15–25% extra disk space beyond original VM size.
Make sure network bandwidth supports rapid file transfers if remote mounting is involved.
For Hyper-V environments: Use servers running Windows Server 2012 or newer; install required agents on both source and target hosts; confirm Cluster Shared Volumes (CSV) are available if working within clusters.
For VMware setups: Ensure ESXi hosts are managed via vCenter; verify Storage vMotion licensing if planning permanent migrations later.
Finally—and most importantly—ensure your backups are “application-consistent.” That means using VSS-enabled jobs so databases like SQL Server start cleanly after restore rather than requiring manual fixes later on.
Step-by-Step Guide to Execute Instant Recovery
Once preparation is complete and you have verified recent application-consistent backups exist in your catalog:
Start by logging into your backup management console—the central dashboard where all protected assets appear organized by type and date.
Navigate to the Recover area then open the Backup Catalog tab where individual systems are listed alongside their available restore points (full/incremental/differential).
Select the desired VM or physical system entry; expand details if needed until you find the specific snapshot required based on timestamp or job type.
Click Instant Recovery—this launches a wizard guiding you through several choices:
1. Choose which host will run the temporary VM (Target Location)
2. Pick which datastore/volume will hold its virtual disks (Target Storage)
3. Assign network interfaces so users can connect (Network Adapter)
4. Review settings such as naming conventions; rename recovered copies if necessary
After confirming options hit Start, triggering background processes that mount backup images over NFS/iSCSI links directly onto chosen hypervisor hosts without copying all data upfront—a major time saver compared with traditional restores!
Monitor progress via an Instant Recovery status tab until prompted that “VM is available for use.” Boot times vary but typically range from two to five minutes depending on storage speed and network load; slower HDD-based appliances may take longer especially if antivirus scans trigger during mount operations.
Once ready log into restored VM using standard hypervisor consoles like vSphere Client or Hyper-V Manager then verify basic functionality before handing off access back to end-users—or proceeding with further checks outlined below!
Validating Your System Post-Recovery
Bringing up a server quickly is great—but making sure it works correctly matters even more! After any successful instant recovery session:
1. Open Command Prompt inside restored VM then run chkdsk /scan against each volume ensuring no file system errors remain from abrupt shutdowns
3. Review event logs via Get-WinEvent -LogName System plus Get-WinEvent -LogName Application focusing on warnings/errors generated since last boot
4. Test connectivity using Test-NetConnection -ComputerName <domain-controller> -Port 389 confirming LDAP/authentication paths function normally
5. If restoring database servers like SQL Server validate DB integrity using built-in tools (DBCC CHECKDB) before resuming production workloads
6. For web servers browse main URLs internally verifying IIS bindings/DNS records updated correctly post-recovery
7. If any disks show offline status open Disk Management utility right-click affected drives select Online, alternatively use PowerShell Set-Disk -Number <ID> -IsOffline $false
Following this checklist reduces surprises once users reconnect—and helps spot subtle problems early!
Comprehensive Protection for Virtual Platforms with Vinchin
To streamline protection and ensure rapid disaster response across diverse virtualization environments—including VMware, Hyper-V, Proxmox, oVirt, OLVM, RHV, XCP-ng, XenServer, OpenStack, ZStack and more—Vinchin Backup & Recovery stands out as an enterprise-grade virtual machine backup solution trusted worldwide (supporting over 15 mainstream platforms).
Vinchin delivers robust features such as forever-incremental backups that minimize storage usage and speed up daily protection cycles; advanced deduplication and compression technologies reduce overall footprint while optimizing transfer efficiency; flexible V2V migration enables seamless movement between different virtualization platforms when needed; granular scheduling options allow precise control over automated jobs—all accessible through an intuitive web console designed for ease of use even at scale
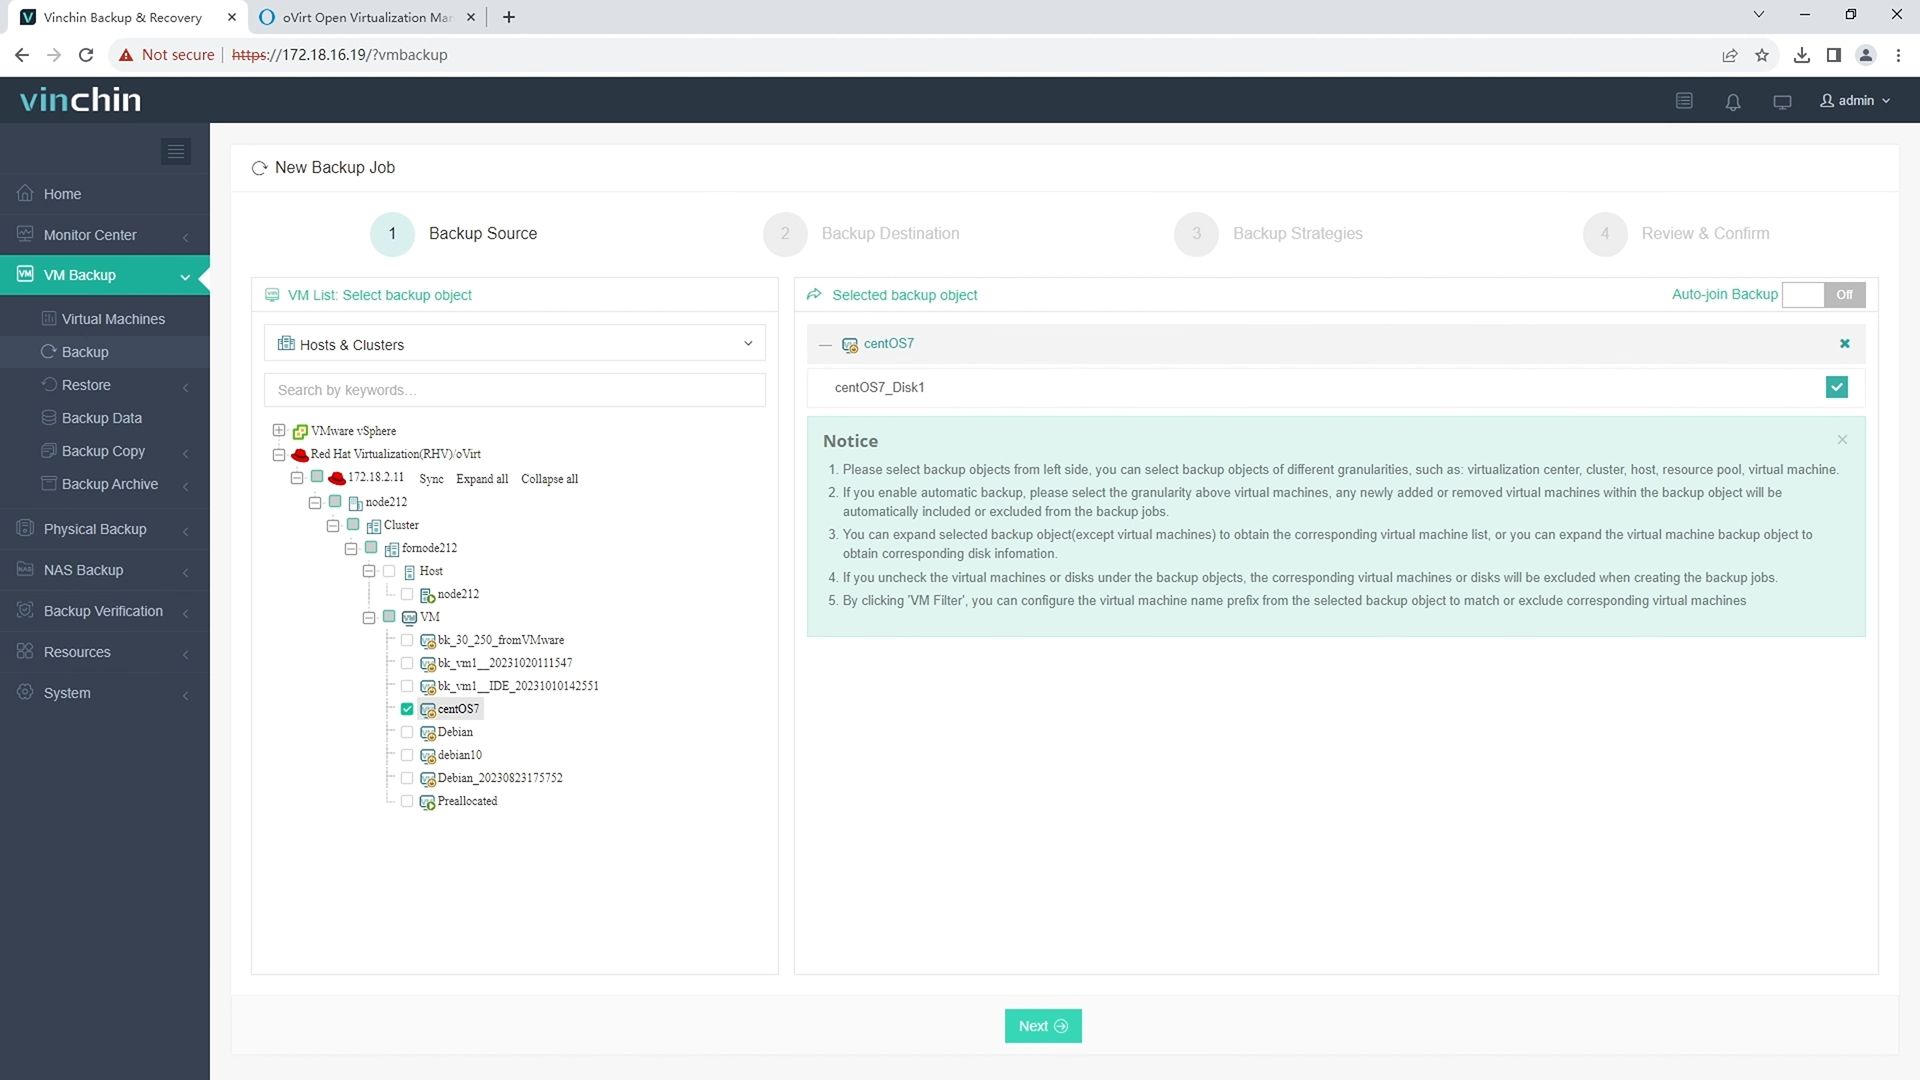
1. Just select oVirt VM on the host

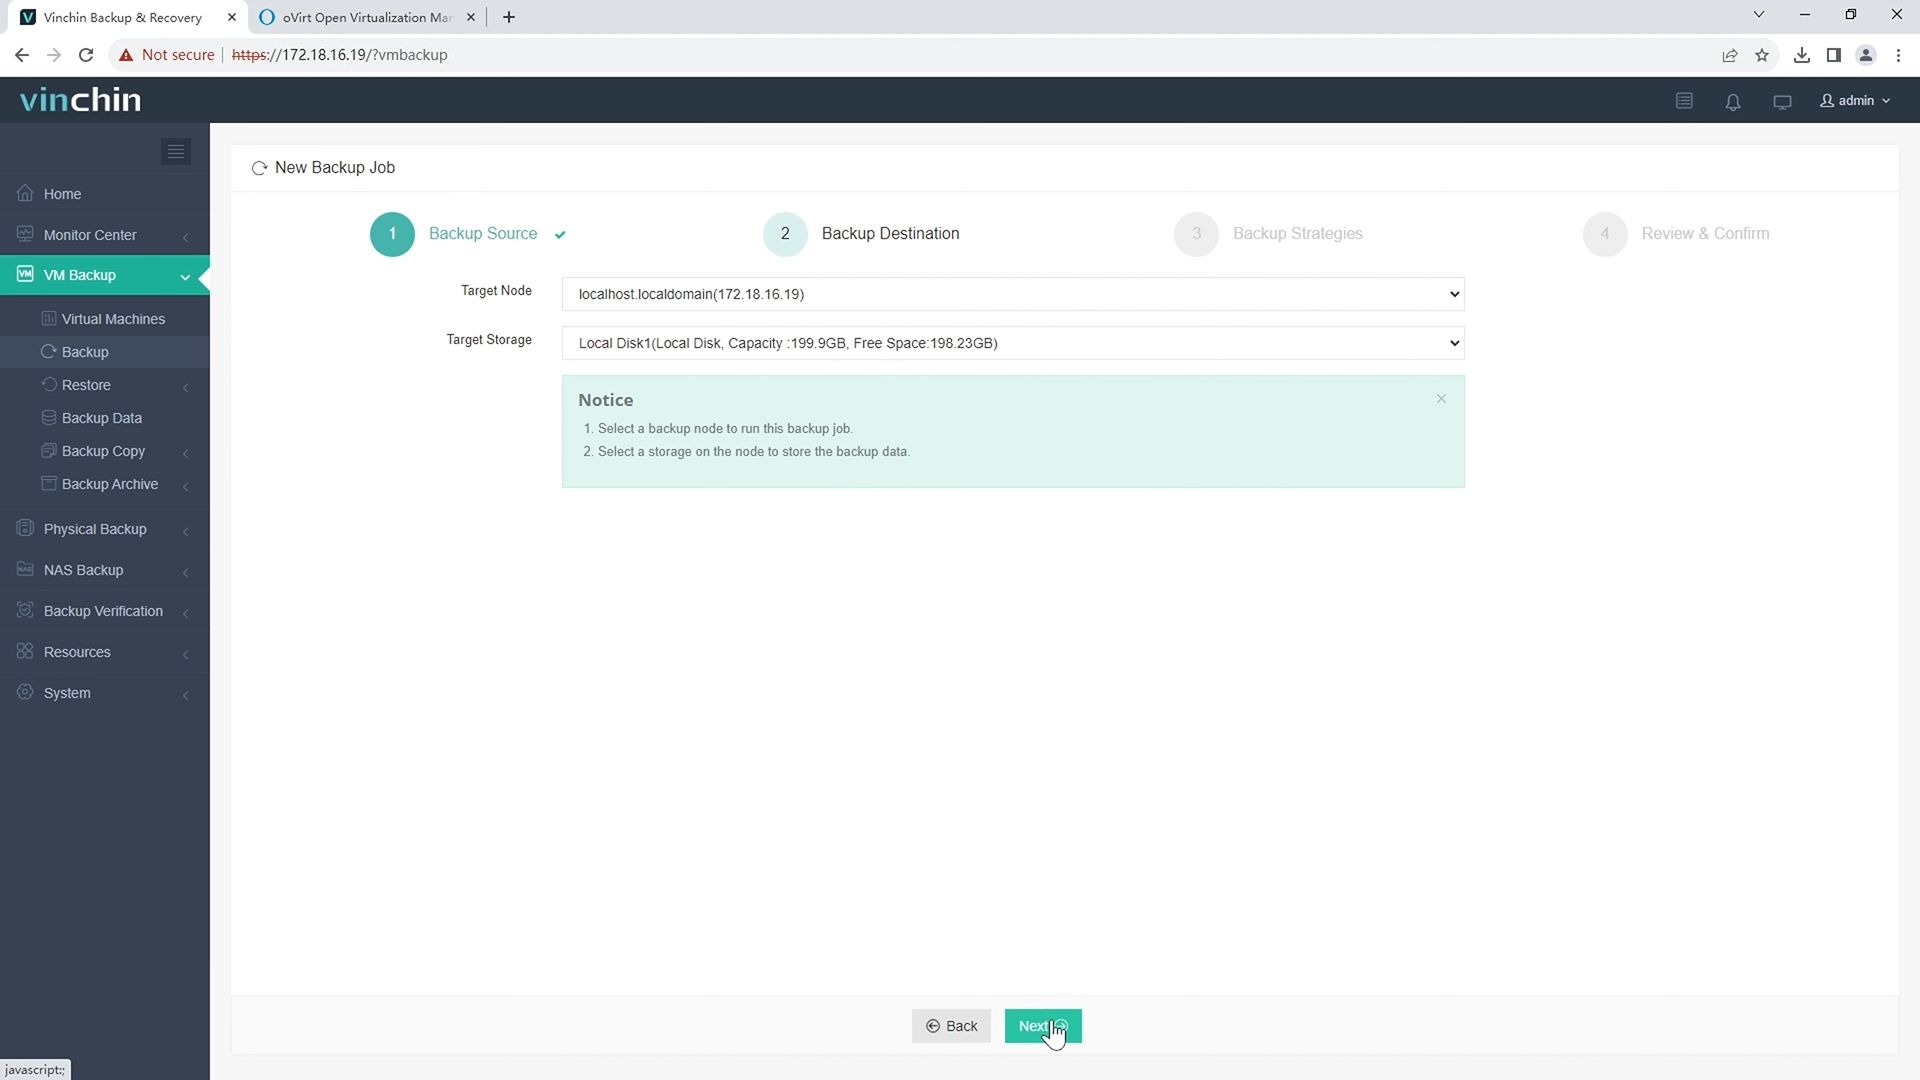
2.Then select backup destination

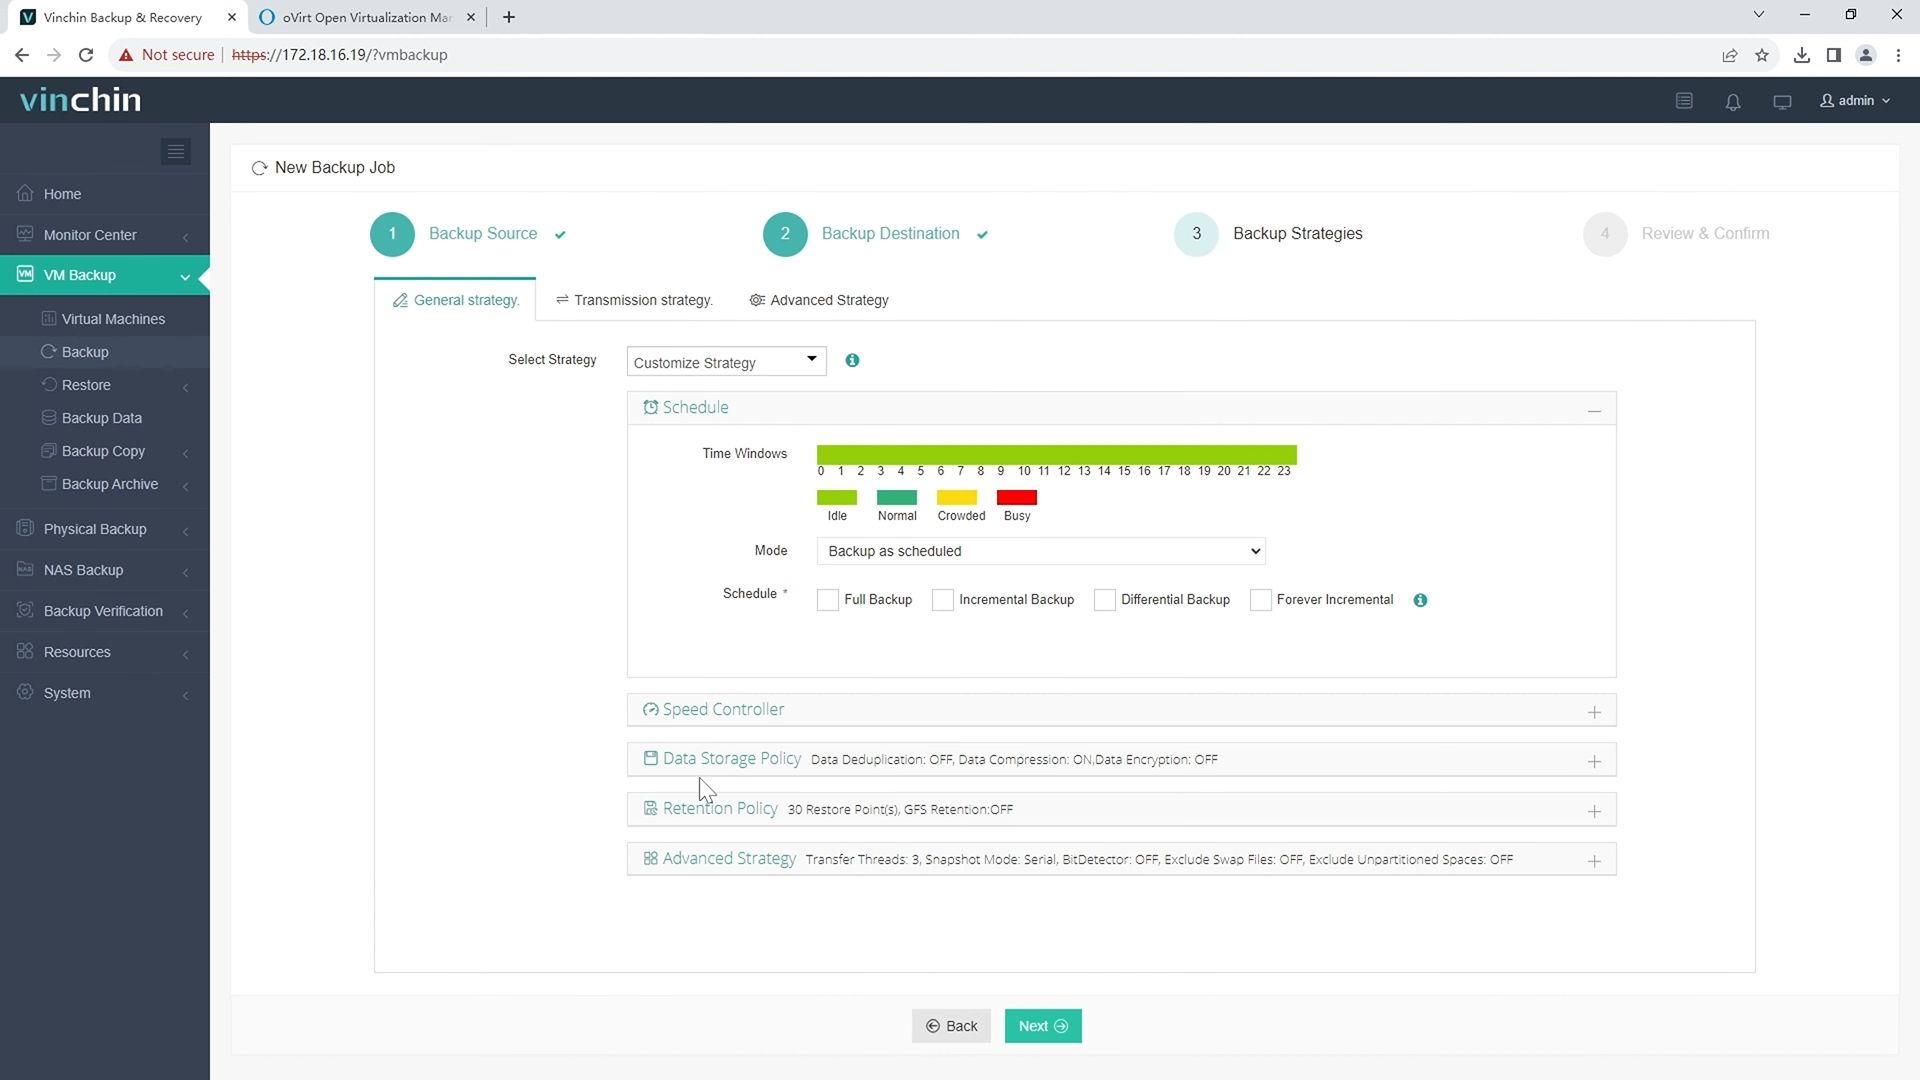
3.Select strategies

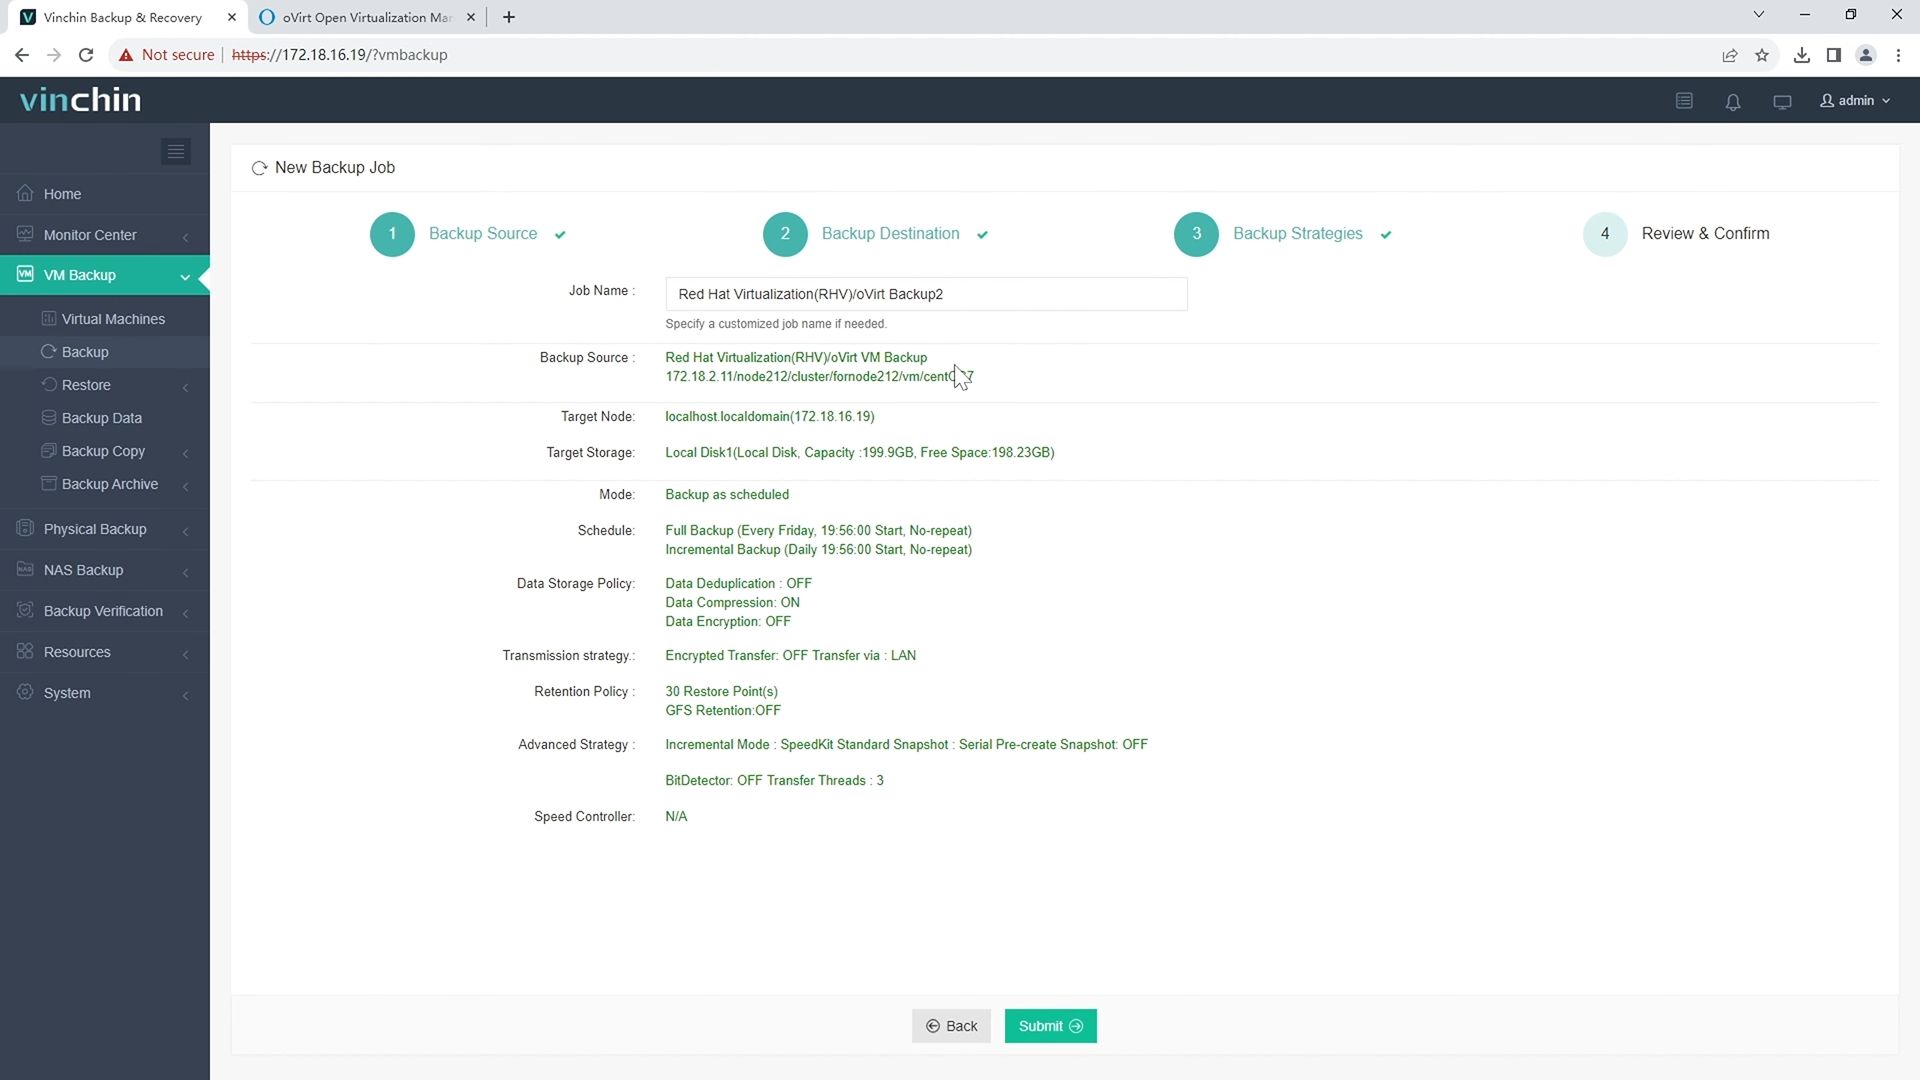
4.Finally submit the job 
Recognized globally with high customer satisfaction ratings and responsive technical support teams behind every deployment big or small—Vinchin offers a fully featured free trial valid for 60 days so you can experience effortless deployment firsthand today.
Windows Instant Recovery FAQs
Q1: Can I safely test risky patches using instant recovery without harming my live environment?
A1: Yes—spin up isolated clones via instant recovery validate changes thoroughly before rolling them out company-wide minimizing risk exposure every time!
Q2: What happens if I make changes inside an instantly recovered guest but forget migrating it permanently afterward?
A2: All modifications vanish once session ends unless migrated back onto production arrays beforehand preserving important updates/data securely!
Conclusion
Windows Instant Recovery gives operations teams powerful tools against downtime threats—from hardware failures through cyberattacks—with minimal disruption when seconds count most! By mastering best practices outlined above—and choosing reliable solutions like Vinchin—you’ll keep business running strong no matter what challenges arise next.
Share on:


