-
What Is Proxmox for Windows?
-
Why Use Proxmox for Windows?
-
How to Set Up a Windows VM on Proxmox?
-
How to Optimize Performance of Your Proxmox-Based Windows VMs?
-
Protect Proxmox VM with Vinchin Backup & Recovery
-
Proxmox For Windows FAQs
-
Conclusion
Running Windows on Proxmox is a smart way to gain flexibility, control, and efficiency in your IT environment. Whether you need to deploy new Windows virtual machines or migrate existing systems into a modern platform, Proxmox offers powerful tools to get the job done right. Let's walk through how you can use proxmox for windows—from basic setup to advanced optimization.
What Is Proxmox for Windows?
Proxmox Virtual Environment (Proxmox VE) is an open-source virtualization solution that lets you run multiple operating systems—including all major versions of Windows—as virtual machines on a single server or cluster. Using proxmox for windows means hosting your critical Windows workloads inside highly manageable VMs with centralized control over resources like storage and networking via an easy web interface.
Why Use Proxmox for Windows?
Why do so many IT teams choose proxmox for windows? First, it's cost-effective since it's open source with no per-VM licensing fees. Second, it supports enterprise-grade features such as live migration between hosts, high availability clustering, snapshots for quick rollback, and flexible resource allocation—all crucial when managing business-critical Windows servers or desktops at scale. With proper drivers installed (like VirtIO), performance is excellent even under heavy load.
How to Set Up a Windows VM on Proxmox?
Setting up a new Windows VM in Proxmox is straightforward if you follow each step carefully—and pay attention to details that affect stability or speed later on.
First upload both your desired Windows ISO image (such as Win11_English_x64.iso) and the VirtIO drivers ISO (virtio-win.iso) into your chosen storage pool using the Upload button within the Storage view of the web console.
Next click Create VM at the top right corner of your dashboard; give your VM a clear name in the General tab so it’s easy to identify later.
In the OS tab select your uploaded ISO under ISO image, set Type to Microsoft Windows, then pick the correct version—like 11/2022 if installing Windows 11 or Server 2022.
Under the System tab review defaults but enable both UEFI boot mode (UEFI) and Trusted Platform Module (TPM) if deploying recent versions like Windows 11 which require them; add TPM by clicking Add > TPM State, set version to v2.0, then assign EFI disk storage as prompted.
Move to the Disks tab: set bus/device type as SCSI (for best compatibility), cache mode as write back (for speed), enable discard if using SSDs (for TRIM support), choose disk size based on workload needs—format should remain QEMU image format (qcow2).
Assign CPU cores in the CPU tab by setting type as host; allocate enough cores based on expected usage patterns but avoid overallocation which can hurt performance cluster-wide. In the Memory tab specify RAM size—at least 4GB recommended for modern desktop/server editions of Windows but adjust higher if needed by applications inside this VM.
For networking go to the Network tab: select model as VirtIO (paravirtualized) unless supporting legacy OSes where e1000 may be safer; VirtIO gives best throughput once drivers are loaded during install process below.
On reaching the final confirmation screen uncheck “Start after created.” After creation completes visit your VM’s hardware page; click Add > CD/DVD Drive then attach your VirtIO ISO here too so drivers are available during install phase next time you boot this VM up!
Now start up your new VM from its attached ISOs—the installer launches just like physical hardware would! When asked where to install select Load driver then browse into appropriate folder inside VirtIO ISO (vioscsi\w11\amd64 works well for most Win11 installs; use vioscsi\2k22\amd64 if doing Server 2022). Repeat this process when prompted about network adapters (NetKVM\w11\amd64). If drivers fail due to signature enforcement errors in older OSes press Shift+F10 at installer window then run bcdedit /set testsigning on before retrying driver load step again.
Once installation finishes log into newly deployed system; open File Explorer navigate into mounted VirtIO ISO again then run virtio-win-gt-x64.msi package which loads all remaining device drivers automatically including balloon service agent if enabled below!
With these steps complete you now have a fully functional proxmox for windows deployment ready for further tuning or production use!
How to Optimize Performance of Your Proxmox-Based Windows VMs?
After initial setup there are several ways operations administrators can boost reliability or speed of their proxmox-for-windows deployments:
Start by tuning disk input/output settings: For newer versions of Proxmox (7.4+), enabling async mode via io_uring improves throughput especially under heavy loads—edit /etc/pve/qemu-server/[VMID].conf, find lines referencing disks like scsi0, append io_uring=1 at end of line then restart affected VM so changes take effect immediately.
Consider CPU pinning when running latency-sensitive apps: Assign dedicated processor cores either through command line using taskset utility inside guest OS or by specifying affinity directly within Proxmox configuration files—this ensures consistent compute resources aren’t shared unpredictably across busy hosts.
Enable dynamic memory management (“ballooning”) by toggling balloon option within Hardware settings panel (balloon=1) plus installing corresponding balloon driver from VirtIO package inside guest OS itself—this allows hypervisor layer flexibility reallocating RAM between VMs based upon actual demand rather than static assignment alone.
Finally always keep both QEMU guest agent services updated along with latest stable release branch of VirtIO drivers themselves since upstream bug fixes often resolve subtle compatibility glitches seen only under certain workloads or kernel versions.
These optimizations help ensure every proxmox-for-windows instance runs smoothly even during peak business hours!
Protect Proxmox VM with Vinchin Backup & Recovery
To meet demanding backup requirements in environments running proxmox for windows, Vinchin Backup & Recovery stands out as a professional enterprise-level solution supporting over 15 mainstream virtualization platforms—including prioritized support for Proxmox VE alongside VMware, Hyper-V, oVirt, OLVM, RHV, XCP-ng, XenServer, OpenStack, ZStack and more.
Vinchin Backup & Recovery delivers robust protection through essential features such as incremental backup strategies, CBT fast backups where supported, granular restore capabilities down to individual files/emails/objects, efficient data deduplication and compression technologies that reduce storage costs significantly, and secure data encryption throughout transmission and storage. These combined functions ensure reliable disaster recovery readiness while optimizing resource utilization across large-scale deployments.
The intuitive web console makes safeguarding your environment simple:
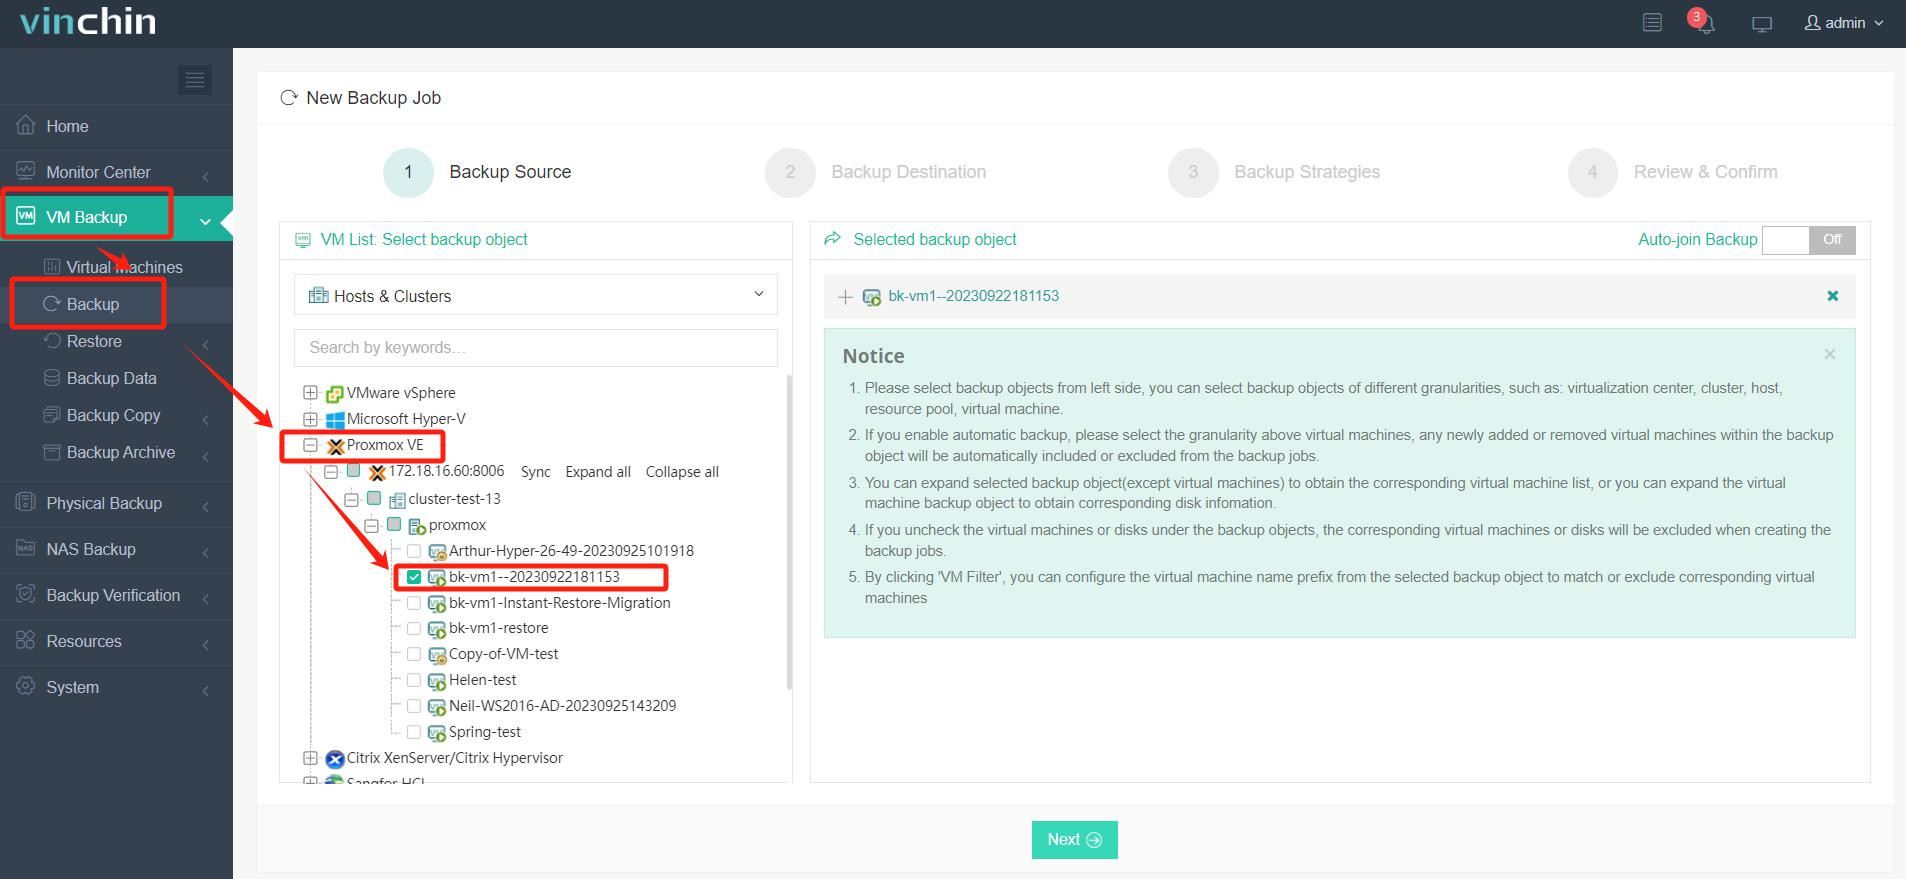
1. Select the Proxmox VM to back up;

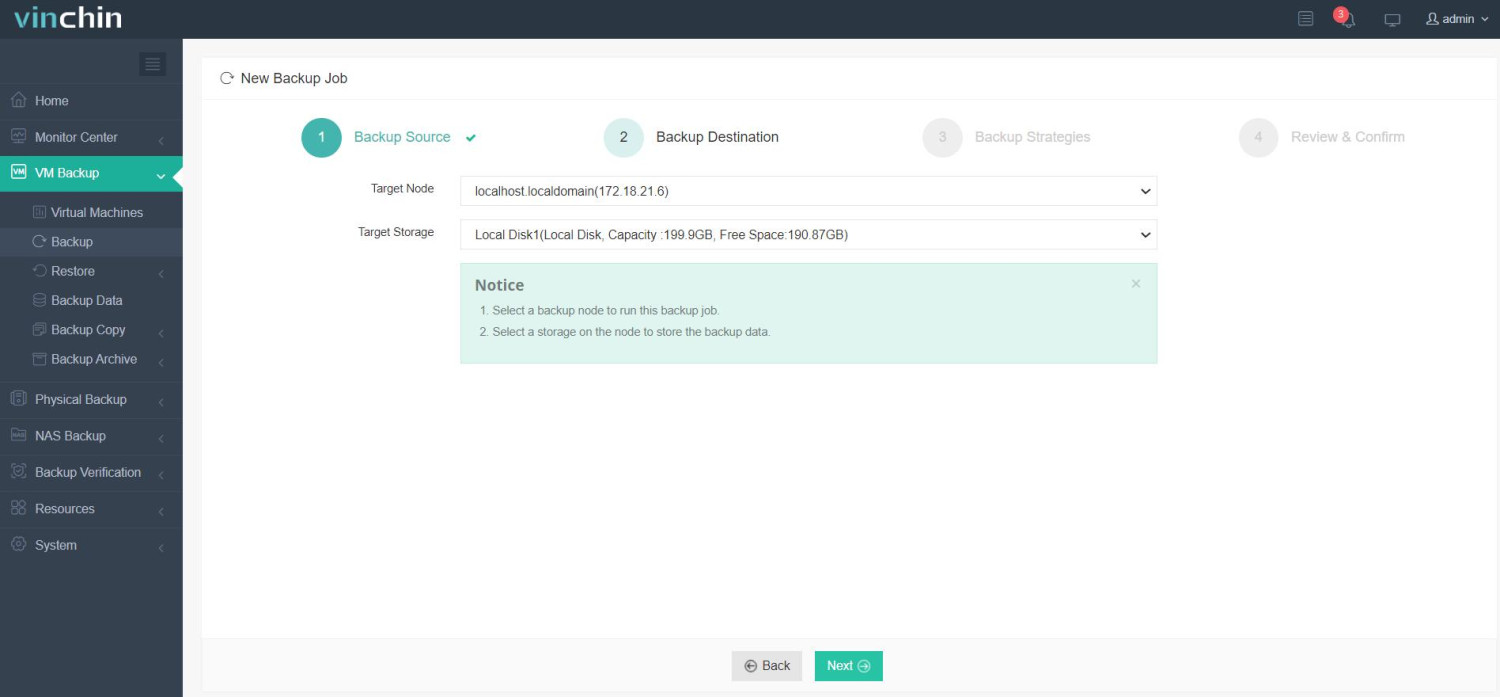
2. Choose backup storage;

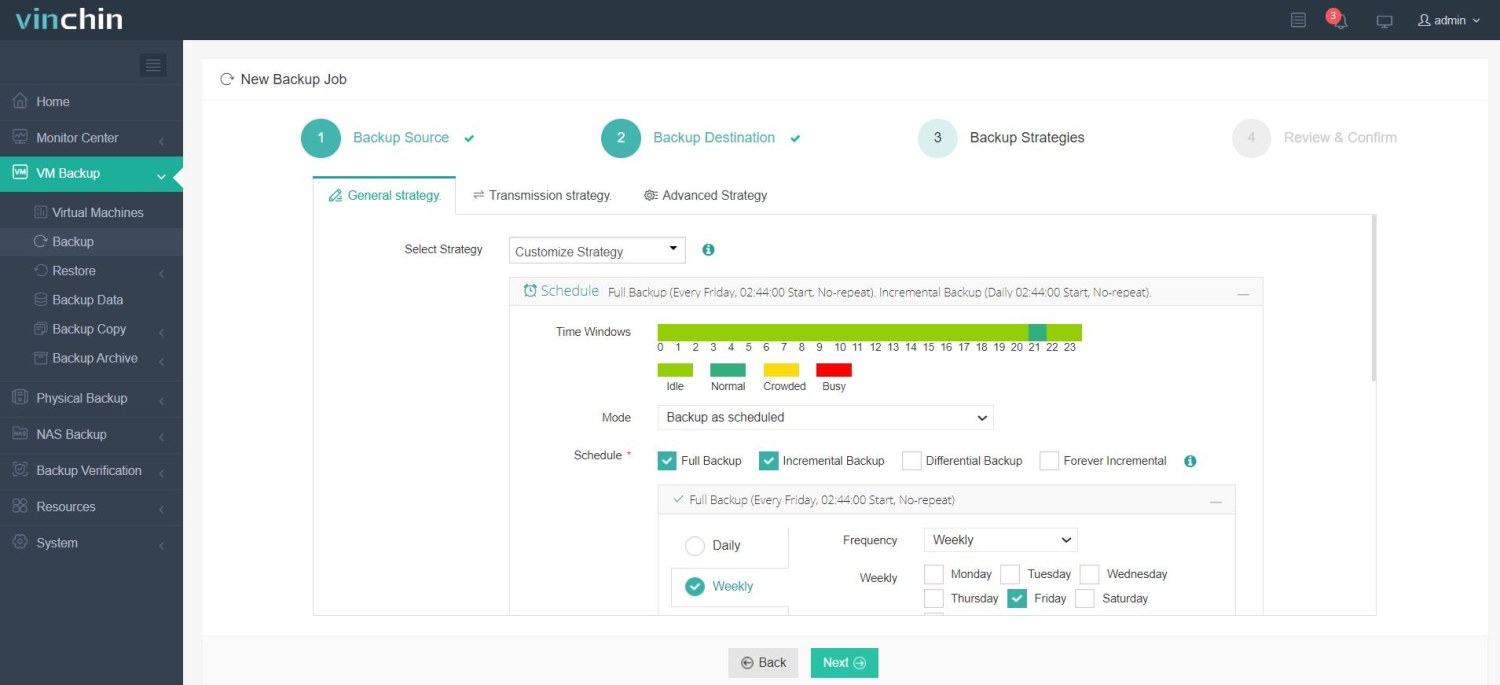
3. Configure backup strategies;

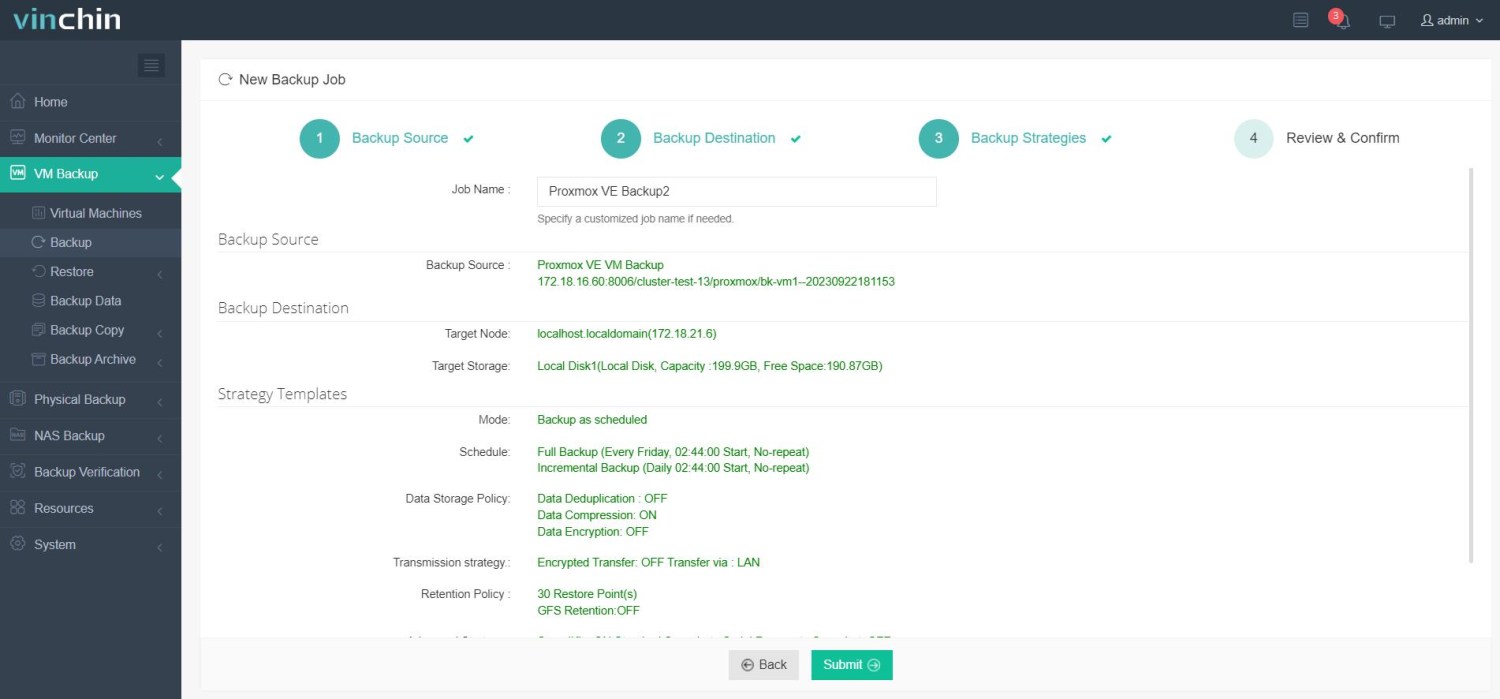
4. Submit the job.

Join thousands worldwide who trust Vinchin—recognized globally with top ratings—for comprehensive enterprise data protection. Start today with a risk-free 60-day full-featured trial; click below to download instantly!
Proxmox For Windows FAQs
Q1: Can I run legacy applications that require older network adapters?
A1: Yes—you can switch network model from VirtIO back down e1000 temporarily during setup phase until compatible drivers become available inside guest OS itself later on.
Q2: What should I do if my migrated system won't activate after moving it into Proxmox?
A2: Try running slmgr /rearm in an elevated Command Prompt first—or reactivate license online/Azure AD portal per company policy guidelines next step thereafter if necessary.
Q3: How do I fix Error Code 43 after passing through my NVIDIA GPU?
A3: Disable Hyper-V integration using bcdedit /set hypervisorlaunchtype off command followed by rebooting system completely before reinstalling latest vendor-supplied device driver package anew afterward each time issue recurs unexpectedly onsite/offsite alike!
Q4: Can I restore images stored only on local USB drives instead of network shares?
A4: Yes—in Clonezilla simply select local_dev option when prompted choose correct USB device mount point continue restoration workflow normally thereafter without needing SMB/NFS connectivity present everywhere always.
Conclusion
Proxmox for windows delivers unmatched flexibility whether deploying fresh workloads migrating legacy assets optimizing resource utilization across hybrid clouds alike—all while keeping costs low thanks open-source foundation underneath everything else involved here today! Vinchin makes protecting those investments simple reliable try free trial see difference firsthand soon!
Share on:


