-
Windows Server Backup tool
-
Method:1 Using Windows Server Backup
-
Method 2: Using Wbadmin.exe
-
Method 3: Using Vinchin Backup & Recovery
-
Windows Server backup restore FAQs
-
Conclusion
Server backup and recovery is a critical step in protecting data from loss or corruption. Whether it is due to hardware failure, power outage, data corruption, human error, natural disaster, or cybercrime threats such as hacking, theft, malicious activities, etc., the data on the server may be at risk. Therefore, it is crucial to back up your Windows Server, especially for those servers that collect and provide important information.
In this article, there are three simple yet effective methods of Windows Server backup and recovery. Whether you utilize the built-in Windows Server Backup tool or opt for a third-party, multi-functional server backup solution, these methods can help you easily realize the security of your server data.
Windows Server Backup tool
Windows Server Backup is a built-in tool provided by Microsoft designed to perform basic backup and recovery tasks for installed servers. It supports backing up an entire server, selected volumes, system state, individual files or folders, and bare metal recovery. Backup contents can be restored to a NAS or other specified location. Here's how to install Windows Server Backup:
1. In the Server Manager, start the Add Roles and Features Wizard and click Next on the Before You Begin page.
2. In the Installation Type section, leave the Role-based and Feature-based installations as default and click Next.
3. Click Next on both Server Selection and Server Roles pages.
4. In the Features section, choose Windows Server Backup and hit Next.
5. On the Confirmation page, click Install. Click Close after the installation.
Method:1 Using Windows Server Backup
Windows Server Backup is a built-in backup tool for Windows Server systems, suitable for backing up the entire server, selected volumes, system state, individual files or folders. With this tool, you can easily store your backup data to a local drive or a remote shared folder for reliable data protection and recovery.
Backup using Windows Server Backup
1. Launch Server Manager> Tools> Windows Server Backup. In the Windows Server, click Start> Administrative Tools> Windows Server Backup.
2. Enter the Backup Operator credentials and click OK if you are asked in the User Account Control dialog.
3. Choose Local Backup.
4. Click Backup Once in the Action section to open the wizard.
5. On the Backup options page, select Different options> Next.
6. On the Select backup configuration page, select Full server (recommended)> Next.
7. On the Specify destination type page, choose Local drives or Remote shared folder> Next.
8. On the Select Backup Destination page, specify the backup location.
9. On the Confirmation page, click Backup and wait for the process. Click Close.
Recovering using Windows Server Backup
1. Start Windows Server Backup and select Local Backup.
2. On the Action page, choose Recover… to open the wizard.
3. On the Getting Started page, choose the source backup location and click Next.
4. On the Specify Location Type page, choose Local drives or Remote shared folder and click Next.
5. On the Select Backup Date page, choose the data of a backup to use for recovery and click Next.
6. On the Select Recovery Type page, select Application and click Next.
7. On the Select Items to Recover page, choose Exchange. You can click View Details to see the components and select Do not perform a roll-forward recovery of the application database if it’s a recently created backup.
8. On the Specify Recovery Option page, choose the destination location and click Next.
9. On the Confirmation page, see all the settings and click Recover. Then Close the wizard.
Method 2: Using Wbadmin.exe
Wbadmin.exe is a command line tool for Windows that supports backup and recovery of operating systems, volumes, files/folders and applications. The command line interface gives you more flexibility in performing backup and and restore windows server tasks.
Backup using Wbadmin.exe
Start an elevated command prompt to enter the commands and press ENTER.
wbadmin start backup -backuptarget:<Drive_letter_to store_backup>: -include:<Drive_letter_to_include>:
Recovering using Wbadmin.exe
You must be a member of the Backup Operators/ Administrators group, or have the proper permissions to perform a recovery.
Right-click the command prompt and select Run as administrator:
wbadmin start recovery -version:<VersionIdentifier> -items:{<VolumesToRecover> | <AppsToRecover> | <FilesOrFoldersToRecover>} -itemtype:{Volume | App | File} [-backupTarget:{<VolumeHostingBackup> | <NetworkShareHostingBackup>}] [-machine:<BackupMachineName>] [-recoveryTarget:{<TargetVolumeForRecovery> | <TargetPathForRecovery>}] [-recursive] [-overwrite:{Overwrite | CreateCopy | Skip}] [-notRestoreAcl] [-skipBadClusterCheck] [-noRollForward] [-quiet]
Method 3: Using Vinchin Backup & Recovery
Vinchin Backup & Recovery provides powerful VM backup and data replication with support for full, incremental and snapshot backups to help you ensure high availability and continuity of your business. With its data replication feature, you can easily migrate virtual machines and data to ensure stable business operations.
Vinchin's solution is compatible with a wide range of Windows versions, including Windows 7 through Windows 11, as well as every version of Windows Server (2003/2003 R2, 2008/2008 R2, 2012/2012 R2, 2016, 2019, and 2022). You can configure automated backup tasks and select backup types as required. In addition, Vinchin supports data reduction technology, which effectively reduces the storage space for backup data. For defense against malware and ransomware threats, Vinchin also offers anti-ransomware backup storage protection, providing extra security for your backup data.
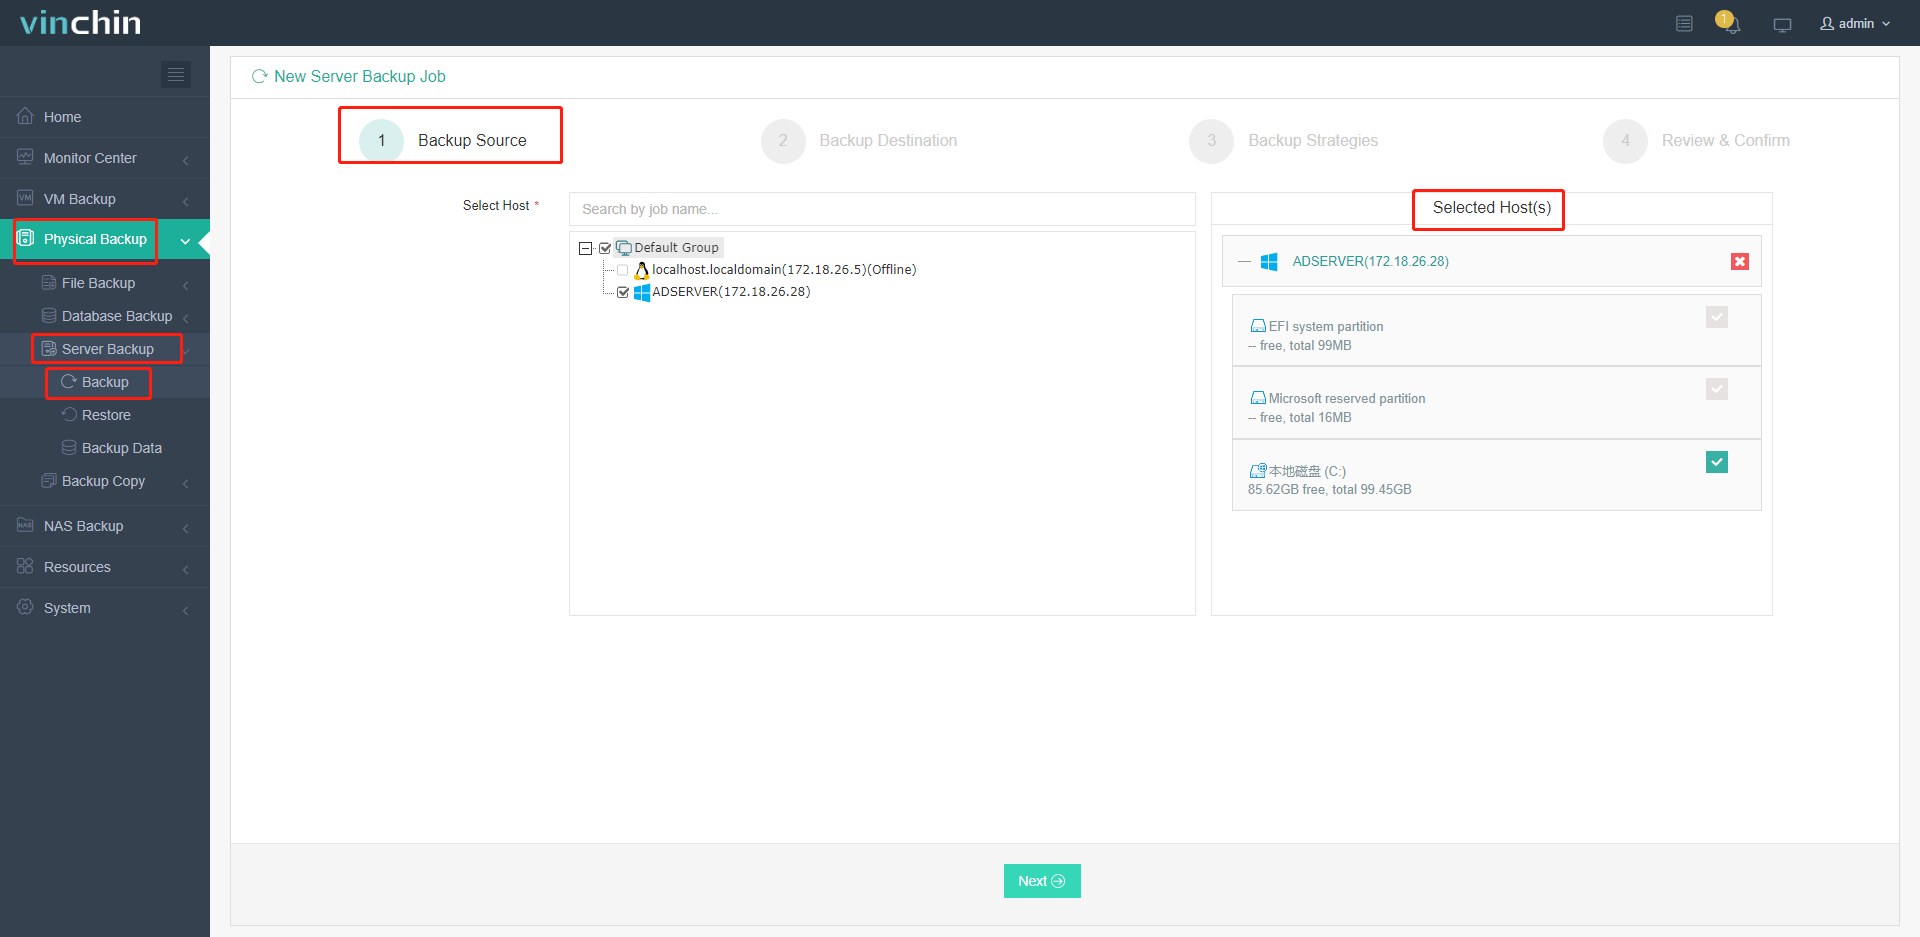
Backup the server
1.Just select the server on the host

2.Then select backup destination

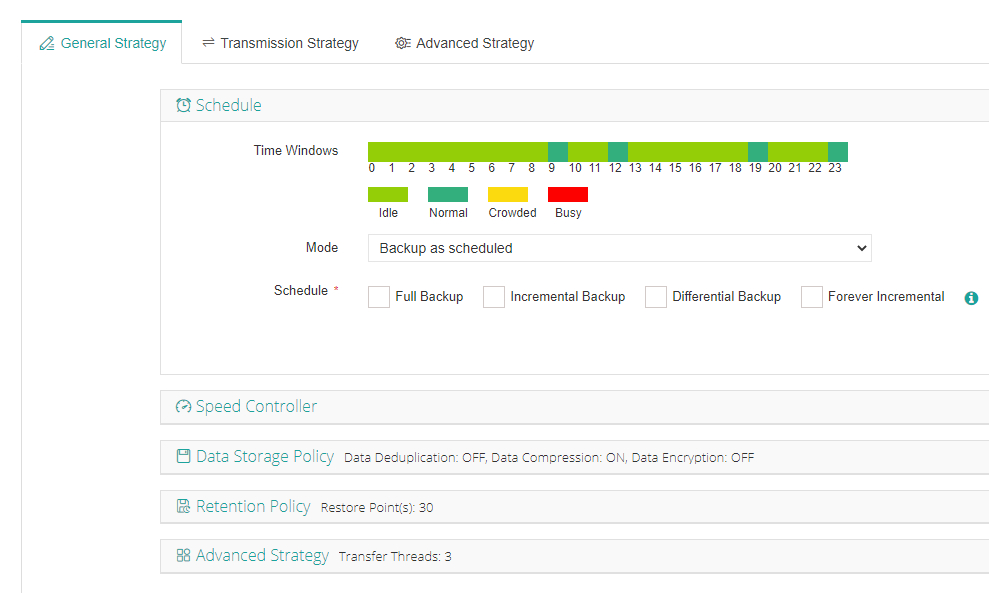
3.Select strategies

4.Finally submit the job
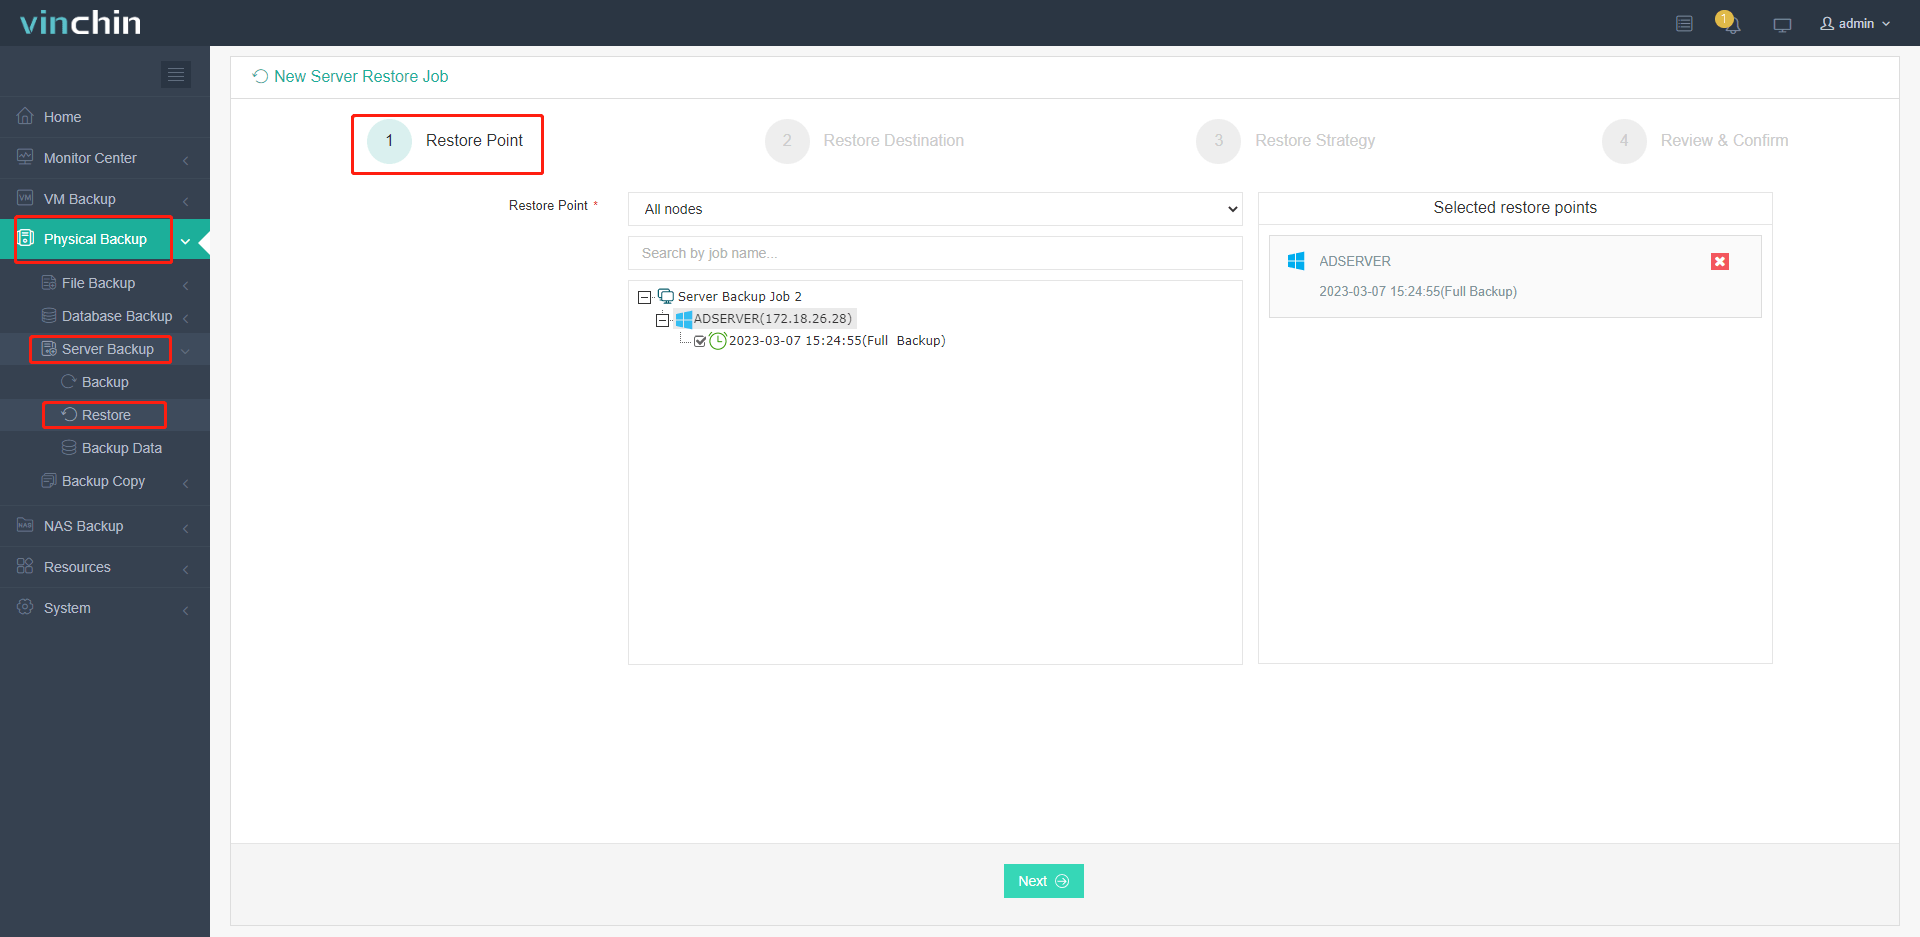
Recovering the server
1. Just select the server you want to restore

2.Then select restore destination

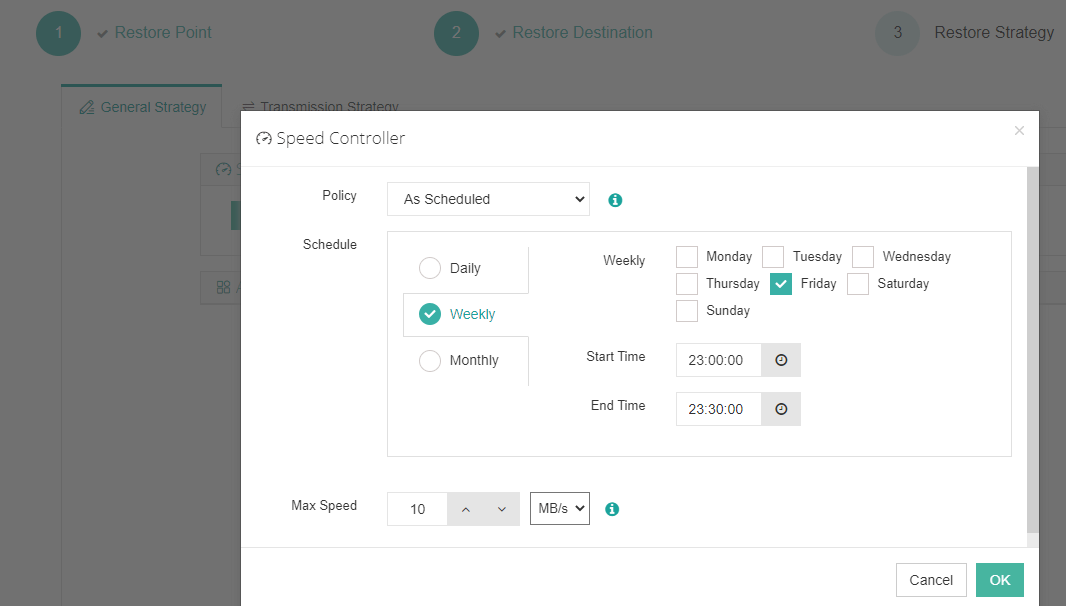
3. Select strategies

4. Review and confirm all the details
Vinchin offers a free 60-day trial so that users can experience its powerful features in a real-world environment. For more information, please contact Vinchin directly or consult with one of our local partners.
Windows Server backup restore FAQs
Q1: Can I restore a backup to different hardware?
A1: Yes, you can restore a backup to different hardware using the Bare Metal Recovery (BMR) option. However, you might need to provide drivers for the new hardware during the recovery process.
Q2: Can I perform a bare metal recovery if the server won’t boot?
A2: Yes, you can perform a bare metal recovery using the Windows Server installation media. Boot from the media, select **Repair your computer**, and then choose to restore from a backup.
Conclusion
Easily secure your Windows Server with three effective backup methods: Windows Server Backup, Wbadmin.exe, and Vinchin Backup & Recovery, ensuring reliable data protection and seamless recovery for your business.
Share on:


