-
Differences between Bridged Mode and NAT Mode
-
How to configure a static IP address in a VMware VM?
-
Backing up VMware virtual machines with Vinchin
-
Virtual machine ip address FAQs
-
Conclusion
When setting up a virtual machine environment using VMware, network configuration plays a crucial role in ensuring that the VM can communicate properly with external networks and the host system. Depending on specific use cases, VMware offers several types of network connections, among which Bridged Mode and NAT (Network Address Translation) Mode are the most commonly used. This guide explains how to configure a static IP address for a Linux virtual machine under both network modes, helping to establish a more stable and manageable networking environment. Whether used for development, testing, or service deployment, mastering IP configuration in virtual machines can greatly enhance the efficiency and control of your virtualization setup.
Differences between Bridged Mode and NAT Mode
In VMware, Bridged Mode and NAT (Network Address Translation) Mode are two commonly used network connection types. Each works differently and suits specific scenarios. Understanding their differences helps you choose the most appropriate network configuration based on your needs.
Bridged Mode
How it works: The virtual machine connects directly to the local area network (LAN) through the host's physical network adapter. It behaves like an independent physical device on the same network.
IP Address Assignment: Assigned by the LAN's DHCP server or manually configured as a static IP.
Network Visibility: The VM is visible to other devices on the LAN and can access or be accessed by them.
Best suited for:
Virtual machines running services (e.g., web or database servers)
Scenarios where the VM needs to communicate directly with other devices
Simulating real-world networking environments
Note: May not work properly on certain wireless or restricted networks.
NAT Mode (Network Address Translation)
How it works: The virtual machine accesses external networks using the host’s IP address via a virtual router provided by VMware, similar to how devices connect to the internet through a home router.
IP Address Assignment: Provided by VMware’s internal DHCP service (usually in the 192.168.x.x range).
Network Visibility: The VM is hidden from the LAN and cannot be directly accessed by other devices on the network.
Best suited for:
Virtual machines that only need internet access
Isolated testing or development environments
Scenarios where the host needs to communicate with the VM without exposing it to the network
Note: To access the VM from external devices (e.g., SSH), port forwarding must be configured.
How to configure a static IP address in a VMware VM?
You can configure a static IP address in a VMware virtual machine using Bridged Mode or NAT Mode. The following are detailed steps for each method.
1. Bridged Mode: Configure Static IP
Bridged mode connects the VM's virtual NIC to the host's physical NIC, allowing the VM to access the external network directly as if it were a physical machine.
Steps:
Select Bridged Mode
In VMware: Right-click the VM → Settings → Network Adapter → Select "Bridged".
Check Network Interface Name
Run the following command in the VM:ip addr
Find your network interface name (e.g.,
ens33,eth0, orens160).Edit Network Configuration File
For example, to editens33:vi /etc/sysconfig/network-scripts/ifcfg-ens33
Use the following configuration (modify values to match your network):
TYPE=Ethernet
BOOTPROTO=static
NAME=ens33
DEVICE=ens33
ONBOOT=yes
IPADDR=192.168.1.100
NETMASK=255.255.255.0
GATEWAY=192.168.1.1
DNS1=8.8.8.8
Restart Network Service
systemctl restart network
Verify Configuration
ip addr
ping 192.168.1.1        # Test gateway connectivity
ping www.google.com     # Test internet connectivity
(Optional) Disable Firewall
systemctl stop firewalld
systemctl disable firewalld
2. NAT Mode: Configure Static IP
NAT mode allows the VM to access external networks via the host using VMware’s internal NAT service (typically via VMnet8), without exposing the VM to the local LAN.
Steps:
Select NAT Mode
In VMware: Right-click the VM → Settings → Network Adapter → Select "NAT".
Check VMware NAT Network Subnet
Subnet:
192.168.182.0/24Gateway:
192.168.182.2On the host machine, go to Network and Sharing Center → VMware Network Adapter VMnet8 → check its IP settings. For example:
Edit Network Configuration File in VM
vi /etc/sysconfig/network-scripts/ifcfg-ens33
Example configuration:
TYPE=Ethernet
BOOTPROTO=static
NAME=ens33
DEVICE=ens33
ONBOOT=yes
IPADDR=192.168.182.100
NETMASK=255.255.255.0
GATEWAY=192.168.182.2
DNS1=8.8.8.8
Restart Network Service
systemctl restart network
Verify Configuration
ip addr
ping 192.168.182.2       # Test gateway
ping www.google.com      # Test internet access
(Optional) Disable Firewall
systemctl stop firewalld
systemctl disable firewalld
Agentless Backup: No need to install agents inside each VM, reducing system overhead and simplifying deployment.
Incremental Backup & CBT (Changed Block Tracking): Significantly improves backup speed and reduces storage usage.
Automated Scheduling: Set up daily, weekly, or monthly backup tasks to ensure consistent data protection.
Flexible Restore Options: Supports full VM restore, file-level restore, and instant restore for minimized downtime.
Cross-platform Support: Easily restore VMware VMs to other virtual environments if needed (V2V migration).
Centralized Management: Manage backup jobs for multiple VMware hosts and VMs from a single web-based interface.
Static IP: Use for servers needing consistent addresses (e.g., web servers, databases).
Dynamic IP: Suitable for temporary workloads (e.g., development/testing environments).
OS-Level: Add secondary IPs via network settings.
Cloud Providers: Attach multiple network interfaces or secondary IPs through the console.
Note: Provider limits may apply.
Backing up VMware virtual machines with Vinchin
Once your virtual machine is properly configured with a static IP—whether under Bridged Mode or NAT Mode—it's essential to implement a reliable backup strategy to safeguard your data and system state. This is especially important for production environments, development platforms, or critical services running inside the VM.
Vinchin Backup & Recovery provides an efficient and easy-to-use solution for backing up VMware virtual machines. Key features include:
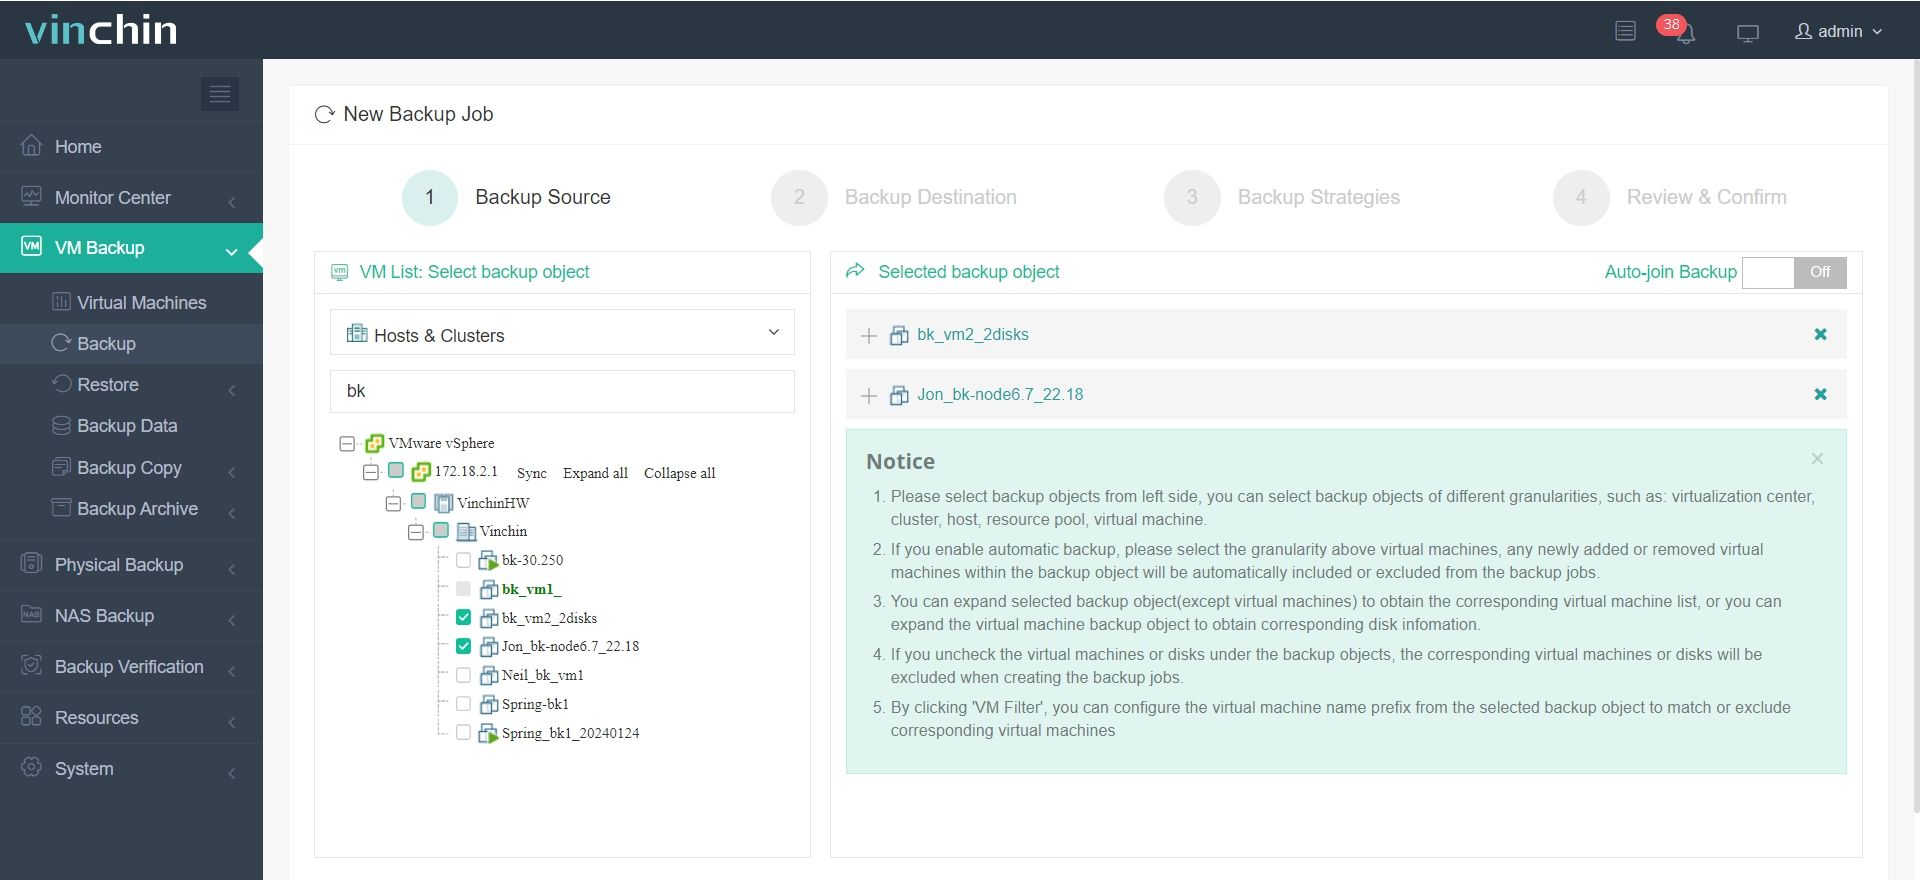
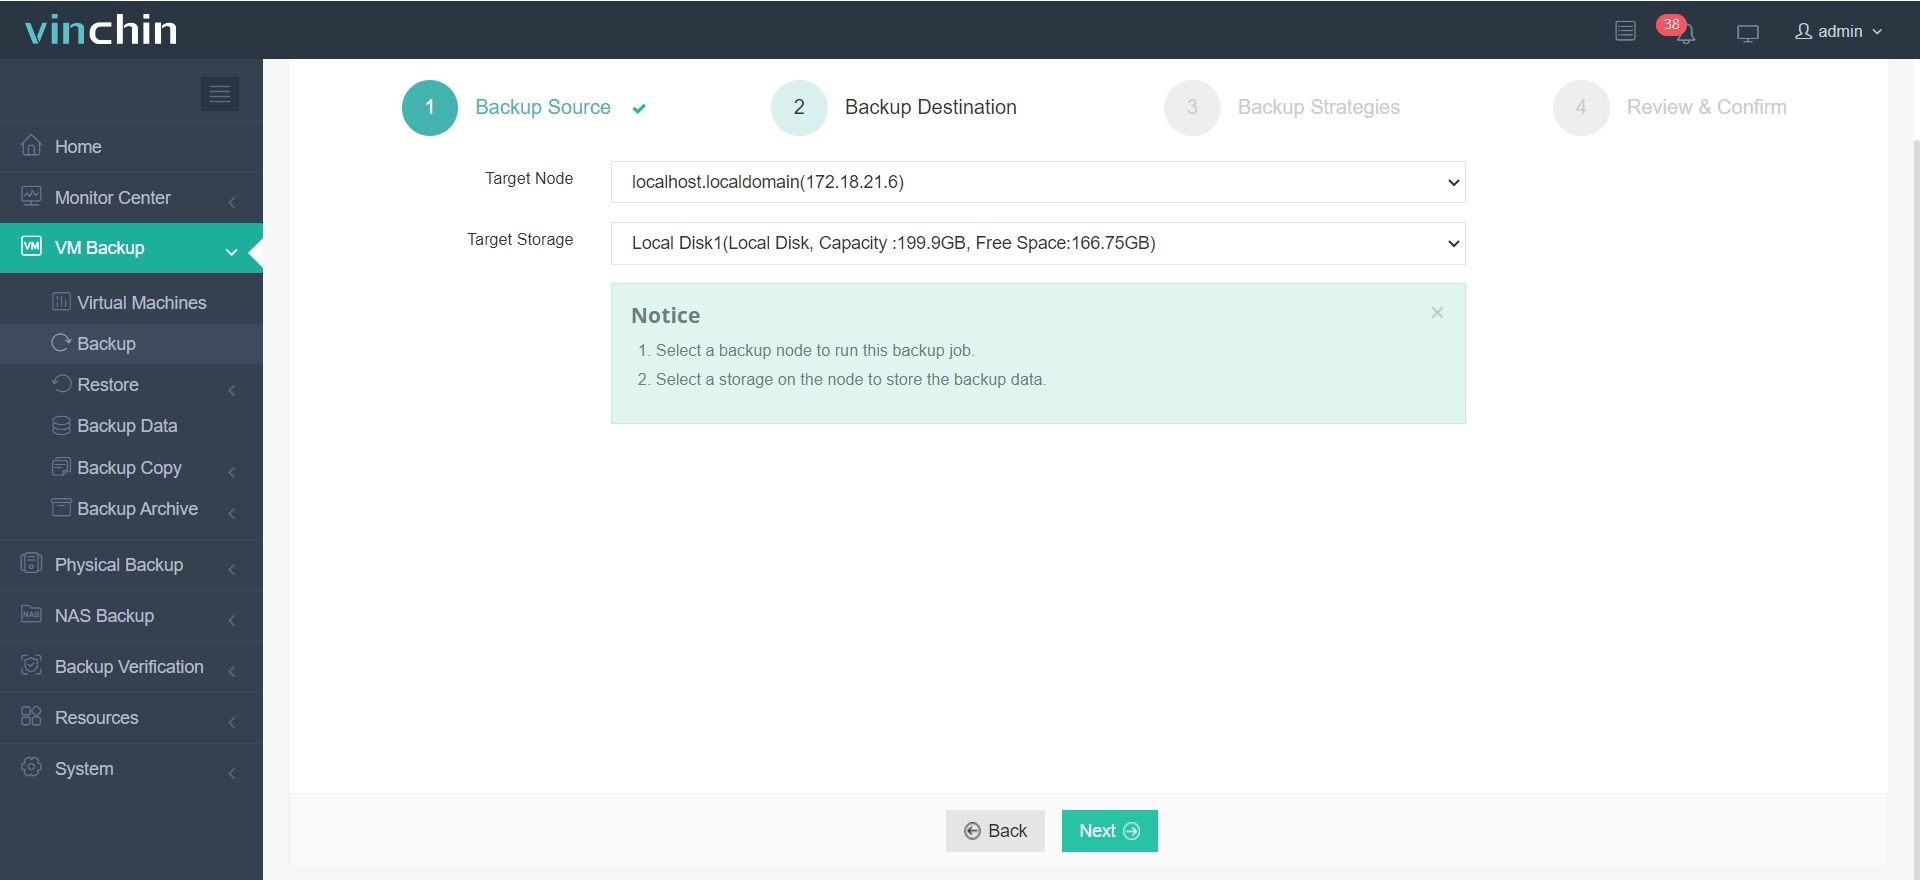
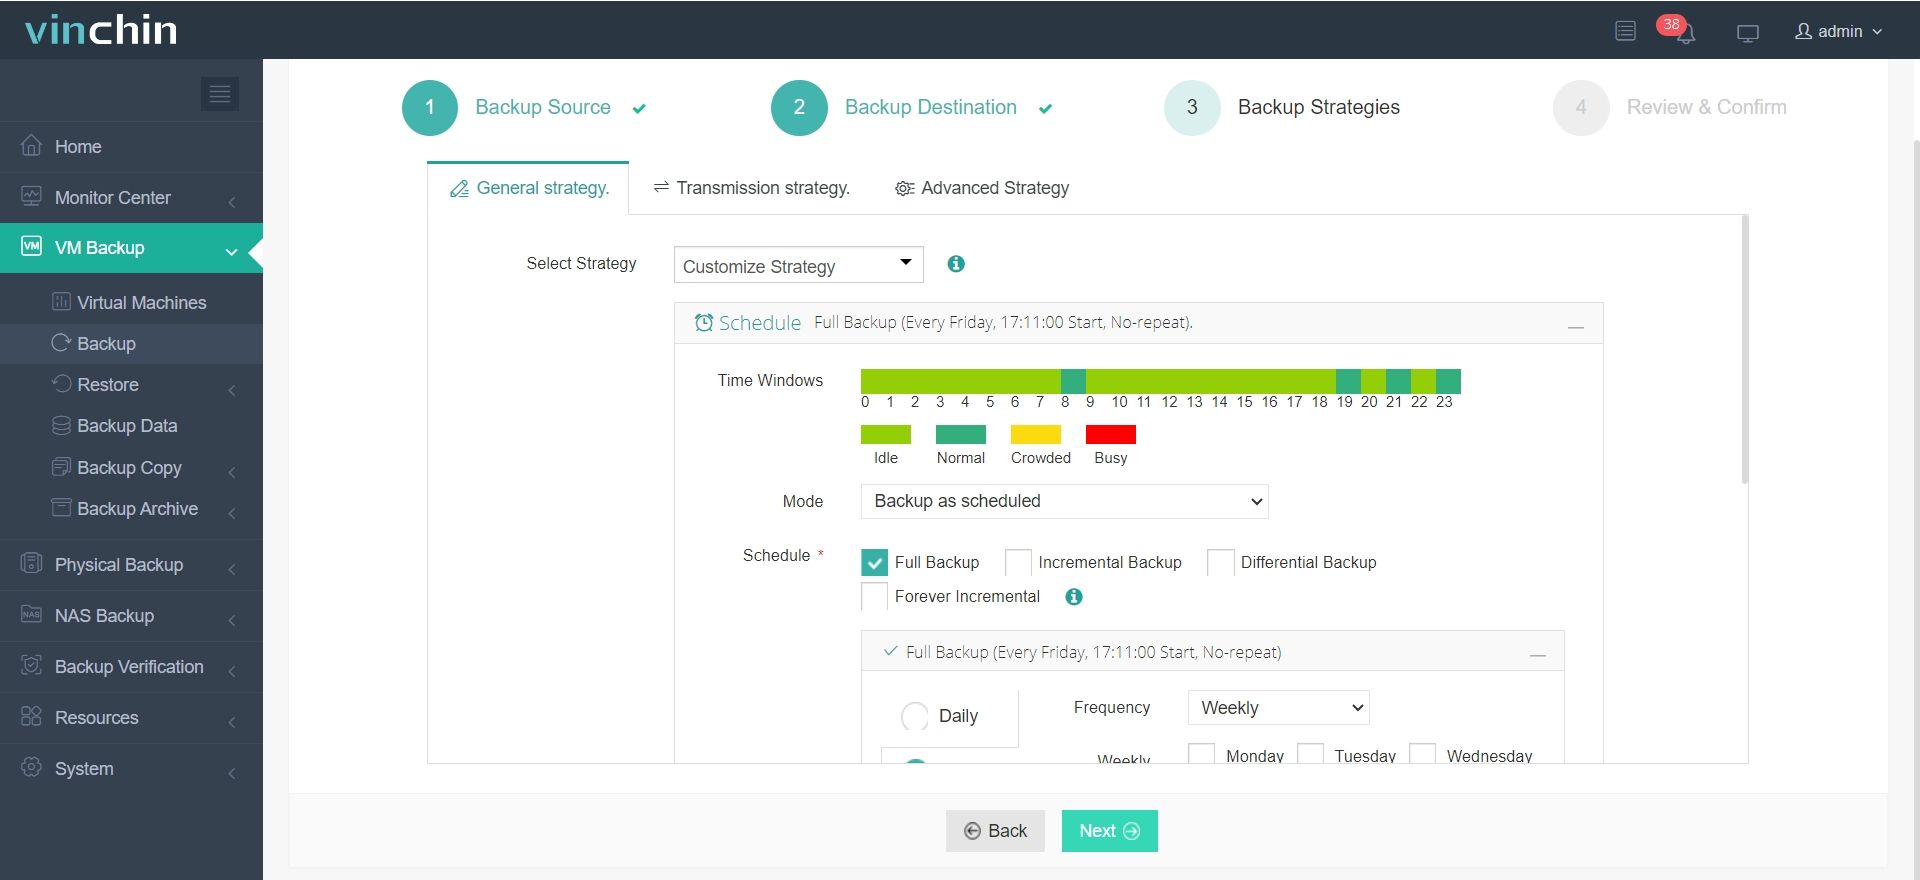
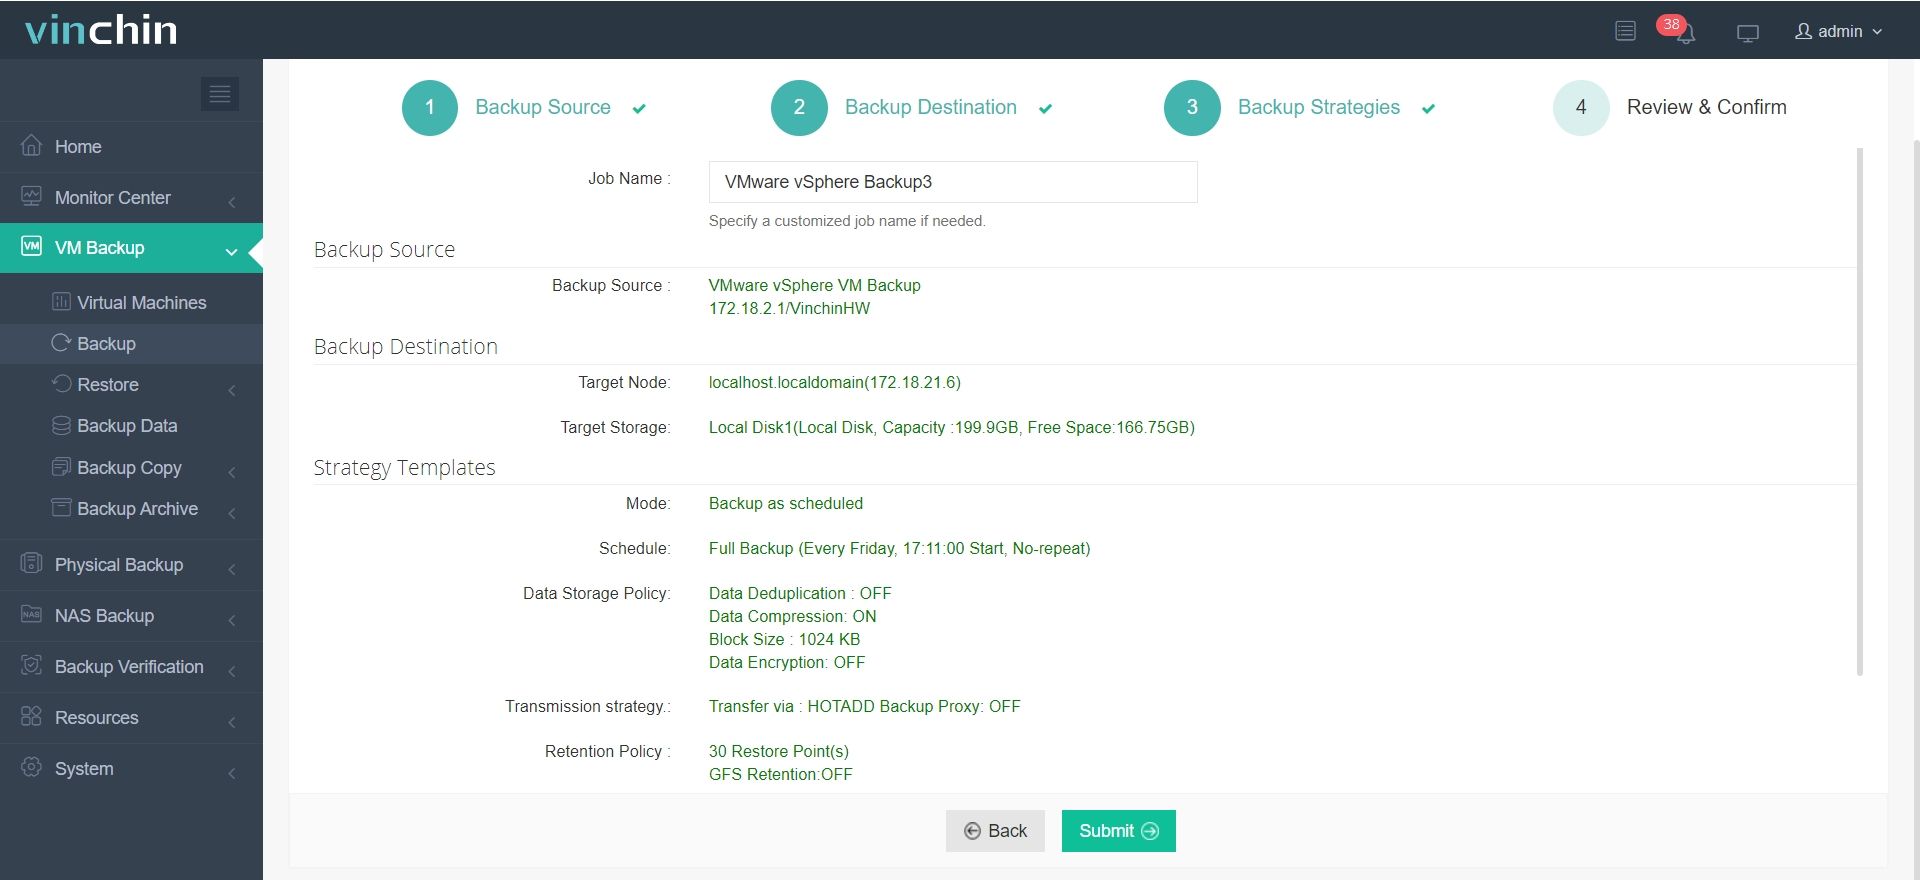
Vinchin Backup & Recovery's operation is very simple, just a few simple steps.
1.Just select VMs on the host

2.Then select backup destination

3.Select strategies

4.Finally submit the job

With Vinchin, you can build a secure and resilient virtual machine environment that stands up to unexpected failures and system issues. Whether you're running a single test VM or overseeing a complex production setup, Vinchin provides comprehensive backup and recovery tools to keep your data protected. A free 60-day trial is available, so you can evaluate its capabilities in your own environment. To learn more, feel free to reach out to the Vinchin team.
Virtual machine ip address FAQs
Q1: Should I use a static or dynamic IP for my VM?
A1:
Q2: How do I assign multiple IP addresses to a VM?
A2:
Conclusion
Proper IP configuration in VMware VMs enhances network stability and control. By understanding Bridged and NAT modes and securing your setup with reliable backup tools like Vinchin, you can ensure smooth operations across development, testing, and production environments.
Share on:


