-
Why install OPNsense on Proxmox?
-
How to install OPNsense on Proxmox?
-
Tip: Add reliable data protection for your virtual firewall
-
OPNsense Proxmox FAQs
-
Conclusion
In today's environment where network security is becoming increasingly critical, building a flexible, secure, and easy-to-manage network system is a common goal for both tech enthusiasts and enterprises. Proxmox VE is a powerful open-source virtualization platform that supports centralized management of virtual machines and containers, while OPNsense is an open-source firewall system based on FreeBSD that offers enterprise-grade security features. Deploying OPNsense on Proxmox allows users to make full use of virtualization resources and build an efficient, reliable virtual network security architecture.
Why install OPNsense on Proxmox?
Installing OPNsense Proxmox comes with several clear benefits:
Reduced hardware costs: Deploying a firewall virtually eliminates the need for separate physical devices, saving on infrastructure expenses.
High flexibility: Easily adjust resource allocations, network interfaces, and make use of snapshots and backups for easier management and maintenance.
Enterprise-level features: OPNsense offers powerful features such as traffic shaping, intrusion detection, VPN support, and bandwidth monitoring, suitable for home labs, SMBs, and enterprise environments.
Centralized management: Running OPNsense alongside other services on Proxmox allows for unified control and monitoring, increasing overall system efficiency.
Ideal for testing and learning: Perfect for network engineers, students, and hobbyists to set up test environments and learn more about networking and security.
How to install OPNsense on Proxmox?
Step 1: Download the OPNSense Image
Use the terminal to download the latest OPNSense image (example version: 24.1):
VER=24.1
wget https://mirror.ams1.nl.leaseweb.net/opnsense/releases/$VER/OPNsense-$VER-nano-amd64.img.bz2
Extract the image file:
bunzip2 OPNsense-$VER-nano-amd64.img.bz2
(Optional) Rename the extracted file for convenience:
mv OPNsense-$VER-nano-amd64.img OPNsense-nano-amd64.img
Resize the image (e.g., expand to 30GB):
qemu-img resize -f raw ./OPNsense-nano-amd64.img 30G
Step 2: Create the OPNSense Virtual Machine
Set the basic parameters:
VM_NAME="OPNSense"
VM_ID=$(pvesh get /cluster/nextid)
RAM=4096
CORES=2
BRIDGE1=vmbr0     # External network interface
BRIDGE2=vmbr1     # Internal LAN interface
IMAGE="./OPNsense-nano-amd64.img"
STORAGE="local"
Create the virtual machine:
qm create $VM_ID \
  --name $VM_NAME \
  --memory $RAM \
  --cores $CORES \
  --cpu cputype=kvm64 \
  --net0 e1000,bridge=$BRIDGE1 \
  --net1 e1000,bridge=$BRIDGE2 \
  --scsihw virtio-scsi-pci \
  --numa 1
Import and attach the disk:
qm importdisk $VM_ID $IMAGE $STORAGE
qm set $VM_ID --virtio0 $STORAGE:vm-$VM_ID-disk-0.raw
Configure the VM boot parameters:
qm set $VM_ID --serial0 socket --vga serial0
qm set $VM_ID --boot c --bootdisk virtio0
qm set $VM_ID --onboot 1
Step 3: Start and Configure OPNSense
Start the virtual machine:
qm start $VM_ID
Open the Proxmox Web UI and access the VM console. On the first boot, the system will automatically enter the OPNSense configuration screen.
Default LAN IP: 192.168.1.1/24
You can manually configure the WAN/LAN interfaces, set the admin password, and enable the web interface from the terminal.
Tip: Add reliable data protection for your virtual firewall
After deploying OPNsense on Proxmox VE, establishing a reliable backup plan is essential to protect your virtual firewall and ensure rapid recovery in case of system failure, misconfiguration, or other unexpected events.
A professional solution like Vinchin Backup & Recovery offers full support for the Proxmox VE platform and helps simplify data protection. With agentless backup, file-level recovery, and cross-platform restore, Vinchin makes it easy to manage and recover your virtual environment efficiently.
Moreover, Vinchin supports data replication and automated VM migration, making it an excellent choice for maintaining high availability and business continuity, especially in dynamic or production environments.
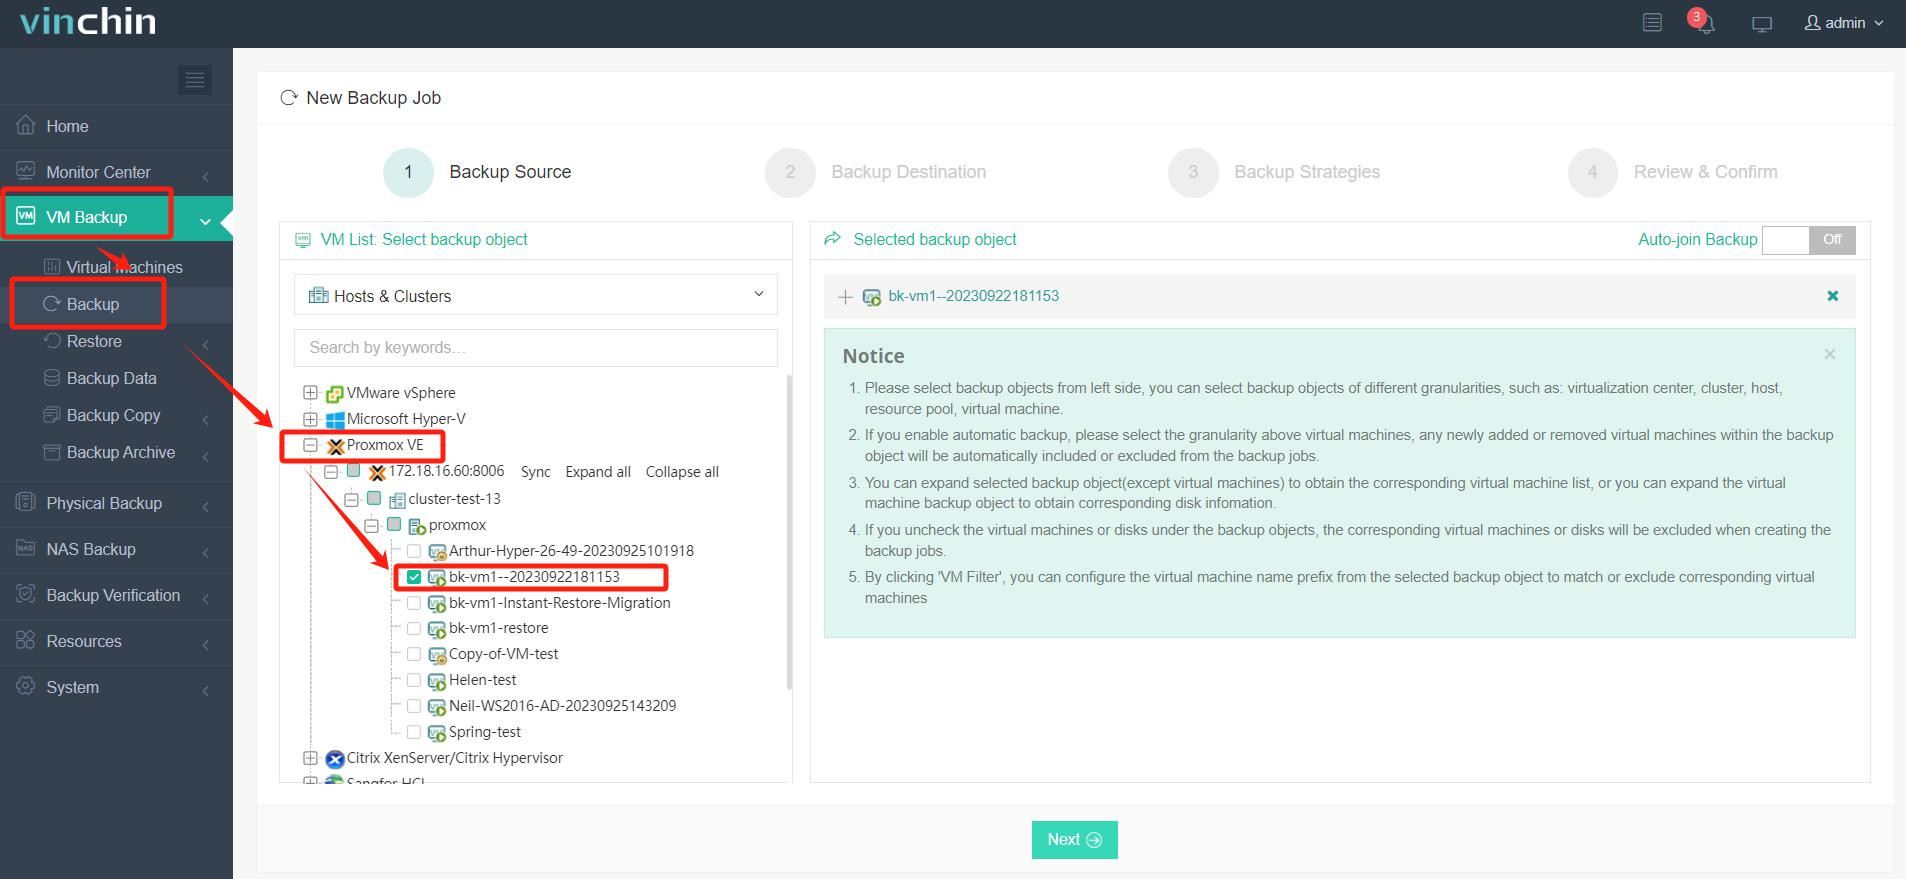
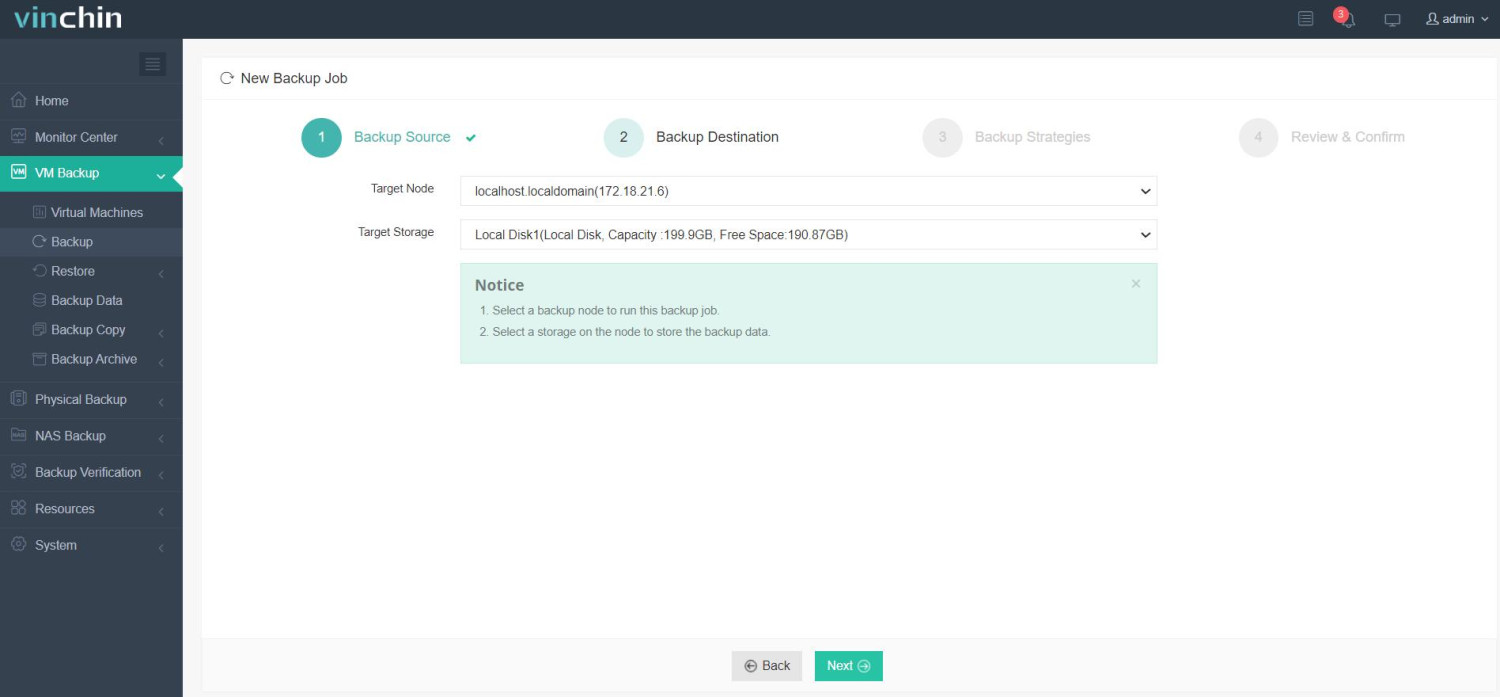
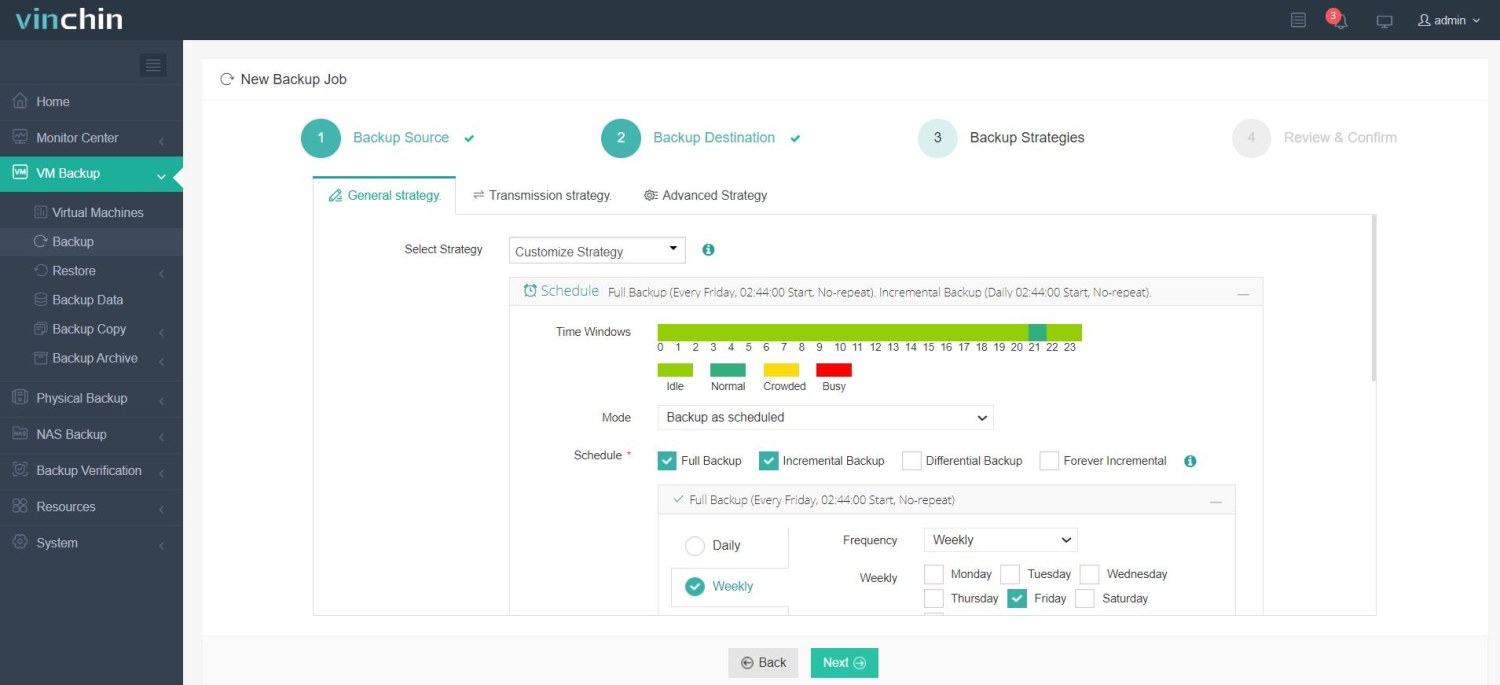
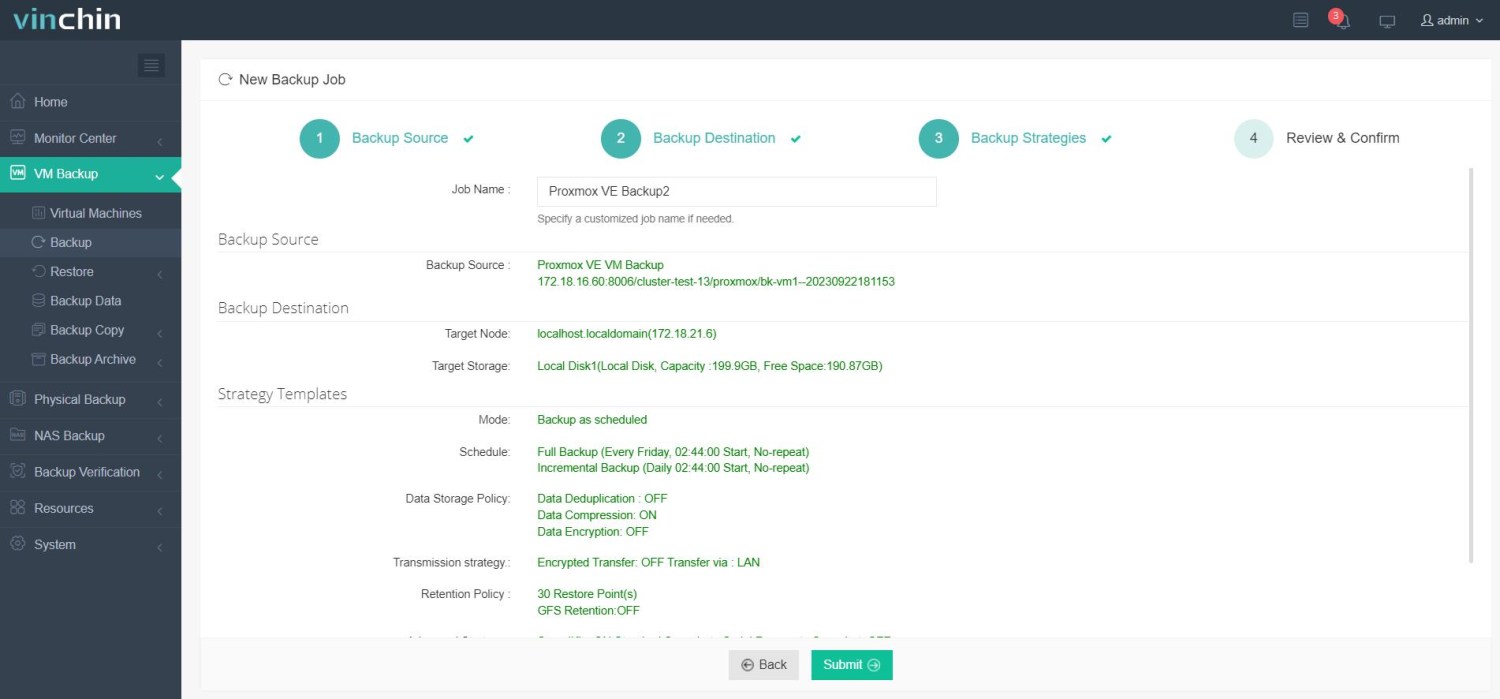
By integrating Vinchin into your Proxmox setup, you can confidently secure your virtual network infrastructure while ensuring fast and reliable recovery when it matters most. Vinchin Backup & Recovery’s operation is very simple, just a few simple steps.
1.Just select VMs on the host

2.Then select backup destination

3.Select strategies

4.Finally submit the job

With the right backup solution in place, you can operate your OPNsense virtual firewall with greater confidence, minimizing the risk of unexpected disruptions. Vinchin offers a free 60-day trial, allowing users to explore its full functionality in real-world environments. For more information, please contact Vinchin directly.
OPNsense Proxmox FAQs
Q1: What is the difference between OPNsense and pfSense?
A1: OPNsense is an offshoot of pfSense, with a more modern interface and a greater focus on security and code review, but with similar functionality.
Q2: Which is better, Proxmox or ESXi?
A2: Proxmox is open source and free and supports containers and clustering;
ESXi Business Edition is more mature, but has more limited features.
Conclusion
Installing OPNsense Proxmox VE combines powerful firewall capabilities with flexible virtualization. Paired with a reliable backup solution like Vinchin Backup & Recovery, you can ensure security, performance, and business continuity for your virtualized network infrastructure.
Share on:


