-
What Is Proxmox Subscription Warning?
-
Why Does Subscription Warning Appear?
-
How Does Disabling Work?
-
How to Disable the “No valid subscription” Popup in Proxmox?
-
Risks of Disabling Subscription Warning
-
How to Back Up Proxmox VM with Vinchin Backup & Recovery?
-
FAQs About Disabling Subscription Warnings in Proxmox VE
-
Conclusion
Do you see a “No valid subscription” popup every time you log into your Proxmox VE server? You are not alone. Many IT admins run Proxmox in labs or small businesses without a paid license. The constant warning can be distracting. Want to know how to remove it safely? This guide will show you how to disable the Proxmox subscription warning using proven methods.
What Is Proxmox Subscription Warning?
The Proxmox subscription warning is a message that appears in the web interface when your server does not have an active support subscription. It pops up right after login and requires you to click OK before accessing any features. While it does not block functionality, it serves as a reminder that your system is running without official support.
Proxmox VE uses this alert to encourage users to buy a license for enterprise-grade updates and assistance. For many home labs or test environments, this message feels unnecessary—but it cannot be turned off from any settings menu.
Why Does Subscription Warning Appear?
Proxmox VE is open source software but offers paid subscriptions for professional support and access to stable repositories. When you log in through the web interface, Proxmox checks if your node has a valid key linked to its subscription servers.
If no key is found or if it has expired, the system triggers the warning popup. This mechanism helps fund ongoing development by reminding users of the benefits of supporting the project financially—such as faster security patches and direct help from engineers.
For non-production setups or learning environments where budgets are tight, many admins look for ways to hide this alert while still enjoying full access to features.
How Does Disabling Work?
Disabling the subscription warning involves editing one of Proxmox’s JavaScript files on each node where you want the change applied. This file controls what messages appear in your browser during login sessions.
By changing specific lines of code inside this file, you prevent the popup from showing—even though your server still lacks a paid license. This method works well for personal labs but comes with some important caveats discussed later in this guide.
How to Disable the “No valid subscription” Popup in Proxmox?
Before making changes, remember: editing core files is not officially supported by Proxmox developers. Always back up important data first.
Here’s how you can disable the “No valid subscription” popup using SSH:
1. Connect via SSH:
Use an SSH client like PuTTY or Terminal on Linux/macOS to connect as root (or use sudo) directly to your target node.
2. Change Directory:
Enter:
cd /usr/share/javascript/proxmox-widget-toolkit
This path applies for both Proxmox VE 7.x and 8.x as of June 2024; future versions may differ.
3. Back Up Original File:
Run:
cp proxmoxlib.js proxmoxlib.js.bak
Keeping backups lets you restore defaults if needed later.
4. Edit JavaScript File:
Open proxmoxlib.js with your preferred editor:
nano proxmoxlib.js
5. Find Warning Code:
Search (in nano: press Ctrl+W) for:
   Ext.Msg.show({
       title: gettext('No valid subscription'),
6. Disable Popup Logic:
Replace
Ext.Msg.show({withvoid({so nothing displays; ORIf there’s an
ifcondition like:
if (res === null || res === undefined || !res || res.data.status.toLowerCase() !== 'active') {Change it simply to:
if (false) {7. Save Changes:
In nano: press Ctrl+X, then type Y at prompt, then press Enter.
8. Restart Web Service:
Apply changes by restarting pveproxy:
systemctl restart pveproxy
9. Clear Browser Cache & Verify:
Log out of all browser sessions connected to this node; clear cache or use private/incognito mode; log back in via web interface—no more popup should appear!
10. Repeat on Each Node:
If managing multiple nodes/clusters, repeat these steps everywhere needed since each runs its own copy of proxmoxlib.js.
Verifying Your Change
After restarting services and logging back into your web console:
Confirm no “No valid subscription” dialog appears after entering credentials.
Optionally check modification date with:
ls -l proxmoxlib.js
This confirms recent edits took effect.
If issues arise or UI breaks unexpectedly, restore from backup using:
cp proxmoxlib.js.bak proxmoxlib.js && systemctl restart pveproxy
Automation Tip: Reapply After Updates
Every time you upgrade or patch Proxmox VE packages (apt upgrade), new versions may overwrite proxmoxlib.js. To save time:
1. Create a shell script that reapplies your edit automatically after upgrades.
2. Use apt hooks (/etc/apt/apt.conf.d/) so script runs post-update.
3. Always verify functionality after major version jumps—file paths may change!
This approach reduces manual work across large clusters but always test scripts before deploying widely.
Risks of Disabling Subscription Warning
Editing core files carries several risks:
Updates overwrite customizations—expect popups again until fix reapplied.
Modifications may void community support eligibility.
In regulated industries (finance/government), unauthorized file edits could trigger audit failures under STIG/CIS benchmarks.
Mistyped code might break parts of web UI until restored from backup.
Disabling warnings does NOT unlock enterprise repositories or official support channels—you remain on community resources only.
For production systems handling sensitive workloads or subject to compliance audits, consider leaving warnings enabled—or better yet—purchase an appropriate license instead of modifying protected files.
In home labs or training environments where risk tolerance is higher and rapid recovery possible via snapshots/backups, disabling makes sense—but always document such tweaks clearly!
How to Back Up Proxmox VM with Vinchin Backup & Recovery?
To ensure reliable protection for virtual machines running on platforms such as Proxmox VE—as well as VMware vSphere/ESXi, Hyper-V Server, oVirt, OLVM, RHV, XCP-ng, XenServer, OpenStack and others—Vinchin Backup & Recovery delivers comprehensive enterprise-level VM backup capabilities across more than fifteen mainstream virtualization environments including full compatibility with Proxmox infrastructure featured here.
Among its robust feature set are incremental backup modes for efficient storage usage; advanced deduplication and compression technologies; V2V migration tools enabling seamless movement between hypervisors; granular restore options for precise recovery at file level; plus scheduled backups and strong data encryption—all designed for operational reliability while minimizing administrative overheads and costs across diverse infrastructures.
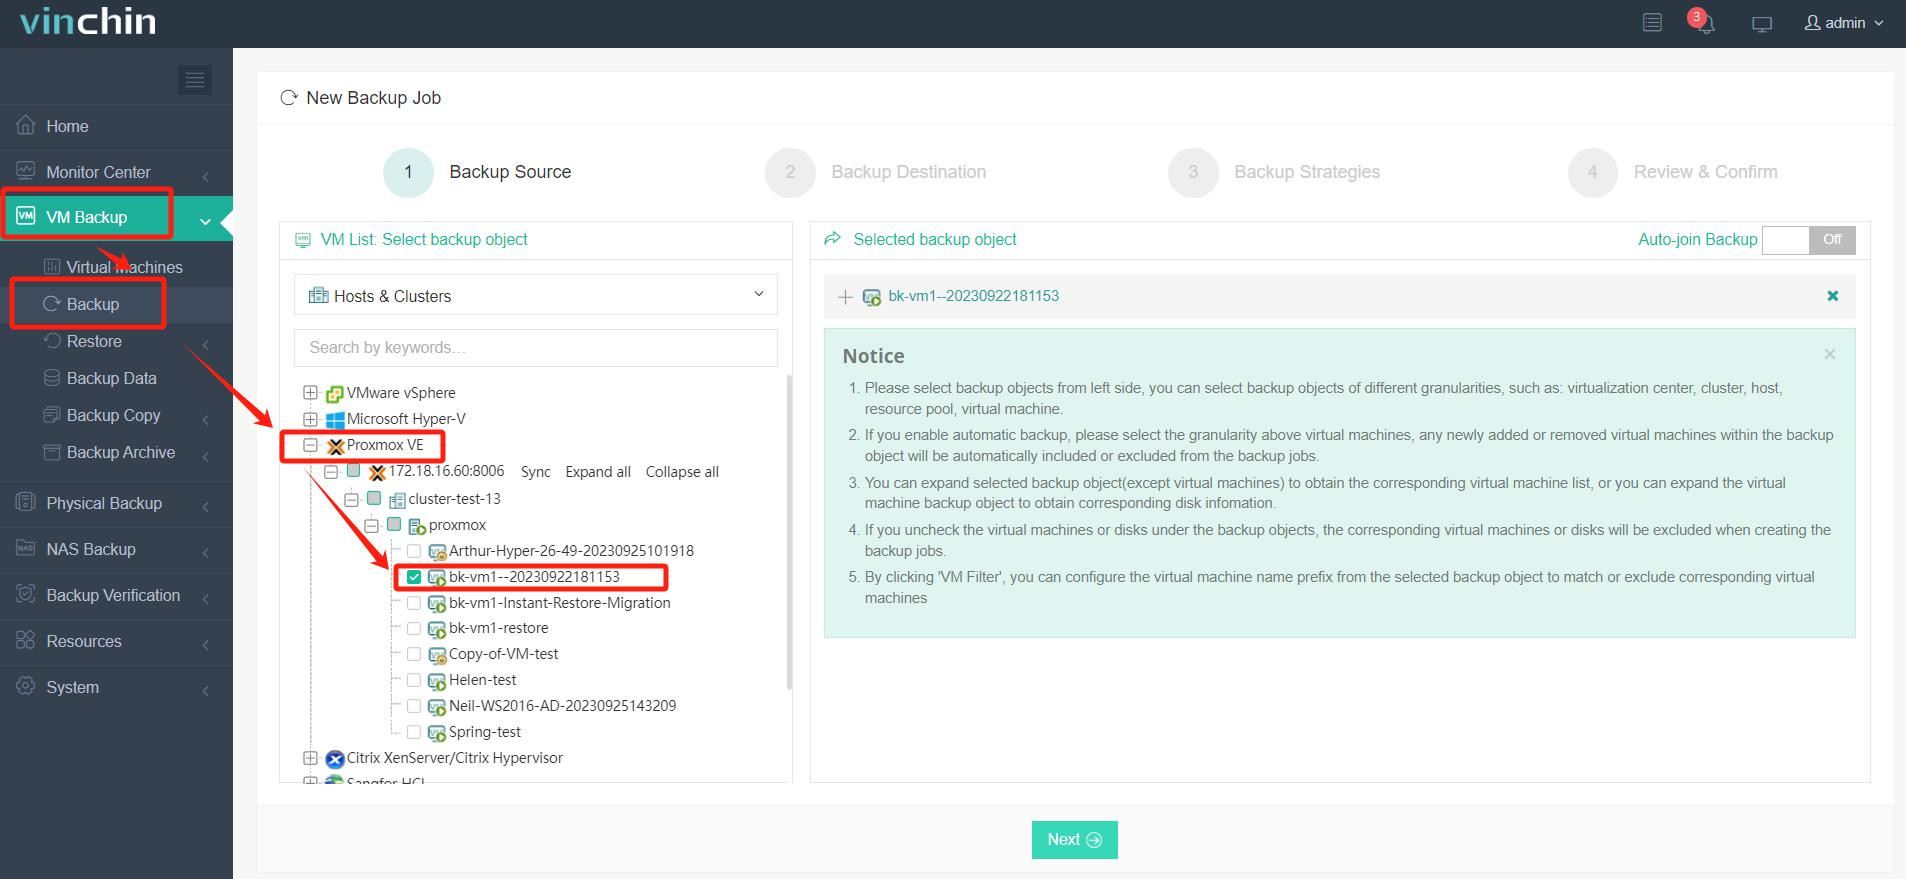
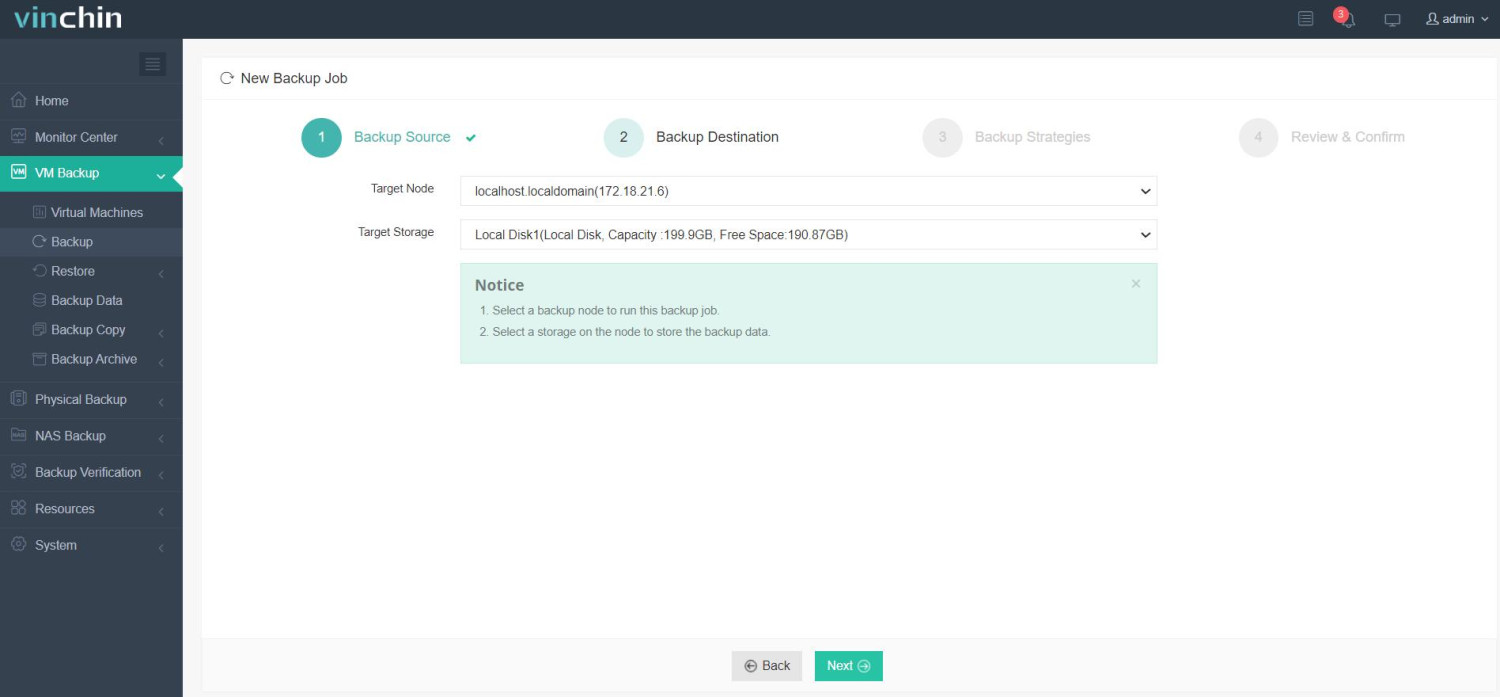
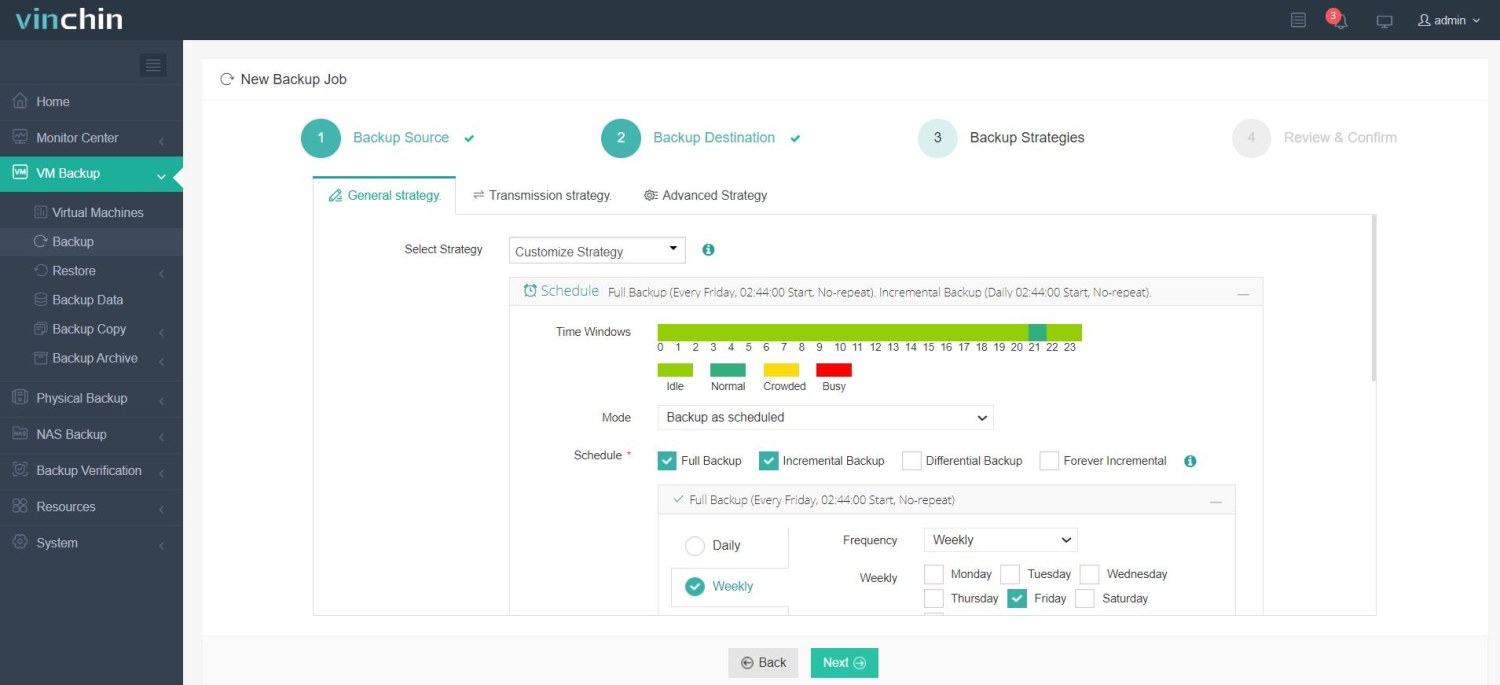
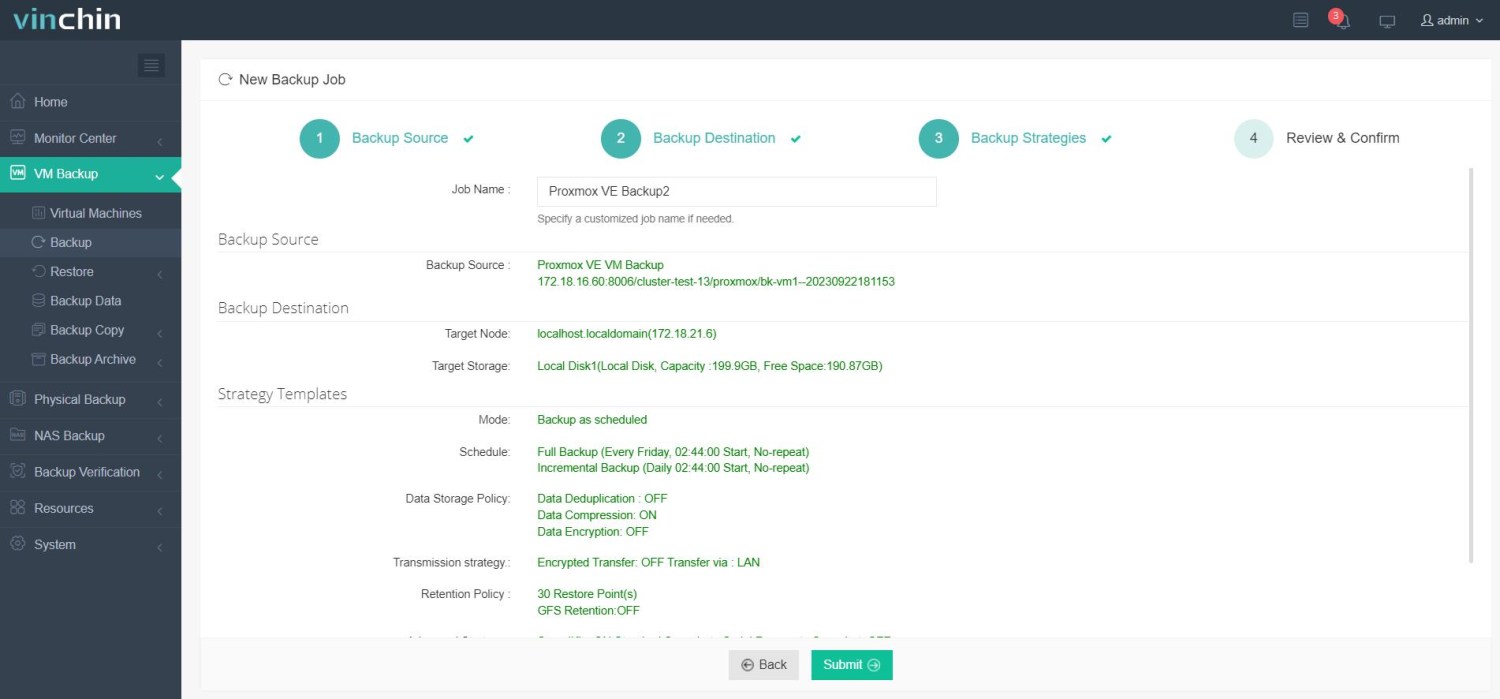
With Vinchin Backup & Recovery's intuitive web console interface, backing up a virtual machine takes just four straightforward steps:
Step 1: Select the Proxmox VM(s) you wish to protect;

Step 2: Choose backup storage destination;

Step 3: Configure backup strategy including schedule and retention policies;

Step 4: Submit the job—the process is streamlined for efficiency even at scale.

Recognized globally among enterprises seeking dependable data protection solutions—with thousands of satisfied customers worldwide—Vinchin Backup & Recovery offers a fully functional free trial lasting up to 60 days so you can experience its advantages firsthand; click below now to get started.
FAQs About Disabling Subscription Warnings in Proxmox VE
Q1: Can I automate restoring my custom patch after every upgrade?
A1: Yes—write a shell script triggered by apt hooks that reapplies edits post-update across all nodes quickly.
Q2: Will disabling this popup affect my ability to receive security updates?
A2: No—the change only hides UI alerts; package downloads/installations continue normally via public repositories unless repository sources themselves are altered elsewhere.
Q3: Does removing this warning also stop repository-related alerts under Datacenter > Updates?
A3: No—the two warnings are separate; disabling one does not silence update/repo notifications shown elsewhere in GUI.
Conclusion
Disabling the Proxmox subscription warning helps streamline lab workflows but comes with trade-offs around updates/supportability—always weigh risks carefully! For robust VM protection across all platforms including Proxmox VE try Vinchin’s easy-to-use backup solution today—it keeps critical data safe while letting you focus on what matters most.
Share on:


