-
Why You Need to Configure Network for Proxmox VM
-
Prerequisites for Configuring Network for a Proxmox VM
-
Networking Concepts in Proxmox
-
How to Configure a Proxmox VM's Network Using the Web Interface?
-
How to Configure a Proxmox VM's Network via CLI?
-
How To Connect A VM To The Bridge?
-
Vinchin – Enterprise Backup Solution for Your Proxmox VMs
-
Proxmox configure network for VM FAQs
-
Conclusion
Configuring network connectivity for your virtual machines is one of the most important tasks in any Proxmox deployment. Without proper setup, VMs cannot communicate with each other or external systems—which means no internet access, no remote management, and limited usefulness overall.
Why You Need to Configure Network for Proxmox VM
Every VM needs a network connection—whether for hosting services, accessing the internet, or communicating within a LAN. In Proxmox VE, this is done by linking the VM's virtual NIC to a Linux bridge, which acts as a software switch connecting physical and virtual interfaces.
Without proper setup:
The VM may not get an IP address
It can't access other devices or the internet
Remote tools won't work
Hosted services stay unreachable
That's why configuring networking should be one of your first steps after creating a VM.
Prerequisites for Configuring Network for a Proxmox VM
Before configuring networks in Proxmox VE for your VMs:
Ensure you have a working installation of Proxmox VE (version 6.x/7.x/8.x).
At least one physical NIC available (enp3s0, ens18, eth0, etc.).
Access rights either via the web interface or SSH terminal.
A created VM with an installed operating system.
Knowledge of your desired IP addressing scheme: subnet mask/gateway/DNS details.
Decide if you want static IP addresses inside VMs or plan to use DHCP from your router/server.
Networking Concepts in Proxmox
Before configuring network settings, ensure the following prerequisites:
Proxmox VE is installed (v6.x, 7.x, or 8.x)
At least one physical NIC (e.g.,
enp3s0,ens18,eth0) is availableYou have access to the system via web UI or SSH
A VM is created with an OS installed
You know your network setup (IP, subnet, gateway, DNS)
Decide whether VMs will use static IP or get IP via DHCP
What Is a Linux Bridge?
A Linux bridge (e.g., vmbr0) acts like a virtual switch, connecting your VMs to physical networks. It combines physical NICs and virtual tap devices created by VMs. Bridges operate at Layer 2 (data link), forwarding traffic based on MAC addresses—similar to physical switches.
Why Use Bridges?
Unlike direct attach (which limits VMs to internal communication), bridges allow full external connectivity without NAT or complex routing.
Key Bridge Parameters (for manual setup):
bridge-stp: Enables Spanning Tree Protocol (for multi-switch environments)bridge-fd: Forward delay (only relevant if STP is used)bridge-vlan-aware: Enables VLAN tagging/filtering—essential in segmented networks
How to Configure a Proxmox VM's Network Using the Web Interface?
Most users find it easiest—and safest—to manage bridges via GUI:
1. Log into the Proxmox web interface using your browser.
2. In left navigation pane click on your node name (such as pve01).
3. Click System, then select Network from submenu.
4. Click Create, then choose Linux Bridge from dropdown list.
5. Fill out dialog fields:
Set Name (
vmbr0recommended unless adding additional isolated networks).Enter desired IPv4/CIDR address range—for example:
192.168.1.10/24.Specify default gateway under Gateway (IPv4) field (
192.168.1.1typical home routers).For Bridge ports, enter name(s) of connected NIC(s) such as
enp3s0.Check box labeled Autostart so config persists across reboots.
6. Click Create button at bottom right corner.
7. Finally click top-right button labeled Apply Configuration so changes take effect immediately without rebooting node.
If you lose connection after applying changes remotely due to misconfiguration—don't panic! Wait two minutes; sometimes settings revert automatically if not confirmed locally.
How to Configure a Proxmox VM's Network via CLI?
For those comfortable editing text files—or automating deployments—the CLI offers full control:
Open /etc/network/interfaces file using nano/vim/editor-of-choice:
auto lo
iface lo inet loopback

auto enp3s0
iface enp3s0 inet manual

auto vmbr0
iface vmbr0 inet static
    address 192.168.1.10/24
    gateway 192.168.1.1
    bridge_ports enp3s0
    bridge_stp off
    bridge_fd 0
Save changes then reload configuration safely:
ifreload -a # Preferred method; requires 'ifupdown2' package installed by default since PVE 7.x+
Or reboot node if necessary—but always back up configs first!
How To Connect A VM To The Bridge?
Once you've created at least one functional bridge device (vmbrX) mapped onto real hardware—you're ready connect individual guest systems!
Step 1: Add/Edit Network Device For Your Virtual Machine
Inside web interface:
1.Select target VM under left navigation tree then click its name;
2.Click tab labeled Hardware
3.Click blue button labeled Add, pick option called Network Device
4. In the pop-up dialog:
Set the Bridge field to the previously used value (e.g.,
vmbr0)Choose the appropriate Model:
Use VirtIO (
virtio-net) for best performance (requires VirtIO drivers in the guest OS)Use E1000 (
Intel PRO/1000) only if compatibility issues arise (e.g., during Windows installation without VirtIO drivers)Optionally, set a custom MAC address if required by cloud environments or specific networks
5. Click the green “Add” button
Tip: To edit an existing adapter, go to Hardware, highlight the NIC, double-click the row, update settings, then click OK.
Step 2: Configure Guest Operating System Networking
Your newly added vNIC appears inside guest OS just like any other Ethernet adapter—but must still be configured internally:
For Debian/Ubuntu
Using /etc/network/interfaces
Edit file /etc/network/interfaces within guest:
auto ens18iface ens18 inet static address 192.168.1.X # Unique per machine! netmask 255..255..255..0 gateway 192..168..1..1 dns-nameservers 8..8..8..8 ..8..8..4..4
Bring up interface & restart service:
sudo ip link set ens18 up && sudo systemctl restart networking
Note: Replace ‘ens18’ with actual detected adapter name shown by running ip addr. Names may differ depending on distro/version/hardware profile.
For Ubuntu With Netplan YAML Configurations
Edit /etc/netplan/01-netcfg.yaml :
network: version: 2 renderer: networkd ethernets: ens18: dhcp4: no addresses: - "192...168...1...101/24" gateway4: "192...168...1...1" nameservers: addresses : [ "8...8...8...8", "8...8...4...4" ]
Apply config instantly:
sudo netplan apply
Tip: On Ubuntu versions newer than 22....04 LTS , replace ‘gateway4’ block above with ‘routes’ syntax due deprecation:
For CentOS/RHEL/Fedora Family Using Ifcfg Files
Edit /etc/sysconfig/network-scripts/ifcfg-ens18 :
TYPE=Ethernet BOOTPROTO=none ONBOOT=yes IPADDR=192....168....1....101 NETMASK=255....255....255....0 GATEWAY=192....168....1....1 DNS1=8....8....8....8 DNS2=8....8....4....4
Restart service:
sudo systemctl restart network
Note: CentOS/RHEL/Fedora releases newer than v7 use NetworkManager/nmcli/keyfiles instead—refer official docs accordingly.
For Windows Server Guests
Within the desktop session:
Open Server Manager
Go to Local Server
Click the IPv4 address link next to the Ethernet label
In the Network Connections window, right-click the Ethernet adapter, then choose Properties
Double-click Internet Protocol Version 4 (TCP/IPv4)
Select Use the following IP address, then fill in the appropriate fields for:
IP address
Subnet mask
Default gateway
Preferred/Alternate DNS server
Click OK to save
Vinchin – Enterprise Backup Solution for Your Proxmox VMs
Once you've successfully configured networking for your Proxmox virtual machines, it's vital to protect them from data loss and downtime with a reliable backup solution built for virtualized environments.
Vinchin Backup & Recovery is an enterprise-level VM backup solution that supports over 15 platforms—including Proxmox VE, VMware, Hyper-V, XenServer, oVirt, and more. Whether you manage a single Proxmox setup or a hybrid infrastructure, Vinchin ensures simple and efficient protection.
It offers key features such as incremental backup to save space, data deduplication and compression to boost efficiency, and cross-platform V2V migration for flexible infrastructure changes—all through an intuitive web-based console.
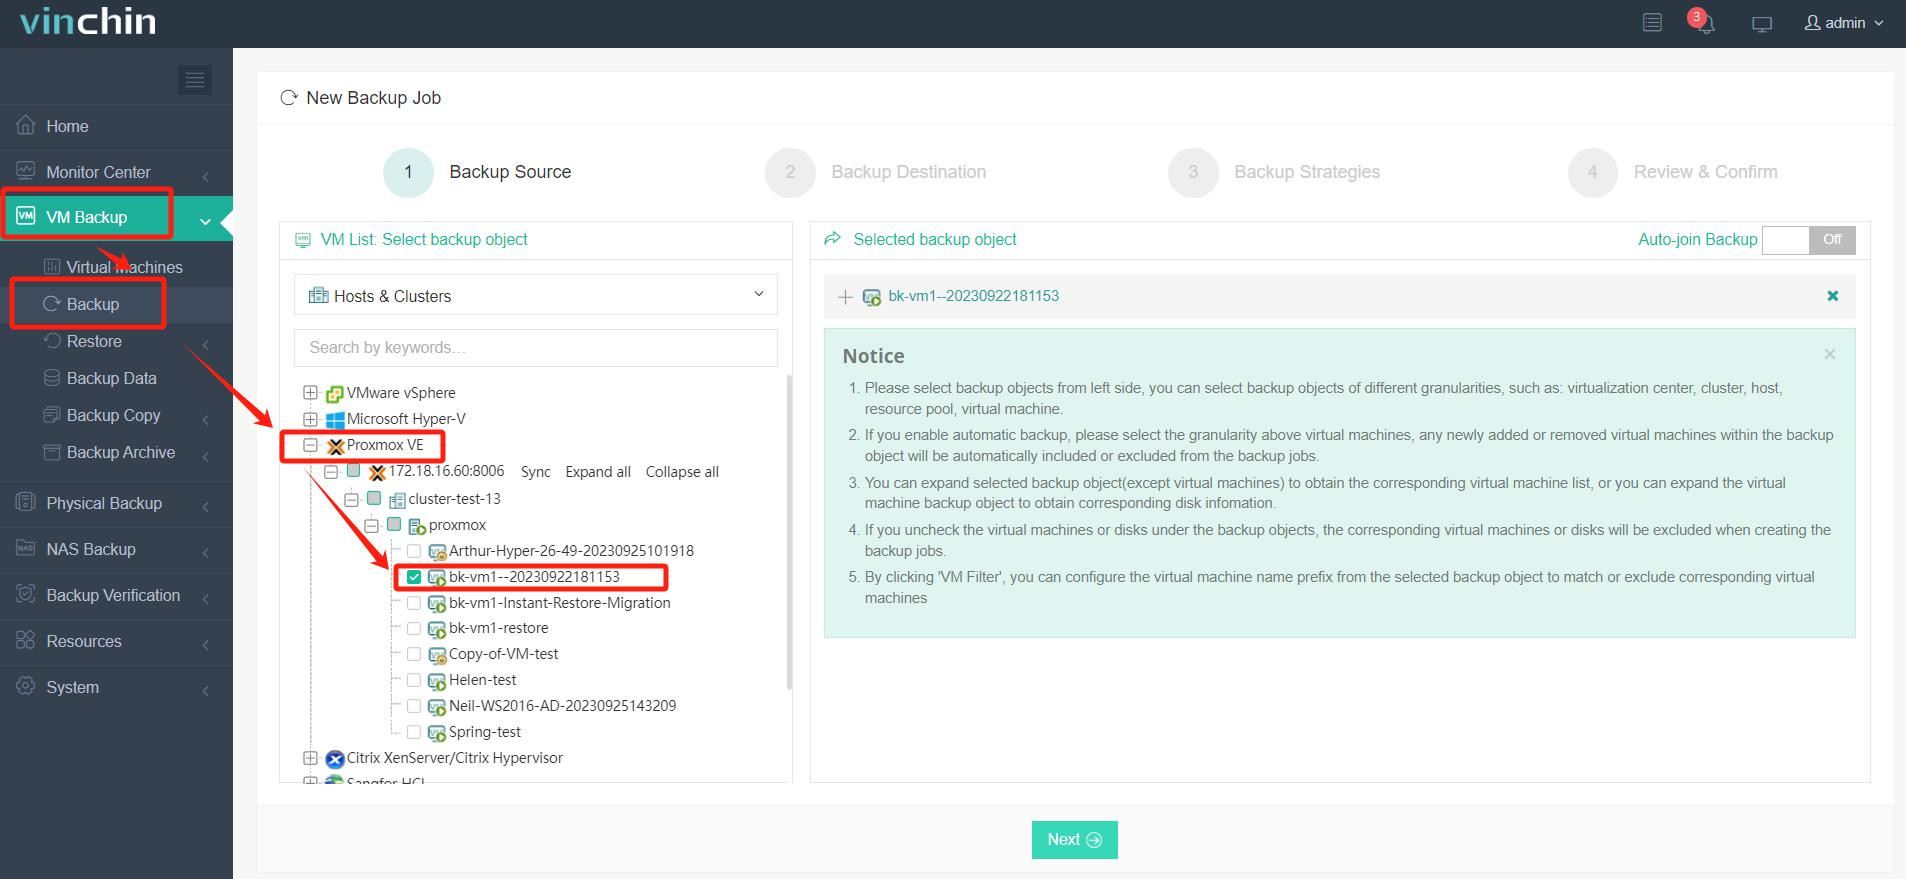
1. Select the Proxmox VM to back up;

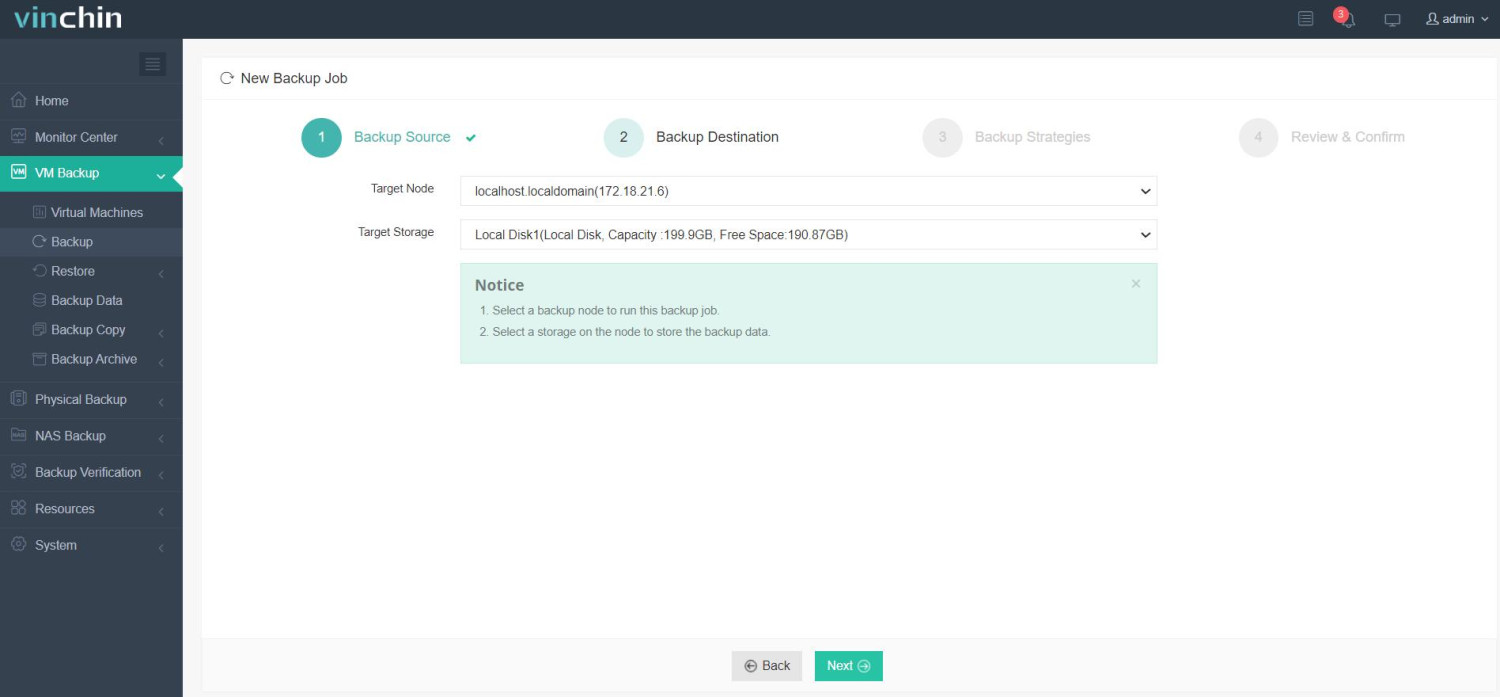
2. Choose backup storage;

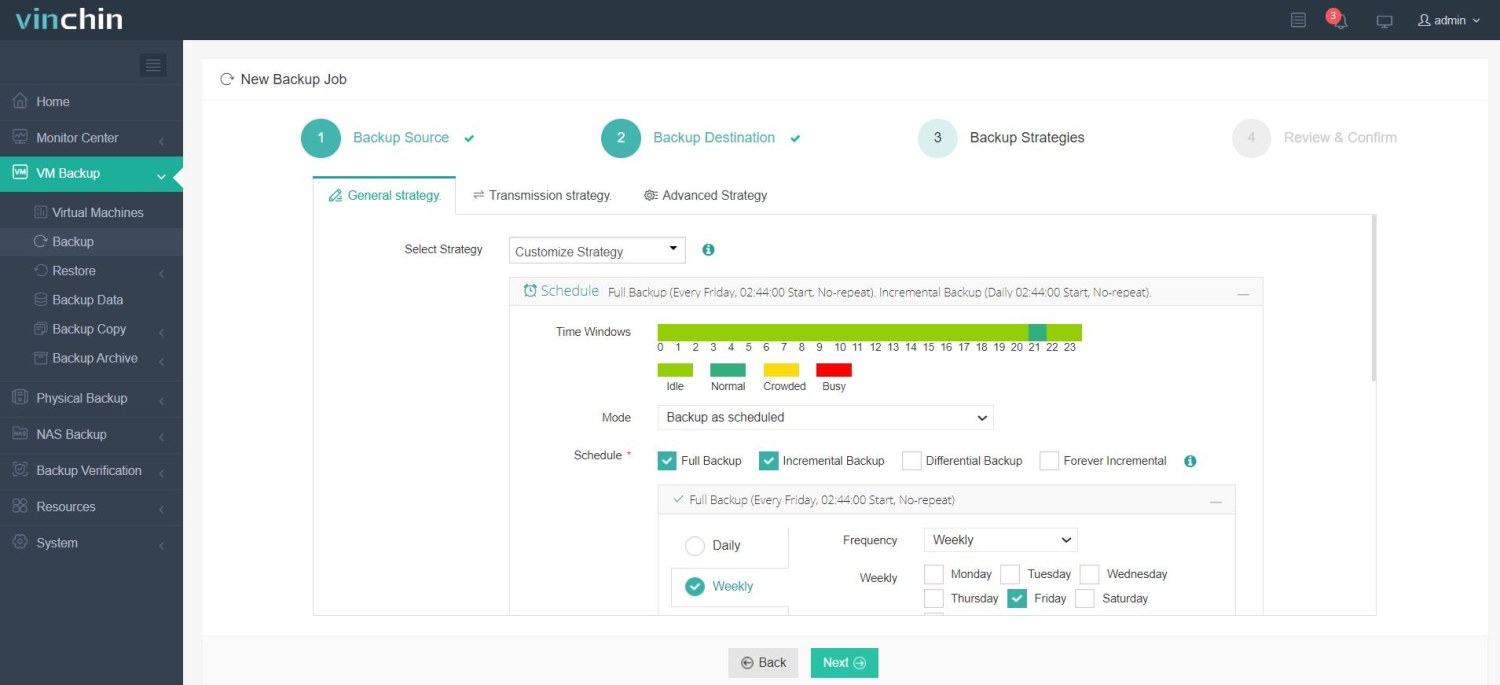
3. Configure backup strategies;

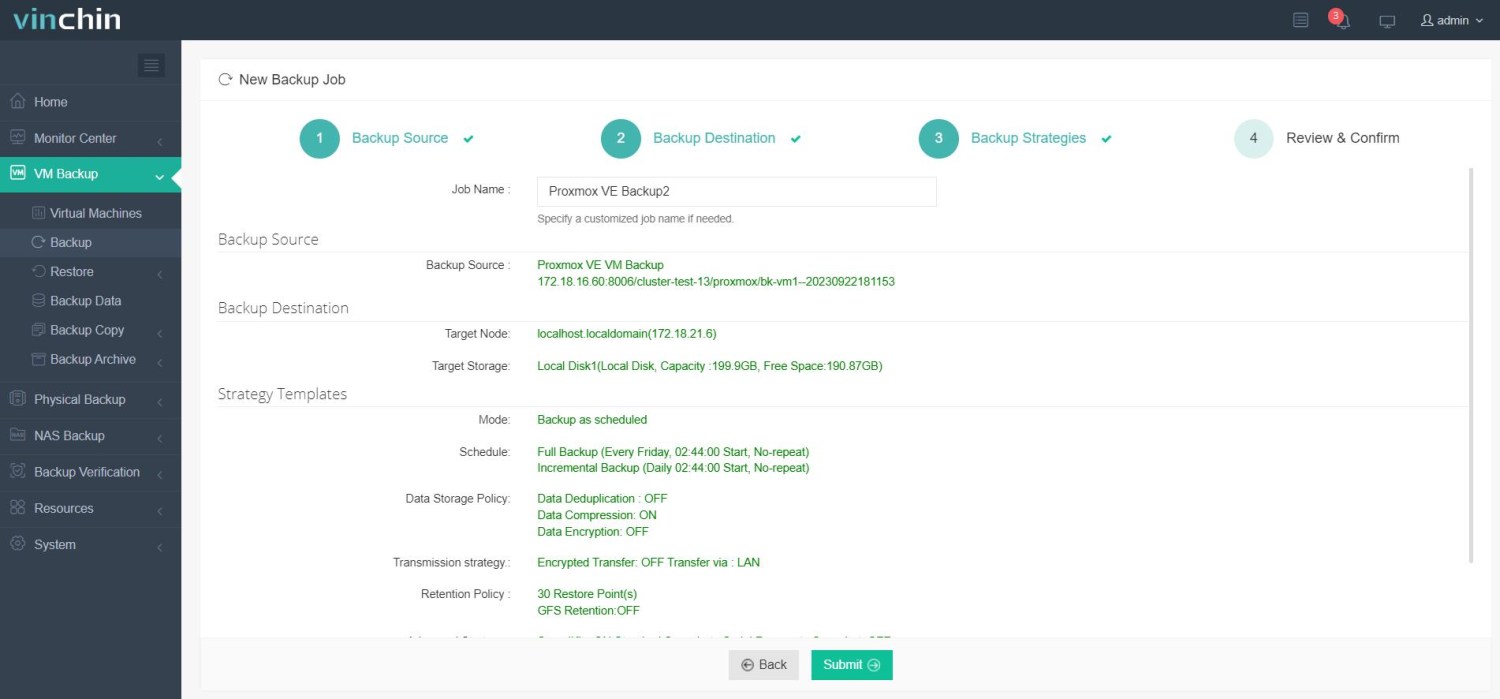
4. Submit the job.

Vinchin is trusted by global users for its powerful features and user-friendly design. Enjoy a full-featured 60-day free trial—no limitations. Questions? We're here to help anytime.
Proxmox configure network for VM FAQs
Q1: Can I change my VM's assigned MAC address later?
A1: Yes—you can edit it anytime via Hardware > Network Device > Edit; ensure uniqueness across all devices.
Q2: How do I move my VM between different bridges without downtime?
A2: Shut down the guest first; edit its hardware settings; attach new vNIC pointing at alternate vmbrX; boot again.
Q3: My Windows guest shows 'Unidentified Network' after setup—what now?
A3: Double-check that correct drivers are installed inside Windows; verify DHCP/static config matches subnet/gateway used by chosen linux bridge.
Conclusion
Configuring networking correctly ensures every Proxmox virtual machine stays connected—and manageable—from day one onward! Whether building simple labs or multi-tier production clouds these techniques scale easily as needs evolve over time . For reliable backup coverage plus advanced recovery features tailored specifically toward modern virtualization platforms—including seamless integration with latest versions of PVE—consider Vinchin today!
Share on:


