-
What is the default IP address of Proxmox?
-
Why need to change IP address of Proxmox?
-
How to change IP address on Proxmox?
-
Put backup first: backup Proxmox with Vinchin
-
Proxmox change IP FAQs
-
Conclusion
Proxmox VE lets admins run virtual machines on a single host or a cluster. It has a web interface on port 8006. To connect, you need the host IP. You set that IP during install. Yet networks can change. You may need to update that IP. In this article, we explain steps to update it safely.
What is the default IP address of Proxmox?
Proxmox VE does not ship with a fixed default IP like “192.168.1.100”. Instead, the installer prompts you to enter an IP address or choose DHCP. If you provide a static IP during setup, Proxmox uses that for its web UI access. If you opt for DHCP, Proxmox may get a lease from your DHCP server. However, using DHCP can make access unpredictable. Best practice is to assign a known static IP at install time.
Many guides note that the installer creates a static address when you give one. That address serves as the management IP. It appears in network device lists only if you reserve it or use DHCP with a reserved lease. Thus, there is no universal default IP. It depends on what you set or what DHCP assigns at first boot.
Why need to change IP address of Proxmox?
Networks evolve. You may move Proxmox to another subnet. You may adjust to company policy. You may rebuild your network topology. Perhaps you need to isolate management traffic on a new VLAN. Or you replace routers or gateways. In any case, locking Proxmox to a new IP keeps the UI reachable. Changing the IP prevents conflicts if another host uses the old address.
Also, naming conventions may change. You may standardize on an IP scheme. A change can align Proxmox with DNS records. You may wish to add redundancy. For example, new gateways or bonds might require an IP shift. Without updating, the web UI and cluster communication can break. Thus, admins must know how to update the address safely.
How to change IP address on Proxmox?
First, check live network requirements. Then update both the network config and host entries. Finally, apply changes and verify access.
Method 1. Change via Web UI
First, ensure you have console access in case network breaks. Then:
1. In the web UI, select the node in the left pane. Then click System and choose Network.
2. Find the bridge (commonly vmbr0). Click Edit. In the IPv4/CIDR field, enter the new IP with the correct prefix (e.g., “192.168.2.10/24”).
3. If on a different subnet, update the Gateway (IPv4) field to the new gateway IP.
4. Click Save. A pending change appears. Click Apply Configuration. Confirm to restart networking.
5. Next, go to System > Hosts. Locate the line with your hostname. Change the IP before the hostname to the new address. Click Save. This updates “/etc/hosts”.
6. If DNS entries exist, update them accordingly.
7. Verify you can reach the web UI at “https://new-ip:8006”. If unreachable, use console to revert or fix.
This method works for standalone nodes. In clusters, repeat on each node and ensure corosync or cluster network settings align. Always adjust cluster network entries if they use IPs directly.
Method 2. Change via CLI
This suits scripted or remote consoles.
1. Back up network config: run “cp /etc/network/interfaces /etc/network/interfaces.bak”.
2. Open “/etc/network/interfaces” in an editor (e.g., “nano /etc/network/interfaces”). Locate the vmbr0 stanza. It looks like:
auto vmbr0
   iface vmbr0 inet static
       address 192.168.1.100/24
       gateway 192.168.1.1
       bridge-ports eno1
       bridge-stp off
       bridge-fd 0
3. Change the “address” line to new IP/CIDR, e.g., “192.168.2.10/24”. If subnet changes, update “gateway” accordingly.
4. Save the file.
5. Edit “/etc/hosts”: find the line with old IP and hostname, and replace with new IP.
6. If using DNS, update records separately.
7. Apply config: with ifupdown2, run “ifreload -a”. Without it, run “systemctl restart networking” or reboot carefully. Watch for errors; use console to recover if network fails.
8. Test access to UI at new IP.
9. In a cluster, repeat per node, and update cluster settings if needed. Ensure corosync network uses correct interfaces; if it binds to IP, adjust “/etc/pve/corosync.conf” if necessary.
Put backup first: backup Proxmox with Vinchin
Backing up VMs protects data. Vinchin Backup & Recovery supports Proxmox VE with agentless backup and rich features. It integrates tightly. You can back up through Vinchin’s web console in a few steps. Vinchin offers features like forever incremental backup, deduplication, compression, V2V migration, throttling policy, GFS retention, instant recovery, granular restore, cloud/tape archiving, and more. Here we highlight key features and guide a simple backup.
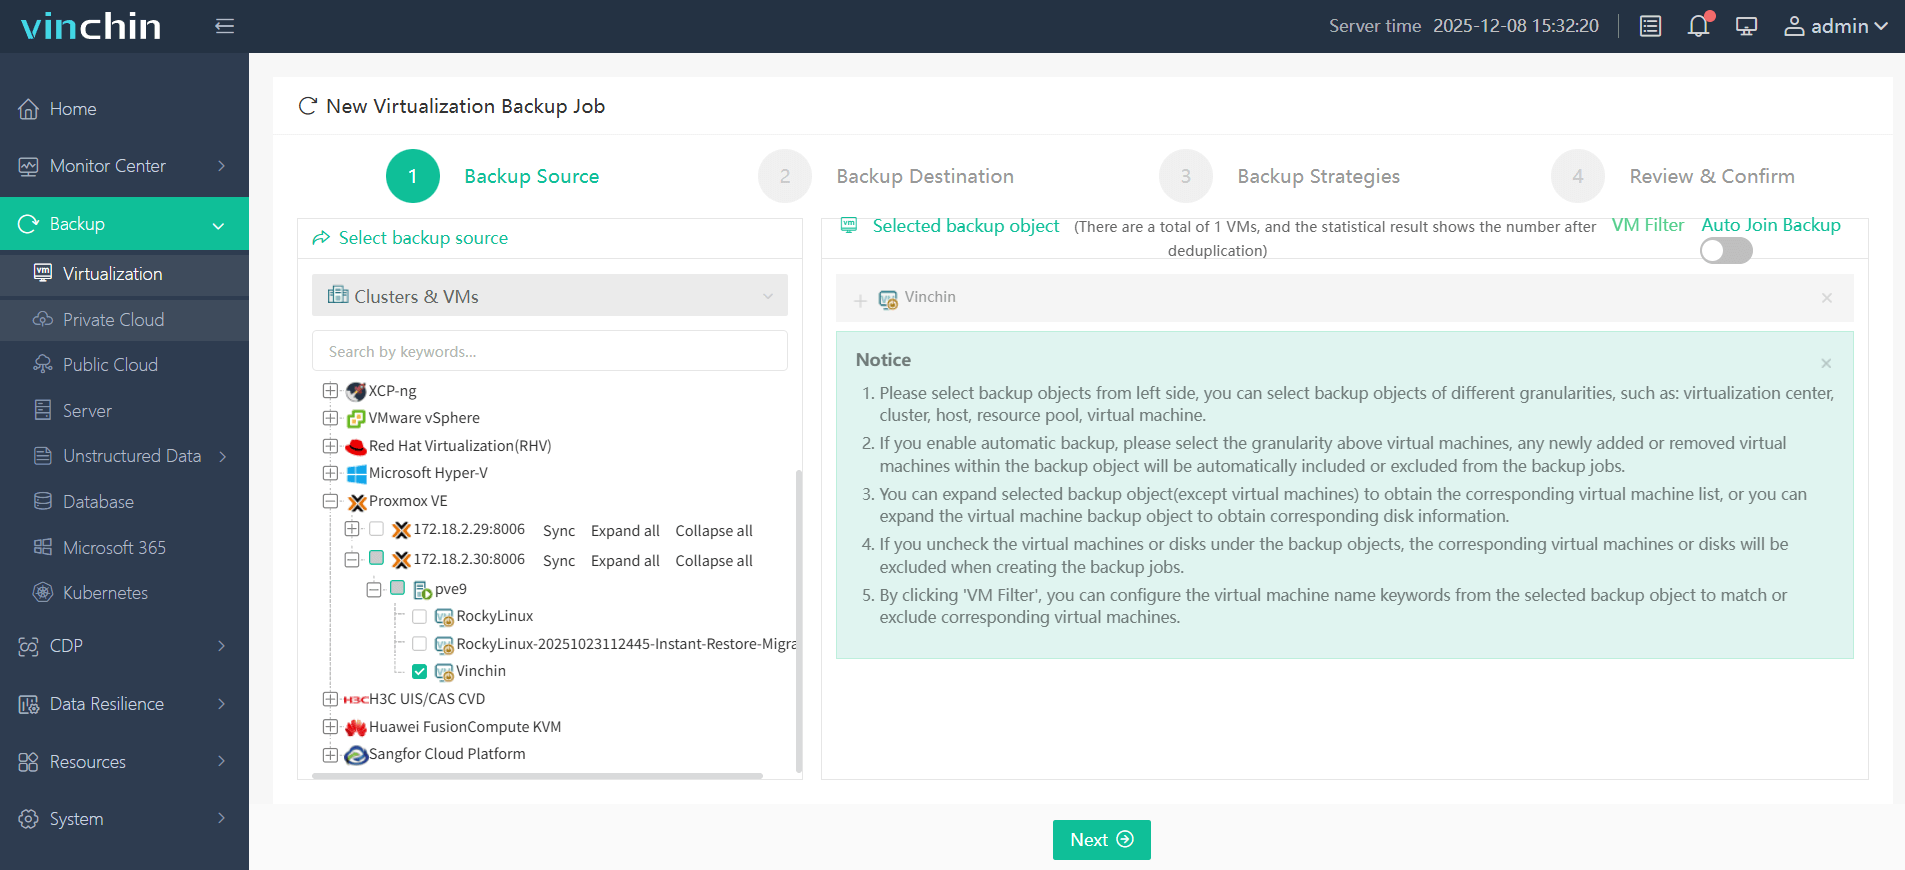
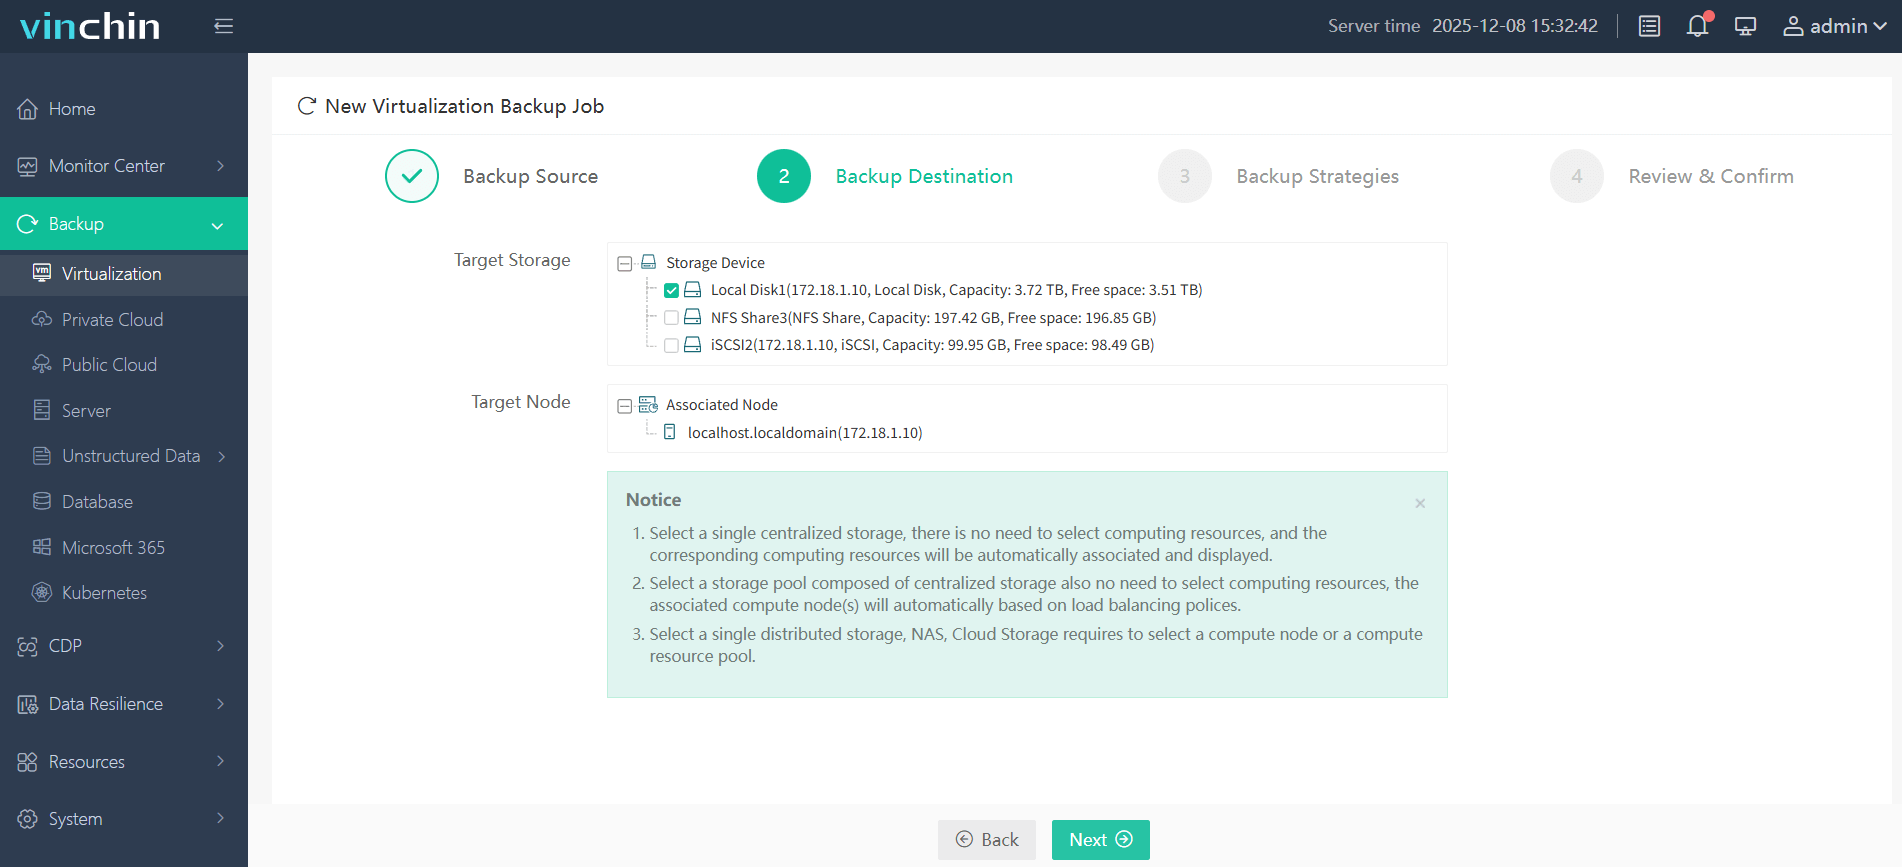
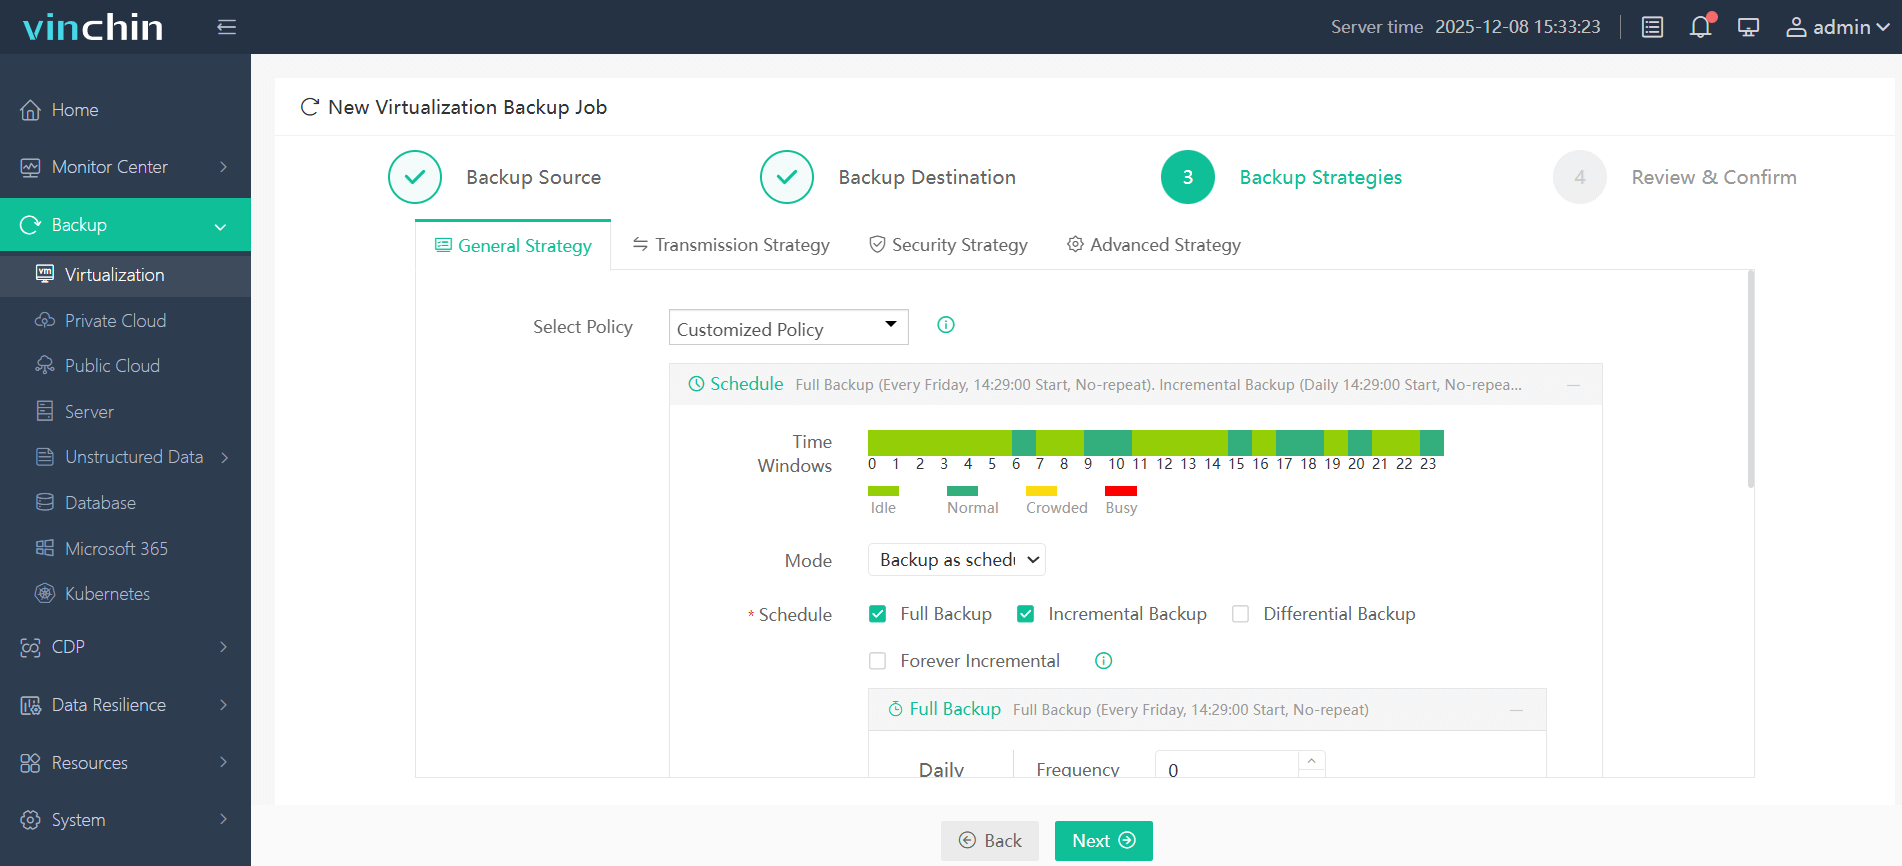
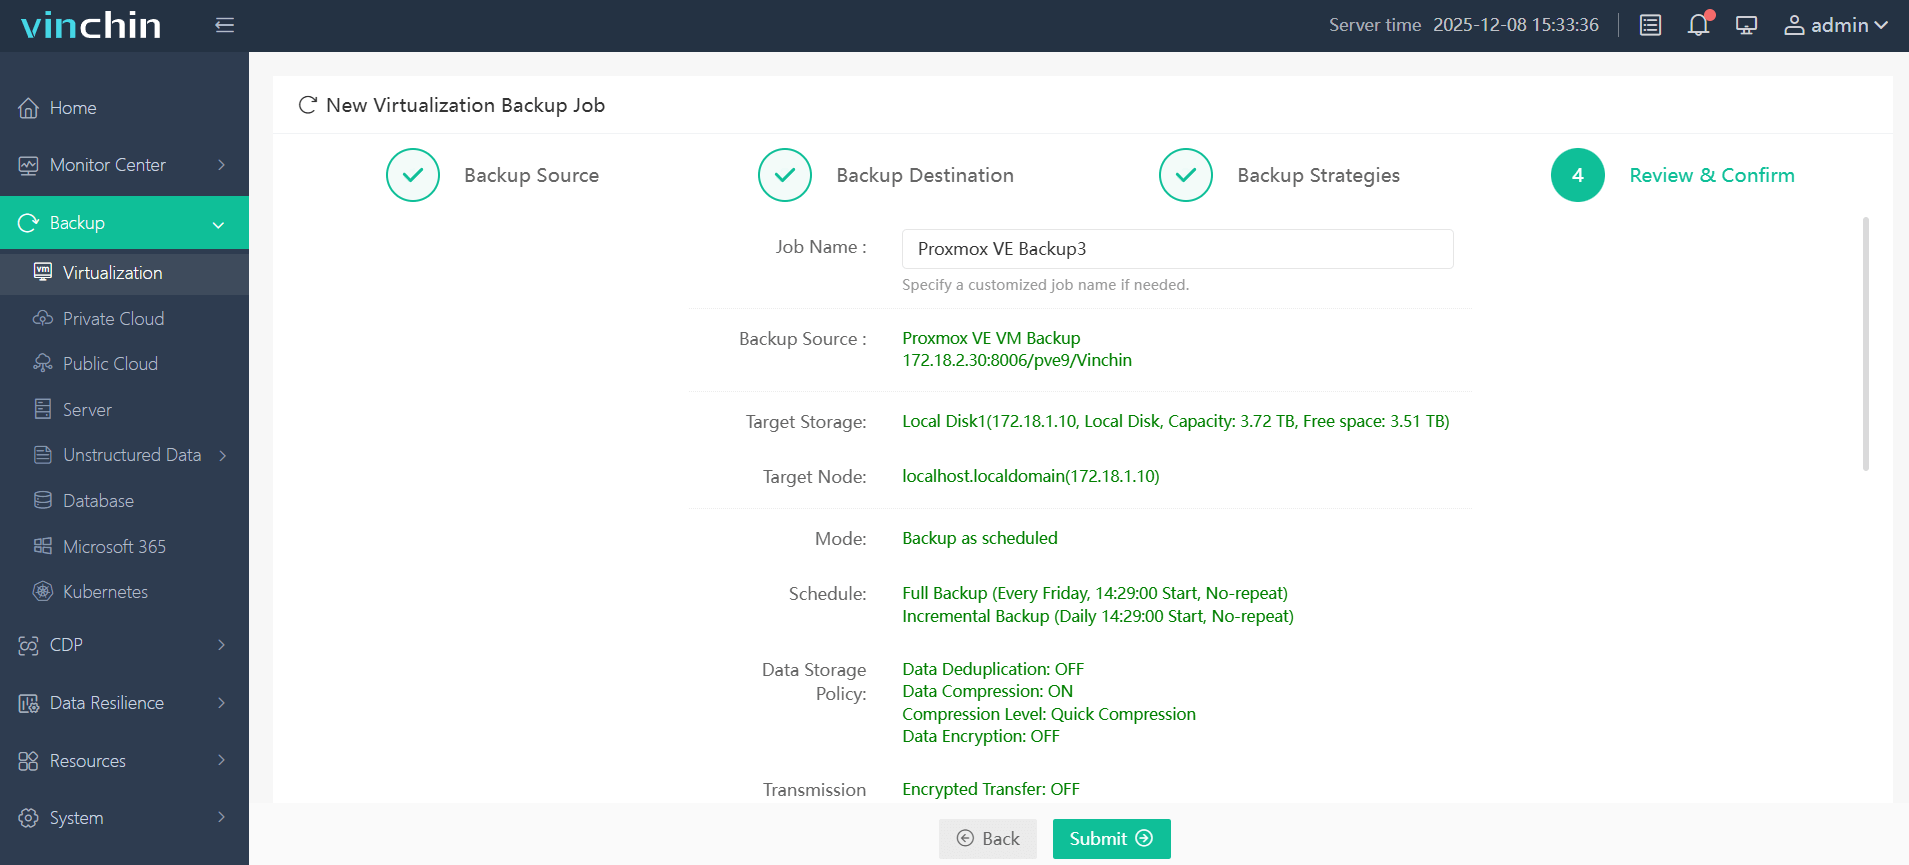
Here is a brief outline of backing up Proxmox VM using Vinchin Backup & Recovery:
1. Select the Proxmox VM to back up.

2. Choose backup storage.

3. Configure backup strategies.

4. Submit the job.

Thousands of companies use Vinchin worldwide. The product earns high ratings for reliability and ease of use. Try a 60-day full-featured free trial to see how Vinchin simplifies VM protection. Ready to start? Click the Download button and deploy in minutes.
Proxmox change IP FAQs
1: Can I use DHCP for Proxmox management IP?
Yes, but reserve the lease on DHCP server to keep IP stable; static IP is more reliable.
2: How to recover if network edit fails?
Use console or IPMI access to restore “/etc/network/interfaces” from backup or revert changes via CLI.
Conclusion
Changing Proxmox IP keeps your management interface reachable after network moves or policy updates. Proxmox installer sets a static IP or uses DHCP based on your choice. You can update the IP via GUI or CLI, always editing vmbr0 and /etc/hosts. Plan carefully to avoid lockout.
Share on:


