-
Major Reasons to use Gen 2 Hyper-V
-
Limitation of Gen 2 Hyper-V
-
How to convert Gen 1 to Gen 2
-
Backup Hyper-V before conversion
-
Hyper-V Gen1 Gen2 FAQs
-
Conclusion
There’re 2 generations of hyper-V VMs available for users to choose. Gen 2 hyper-V VMs show advantages in multiple aspects over Gen 1. If you’re currently using Gen 1 VM with 64-bit Windows Server 2012 R2 or later versions and want to do a system upgrade, it’s possible to do a conversion from 1 to 2.
Major Reasons to use Gen 2 Hyper-V
Safer with more advanced security features including secure boot and trusted platform module
Performance enhancement on CPU and memory limits
Support boot from SCSI with faster startup speed
Maximize the disk usage with vhdx virtual hard disk
PXE boot with a synthetic network adapter that gen 1 doesn’t support to directly boot from
Limitation of Gen 2 Hyper-V
Whether to convert from Gen 1 to Gen 2 mainly depends on the guest OS and the boot strategy you want to use. So, before we get started, it’s important to consider these limitations of Gen 2 VM:
32-bit operating systems are not supported anymore. Gen 2 VM only supports 64-bit guest OS.
Older OS that lacks drivers for synthetic hardware, or doesn’t support UEFI cannot run on Gen 2 VMs. If you’re still using old Windows operating systems like Windows XP, Windows Server 2008, or old Linux distributions, converting Gen 1 to Gen 2 might not be a wise choice.
If you don’t have plans using the OS that is mentioned above, it’s worth trying to do a conversion for more modernized VM operations.
How to convert Gen 1 to Gen 2
1. Navigate to Hyper-V Manager, shut down the gen 1 VM.
2. Open Settings for the target VM, select IDE controller that contains the virtual disks.
3. In the Choose Action section, select Convert.
4. Choose VHDX as the target disk format.
5. Select the disk type to be Fixed or Dynamically expanding as per your requirement. It’s recommended to choose a dynamically expanding disk.
6. Select a location for the converted disk, confirm the settings and let the conversion begin. Wait for it to complete.
7. Once completed, create a new Gen 2 VM but not new virtual disk. It’s important to select Add Operating System Later.
8. Make sure Enable Secure Boot is unchecked in Security section.
9. Attach the converted drives to the SCSI controller.
10. Specify the path to the WINPE ISO that is downloaded.
11. Boot into PreBoot Environment. Run mbr2gpt to convert the partition.
12. Boot up the VM as Gen 2.
Backup Hyper-V before conversion
Upgrade Hyper-V VM generation involves major system changes, and you may face the risk of losing data if unexpected errors occur during the conversion process. Therefore, it’s important to backup the old Gen 1 Hyper-V VM first, so that you can recover the data anytime in case an emergency situation hits.
With the help of Vinchin Backup & Recovery, you can profoundly save the time that needs to spend on this task. It offers agentless and automatic Hyper-V backup service. There are many useful backup strategies like incremental backup, granular restore, BitDetector, offsite backup, etc.
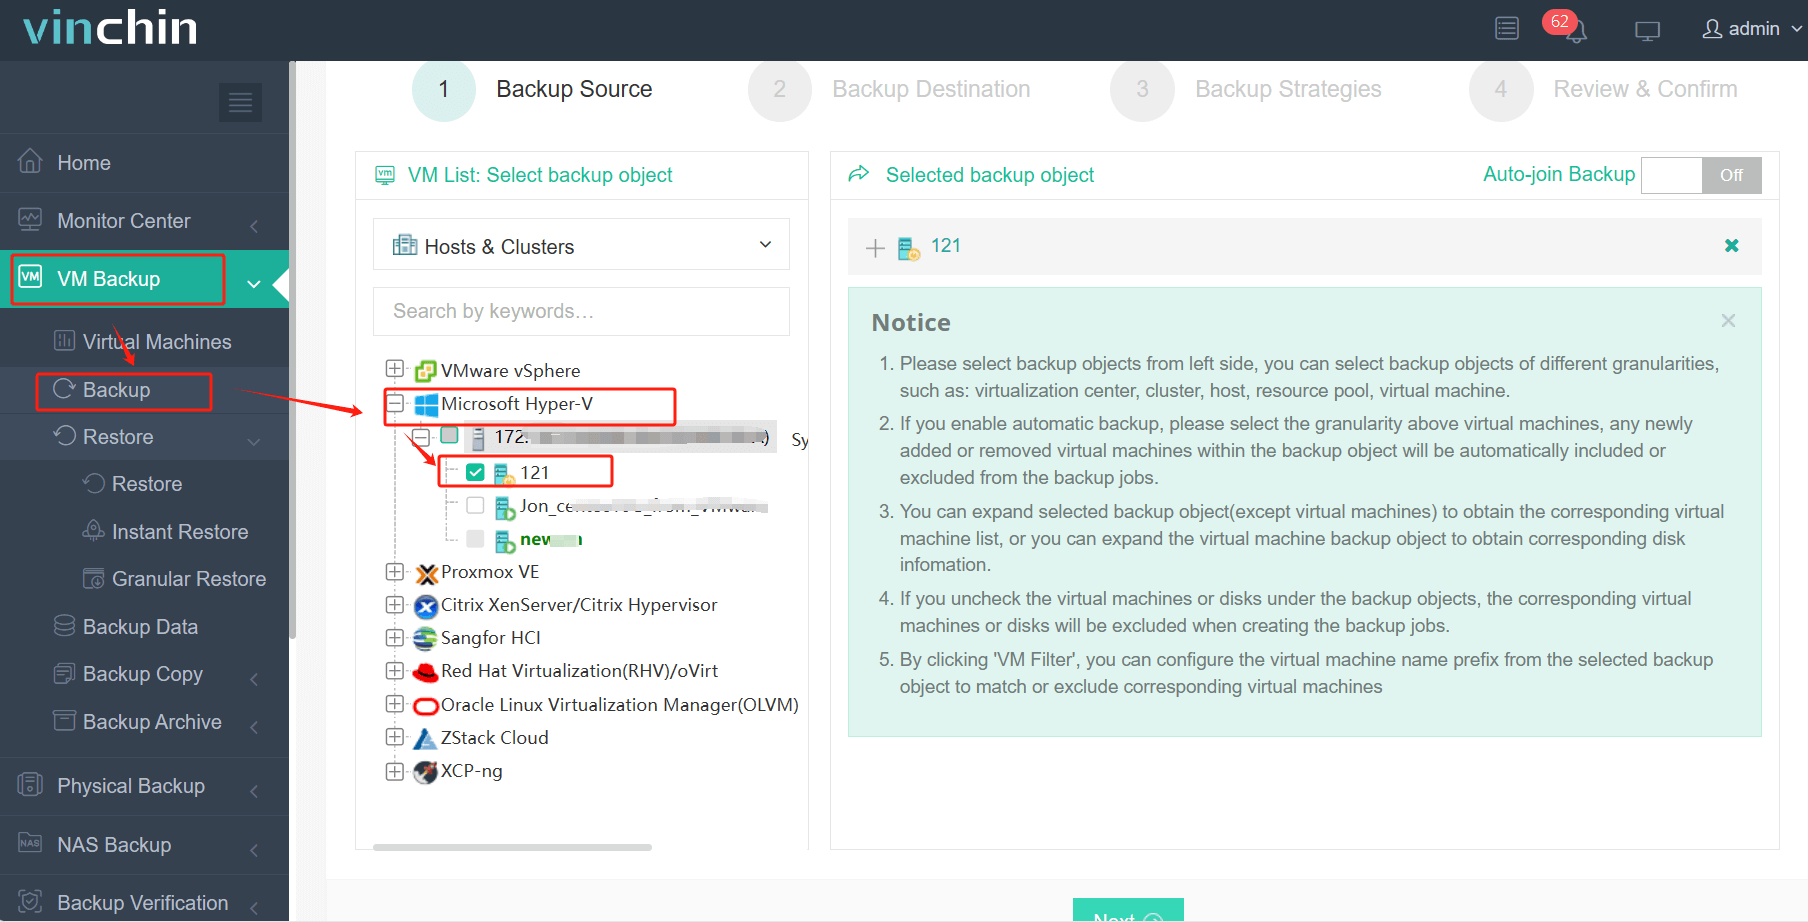
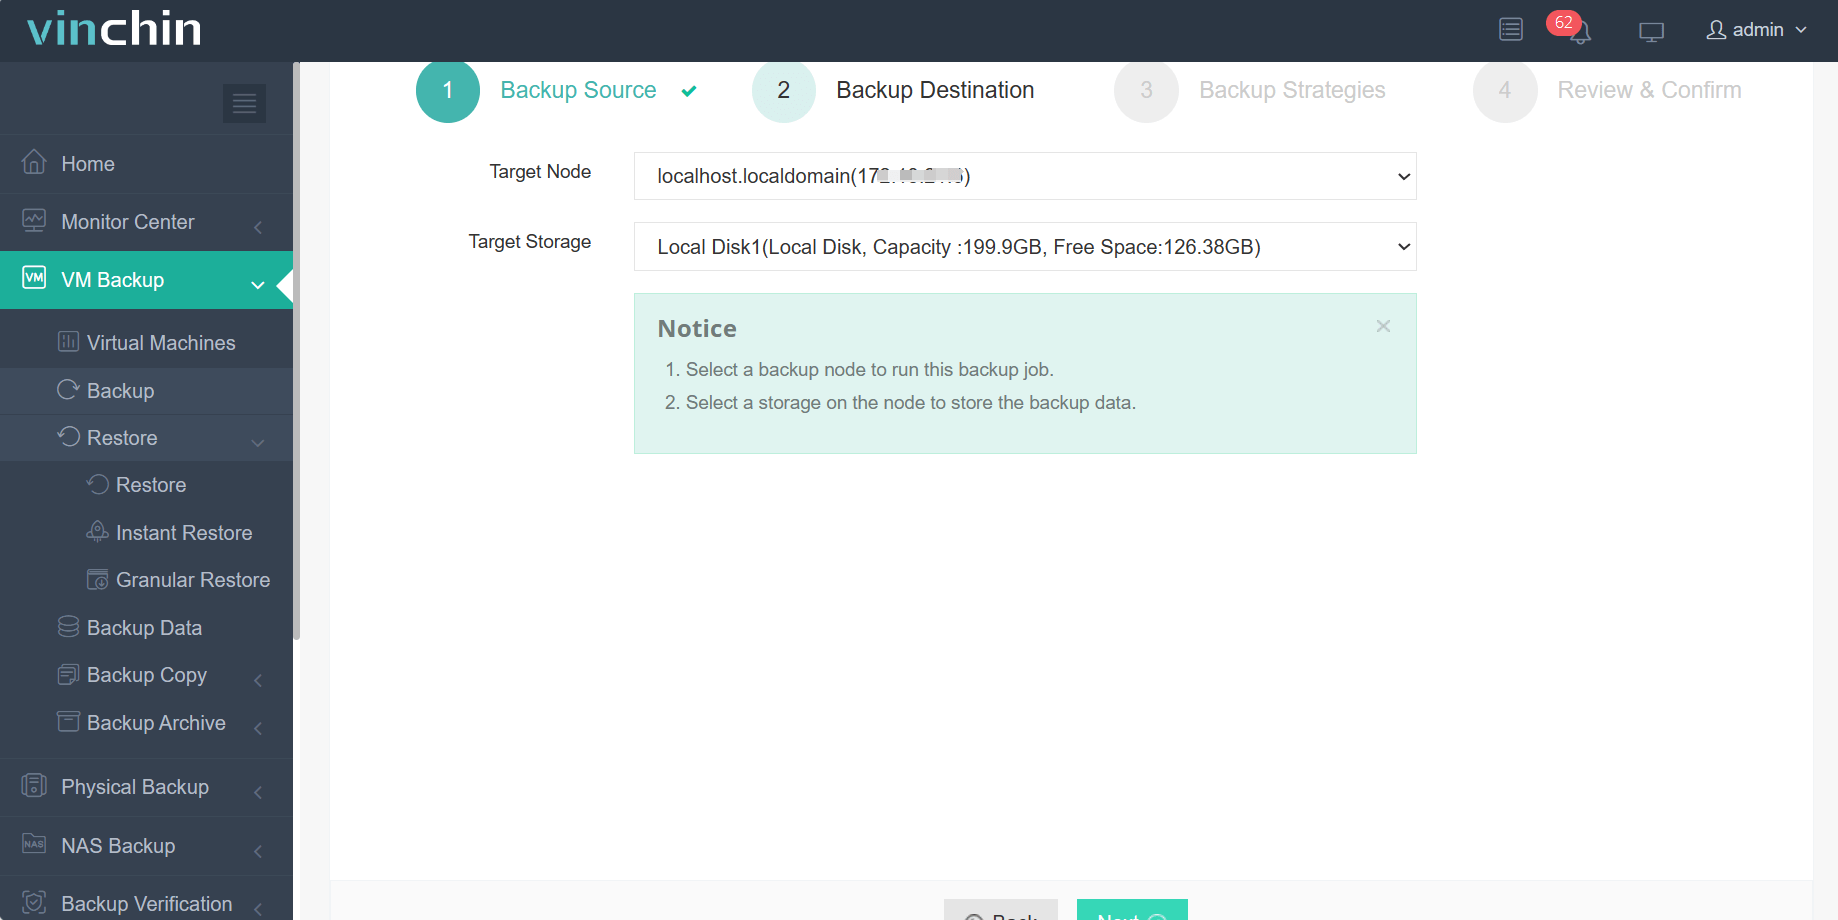
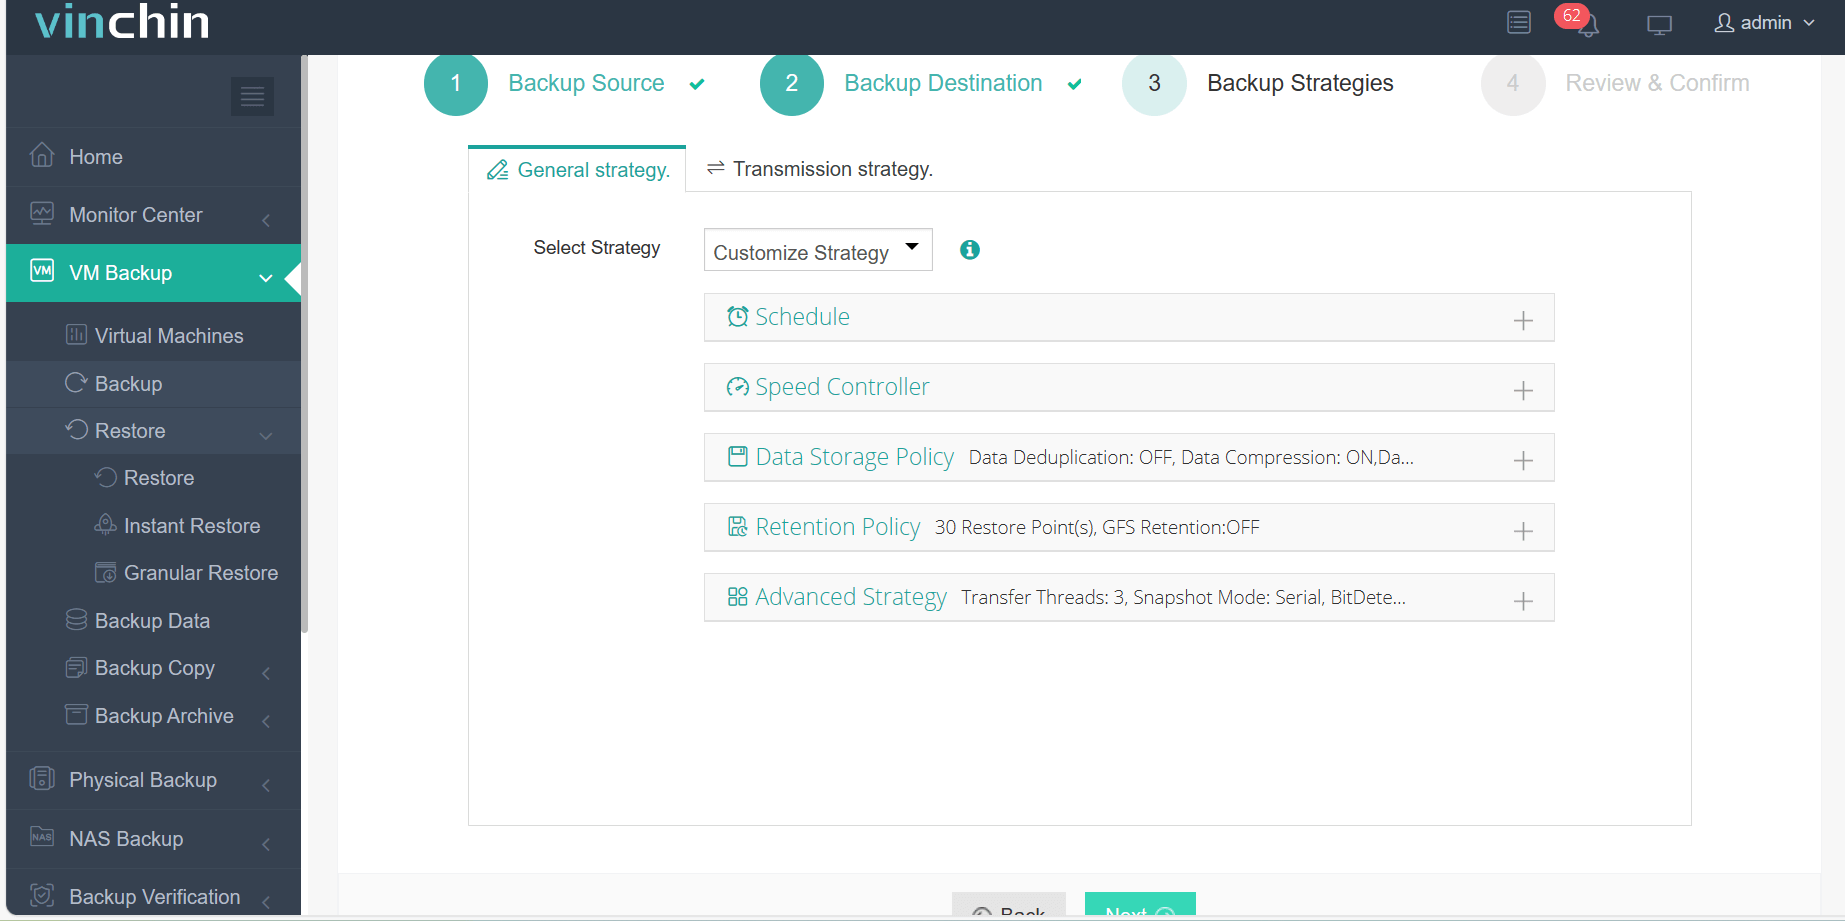
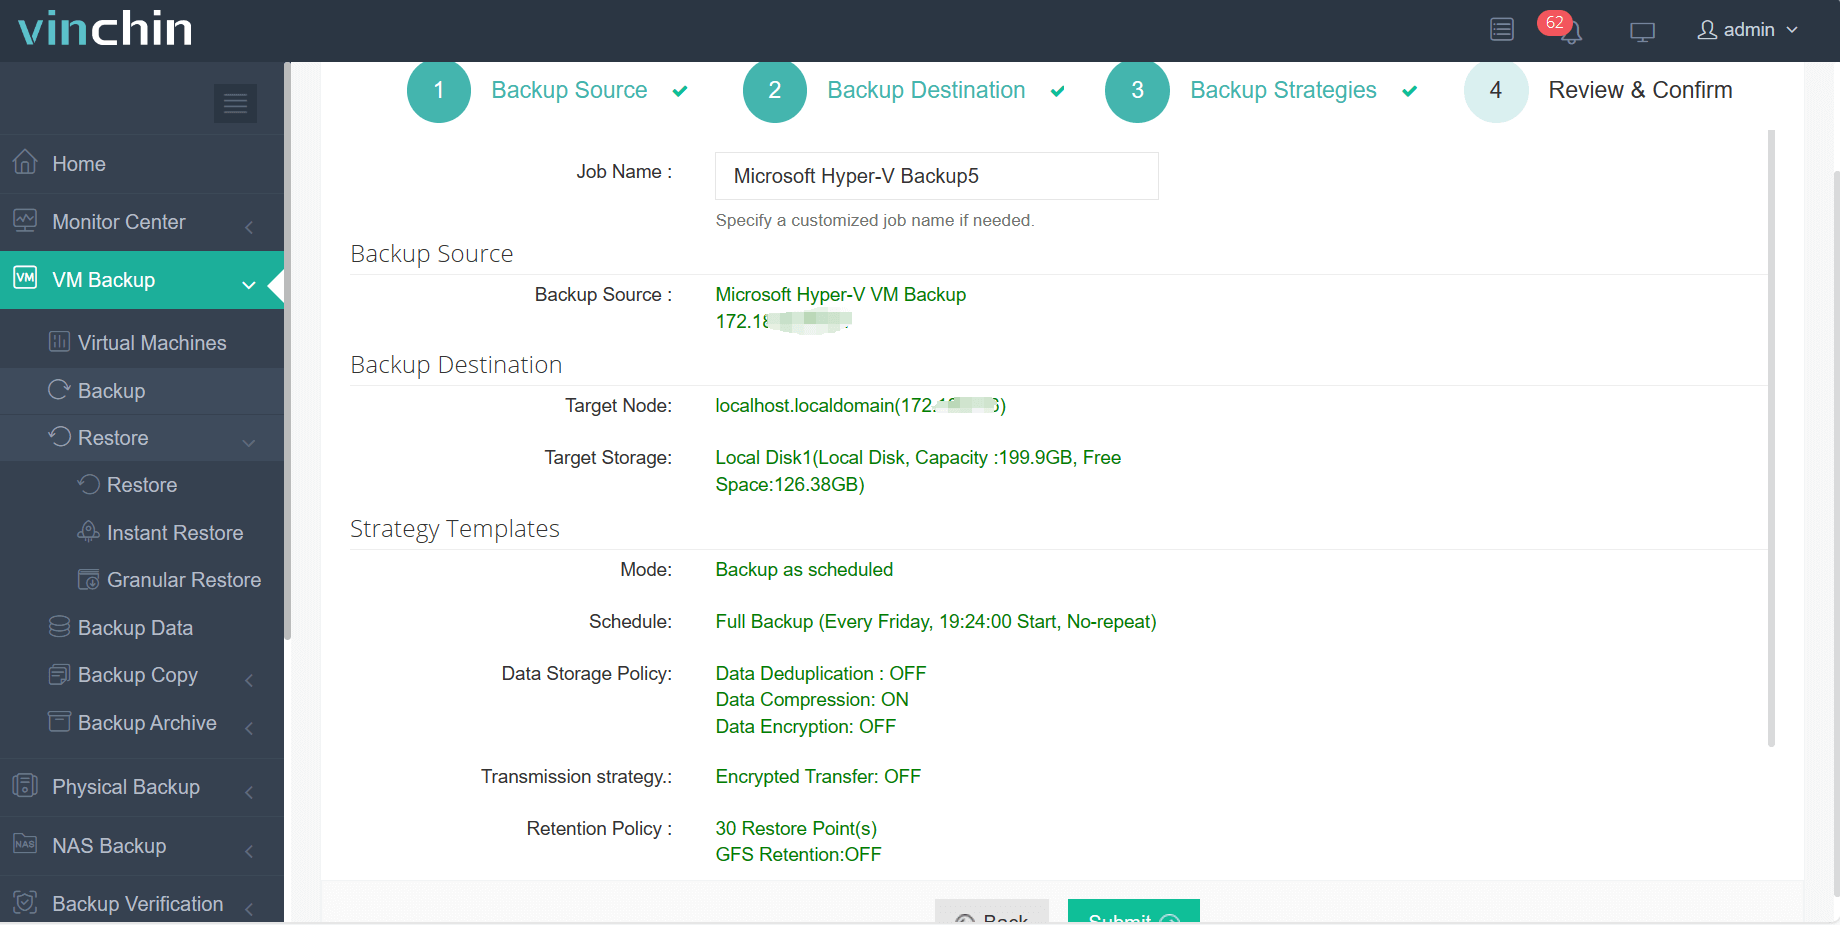
You can simply get the backup job started via 4 simple steps of configurations through a single web console.
1. Select the Hyper-V VM

2. Select the backup storage
3. Select the backup strtegies

4. Submit the job

Vinchin has been selected by thousands of companies. Just try Vinchin with a 60-day full-featured free trial.
Hyper-V Gen1 Gen2 FAQs
Q1: Which operating systems can run on a Generation 2 VM?
A: Generation 1 VMs use BIOS and emulated devices, while Generation 2 VMs use UEFI firmware and synthetic devices.
Q2: Does Generation 2 support Secure Boot?
A: Generation 2 VMs support 64-bit Windows 8/Server 2012 or later and many modern Linux distributions.
Q3: Can Generation 2 boot from a SCSI-attached disk?
A: Yes, Generation 2 VMs can boot directly from a virtual disk attached to the SCSI controller, unlike Generation 1.
Conclusion
With advanced security features like Secure Boot and TPM, enhanced CPU and memory performance, and faster SCSI boot, migrating Gen 1 to Gen 2 Hyper-V VMs is a smart step toward a modernized infrastructure. Don’t forget to backup your Gen 1 VMs before conversion to prevent data loss.
Vinchin Backup & Recovery streamlines this with agentless, automatic Hyper-V backup, incremental and offsite strategies, and one-click restore. Try Vinchin today—enjoy a 60-day full-featured free trial for a seamless, risk-free VM upgrade experience!
Share on:


