-
How to Solve Lag During Proxmox Installation?
-
Protecting Your Proxmox VM with Vinchin
-
Awful lag during proxmox installation FAQs
-
Conclusion
Proxmox is a leading open-source virtualization platform used worldwide by IT professionals. Yet even seasoned admins can face one stubborn problem: awful lag during Proxmox installation. If you've ever watched your installer freeze or seen keystrokes echo twice before anything happens, you know how frustrating this can be.
What Are the Common Causes of Lag in Proxmox Installation?
Issue 1: USB Boot Media Issues
USB drives created with tools like Ventoy may cause compatibility issues due to their non-traditional write method, potentially leading to lag or input delays—especially on older hardware.
Issue 2: Installation Mode Selection
Text mode relies on basic video drivers and may have limited compatibility, while graphical mode often runs more smoothly by using broader driver support—even on headless servers.
Issue 3: Hardware Compatibility
Older servers (e.g., Dell T610) may use RAID controllers or SATA chipsets not fully supported by Linux, causing slow disk response during installation. Checking dmesg logs can help identify such issues.
Issue 4: Wrong Firmware and BIOS/UEFI Settings
Incorrect BIOS settings (Legacy vs. UEFI) or enabled Secure Boot can lead to boot failures or lag. Make sure the boot mode matches your media and disable Secure Boot unless supported.
Issue 5: Proxmox Version and Performance
After upgrading Proxmox (e.g., from 7.x to 8.x), GUI slowness may occur due to insufficient resources, browser cache, or missing updates. Check RAM, disk usage, and apply system updates regularly.
How to Solve Lag During Proxmox Installation?
If you're stuck watching a frozen installer screen—or typing passwords only for nothing to appear—don't panic! There are proven steps at every level of expertise that can get things moving again.
Method 1: Use a Different USB Creation Tool & Verify ISO Integrity
Start simple: switch up how you create your bootable USB stick.
Before writing any ISO file:
Download the official Proxmox ISO
Check its SHA256 checksum using
sha256sum proxmox-ve_*.iso
Compare this value against those listed on the official download page.
For Windows users: try Rufus set to “DD Image” mode instead of “ISO.”
On Linux/macOS: use dd for bit-for-bit accuracy:
sudo dd if=/path/to/proxmox.iso of=/dev/sdX bs=4M conv=fsync status=progress
Replace /dev/sdX with your actual device name (not a partition).
After writing completes:
Run
syncOptionally flush buffers:
blockdev --flushbufs /dev/sdX
Alternative cross-platform tool: BalenaEtcher also writes ISOs reliably.
Test finished media on another machine if possible—to rule out bad sticks entirely.
Some cheap drives have subtle faults that only show up under heavy read/write load.
Method 2: Switch to Graphical Installation Mode
If console installs freeze but graphical installs don't—even without fancy GPUs—that's no accident.
At the initial menu after booting from USB:
Select Graphical install
You may need a mouse temporarily but will likely find input much more responsive.
Graphical mode uses broader driver support via X11/Xorg rather than relying solely on framebuffer text output—which often lags badly when hardware acceleration isn’t available.
Method 3: Update Firmware and BIOS Before Installing
Old firmware causes strange problems—including awful lag during OS installations.
Visit your server manufacturer's website (e.g., Dell Support) for model-specific updates covering:
System BIOS
RAID controller firmware
Network card firmware
Apply updates using vendor-supplied utilities such as Dell EMC Repository Manager or downloadable ISO images burned onto separate media.
After updating:
Reboot into setup utility (F2, DEL, etc.)
Double-check all relevant settings match intended install method (UEFI vs Legacy)
Firmware updates resolve many silent incompatibilities between old hardware components and modern Linux kernels.
Method 4: Switch Connection Types & Test Alternative Drives
Sometimes simply changing where/how drives connect solves mysterious installer lags.
If installing onto an internal SATA drive fails but works over external USB3/SATA adapters—or vice versa—try swapping connection types again.
Some motherboards handle hot-plugged storage differently than onboard ports due to interrupt routing changes introduced by newer chipsets.
Also consider testing another physical hard drive entirely; failing disks often cause stalls long before SMART errors appear.
Method 5: Be Patient During Lengthy Operations (“Creating LVs”)
Certain steps take longer than expected—especially logical volume creation (“Creating LVs”) on large disks or complex RAID arrays.
On older servers with battery-backed RAID caches enabled, consistency checks may delay progress beyond ten minutes per operation!
Don't assume a hang until at least fifteen minutes have passed without visible change.
Want proof activity continues? Open another shell (Ctrl+Alt+F2) then run iostat -dxm 1
Look for ongoing disk activity ("await" values below ~50ms mean healthy progress).
Method 6: Troubleshoot Using Installation Logs & Kernel Parameters
When standard fixes fail, deeper diagnostics help pinpoint root causes fast.
During any stall:
1. Press Ctrl+Alt+F2 for an alternate terminal session
2. Log in as root (no password needed)
3. View live logs using tail -f /var/log/syslog
Look specifically for lines mentioning "error," "timeout," "resetting device," or references to problematic controllers/drivers (usb, ata, etc.).
Advanced tip: At GRUB prompt before starting installer,
press e then append extra kernel parameters such as:
nomodeset— disables GPU acceleration if graphics-related hangs occurpci=nomsi— fixes interrupt storms affecting PCI devicesusbcore.autosuspend=-1— disables aggressive power management causing dropped inputs
Press F10 after editing line(s) above "linux" entry.
Method 7: Address Post-Installation Lag & Optimize Host Performance
Even after successful setup, sluggishness inside the web GUI signals deeper issues worth fixing right away.
First check system resources:
Open shell (ssh root@yourhost) then run:
htop        # Real-time CPU/memory usage overview
vmstat 1 5  # High 'wa' column = I/O wait bottleneck
iostat -dxm 1   # Disk latency >50ms = trouble spot
If swap usage spikes regularly (free -h), reduce swappiness parameter (sysctl vm.swappiness=10) so RAM gets priority over slow disk paging.
Update all packages regularly—even free users should enable no-subscription repositories—to benefit from bugfixes improving GUI speed (Proxmox wiki).
Try different browsers too; sometimes clearing cache resolves persistent UI delays.
Method 8: Alternative – Network Boot (PXE) Installation
When all else fails—or when deploying many nodes at once—consider network-based installations via PXE instead of unreliable USB sticks altogether.
PXE lets machines fetch installers over LAN using DHCP + TFTP protocols configured centrally,
bypassing local media quirks completely (Debian PXE Guide).
Setting up PXE requires configuring DHCP options pointing clients toward TFTP server hosting extracted ISO contents;
most enterprise switches/firewalls support necessary options natively.
Protecting Your Proxmox VM with Vinchin
After successfully installing Proxmox and ensuring a stable virtual environment, implementing reliable backup solutions is essential for business continuity and disaster recovery. Vinchin is a professional enterprise-grade backup solution that supports Proxmox and over 15 other platforms including VMware, Hyper-V, and OpenStack.
Vinchin Backup & Recovery offers efficient features like incremental backup, data deduplication, and compression to reduce storage and bandwidth use. It also supports automated backups, V2V migration—all managed through an easy-to-use web interface.
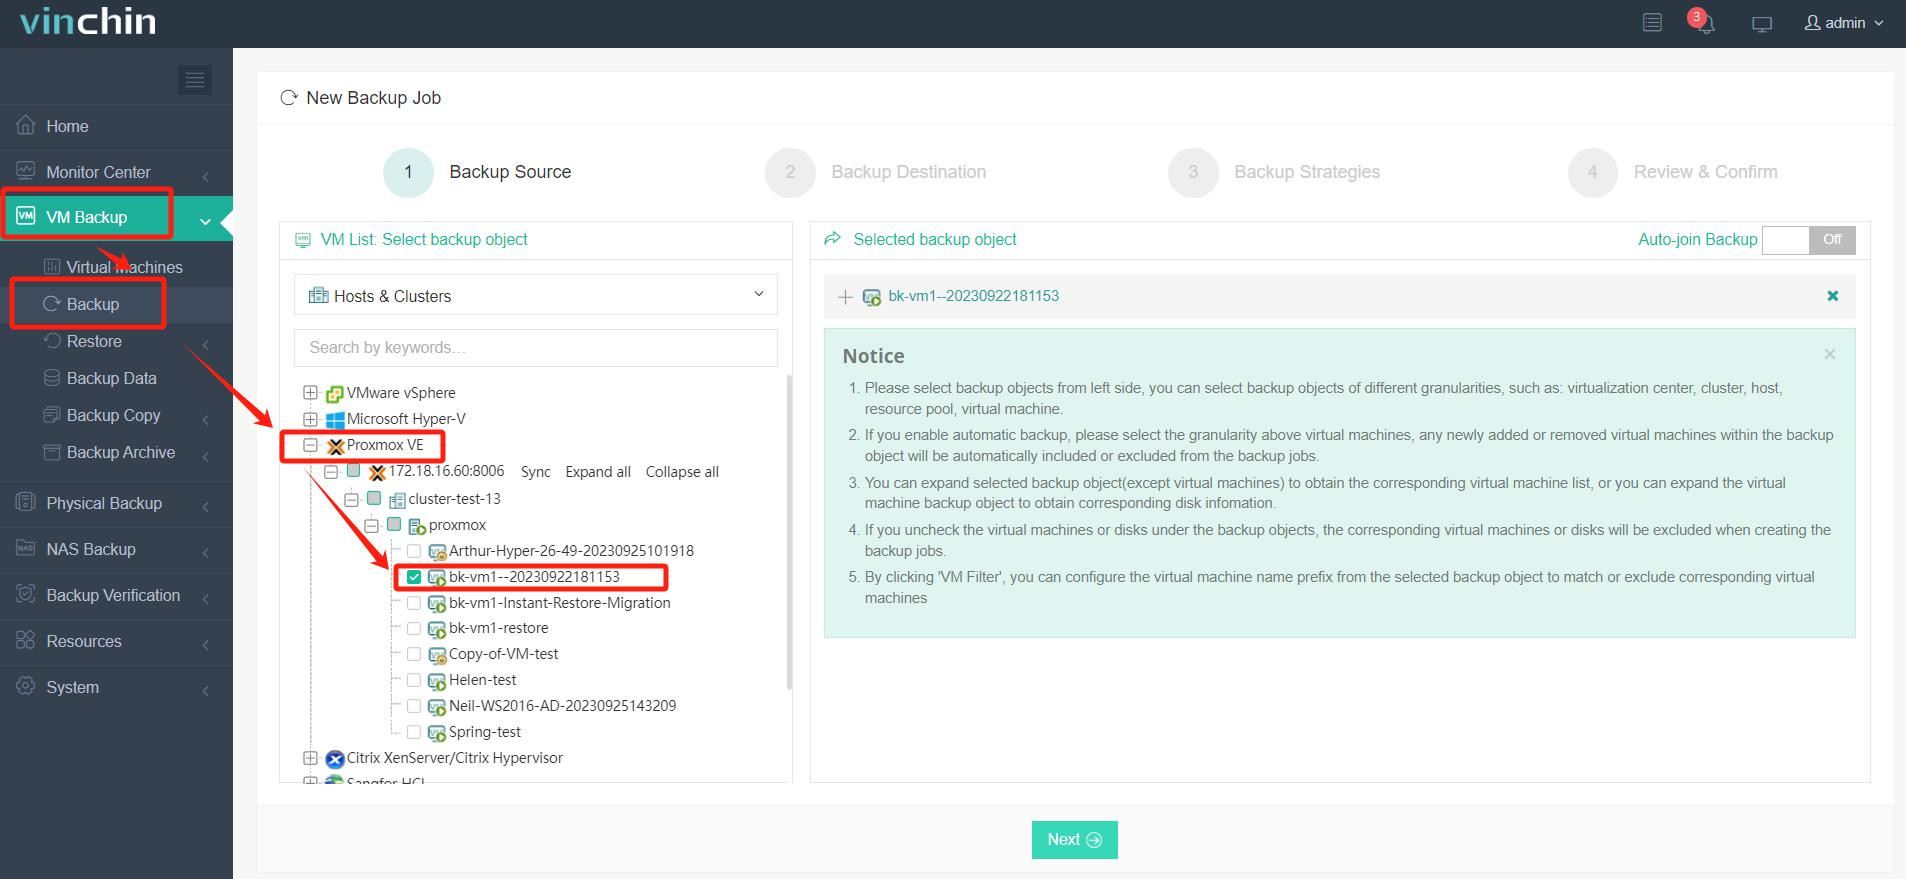
1. Select the Proxmox VM to back up;

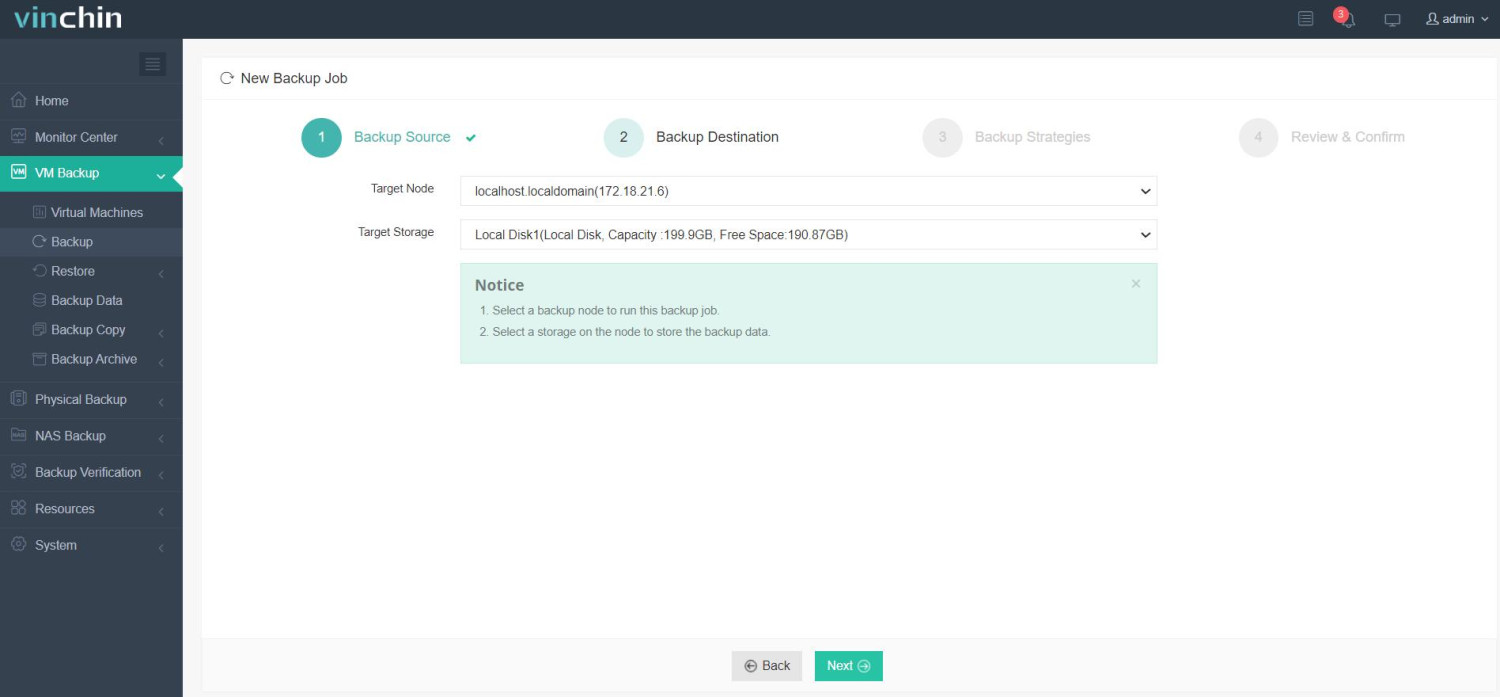
2. Choose backup storage;

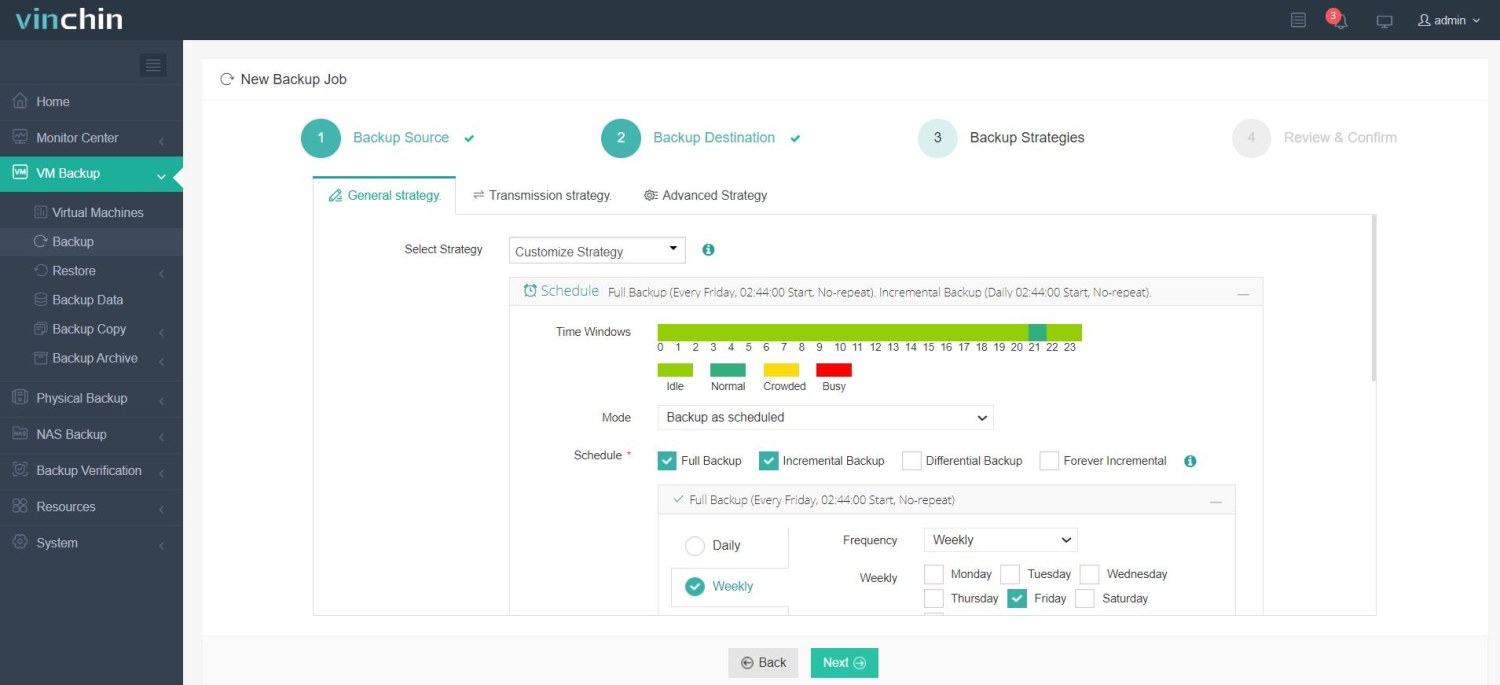
3. Configure backup strategies;

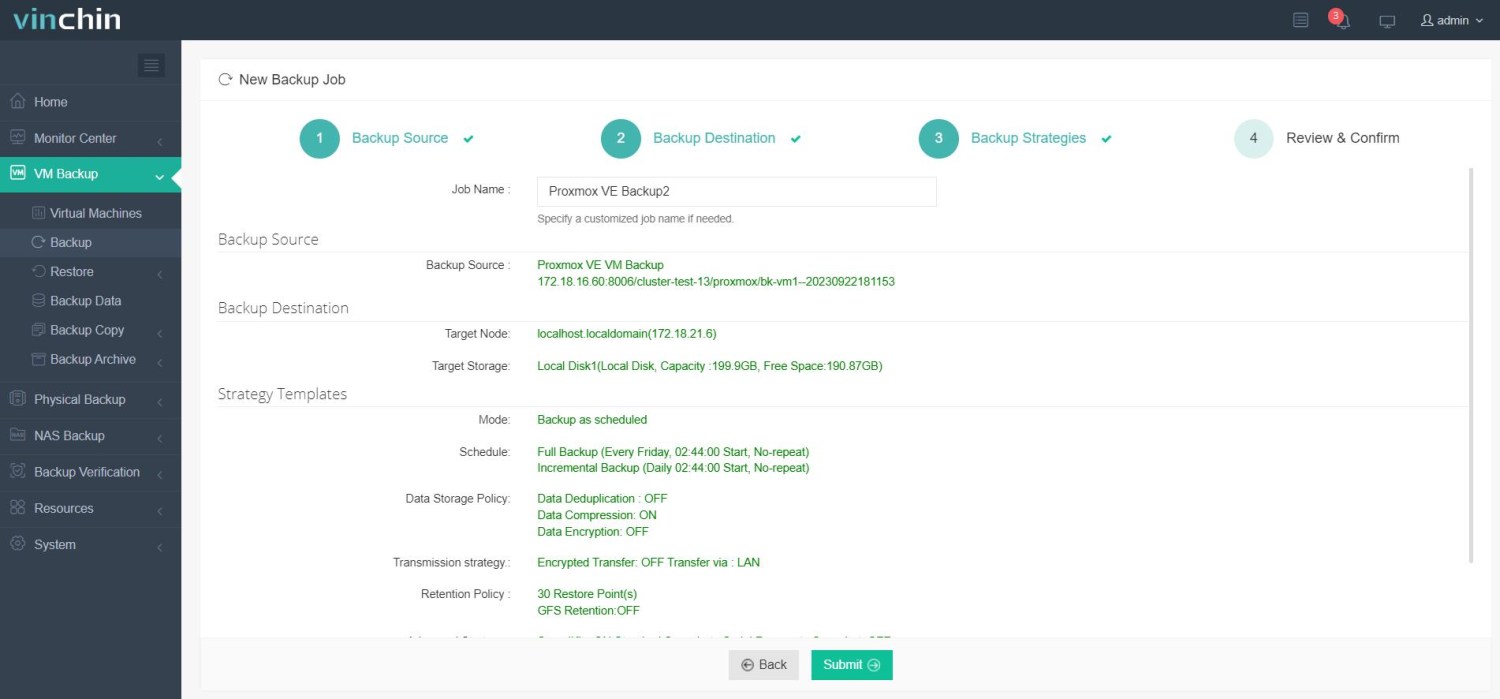
4. Submit the job.

Globally trusted by thousands of enterprises—with consistently high ratings for reliability—Vinchin offers a fully-featured free trial valid for 60 days so you can experience its benefits firsthand risk-free. Click below now to download the installer package and deploy easily within minutes! Any problem? Feel free to contact us!
Awful lag during proxmox installation FAQs
Q1: How do I quickly verify if my bootable USB was written correctly?
A1: After creating it with dd/Rufus/BalenaEtcher,
mount it on another machine—the presence of EFI/grub folders confirms success; mismatches suggest rewriting needed.
Q2 Can I switch between UEFI/Legacy modes mid-installation if stuck?
A2: No—you must recreate both boot media and adjust BIOS settings together since mismatches prevent proper detection during startup.
Conclusion
Proxmox installation lag can be frustrating for many admins, but in most cases, the issue can be resolved quickly by switching USB creation tools, trying a different install mode, or updating firmware first. Once your system is up and running smoothly, safeguard all your workloads with Vinchin's powerful backup solution—your best choice for reliable business continuity across any virtual environment!
Share on:


