-
Why Migrate Proxmox to AWS?
-
How to migrate Proxmox to AWS with VM by exporting and importing VM?
-
How to migrate Proxmox to AWS with AWS MGN?
-
Easy Proxmox to AWS Migration with Vinchin
-
Proxmox to AWS Migration FAQs
-
Conclusion
Migrating Proxmox workloads to AWS lets organizations eliminate upfront hardware capex and adopt a true pay-as-you-go model—only paying for the GB-months of EBS you provision, plus IOPS and throughput as needed. AWS spans 36 Regions and 114 Availability Zones worldwide, with dozens of Edge locations for low-latency performance. Beyond compute and storage, AWS delivers fully managed services (databases, networking, security) that offload maintenance and bolster resilience.
Why Migrate Proxmox to AWS?
Proxmox Pain Points
High storage overhead: Proxmox hyperconverged setups often rely on Ceph, which incurs roughly 1 CPU + 4 GB RAM per OSD and monitor, plus external SAN arrays demand significant CapEx and administrative effort.
Complex HA Requirements: Achieving true high availability requires at least three cluster nodes for quorum and shared storage; without this, node failures lead to cold restarts and potential data loss.
AWS Cloud Advantages
Pay-as-You-Go Economics
AWS’s utility-style billing lets you pay only for each service you consume, with no long-term contracts or termination fees—similar to metered utilities like water or electricity.
Global Infrastructure
The AWS Cloud spans 36 Regions and 114 Availability Zones, plus over 700 Edge locations, enabling low-latency deployments, geographic redundancy, and compliance with local data-residency requirements.
Cost-Efficient Block Storage
Amazon EBS charges per GB-month of provisioned storage and per provisioned IOPS, so you tailor capacity and performance exactly to your needs—eliminating over-provisioning overhead.
Native Multi-AZ HA
EC2 instances and EBS volumes automatically distribute across multiple AZs, providing built-in fault isolation and synchronous replication without manual quorum or shared-storage setup.
High-Performance Databases
Amazon Aurora delivers up to 5× the throughput of standard MySQL and 3× that of PostgreSQL on similar hardware, with fully managed scaling and serverless options to match workload spikes.
Enterprise-Grade Security
AWS enforces least-privilege identity via IAM, isolates networks with VPCs, and protects data at rest and in transit using envelope encryption with AWS KMS—guided by the AWS Well-Architected Security Pillar best practices.
How to migrate Proxmox to AWS with VM by exporting and importing VM?
Migrating Proxmox VMs to AWS involves several steps, from preparing your environment to verifying the successful launch of your EC2 instances. Below is a structured guide to ensure a smooth migration process.
Prerequisites
AWS Account: An active AWS account with necessary permissions.
Network Connectivity: Established VPN or Direct Connect between your on-premises environment and AWS.
VM Compatibility: Check whether AWS supports importing VMs with the OS of the Proxmox VM.
AWS CLI Installed: Ensure the AWS Command Line Interface (CLI) is installed and configured on your local machine.
IAM Role for VM Import: Create an IAM role named vmimport with the necessary trust and permission policies to allow VM imports.
Proxmox to AWS migration steps
1. Prepare the Proxmox VM
Ensure the VM is powered off and convert the VM's disk image to a supported format.
qemu-img convert -f qcow2 -O raw /path/to/proxmox-vm.qcow2 /path/to/vm.raw
2. Upload the Disk Image to AWS S3
Create an S3 bucket and upload the converted disk image to the S3 bucket.
aws s3 cp /path/to/vm.raw s3://my-vm-imports/vm.raw
3. Create the Import Task
Create a containers.json file specifying the S3 location of the disk image.
[
  {
    "Description": "Proxmox VM",
    "Format": "raw",
    "UserBucket": {
      "S3Bucket": "my-vm-imports",
      "S3Key": "vm.raw"
    }
  }
]
Run the import command:
aws ec2 import-image --description "Proxmox VM Import" --disk-containers file://containers.json
4. Monitor the Import Task
Check the status of the import task:
aws ec2 describe-import-image-tasks --import-task-ids import-ami-xxxxxxxx
Wait until the status is completed.
5. Launch the EC2 Instance
Once the import is complete, register the imported image as an AMI.
Launch an EC2 instance using the imported AMI.
6. Verify the Instance
Connect to the EC2 instance to ensure that the applications and services are running as expected.
Check system logs and application logs for any errors or issues.
Troubleshooting Tips
Import Failures: Ensure that the VM's disk image is in a supported format and that the IAM role has the necessary permissions.
Boot Issues: Verify that the VM's operating system is compatible with EC2 and that the necessary drivers (e.g., for networking and storage) are included.
Performance Concerns: Consider resizing the EC2 instance or optimizing the application's configuration for cloud environments.
How to migrate Proxmox to AWS with AWS MGN?
Prerequisites
Supported OS: Ensure Proxmox VMs run supported operating systems.
Network Connectivity: Establish secure network connectivity between Proxmox and AWS via VPN or Direct Connect.
AWS Account: Have an active AWS account with necessary permissions.
Proxmox to AWS Migration steps with AWS MGN
1. Set Up AWS MGN
Log in to AWS Console. In the search bar, type and select Application Migration Service. Click on Get started to begin the setup process.
2. Create Replication Settings Template
Staging Area Subnet: Select the subnet for the staging area.
Replication Server Instance Type: Choose the instance type (default: t3.small).
EBS Volume Type: Select the volume type (default: gp3).
EBS Encryption: Choose the encryption option.
Security Group: Ensure Always use Application Migration Service security group is checked.
Private IP for Data Replication: If using private network connection, select Use private IP for data replication.
Network Bandwidth Limiting: If needed, select Limit network bandwidth (per server - in Mbps).
Create Template: Click on Create template to finalize the configuration.
3. Install Replication Agent on Source VM
Generate Temporary Credentials: Use AWS CLI or CloudShell to generate temporary credentials:
aws sts assume-role \
  --role-arn arn:aws:iam::<account-id>:role/MGN_Agent_Installation_Role \
  --role-session-name mgn_installation_session_role
Install Required Packages: On the source VM, install necessary packages:
sudo yum install -y make openssl wget curl gcc kernel-devel-$(uname -r) build-essential
Download and Install Agent: Download the AWS Replication Agent installer and run it using the temporary credentials obtained earlier.
4. Configure Replication Settings
In the AWS MGN console, navigate to the Source Servers section and select the server. Click on the Launch Settings tab and configure the necessary settings, including EC2 launch template configurations.
5. Launch Test Instance
In the Source Servers section, select the server and click on Test and cutover, then choose Launch test instance. Monitor the progress in the console until the test instance is fully launched.
6. Perform Cutover to AWS
Prepare for Cutover: Once the test instance is validated, select the server and click on Test and cutover, then choose Mark as ready for cutover. Click on Launch cutover instance to start the cutover process. Ensure the cutover instance is fully launched and operational.
7. Verify VM Startup on AWS
Navigate to the EC2 Dashboard. Locate the migrated instance and verify its status is running. Use SSH (for Linux) or RDP (for Windows) to connect to the instance and confirm its functionality.
Easy Proxmox to AWS Migration with Vinchin
Vinchin Backup & Recovery is a professional, enterprise-level VM backup solution that supports fully agentless backup and migration, enabling businesses to transition to new virtual environments with minimal impact on production systems.
It supports over 15 virtualization platforms—including VMware vSphere, Microsoft Hyper-V, Proxmox VE, oVirt, Oracle OLVM, Red Hat Virtualization, XCP-ng, XenServer, OpenStack, and more—providing unified protection and migration across heterogeneous environments. Beyond on-premises servers, Vinchin seamlessly migrates VMs between on-prem and cloud platforms—such as Proxmox to AWS EC2—using the same agentless, GUI-driven workflows.
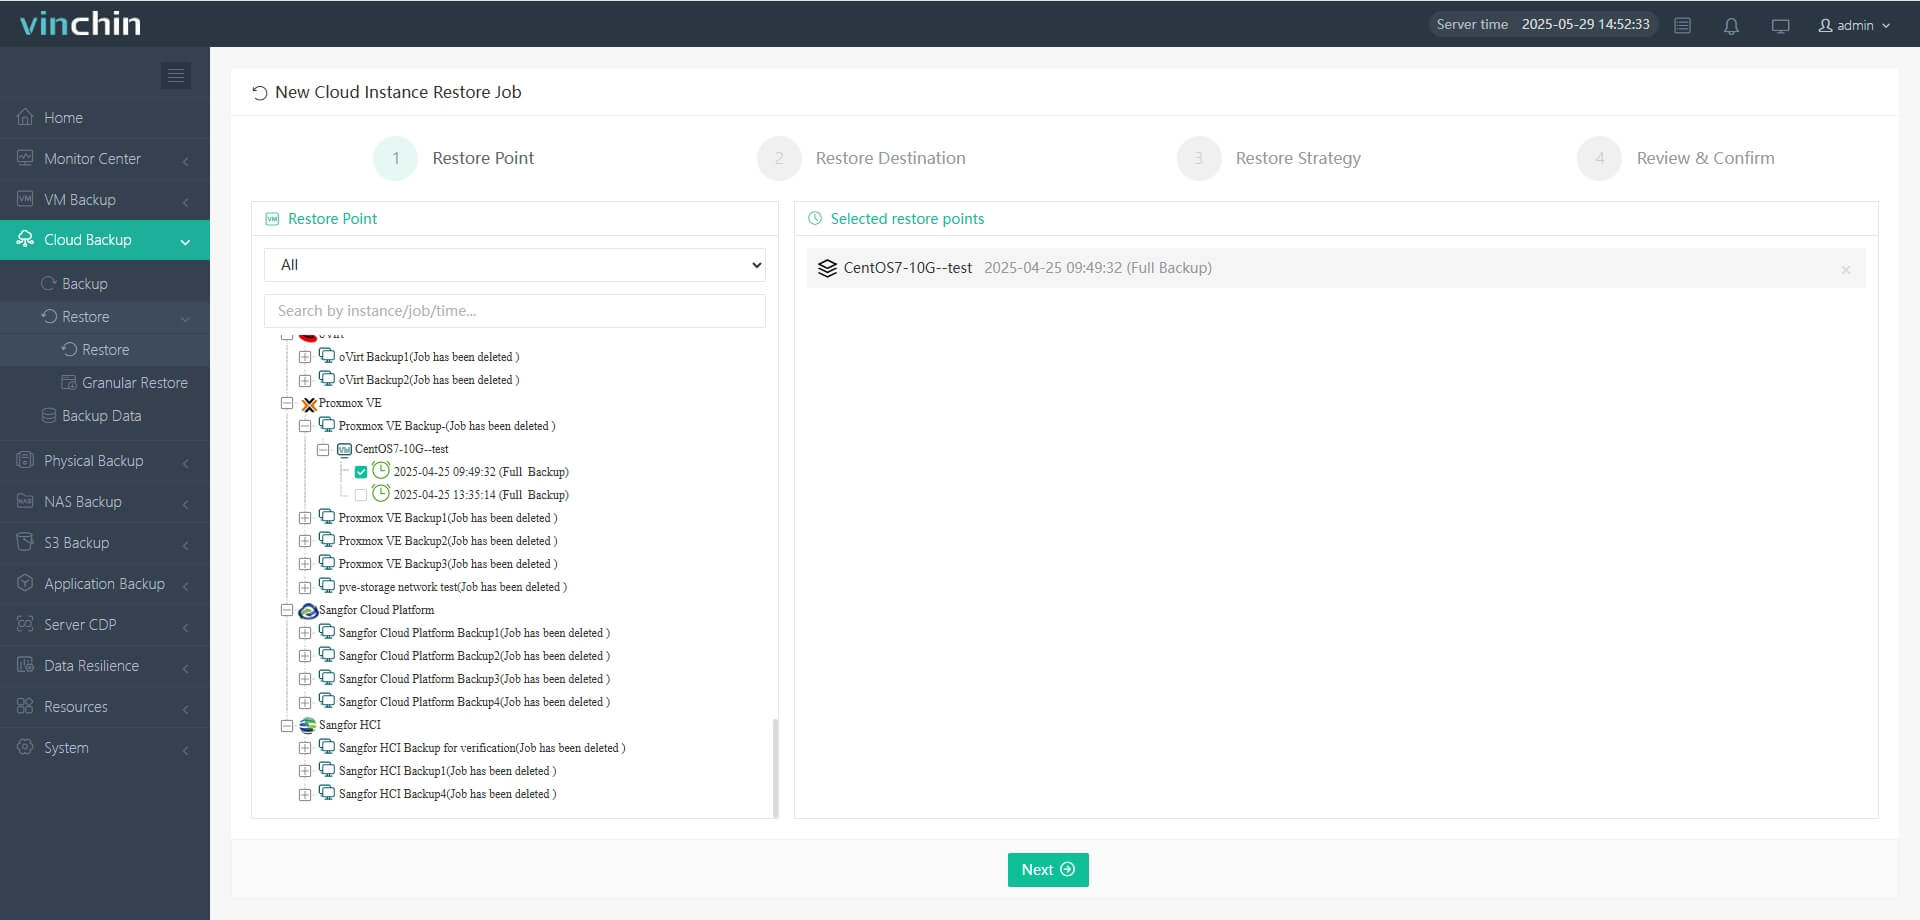
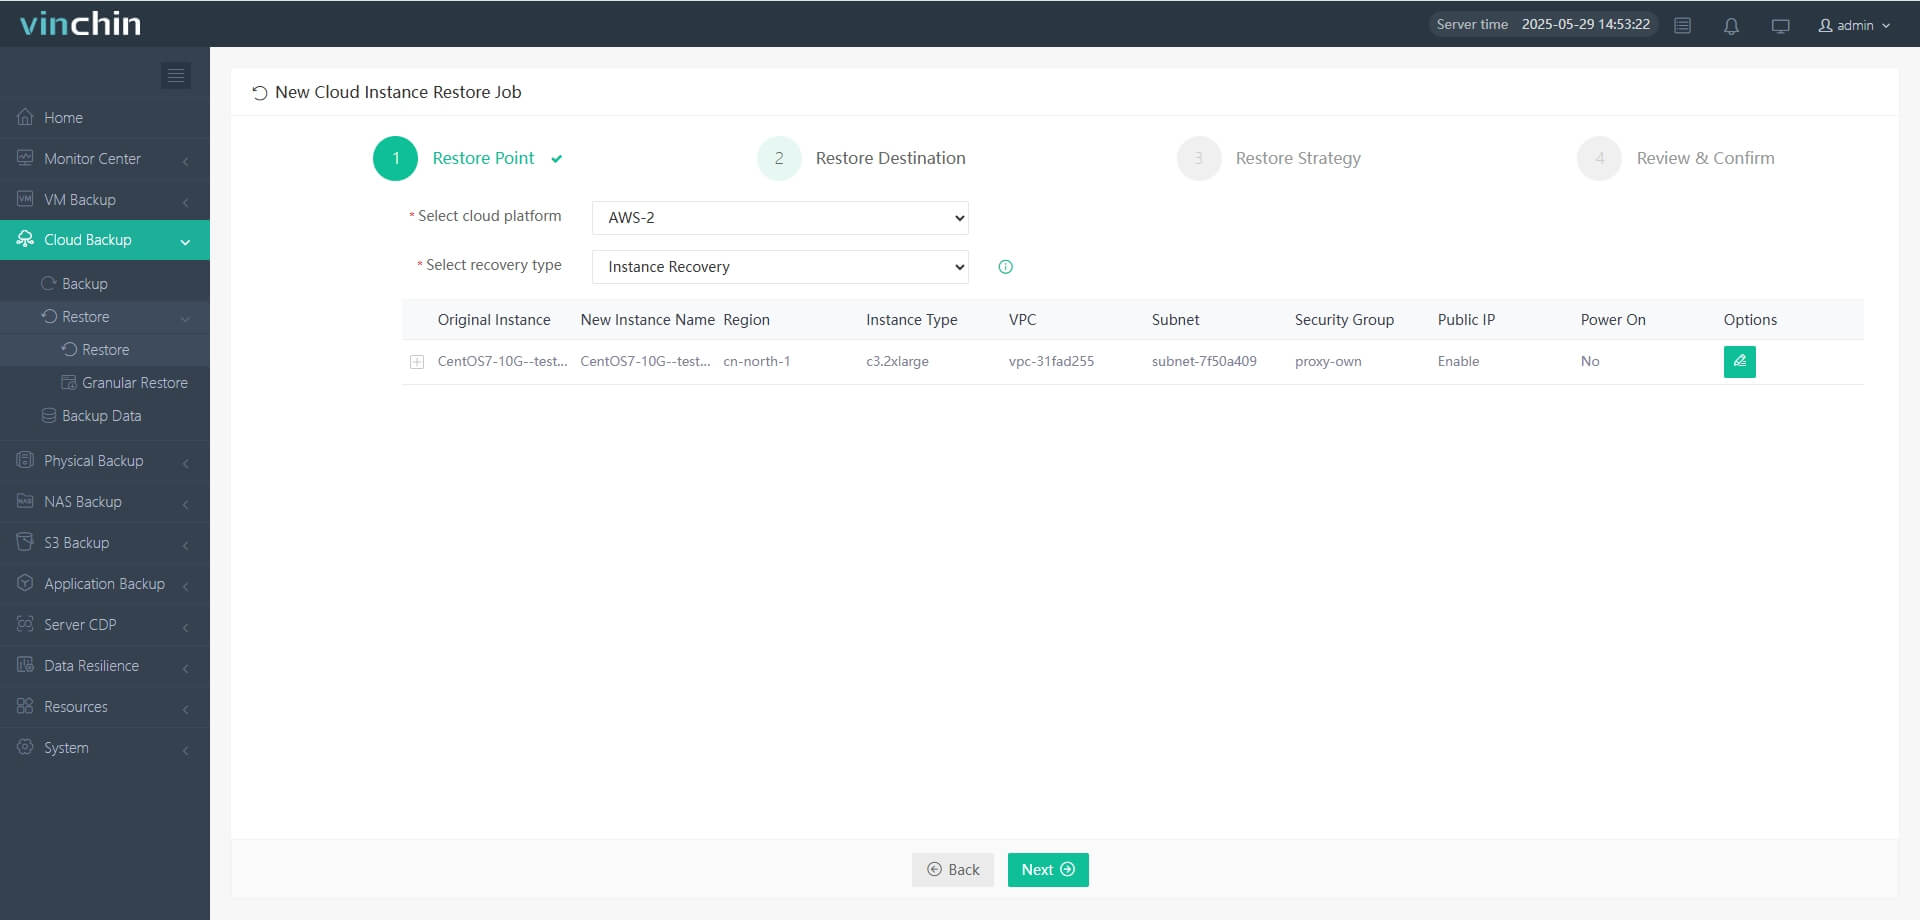
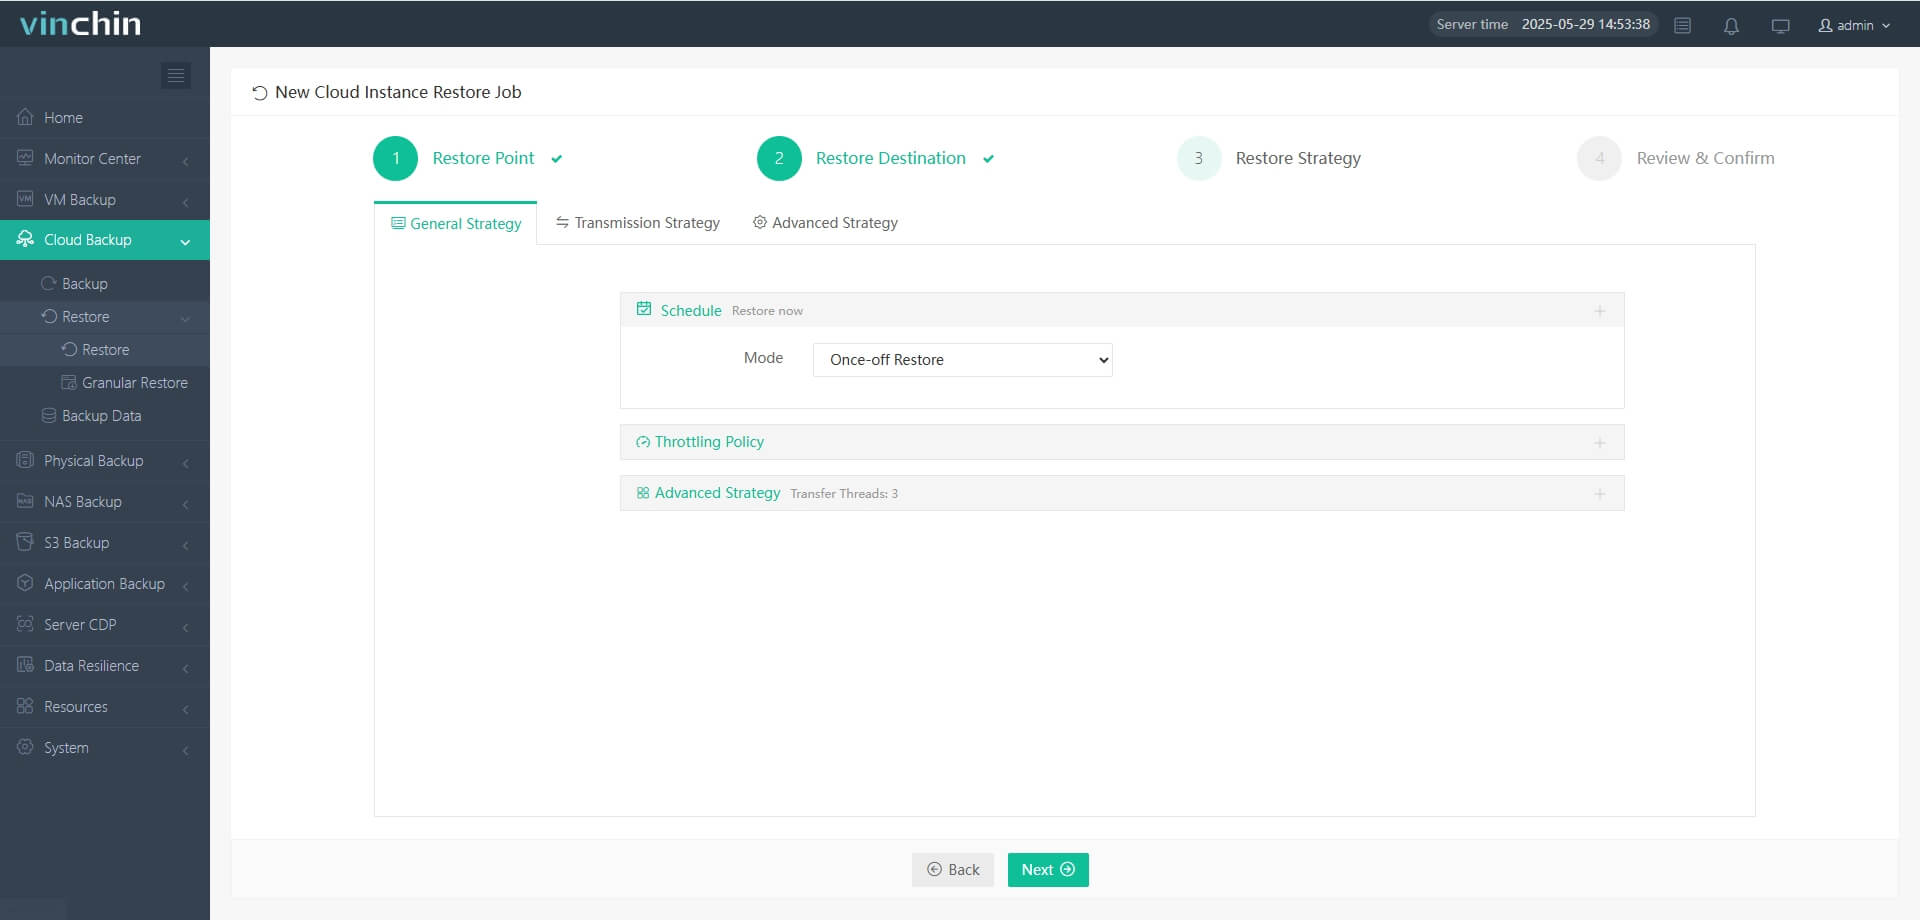
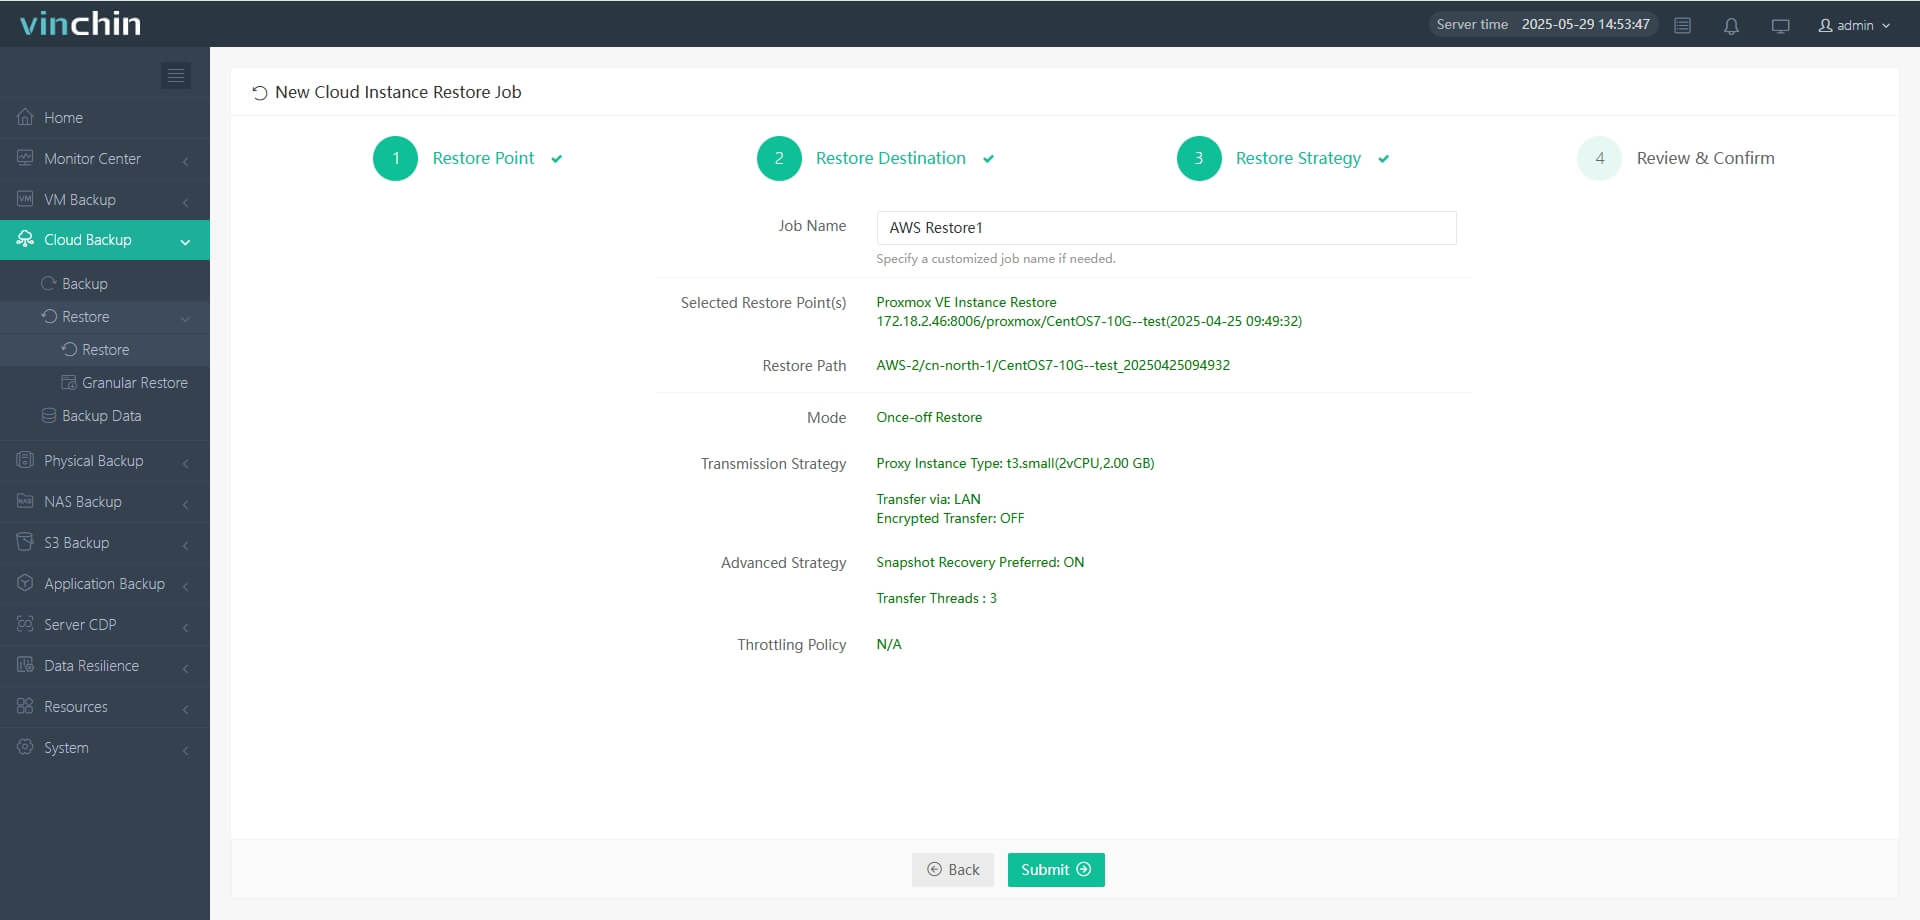
The VM migration process is straightforward: backup the source VM and restore it to the target host to boot; you simply create a VM backup task in Vinchin’s user-friendly web console and choose your destination. To migrate, follow these four steps:
1. Select the Proxmox VM backup
2. Select AWS as target host
3. Choose the migration strategies
4. Submit the job
Join thousands of global enterprises that rate Vinchin as a High Performer on G2, TrustRadius, SoftwareAdvice, and Gartner. Start a 60-day full-featured free trial today—click the button to download and deploy in minutes.
Proxmox to AWS Migration FAQs
Q1: Is there a free tier for AWS Application Migration Service?
A: Yes, AWS MGN offers 90 days of free usage per server, after which standard AWS charges apply.
Q2: Do I need to install agents on Proxmox VMs for migration?
A: For agentless migration, AWS MGN supports VMware vCenter 6.7 and 7.0; however, Proxmox is not natively supported.
Q3: Are there any limitations when using AWS MGN for migration?
A: AWS MGN does not support Proxmox natively; alternative methods like exporting and importing VMs or Vinchin Backup & Recovery may be required.
Conclusion
Moving Proxmox VMs to AWS unlocks cost savings, global reach, and managed services. Choose VM Import/Export for simple lift-and-shift or AWS Application Migration Service for minimal downtime. For an agentless, one-click experience, Vinchin Backup & Recovery lets you back up Proxmox VMs and restore them to EC2 in minutes. Try Vinchin’s 60-day full-featured free trial today.
Share on:


