-
Traditional vs. Quick Virtual Machine Creation
-
How to Quickly Create a Hyper-V Virtual Machine?
-
How to Quickly Create a Hyper-V Virtual Machine Using a Template?
-
How to Backup Hyper-V VMs?
-
Hyper-V Quick Create FAQs
-
Conclusion
When conducting experimental tasks, virtual machines are invaluable tools. Windows 10 comes with Hyper-V, a simple and easy-to-use software. When setting up a cluster environment, multiple virtual machines are often needed. Creating each one manually would be time-consuming (for example, installing CentOS 7-Minimal takes at least 10 minutes). Therefore, it's desirable to quickly create new virtual machines from an already installed one.
Traditional vs. Quick Virtual Machine Creation
Traditionally, creating a Hyper-V virtual machine involves using the "New | Virtual Machine" command to launch the wizard, which has eight configuration pages for detailed settings. The Quick Create feature, however, allows you to select an ISO file or a virtual hard disk file to create a virtual machine with one click from the Hyper-V Manager's action pane. You can also enable or disable Secure Boot for Windows. Clicking "More Options" lets you set the VM name and select a virtual switch, but it lacks the comprehensive settings offered by the traditional method.
Quick Create is suitable for setting up temporary virtual machines, while production environments requiring strict configuration control are better served by the traditional wizard.
How to Quickly Create a Hyper-V Virtual Machine?
1. Open “Quick Create” from the Start menu in the right side.
2. Choose an operating system. To use your own image, select “Local Installation Source,” click “Change Installation Source,” and choose the appropriate .iso or .vhdx file. For Linux images, uncheck the “Enable Secure Boot” option.
3. Click “Create Virtual Machine.” Quick Create will automatically complete the remaining steps.
How to Quickly Create a Hyper-V Virtual Machine Using a Template?
Hyper-V supports the export and import of a fully configured virtual machine. By creating a template, you can rapidly and massively deploy new virtual machines, saving significant time on installation and configuration.
Moreover, Hyper-V allows exporting a running virtual machine while retaining its current state. This real-time cloning feature enables exporting any VM with checkpoints (snapshots) without shutting it down. This means you can quickly migrate to a new host without suspending services, allowing for testing and upgrading of existing services.
It is important to note that this process is a complete copy of the original VM. All configurations such as the IP address and machine name will be preserved. During the import process, make sure to avoid IP conflicts, and ensure the virtual machine template does not use a static IP address.
1. Create a virtual machine template
Install a virtual machine using the normal steps and perform the necessary basic configuration. Shut down the virtual machine properly.
2. Right-click the virtual machine and choose to export the VM template
Structure of the exported template files:
D:\virtualPC_Model>tree /F
Volume in drive D is New Volume
Volume Serial Number is B601-E749
D:.
└─win11
    └─win11_251
        ├─Snapshots
        ├─Virtual Hard Disks
        │      win11_251.vhdx
        │
        └─Virtual Machines
                2B39C6B7-9D9D-491B-BB18-19811EFBBB47.vmcx
                2B39C6B7-9D9D-491B-BB18-19811EFBBB47.vmgs
                2B39C6B7-9D9D-491B-BB18-19811EFBBB47.VMRS
3. Import the virtual machine
To copy a new virtual machine, click “Import Virtual Machine” in the Actions menu on the right side of Hyper-V Manager to begin the import process.
4. Locate the folder
In the “Folder” input box, click Browse or directly enter the storage path of the previously created virtual machine. Click “Next.”
5. Select the virtual machine and click “Next”
6. Choose import type
Select “Copy the virtual machine (create a new unique ID).” Click “Next.”
7. Choose folders for virtual machine files
By default, “Store the virtual machine in a different location” is not checked. Since we are copying, check this option.
Virtual Machine Configuration Folder: leave this unchanged.
Checkpoint Store and Smart Paging Folder: these are set by default to the new VM's path. Change them to the target path for the copied VM. Click “Next.”
8. Select the folder to store virtual hard disks. Click “Next.”
9. Summary – Completing the import wizard
This page displays the information of the virtual machine to be imported. Click “Finish.”
10. Start the virtual machine
Now you have successfully copied a new virtual machine. Start it and verify its functionality. Add a network adapter if needed. If the template had a NIC with a static IP, remember to change it after startup to avoid conflicts.
Other Notes
When creating virtual machines from a template, be aware of Hyper-V configuration version compatibility. For example:
Windows Server 2022 Hyper-V – Configuration Version 10.0
Windows Server vNext 25206 Hyper-V – Configuration Version 11.0
Templates exported from the latter cannot be imported into the former.
How to Backup Hyper-V VMs?
Vinchin Backup & Recovery is designed to provide comprehensive data protection and disaster recovery for virtualized environments, including those using Microsoft Hyper-V. It is developed to address the needs of businesses looking for reliable and efficient ways to backup and restore their virtual machines in the event of data loss, system failures, or other catastrophic events.
It also supports VMware vSphere, XenServer, XCP-ng, oVirt, RHV, OpenStack, Proxmox, etc. and database, NAS, file server, Linux & Windows Server, etc. Tailored for virtual environments, Vinchin offers automated backups, agentless backup, LAN/LAN-Free options, offsite copying, data deduplication, and cloud archiving. With data encryption and ransomware protection, it provides dual insurance for Hyper-V VM backups and supports easy migration between Hyper-V and other platforms.
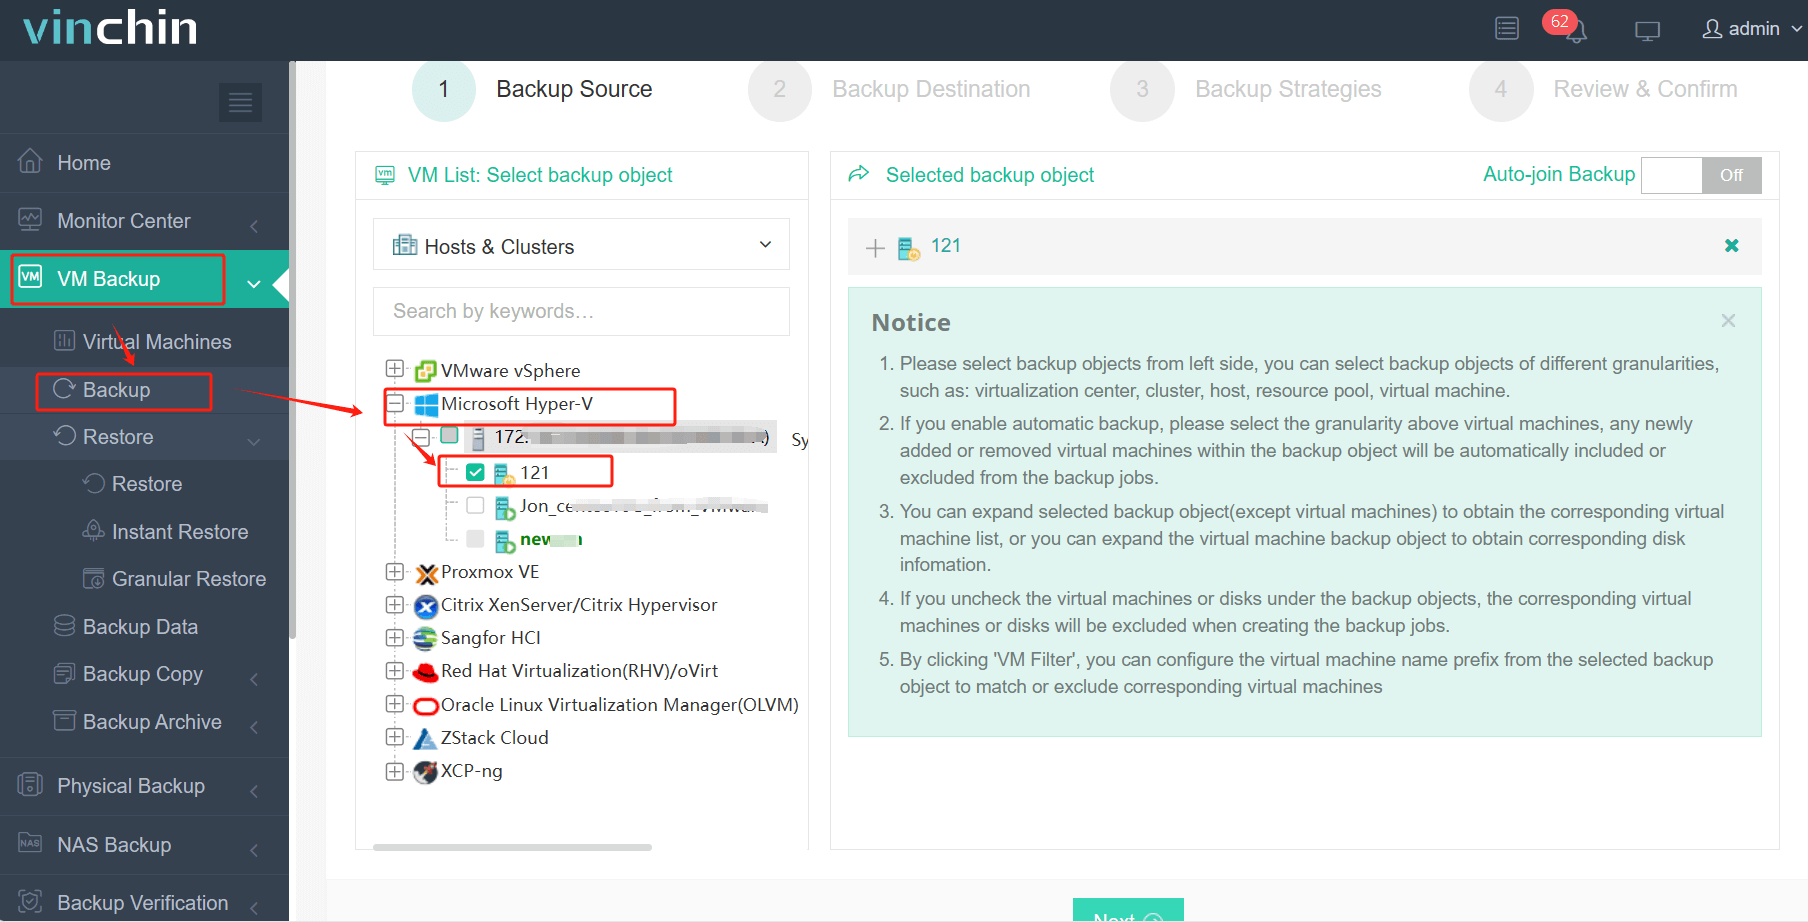
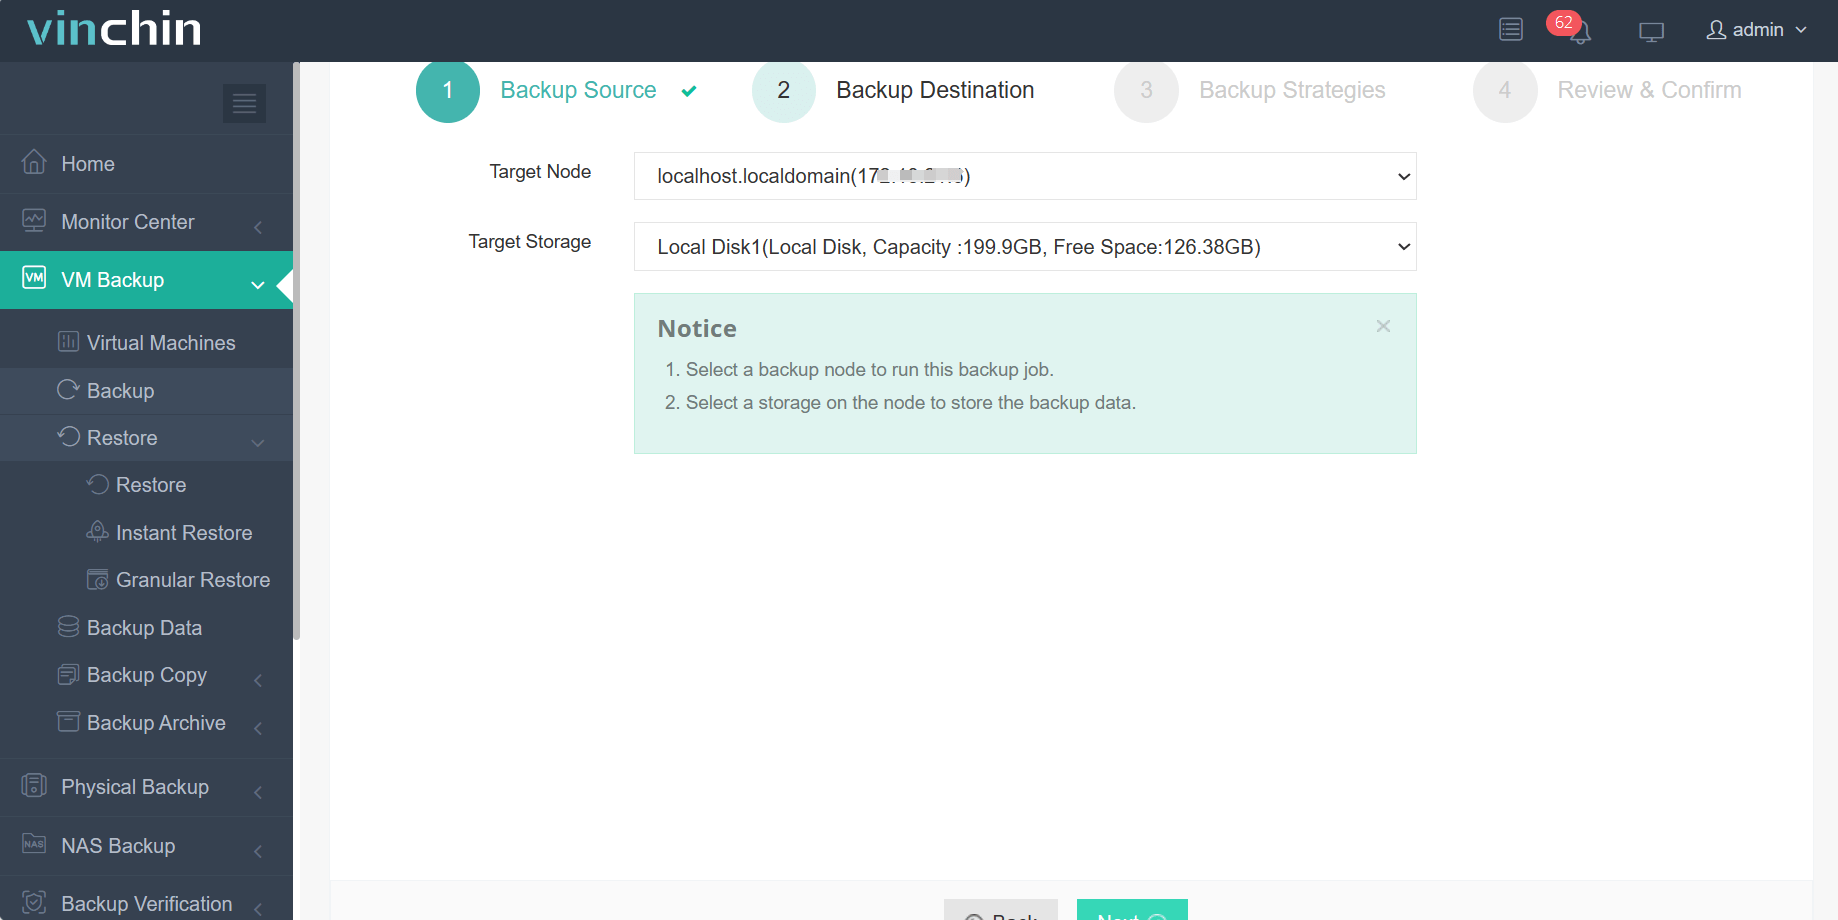
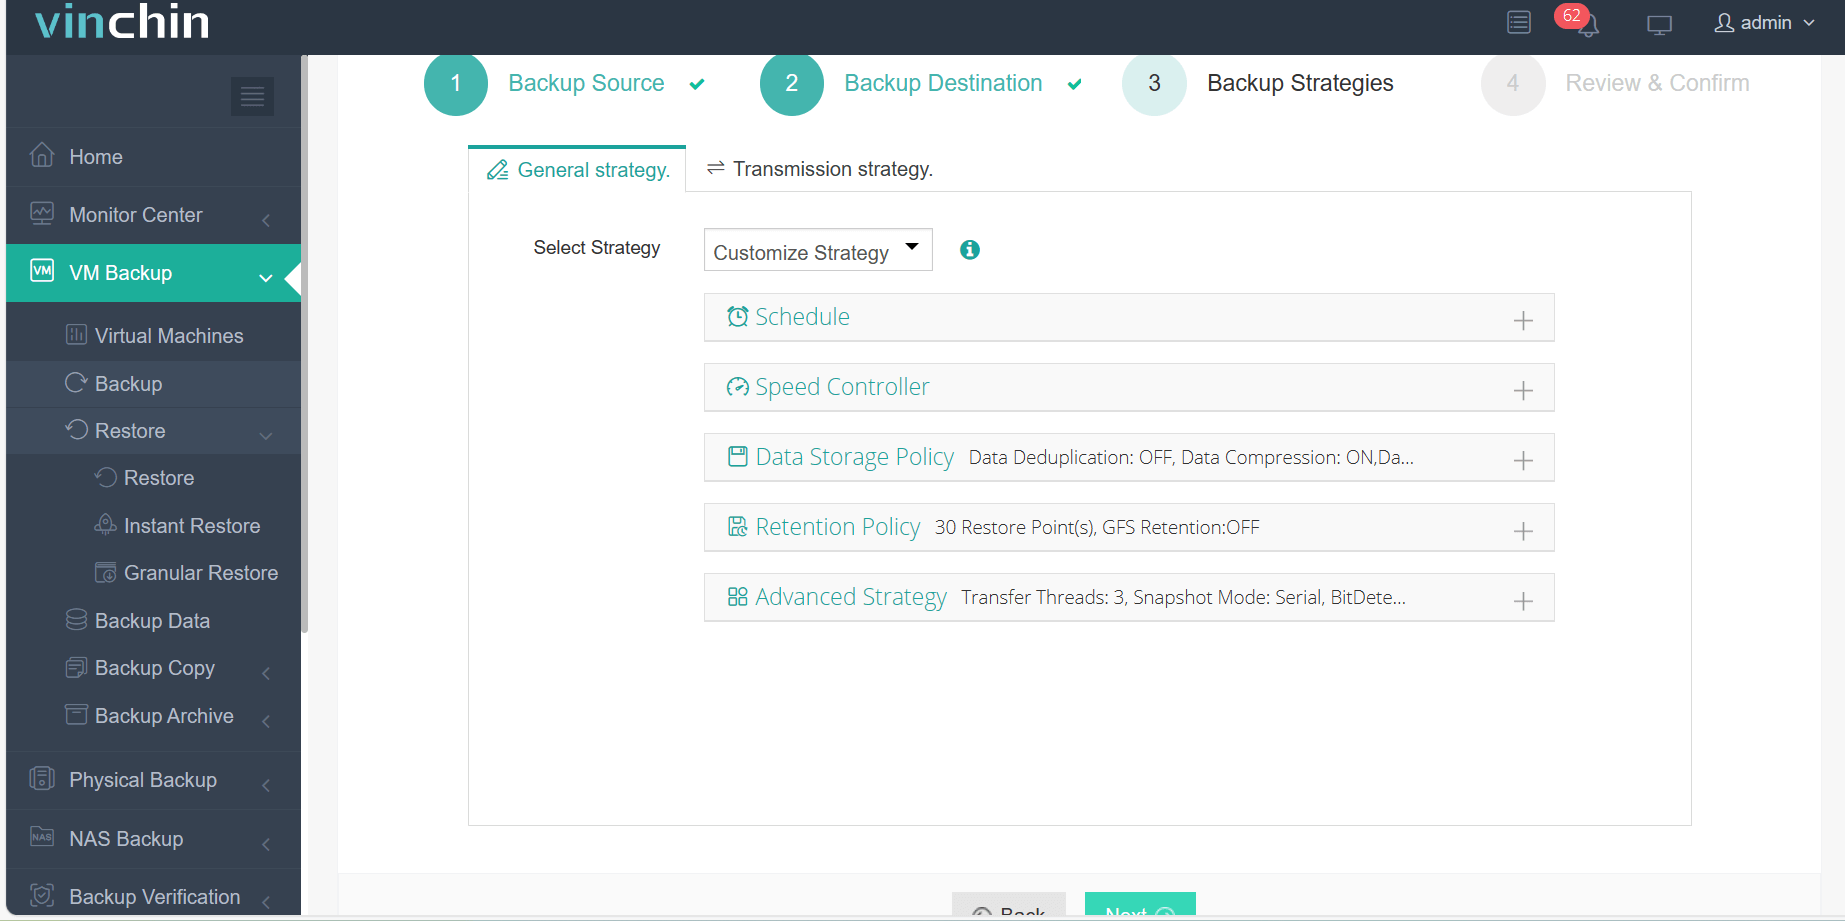
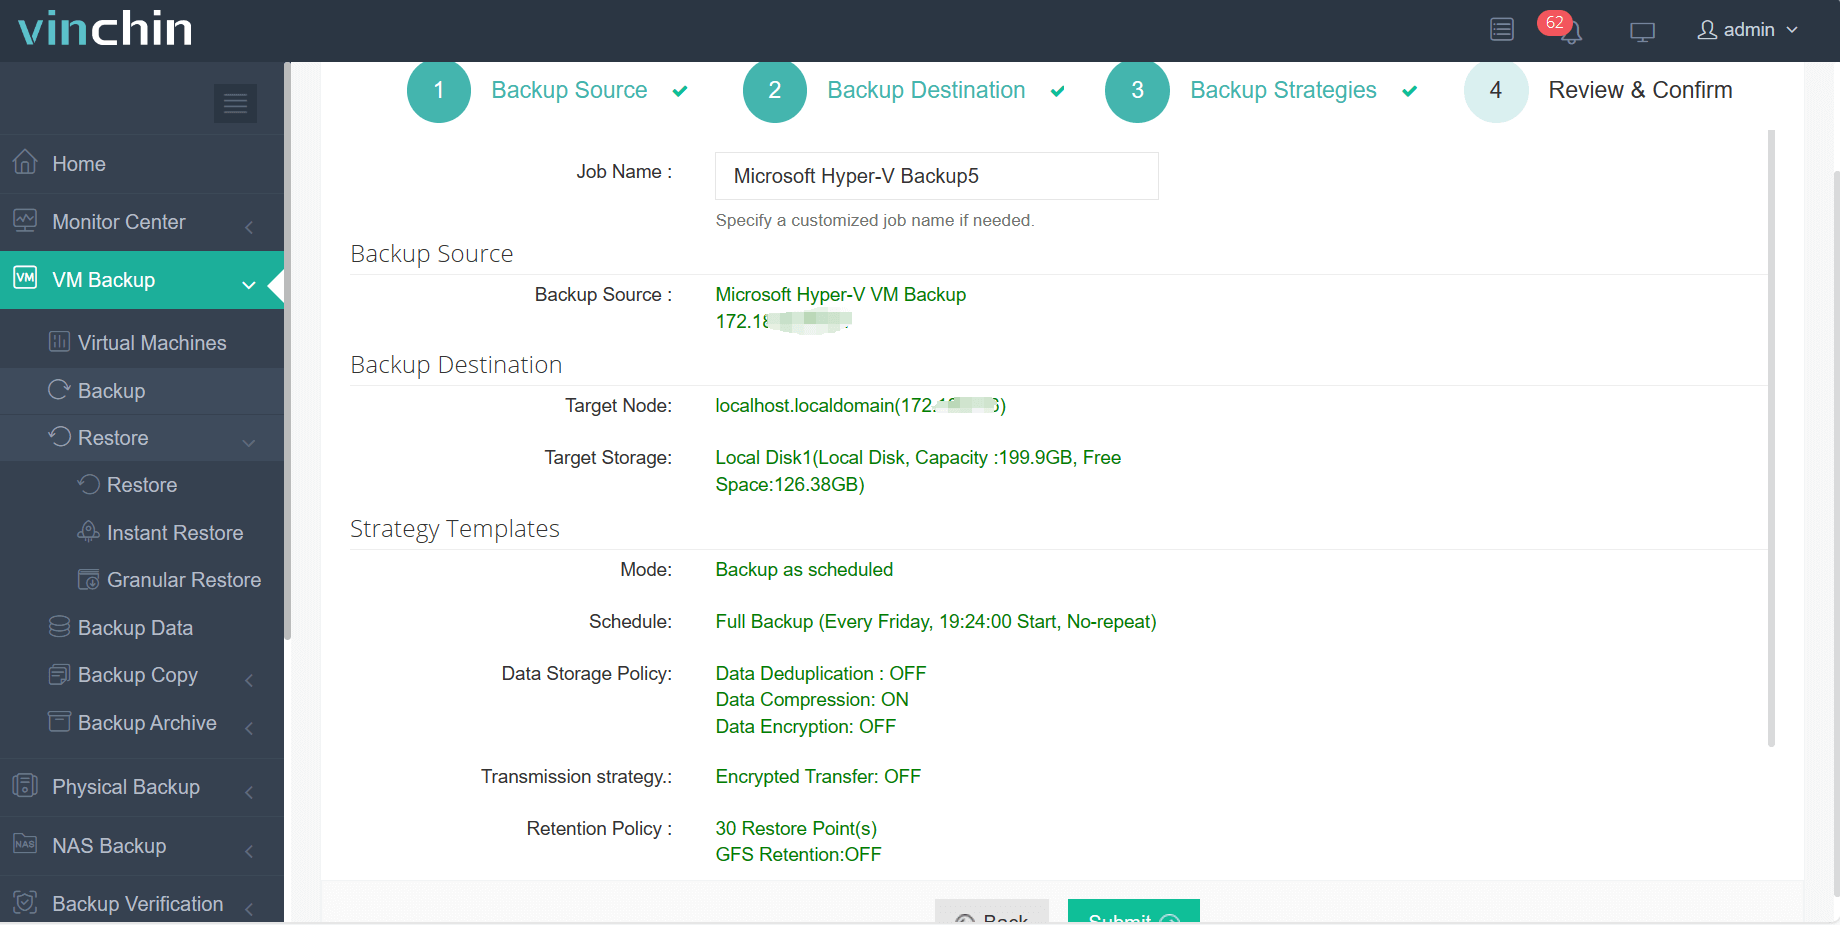
It only takes 4 steps to backup Hyper-V VMs with Vinchin Backup & Recovery:
1. Select the backup object.

2. Select backup destination.

3. Configure backup strategies.

4. Review and submit the job.

Come on and experience the full capabilities of this robust system with a complimentary 60-day trial! Contact us with your requirements, and you will receive a tailored solution for your IT landscape.
Hyper-V Quick Create FAQs
1. Can I change the default location of Quick Create VMs?
Not directly through the Quick Create UI. You'd need to manually move the VM files after creation or use the standard New Virtual Machine Wizard for more control.
2. Is Hyper-V Quick Create available in all Windows editions?
No, it's available in Windows 10/11 Pro, Enterprise, and Education editions. It's not available in the Home edition unless Hyper-V is manually enabled via additional steps.
Conclusion
Using templates in Hyper-V is an efficient way to streamline virtual machine deployment, especially in environments requiring multiple similar setups. By preparing and exporting a well-configured VM, you can quickly clone and deploy new instances with minimal effort. Just be mindful of configuration details like IP addresses and version compatibility to ensure smooth operation.
Share on:


