-
When do You Need to SSH into Proxmox?
-
How to Configure SSH in Proxmox?
-
How to SSH into Proxmox VM?
-
How to Setup SSH Remote Access on Proxmox VE?
-
How to Solve Connection Issues?
-
Trustworthy and Professional Proxmox Backup Solution
-
Proxmox Enable SSH FAQs
-
Conclusion
SSH enables remote CLI administration of Proxmox VE hosts and VMs. It bypasses the web UI for automation, scripting, and troubleshooting. This guide explains secure SSH setup, VM access, hardening, and diagnostics. We cover configuration, network modes, key-based access, firewall rules, cluster setup, and common fixes.
When do You Need to SSH into Proxmox?
You need SSH if the web GUI is unreachable or slow. You may script mass tasks or run batch updates. You can debug boot issues via the serial console (e.g., using qm terminal) when agents fail. You might check logs directly or run cluster commands without mouse clicks. SSH also helps in post-incident analysis when GUI hangs.
How to Configure SSH in Proxmox?
1. Proxmox VE includes OpenSSH by default. Verify with systemctl status sshd. Default listens on port 22. Start by updating Proxmox packages to the latest stable release. Confirm SSH is active: ss -tuln | grep :22 shows the port listening. Edit /etc/ssh/sshd_config to harden access. For example:
PermitRootLogin no
PasswordAuthentication no
AllowUsers admin_user
Port 2222
2. Reload SSH: systemctl reload sshd. Validate: ssh -T admin_user@proxmox_ip -p 2222.
3. Next, lock down root. Use PermitRootLogin no to force non-root users. Create an admin user: adduser admin_user, then grant sudo via usermod -aG sudo admin_user. Place your public key in
/home/admin_user/.ssh/authorized_keys. Use ssh-keygen -t ed25519 on client side and ssh-copy-id -i ~/.ssh/id_ed25519.pub admin_user@proxmox_ip -p 2222.
4. Set up firewall rules. If you use UFW on a separate management host or testing, run ufw allow 2222/tcp. For Proxmox VE Firewall, add a rule:
pve-firewall add SSH --action ACCEPT --source <TRUSTED_IP> --iface <node>
The syntax may vary if using the nftables-based proxmox-firewall service. Confirm the rule is active.
5. Consider changing the default port. After editing Port 2222 in sshd_config, update any SELinux/AppArmor contexts if enforced. For SELinux: semanage port -a -t ssh_port_t -p tcp 2222. Reload policies. Adjust firewall to allow the new port.
6. Install Fail2Ban to prevent brute-force. On Debian-based Proxmox:
apt update
apt install fail2ban
7. Create a jail for SSH: in /etc/fail2ban/jail.local:
[sshd]
enabled = true
port = 2222
filter = sshd
logpath = /var/log/auth.log
maxretry = 5
bantime = 3600
8. Restart: systemctl restart fail2ban. Monitor banned IPs with fail2ban-client status sshd.
9. Add two-factor authentication if desired. Install libpam-google-authenticator:
apt install libpam-google-authenticator
10. Run google-authenticator for each user. In /etc/pam.d/sshd, add:
auth required pam_google_authenticator.so
11. And in sshd_config, set ChallengeResponseAuthentication yes. Reload SSH. Test login with key plus TOTP.
12. Audit the SSH config regularly:
sshd -T | grep -i permitroot
grep -i allowusers /etc/ssh/sshd_config
Ensure settings match policy. Use a config management tool for consistency across nodes.
How to SSH into Proxmox VM?
1. Ensure the VM has an SSH server. Most Linux templates include OpenSSH. If absent, install: apt install openssh-server or equivalent. Choose a network mode: bridged, routed, or NAT with port-forwarding. For bridged, VM gets an IP on LAN via vmbr0. For routed, assign a routed subnet or use VLAN. For NAT, set up host port-forwarding:
iptables -t nat -A PREROUTING -p tcp --dport 2223 -j DNAT --to-destination <VM_IP>:22
2. Test connectivity: from host, ssh root@<VM_IP> or via forwarded port: ssh user@host_ip -p 2223.
3. Verify VM firewall. If Proxmox VE Firewall is enabled for that VM: temporarily disable with qm set <VMID> --firewall 0 or add rules to allow SSH. Inside VM, check ufw status or iptables -L. Ensure port 22 is open.
4. Use QEMU agent for inside info: if installed, run:
qm guest exec <VMID> -- ip addr
This shows the VM's IP without logging in. Ensure the agent is running in the guest.
5. For root login, consider disabling direct root in VM. Use a non-root user with sudo. Add SSH keys similarly. Use ssh-copy-id user@vm_ip. If VM is behind NAT, ensure port-forwarding works at host and network firewall allows it. If using routed mode, ensure correct routing and firewall rules.
6. To debug SSH failures: from client host, run nc -zv proxmox_ip 2223 or telnet proxmox_ip 2223. On VM: check systemctl status sshd, inspect /var/log/auth.log or journalctl -u sshd. Adjust firewall or network settings accordingly.
How to Setup SSH Remote Access on Proxmox VE?
1. First, ensure the host’s firewall allows the SSH port. In Proxmox VE Firewall: add an ACCEPT rule for SSH from trusted subnets or IPs. For example:
pve-firewall add SSH --action ACCEPT --source 203.0.113.0/24
2. Apply on both IPv4 and IPv6 if used. For external firewalls, permit the chosen port only from known addresses.
3. Limit SSH access: use AllowUsers admin_user@203.0.113.* or similar in sshd_config. This restricts login sources. Use key-based auth only: PasswordAuthentication no. Reload SSH afterwards.
4. Change the default port. Edit Port 2222. Reload SSH: systemctl reload sshd. Update firewall rules to allow the new port. For SELinux contexts, use semanage port -a -t ssh_port_t -p tcp 2222 if SELinux enforced. For AppArmor, ensure no conflicting profiles.
5. For cluster nodes, establish passwordless SSH keys. On each node:
ssh-keygen -t ed25519
ssh-copy-id -i ~/.ssh/id_ed25519.pub root@node2_ip -p 2222
6. Repeat so each node can SSH into others without password. Verify with ssh node2 pvecm status. This aids live migration, replication, and scripts.
7. Use jump hosts if needed: from admin workstation:
ssh -J admin_user@bastion_ip admin_user@proxmox_ip -p 2222
This secures direct exposure. Keep bastion hardened and monitored.
8. Enable logging and monitoring. Check /var/log/auth.log for SSH events. Integrate with SIEM or log collectors. Rotate logs and set alerts for repeated failures. Use Fail2Ban to ban attackers. Periodically audit /etc/ssh/sshd_config via sshd -T. Automate checks in CI/CD pipelines.
How to Solve Connection Issues?
1. If SSH port seems closed: test with ss -tuln | grep 2222 on host. From remote, use nc -zv proxmox_ip 2222. If it times out, check firewall. If connection refused, ensure sshd is active: systemctl status sshd. Check SELinux/AppArmor denials in audit logs.
2. If host is unreachable via SSH but GUI works, inspect network interface and routes: ip addr, ip route. If GUI unreachable but SSH works, check systemctl status pveproxy and ss -tuln | grep 8006. Restart GUI services: systemctl restart pveproxy pvedaemon.
3. If key-based login fails, enable verbose SSH client: ssh -vvv admin_user@proxmox_ip -p 2222. Inspect mismatch in keys or permissions. Ensure ~/.ssh and authorized_keys have correct permissions (700/600).
4. If cluster commands hang, verify SSH connectivity among nodes. Use ssh node1 pvecm status and ssh node2 hostname. Check host keys; replace stale entries in ~/.ssh/known_hosts when IPs change.
Trustworthy and Professional Proxmox Backup Solution
While SSH secures access, you also need a reliable backup plan. Vinchin Backup & Recovery is an enterprise-grade solution for Proxmox. It supports full and incremental VM backups. It uses deduplication and compression to save storage. You can schedule backups and set retention policies. It integrates with Proxmox seamlessly. You can create backup tasks for VMs without installing an agent. Vinchin verifies backups and offers fast restores. It also supports offsite replication and encryption for data security, always ensuring business continuity and streamline recovery. It also facilitates seamless V2V migration between supported virtual platforms, ensuring flexibility and ease of data transfer.
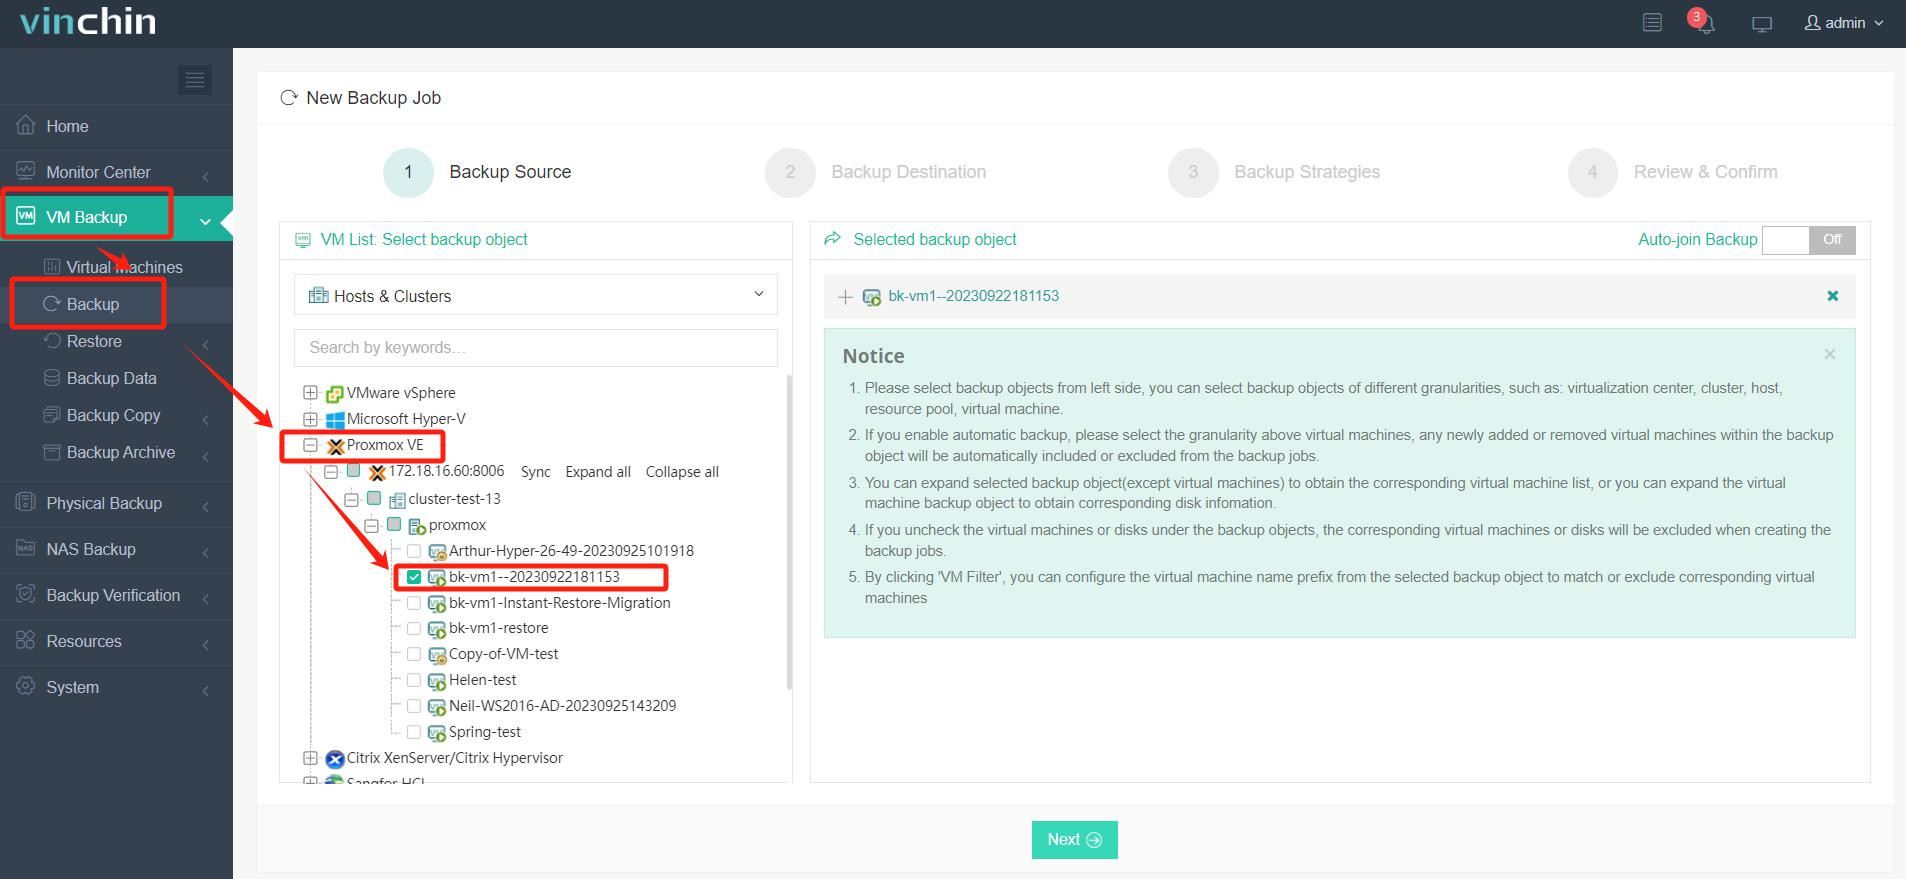
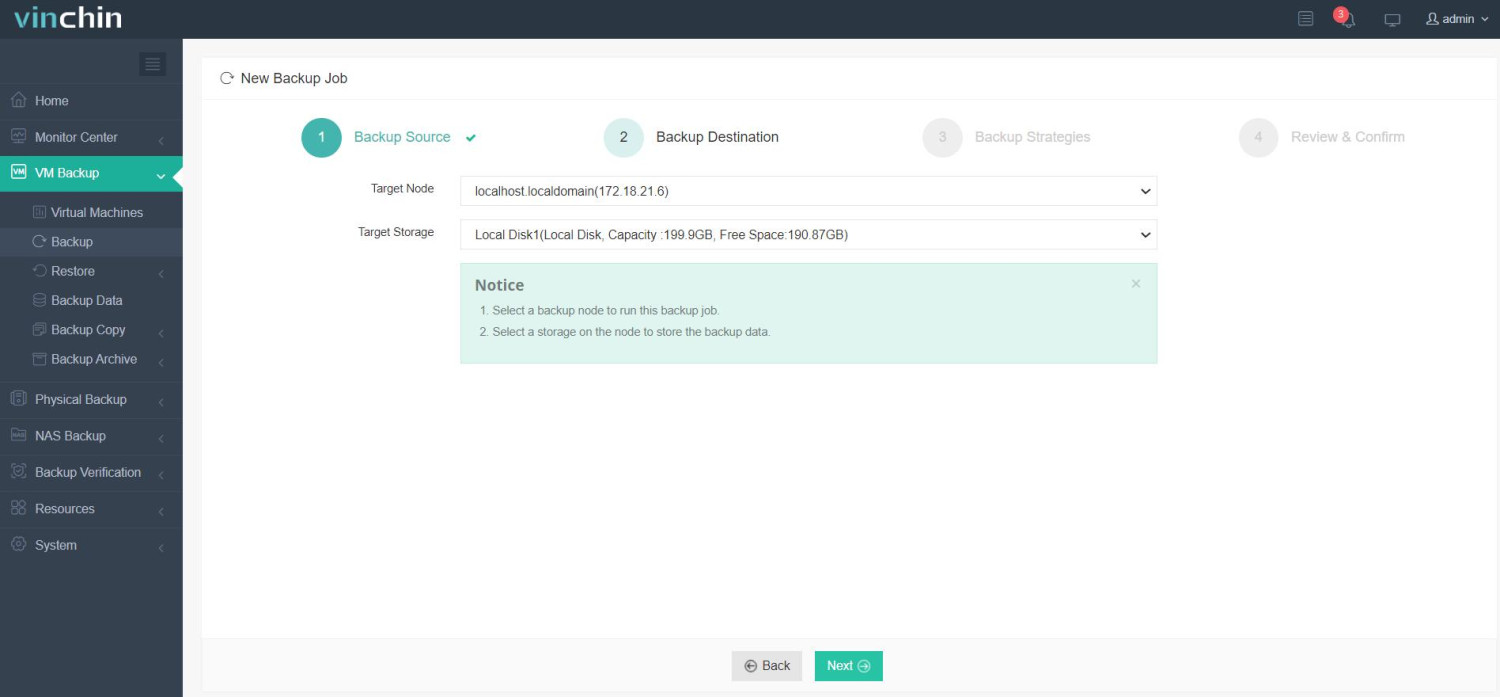
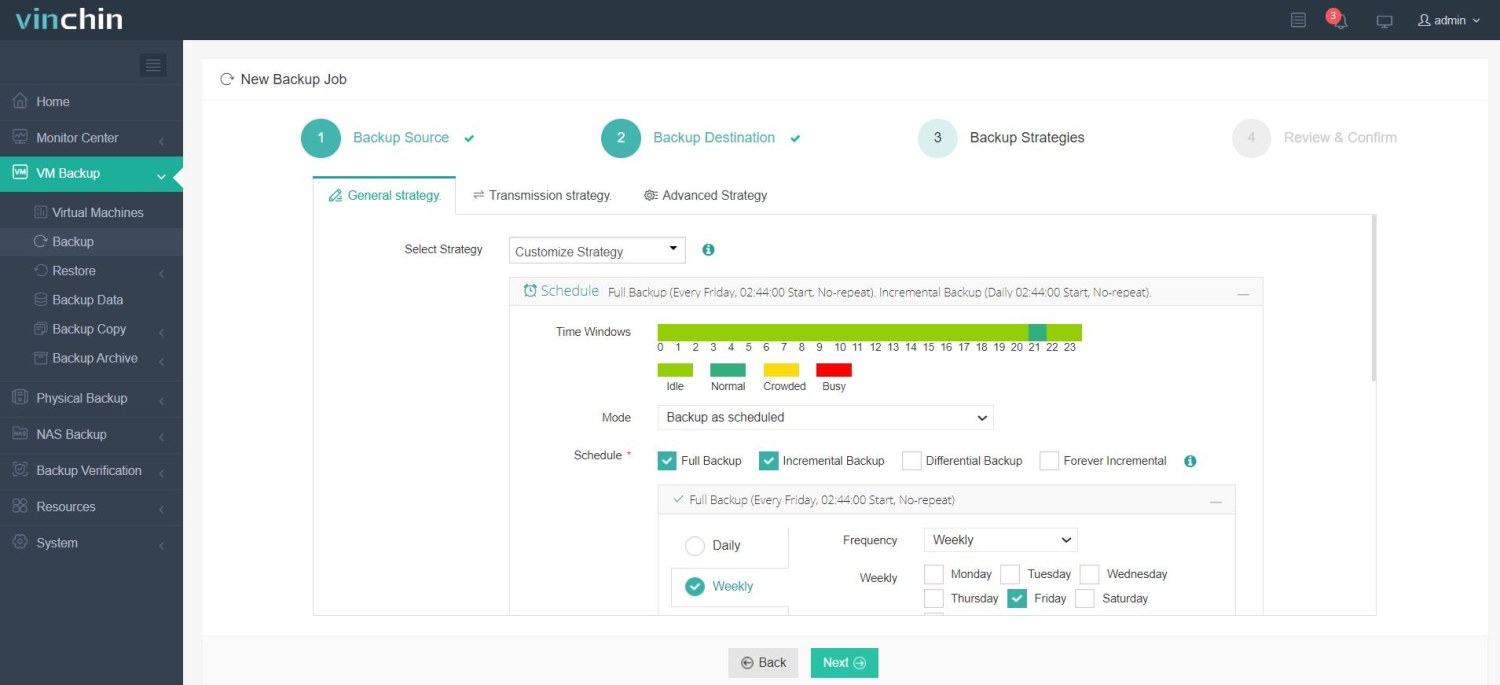
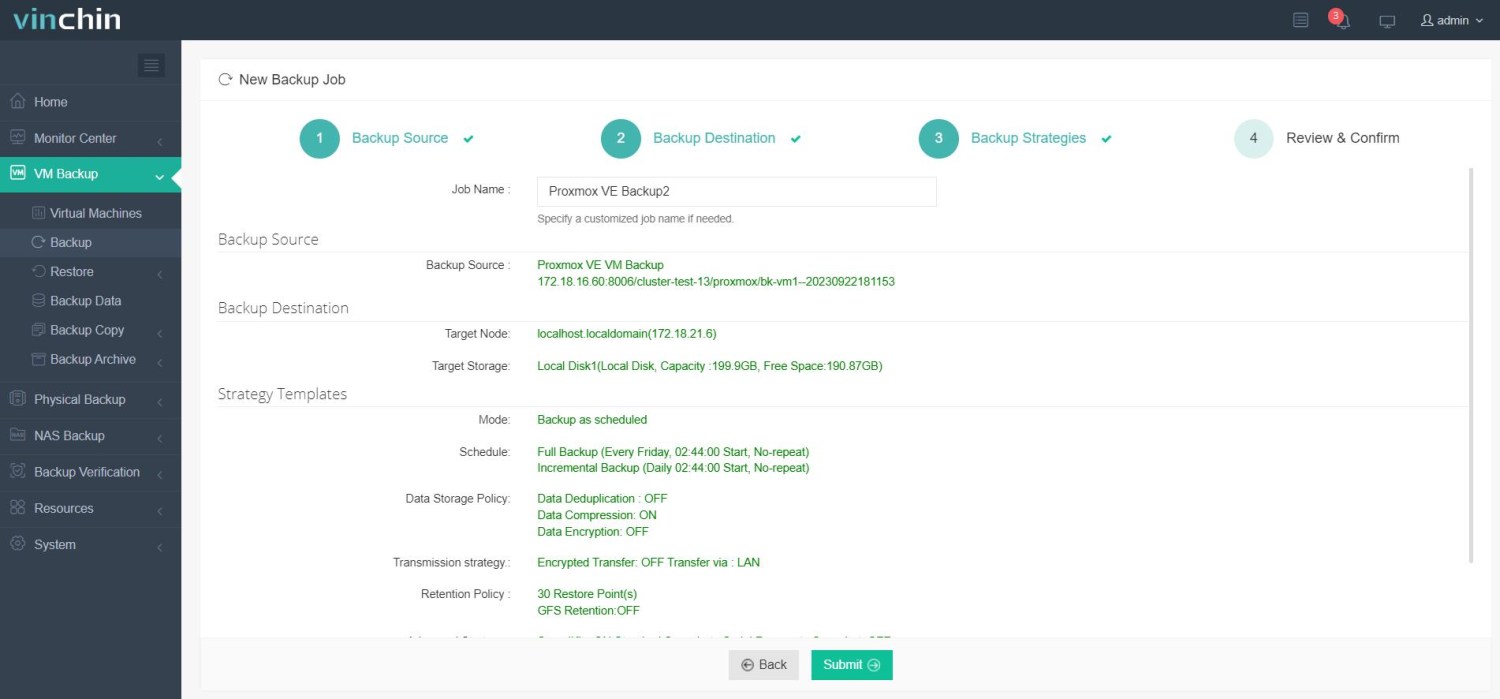
The Vinchin web console is intuitive. To back up a Proxmox VM:
1. First, select the Proxmox VM you want to back up.

2. Next, choose backup storage in your environment.

3. Then configure backup strategies.

4. Finally, submit the job.

Vinchin serves customers worldwide and earns high ratings. Enjoy a 60-day full-featured free trial to see how it fits your workflow. Download Installer for easy deployment and start protecting your VMs today.
Proxmox Enable SSH FAQs
Q1: How do I test SSH connectivity when Proxmox GUI is down?
Use ssh admin_user@proxmox_ip -p 2222 from a trusted host; verify port is open and SSH service is active.
Q2: How can I harden SSH on Proxmox?
Disable root login (PermitRootLogin no), enforce key-based auth (PasswordAuthentication no), restrict source IPs (firewall/AllowUsers), change port (Port 2222), and install Fail2Ban.
Q3: How do I SSH into a VM behind NAT?
Set up host port-forwarding or use a VPN: iptables -t nat -A PREROUTING -p tcp --dport 2223 -j DNAT --to-destination <VM_IP>:22, then run ssh user@host_ip -p 2223.
Conclusion
SSH is vital for robust Proxmox management. Secure it through key-based auth, firewall rules, least privilege, and regular audits. Integrate SSH setup in automation workflows and backup strategies to ensure quick recovery. Maintain consistent configurations across nodes and monitor access logs. Vinchin complements SSH operations by offering enterprise VM protection in diverse environments.
Share on:


