-
What is Disk2vhd?
-
How to use Disk2vhd to achieve P2V migration to Proxmox VE?
-
Backup is also important before and after P2V
-
Conclusion
-
Disk2vhd Proxmox FAQs
What is Disk2vhd?
Disk2vhd is a free utility from Microsoft Sysinternals designed to create virtual hard disks from live Windows systems. It uses Windows Volume Shadow Copy Service (VSS) to take a consistent snapshot without shutting down the server. This allows minimal downtime during conversion.
Disk2vhd works only on Windows systems, capturing all selected volumes into a VHD or VHDX file. It cannot be used for Linux servers. For Linux P2V, other tools like dd or Clonezilla are better suited.
While Disk2vhd's VSS snapshots are generally consistent, applications like SQL Server or Exchange may need special VSS-aware backup tools to ensure full data integrity.
The VHD format created is compatible with several hypervisors, but Proxmox VE requires converting these files to its native disk formats before use.
How to use Disk2vhd to achieve P2V migration to Proxmox VE?
Step 1: Prepare the Physical Windows Server
Before running Disk2vhd, clean your system to reduce disk size and avoid boot issues later:
Disable Windows-specific monitoring or hardware tools that may interfere with virtualization.
Remove unused drivers and clean temporary files.
Defragment the disk if possible to optimize image size.
Step 2: Run Disk2vhd on the Source Server
Download Disk2vhd from Microsoft's official Sysinternals page and run it with Administrator rights. Select the volumes you want to convert—typically the system drive (C:) and any critical data partitions. Check Use VSS to ensure consistent snapshots, then select an external or network location with enough space to save the VHD file. Click Create and wait for completion.
Disk2vhd creates fixed-size VHD files by default, which may be large and less flexible.
Step 3: Verify and Shrink the VHD (Optional)
After creation, you can shrink the VHD using Windows diskpart to save space before conversion:
select vdisk file="C:\path\to\disk.vhd"
attach vdisk readonly
compact vdisk
detach vdisk
Alternatively, verify the VHD file using:
qemu-img info source.vhd
This command gives info on disk size and format.
Step 4: Convert VHD to Proxmox-Compatible Format
Proxmox VE prefers QCOW2 disk images because of thin provisioning and snapshot support. However, raw format offers better performance for heavy workloads. Use qemu-img to convert:
For QCOW2 (recommended):
qemu-img convert -p -f vpc -O qcow2 source.vhd dest.qcow2
For raw:
qemu-img convert -p -f vpc -O raw source.vhd dest.raw
The -p option shows progress. After conversion, check disk integrity:
qemu-img check dest.qcow2
You can also optimize space with sparse conversion:
qemu-img convert -p -f vpc -O qcow2 -o cluster_size=2M,preallocation=metadata source.vhd dest.qcow2
Step 5: Create the VM in Proxmox VE
In the Proxmox web console:
Click Create VM.
Set a name and select system settings matching the physical server.
Skip adding a disk or add a placeholder disk.
Complete the wizard.
Step 6: Replace the VM Disk with Converted Image
Find the VM's storage folder on Proxmox host, usually /var/lib/vz/images/<VMID>/. Upload the converted QCOW2 or raw file here. Remove or rename the placeholder disk and rename your converted disk to vm-<VMID>-disk-0.qcow2 (or .raw).
Edit the VM config if needed (/etc/pve/qemu-server/<VMID>.conf) to point to the new disk file.
Step 7: Boot and Troubleshoot the VM
Start the VM in Proxmox. On first boot, Windows might face driver or bootloader issues due to hardware changes.
Common issues and fixes:
| Issue | Solution |
| INACCESSIBLE_BOOT_DEVICE | Enable SATA/SCSI controller compatibility or install VirtIO drivers |
| Network adapter missing | Replace physical NIC drivers with VirtIO-net or E1000 |
| Boot failure | Use Windows recovery ISO and run bootrec /fixmbr and bootrec /fixboot |
Enable VirtIO drivers for disk and network in VM hardware settings for better performance. Adjust CPU type to host or kvm64 for compatibility.
Step 8: Handle UEFI vs. BIOS Boot
If the original server uses UEFI boot, configure the Proxmox VM with OVMF firmware instead of BIOS. You may need to repair the Boot Configuration Data (BCD) manually with Windows recovery tools to fix boot errors after migration.
Backup is also important before and after P2V
After converting your physical server to a Proxmox VM, protecting your data is essential. Reliable backups prevent data loss and reduce downtime when problems occur. A strong backup and recovery plan keeps your virtual environment stable and secure.
Vinchin Backup & Recovery provides comprehensive, agentless backups tailored for virtual machines. It supports instant recovery to minimize disruption and includes V2V migration to move or restore VMs smoothly. These features keep your critical data safe and easy to manage.
Supporting major platforms like Proxmox, VMware, Hyper-V, oVirt, and XenServer, Vinchin adapts well to diverse environments. Its simple interface and robust functions help businesses confidently safeguard their virtual infrastructure.
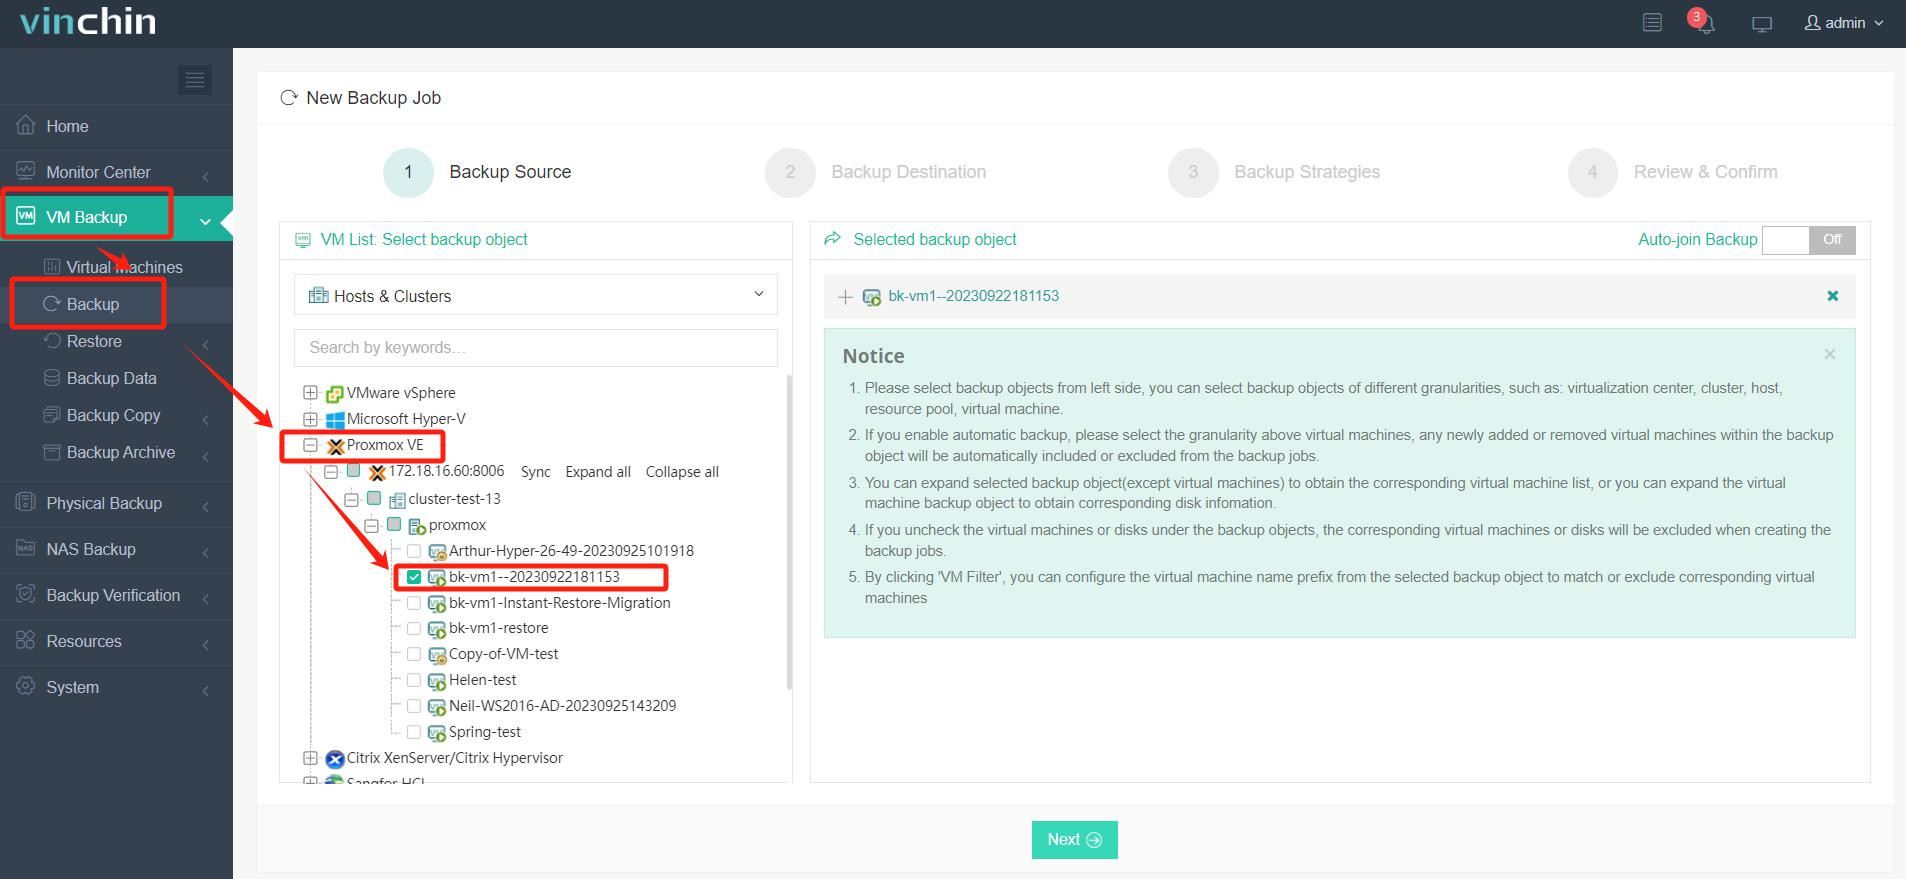
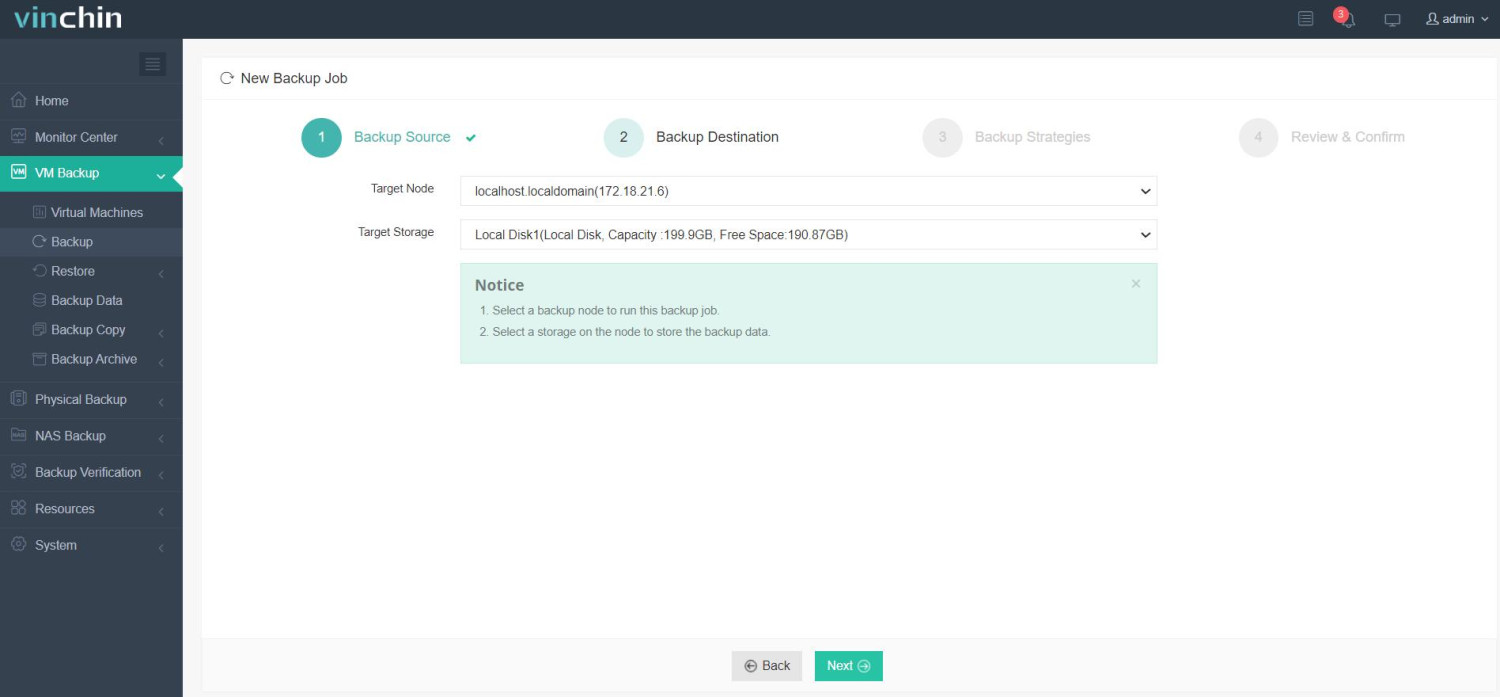
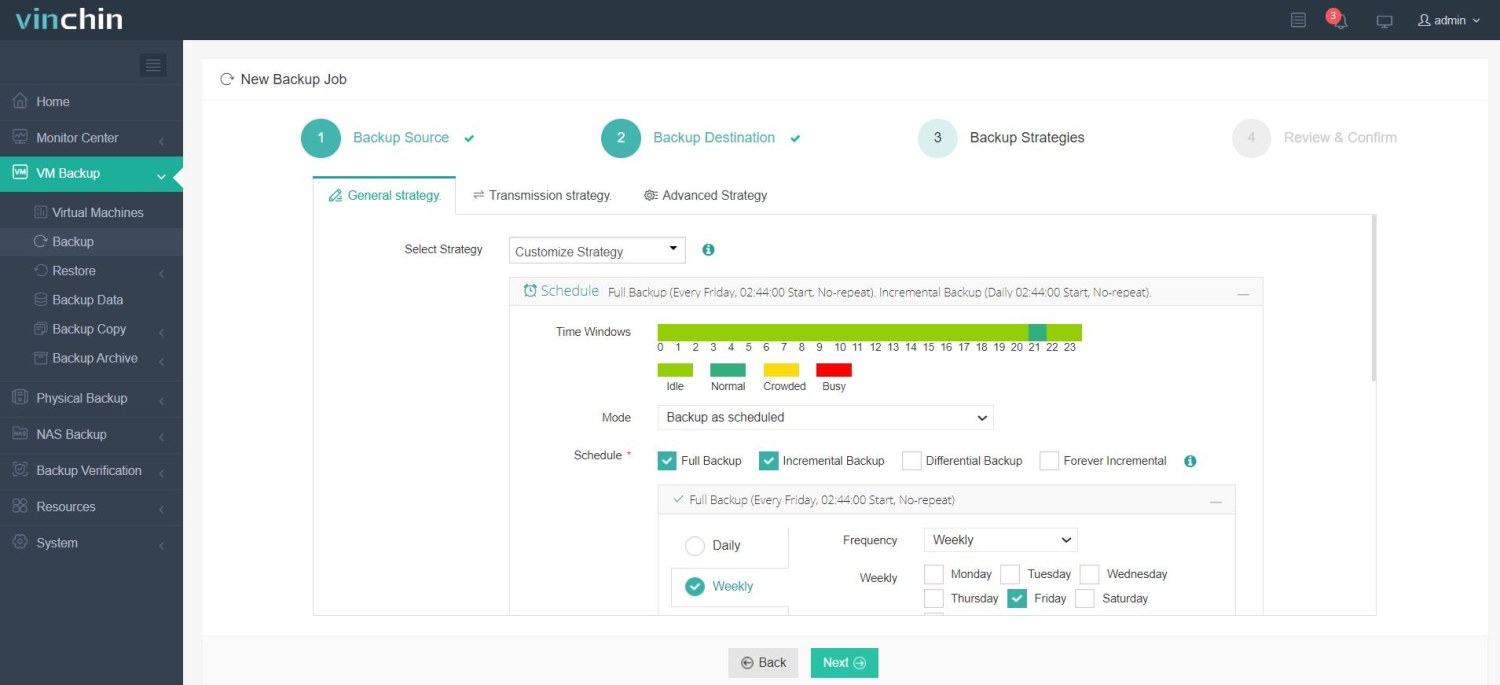
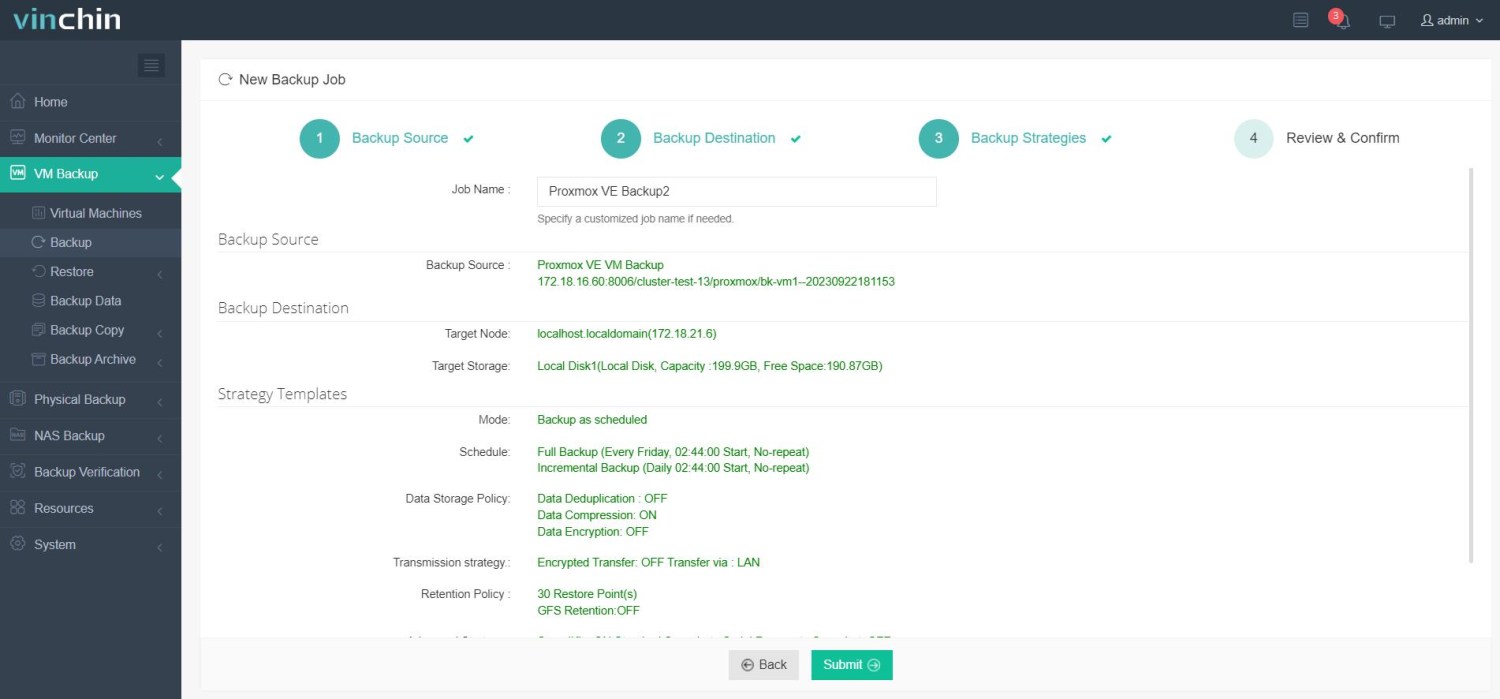
The VM migration process is extremely simple, just a few simple steps.
1.Just select VMs on the host

2.Then select backup destination

3.Select strategies

4.Finally submit the job

Thousands of global customers trust Vinchin for protecting and moving their VMs. Rated highly for ease of use and performance, Vinchin offers a 60-day full-featured free trial.
Conclusion
Disk2vhd helps convert Windows servers to virtual disks. Use qemu-img for Proxmox formats. Check disk settings and boot issues. To protect and migrate VMs with ease, use a reliable backup solution that supports agentless migration and live recovery.
Disk2vhd Proxmox FAQs
Q1: Can Disk2vhd capture Linux servers?
No, Disk2vhd only supports Windows systems; use Linux tools like dd or Clonezilla for Linux P2V.
Q2: How do I avoid UUID conflicts when cloning disks?
Use virt-sysprep or manually regenerate UUIDs to prevent conflicts in Proxmox.
Q3: How to shrink a Disk2vhd-created VHD before conversion?
Use Windows diskpart commands: select, attach, compact, and detach the VHD to reduce size.
Share on:


