-
How to take a snapshot in KVM as a short-term backup?
-
How to make KVM backup with command line?
-
How to clone KVM VM with command line?
-
How to backup and restore VMs on KVM-based platforms simply?
-
KVM Backup FAQs
-
Conclusion
Server virtualization technology has greatly improved the utilization of physical server resources. The popular hypervisors include ESXi, Hyper-V, KVM, Xen, etc. ESXi is the most popular one but KVM also captures a lot of users because of its advantages, fast and economical.
VM backup is always a required skill for IT administrators and you can use the KVM backup scripts in the following sections to protect data in virtual environment.
How to take a snapshot in KVM as a short-term backup?
Snapshot can be regarded as a kind of quick backup. It is often created before system patching or updating for saving the status of the VM including power, memory, etc. When you restore VM from snapshot, VM will be reverted to the previous state.
Taking a snapshot takes much less time than creating backup and snapshot works in the way similar to backup when restoring VM, but it is still suggested to take KVM VM backup. Using snapshot to recover KVM VM relies on both of the VM files and snapshot files so that it can’t recover VM from severe disaster. In addition, storing snapshot for too long (more than 72 hours) will increase the load of VM and affect VM performance. Therefore, KVM snapshot is good, but you need to use it as backup correctly.
Creating snapshot backup in KVM environment needs virsh command. Just type the command below,
virsh snapshot-create-as domain snapshot-name
Domain is the name of the KVM VM, and snapshot-name is the name you give to the snapshot.
To check the list of KVM VM snapshots, type the command below:
virsh snapshot-list domain
To restore VM from KVM VM snapshot, type the command below:
virsh snapshot-revert domain snapshot-name
To delete one KVM VM snapshot, type the command below:
virsh snapshot-delete domain snapshot-name
How to make KVM backup with command line?
Virsh commands can also help export VM configuration and virtual hard disk. You can use them to create new virtual machine .
To export the VM configuration, type the command below:
# virsh dumpxml vm_name > /etc/libvirt/qemu/vm_name_backup.xml
Vm_name is the name of the KVM VM and the last part is the directory you would like to store the configuration file
To check the directory of virtual hard disk, type the command below:
# virsh domblklist vm_name
To copy the virtual hard disks, type the command below:
# cp /var/lib/libvirt/images/vm_name.qcow2 /var/lib/libvirt/images/vm_name_backup.qcow2
Replace the directories in this command with the real directory that you have checked.
To modify the configuration file, type the command below:
# vim /etc/libvirt/qemu/vm_name_backup.xml
Note: Virsh editing is not supported because the VM hasn’t been registered, so it can be only edited by vi/vim.
Things need to be modified:
1. Metadata
Change vm_name into vm_name_backup
2. UUID
Modify any number to make it distinct from the original one
3. virtual disk label
Change the directory into the new one
4. VNC port
VNC port should be unique
To register VM, type the command below:
# virsh define /etc/libvirt/qemu/vm-name_backup.xml
# virsh start vm_name_backup
How to clone KVM VM with command line?
Virt-clone is the command line tool for KVM VM clone. Before you use it to clone VM, make sure the guest is powered off.
For instance, if you have a QEMU VM in Red Hat Virtualization environment, and its name is demo, type the command below to clone it:
# virt-clone --connect qemu:///system --original demo --name newdemo --file /var/lib/libvirt/images/newdemo.img --file /var/lib/libvirt/images/newdata.img
If you would like to perform a simple automatic clone, type the command below:
# virt-clone --original demo --auto-clone
How to backup and restore VMs on KVM-based platforms simply?
It might take a long time to backup VMs on the native KVM but you can have a better solution to backup VMs on KMV-based platforms. Vinchin Backup & Recovery is a professional backup and disaster recovery solution for KVM-based platforms, like Prxmox, oVirt, Oracle Linux KVM, Red Hat Virtualization, oVirt, etc. (Native KVM is not supported for now)
All the VM backup and restore job configurations are completed with wizards in a user-friendly web console. You just need to add the host into Vinchin backup server, and then you can make backup of any VMs on the host agentlessly.
Besides, Vinchin Backup & Recovery will also help manage heterogeneous virtual environment by allowing you to move VM between different virtualization platforms.
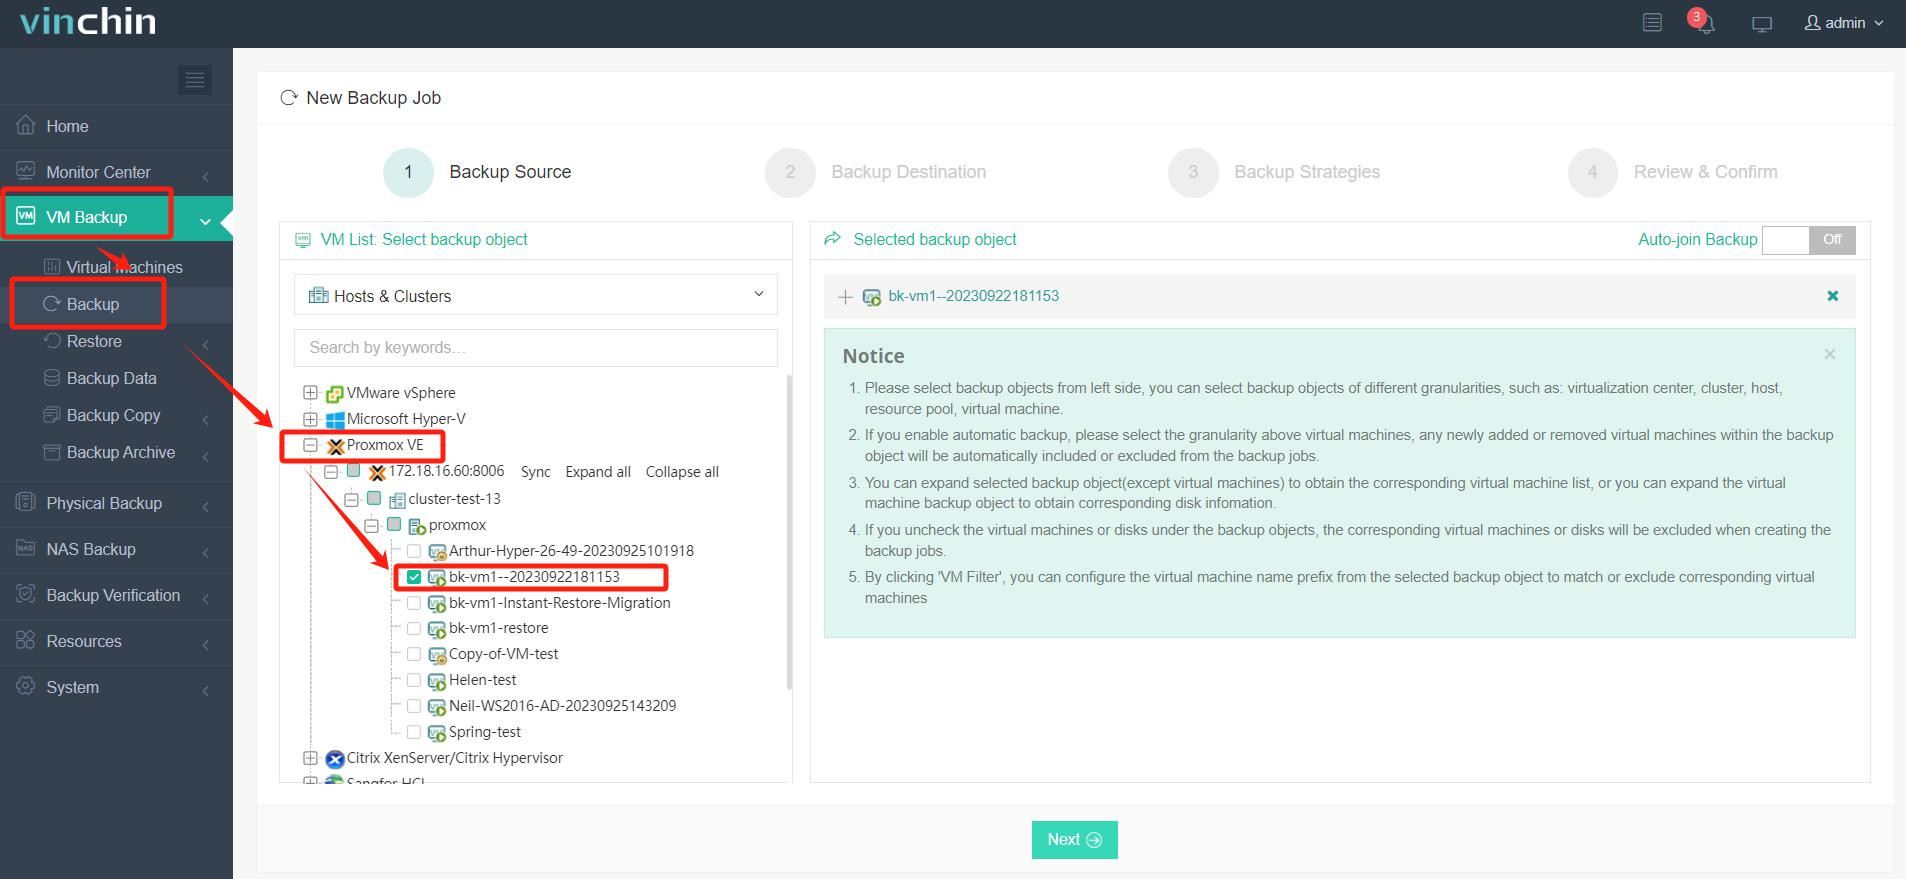
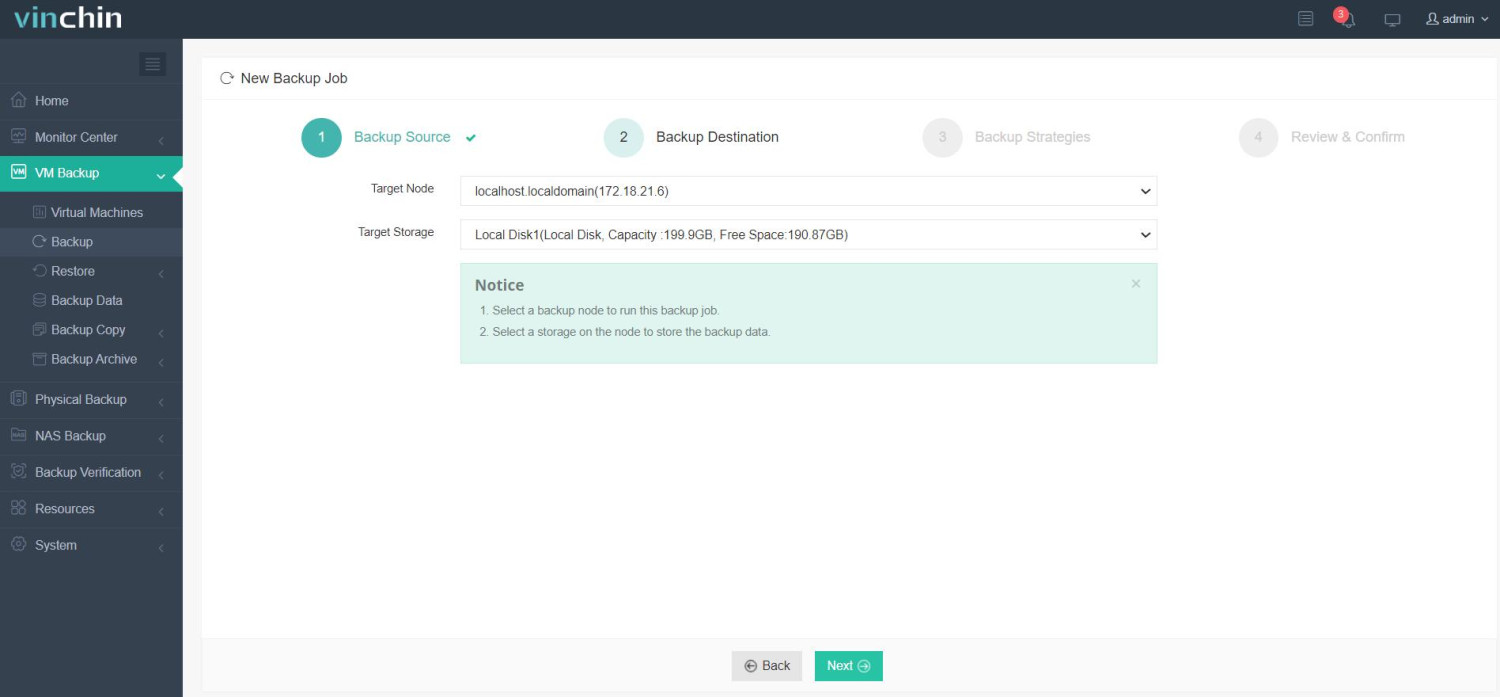
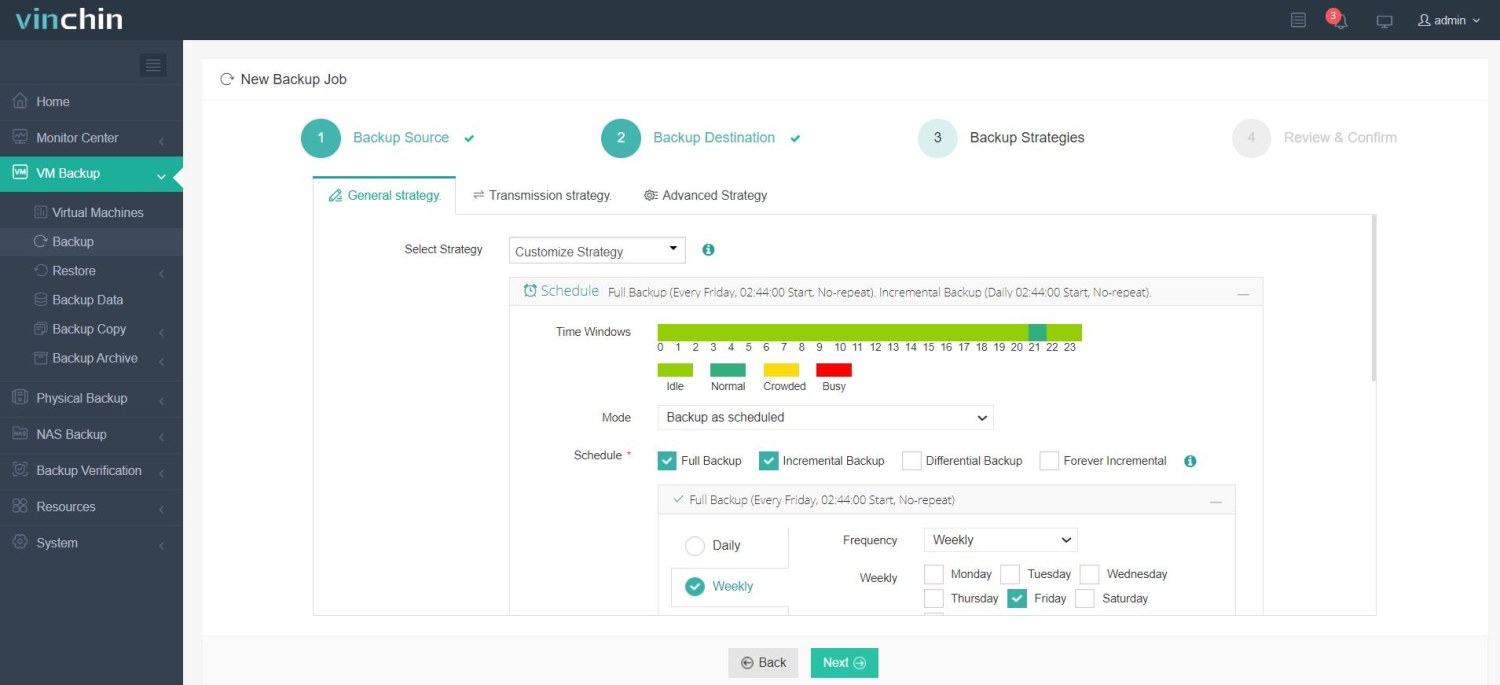
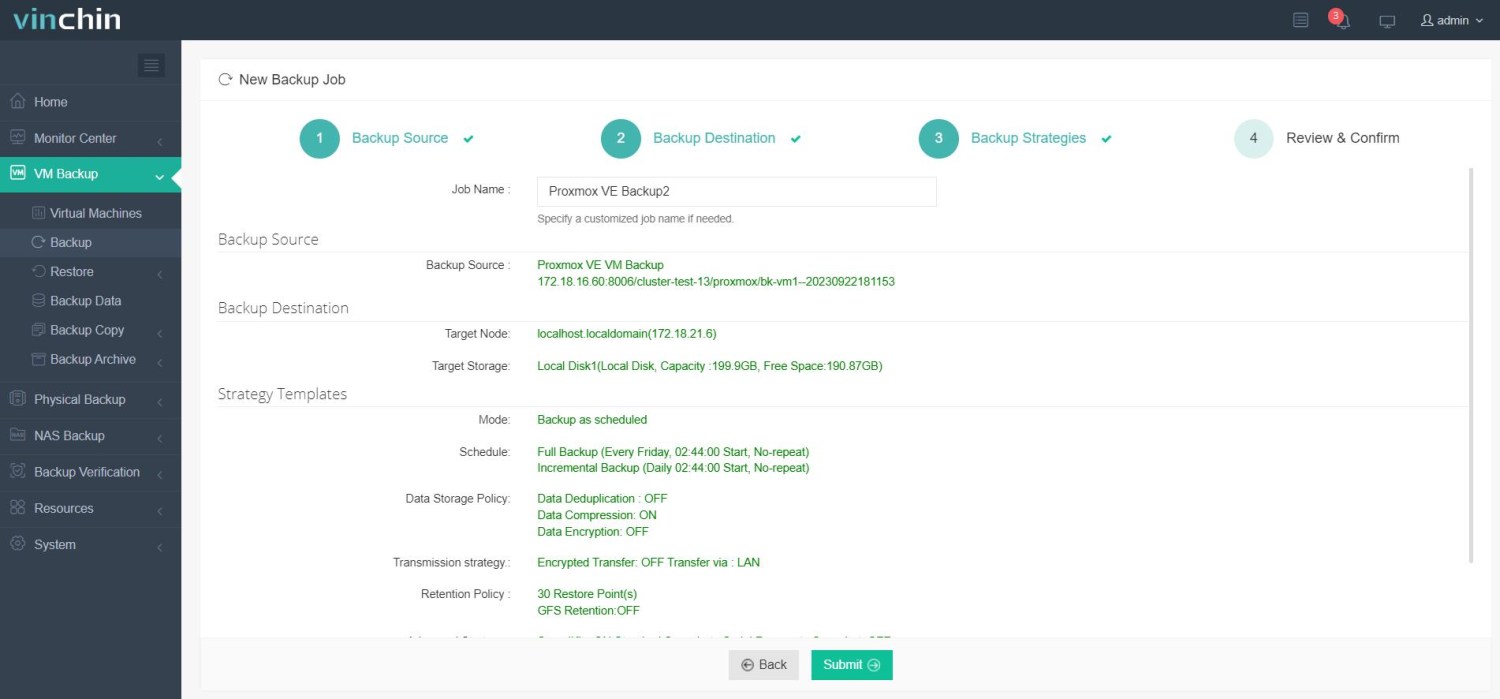
Here is an example of backing up Proxmox VM:
1. Select the Proxmox VMs

2. Select the backup storage

3. Select the backup strategies

4. Submit the job

You can try this solution with a 60-day full-featured free trial. It just takes a few minutes to deploy in your virtual environment.
KVM Backup FAQs
1. Can you automate KVM backup?
Yes, you can use scripts to automatically backup KVM VMs but it is suggested to use a professional backup solution like Vinchin Backup & Recovery to better protect data.
2. How often should you backup KVM VM?
It depends on your RPO requirements. Usually, companies can perform a full VM backup once a week and an incremental once a day. For critical workloads, you can use continuous data protection solution to protect them.
3. Can you restore just files from KVM backup?
Yes, Vinchin granular restore can help you extract files from KVM VM backup and then you can restore the files to where you want.
Conclusion
KVM becomes more and more popular and KVM backup is always necessary. To make backup, you can use the commands in this post to backup and clone VM.
The procedures of type commands might be tedious. You can use Vinchin Backup & Recovery to easily configure backup and restore jobs for VMs on KVM-based platforms, greatly improving work efficiency. Don’t miss the free trial.
Share on:


