How to do Hyper-V P2V Migration?
2022-04-01 | Nick Zhao
Among all the virtual platforms right now available in the market, Hyper-V may be one of the most popular choices of many enterprise-grade virtualization users, apart from VMware and XenServer. Created and developed by Microsoft, it offers high scalability and flexibility for users to build a cloud environment to run their IT workloads, with existing hardware resources being utilized to the greatest extent. Hyper-V is a typical type 1 hypervisor, which means it can directly run upon hardware without having an operating system (OS) installed first, bringing higher computing performance of the virtual machines. Therefore, if you’re in need of updating your IT infrastructure by making a physical-to-virtual switch, Hyper-V could also be a great choice of yours.
P2V Tools for Hyper-V
In the past, System Center Virtual Machine Manager (SCVMM), the management tool for Hyper-V VMs used to have built-in P2V feature, but later out of support since SCVMM 2012 R2. So what should we do if we’re in a SCVMM 2012 R2 later environment or even without SCVMM deployed? Well, there were 2 commonly used tools that Microsoft provides to help us on this: Microsoft Virtual Machine Converter (MVMC) and Disk2vhd.
What is Microsoft Virtual Machine Converter (MVMC)?
Microsoft Virtual Machine Converter (MVMC) is a tool for users who wants to convert VMware hosts to Hyper-V hosts, or convert a physical server running Windows Server 2008 or above server operating systems, or Windows Vista or above client operating systems to a virtual machine running on Hyper-V host. Unfortunately, MVMC has also retired since 2017, and is now no longer available for users to download.
What is Disk2vhd?
Disk2vhd is another utility that creates a VHD (Virtual Hard Disk, Microsoft’s official VM disk format) file of a physical disk for use in Microsoft Virtual PC or Microsoft Hyper-V virtual machines, which can run on an online system. We can directly use the converted VHD file to create a new virtual machine on Hyper-V. It seems to be the only available official utility left for us, and we’re surely use it to give it a go.
Hyper-V P2V using Disk2vhd
1. Download Disk2vd and run it on the physical server you wish to convert.
2. The console will list all existing volumes on the server. You can simply tick the volumes you want to convert, and then select “Create”.
3. VHD of the selected volumes’ disks will be created. You can see a .VDHX file with the system’s name in the disk.
4. Copy the .VDHX file to the virtual server or SCV, creating a new virtual machine with the file by following the wizard.
5. After the VM is successfully created, you can also edit the settings to adjust the allocation of CPU and memory. Hyper-V’s integrated services will be installed by default within the VM.
6. Get the VM up running and enjoy your Hyper-V journey.
So, as you can see, the P2V migration from physical servers to Hyper-V is quite simple, as long as we gain support from the right tool. But wait, before you put yourself fully into the world of virtualization, another issue raises here: what about the protection of data in your Hyper-V VM?
Backup is always important for the security and stability of your IT systems, which has been a universal truth we learn from many years of experience. In the past, you might need to install agent on each physical server for backup that usually takes time and effort to deploy and maintain. But something’s need to be changed from the moment you choose virtualization as the next stop—what we’re referring to here, is the way of backup, and a powerful VM backup solution should help you by offering the same flexibility.
Backup Hyper-V VMs with Vinchin Backup & Recovery
Vinchin Backup & Recovery is backup software with high compatibility that supports protection of 10+ virtualization platforms, including Hyper-V. It offers automatic, and agentless Hyper-V VM backup to make things easy. Even if you have a large-scale Hyper-V cluster, you can still manage massive backup tasks in a single web-based console.
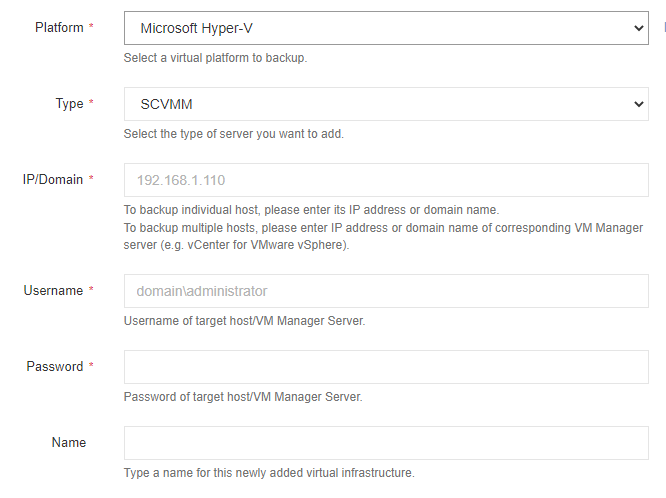
Step 1: Add Hyper-V to backup infrastructure.
Open Vinchin backup console, go to VM Backup > Virtual Infrastructure > Add page to add your new Hyper-V environment. The type can be SCVMM, Failover, and Standalone Server.
Step 2: Configure backup storage.
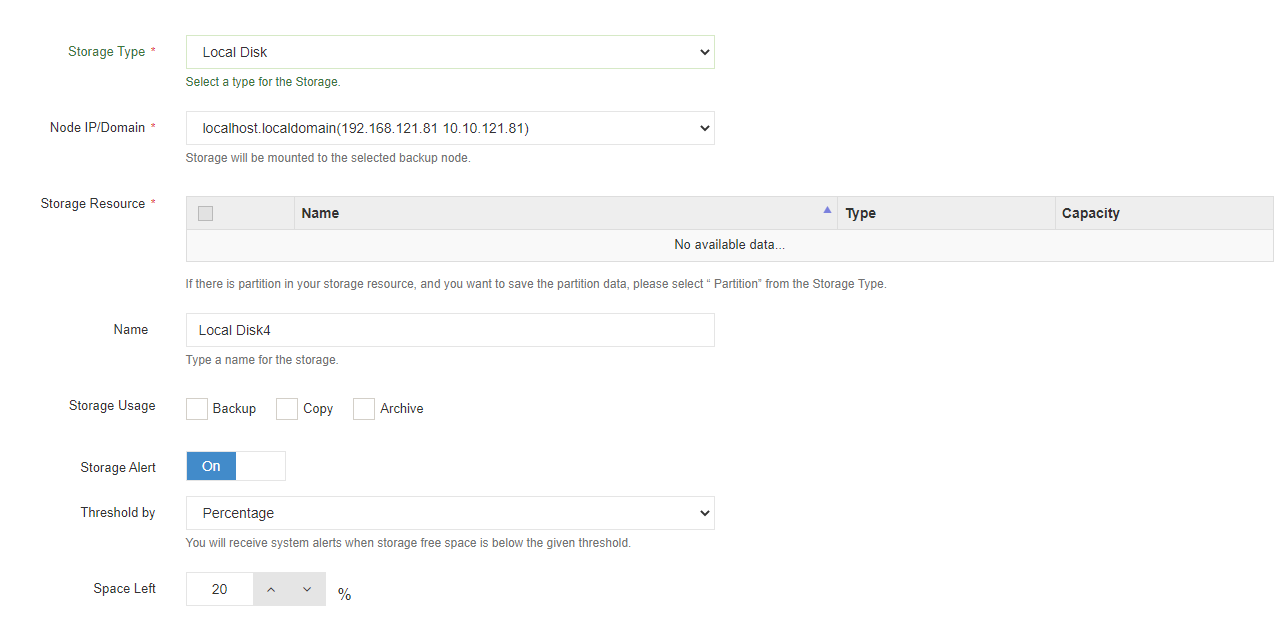
Go to Resources > Storage > Add page. Choose a storage type as the backup destination of your local Hyper-V VM backups. Disk partition, local disk, local directory, logical volume, fibre channel, iSCSI, NFS share, CIFS share are all supported.
Step 3: Create a new Hyper-V VM backup job.
Go to VM Backup > Backup to create a new backup job. Select a host you wish to back up.
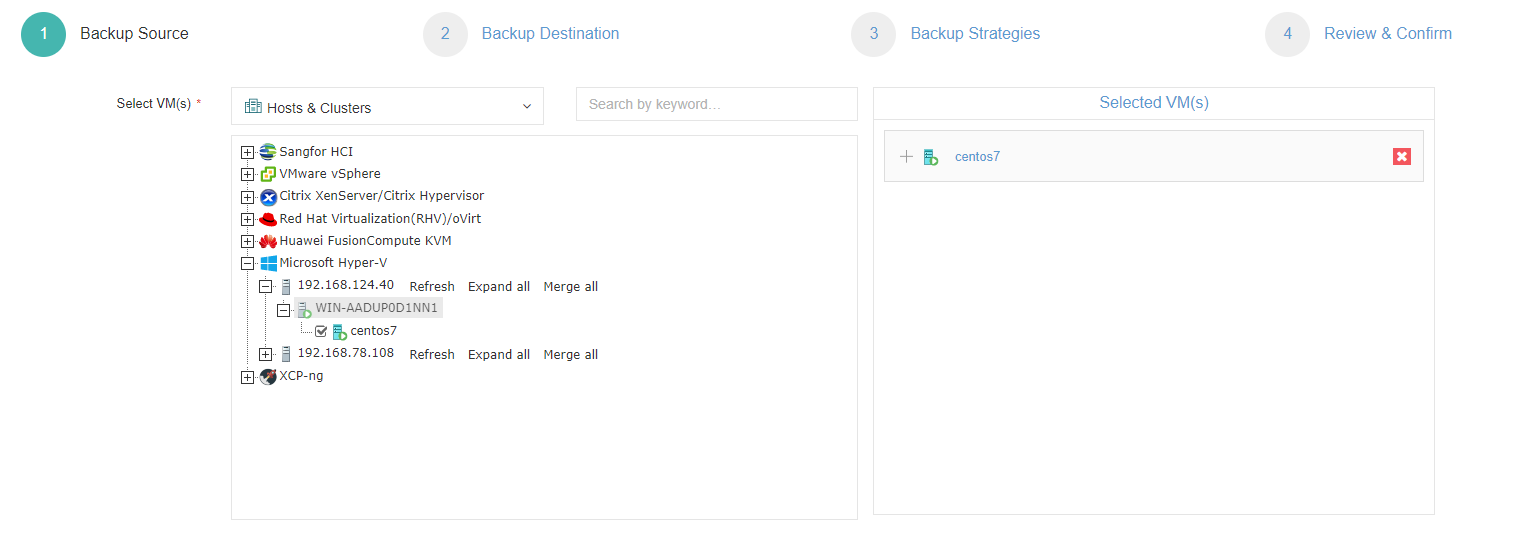
Choose desired backup destination, the local backup storage you’ve configured just now can be selected.

Customize your own Hyper-V VM backup solutions with simple clicks.

For the backup schedule, you can either choose to backup a Hyper-V VM in a once-off or frequent manner.
If you want scheduled VM backups, choose the backup strategy and their time to run, the time windows can be a good reference for you to make the plan.
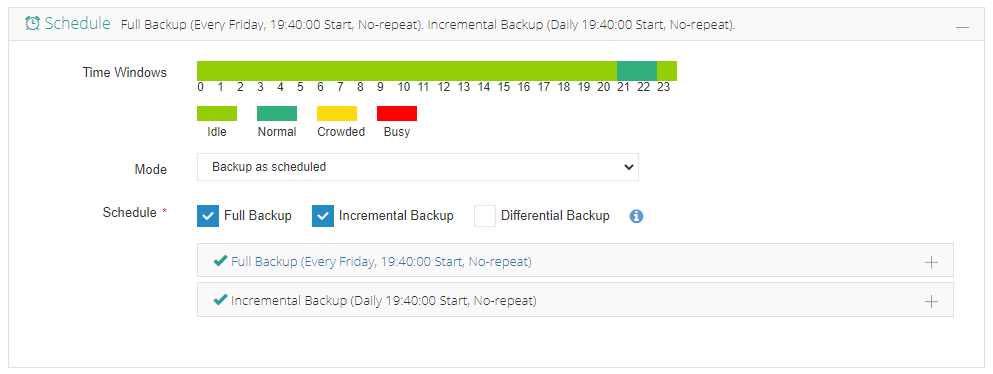
If you want a once-off backup, just simply choosing a start time as you like.

There’re 2 data reduction features you can enable to save backup storage. With data deduplication and data compression working together, the size of your backup data can be reduced by at least 60% each time.

For the advanced strategy, you can change the snapshot type, and enable another advanced data reduction feature that Vinchin develops, BitDetector, if needed.

Review the configurations and submit the backup job.
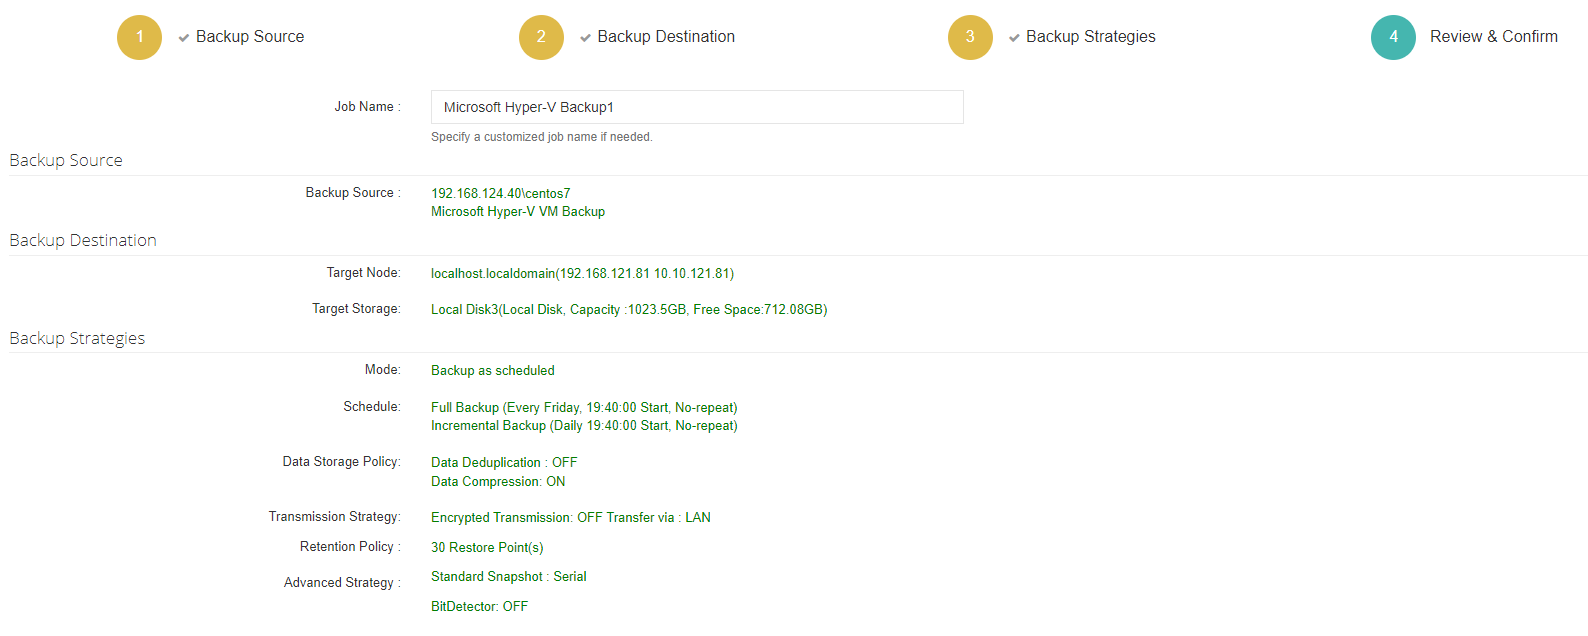
After these, the Hyper-V VM you wish to protect will be automatically backed up as scheduled, and is later available for fast full VM recovery, and file-level granular recovery. To enjoy the simple and complete Hyper-V protection yourself, you can download the 60-day full-featured trial of Vinchin Backup & Recovery within 10-15 minutes.
Wrap Up
When you decide to replace traditional physical servers with virtualization, Hyper-V could be one of your most ideal choices for its high scalability and flexibility, and the Hyper-V P2V migration tool Disk2vd provided by Microsoft can help you easily make the switch without trouble. While enjoying the ultimate benefits that this virtual platform brings to your IT environment, also don’t forget to set up a complete Hyper-V VM backup plan to ensure system security and stability.
Share on:
 English


